manuals.online logo
Brands
  1. Home
  2. •
  3. Brands
  4. •
  5. Philips
  6. •
  7. DVD Player
  8. •
  9. Philips DVDR3400/97 User manual

Philips DVDR3400/97 User manual

This manual suits for next models

1

Other Philips DVD Player manuals

Philips DVP3258/98 User manual

Philips

Philips DVP3258/98 User manual

Philips DVD590M/17 Operating manual

Philips

Philips DVD590M/17 Operating manual

Philips DVDR3355 Quick start guide

Philips

Philips DVDR3355 Quick start guide

Philips DVP3356 User manual

Philips

Philips DVP3356 User manual

Philips DVP5990/05 User manual

Philips

Philips DVP5990/05 User manual

Philips 711 User manual

Philips

Philips 711 User manual

Philips DVP532K User manual

Philips

Philips DVP532K User manual

Philips DVD737K/931 User manual

Philips

Philips DVD737K/931 User manual

Philips DVP2850 User manual

Philips

Philips DVP2850 User manual

Philips DVP3852K User manual

Philips

Philips DVP3852K User manual

Philips DVP3020/75 User manual

Philips

Philips DVP3020/75 User manual

Philips DVP3366K/93 User manual

Philips

Philips DVP3366K/93 User manual

Philips DVP3100/96 User manual

Philips

Philips DVP3100/96 User manual

Philips DVP5900/98 User manual

Philips

Philips DVP5900/98 User manual

Philips DVP3380/05 User manual

Philips

Philips DVP3380/05 User manual

Philips DVD 711 User manual

Philips

Philips DVD 711 User manual

Philips DVP5166K/98 User manual

Philips

Philips DVP5166K/98 User manual

Philips DVD760 User manual

Philips

Philips DVD760 User manual

Philips DVP3520 User manual

Philips

Philips DVP3520 User manual

Philips DVP3980/75 User manual

Philips

Philips DVP3980/75 User manual

Philips DVP 3100V Operating manual

Philips

Philips DVP 3100V Operating manual

Philips DVD 951 User manual

Philips

Philips DVD 951 User manual

Philips DVD 620 User manual

Philips

Philips DVD 620 User manual

Philips DVP2800/12 User manual

Philips

Philips DVP2800/12 User manual

Popular DVD Player manuals by other brands

Yamaha DVD S540 - Progressive Scan DVD Player Service manual

Yamaha

Yamaha DVD S540 - Progressive Scan DVD Player Service manual

Yamakawa DVD-MP12i user manual

Yamakawa

Yamakawa DVD-MP12i user manual

Roadstar DVD-2020H Service manual

Roadstar

Roadstar DVD-2020H Service manual

Beko DVD 2006 user manual

Beko

Beko DVD 2006 user manual

Atak DVDA2015 instruction manual

Atak

Atak DVDA2015 instruction manual

LG DV257K owner's manual

LG

LG DV257K owner's manual

auna 10005069 manual

auna

auna 10005069 manual

Sony DVP-F11 Service manual

Sony

Sony DVP-F11 Service manual

Toshiba SD-2300U owner's manual

Toshiba

Toshiba SD-2300U owner's manual

LENCO DVP-740 X2 user manual

LENCO

LENCO DVP-740 X2 user manual

Tevion 44330 user guide

Tevion

Tevion 44330 user guide

Aiwa XD-DV370 operating instructions

Aiwa

Aiwa XD-DV370 operating instructions

Sony DVP S530D operating instructions

Sony

Sony DVP S530D operating instructions

Denon DVM-1805 - DVD Changer operating instructions

Denon

Denon DVM-1805 - DVD Changer operating instructions

Toshiba SD-3815 owner's manual

Toshiba

Toshiba SD-3815 owner's manual

Sylvania DP170SL8 Service manual

Sylvania

Sylvania DP170SL8 Service manual

Toshiba SD-P1200 Service manual

Toshiba

Toshiba SD-P1200 Service manual

FUNAI DP100FX4 owner's manual

FUNAI

FUNAI DP100FX4 owner's manual

manuals.online logo
manuals.online logoBrands
  • About & Mission
  • Contact us
  • Privacy Policy
  • Terms and Conditions

Copyright 2025 Manuals.Online. All Rights Reserved.

Quick Start Guide
Need help?
User Manual
See the user manual that came with your Philips recorder.
Online
Go to www.philips.com/support.
3Enjoy DVD Player/ Recorder DVDR3400
Connect
Set up
Enjoy
1
2
3
What’s in the box?
DVD Player/ Recorder
Remote Control
and 2 batteries
RF Coaxial Cable Audio/video cable
User
Manual
2006 © Koninklijke Philips N.V.
All rights reserved.
12 NC 3139 245 20621
BArchiving from a USB device
AInsert a recordable DVD disc in the tray.
BConnect the USB flash drive into the USB port
on the front panel of the recorder.
CPress TOOLS
TOOLS
to access the USB mode.
–Select { Copy to DVD } and press OK .
–The USB content menu appears.
Archiving from USB to DVD
Directory Copy List
Japan trip
Bryan Bday
My songs
Hot Hits
Archiving from USB to DVD
Directory Copy List
Picture1.jpg
Picture2.jpg
Song1.mp3
NATURE-1.JPG
BUTTER-1.JPG
P1022500.JPG
Music.mp3
MERLIO-1.JPG
1
2
3
4
5
6
7
8
..\Move up directory
Picture2.jpg
Music.mp3
1
2
DSelect the folder you want and press OK to
access the folder/ album.
ECreate a copy list, highlight the file you want to
copy and press SELECT .
– The selected les will appear on the right
{ Copy List } screen.
– To remove the le from the copy list, press
CLEAR
CLEAR
.
FOnce the copy list selection is complete, press
REC to start archiving.
– A message will appear. Select
OK
in the
menu and press OK to proceed.
Start Playback
APress OPEN/CLOSE on the remote
control, load in a disc and close the disc tray.
BPress PLAY/PAUSE to start playback.
CTo stop playback, press STOP .
Start Recording
ARecording from the TV or
an external device
AInsert a recordable DVD disc in the tray.
Types of discs for recording
DVD+R DL
BPress SOURCE repeatedly to
select the source to record from.
(eg, TUNER, CAM1, CAM2, DV,
EXT1, EXT2 or EXT3.)
To record a TV programme, use
CH +/-to scroll through the
channels, or press 0 -9
to select the channel that you want
to record.
CPress REC MODE repeatedly to
select the mode of recording quality.
DPress REC to start recording, press
REC again to automatically record 30
minutes.
ETo end recording, press STOP .
‘UPDATE’ will be displayed on the recorder.
FTo playback the recording, press DISC
MENU
DISC MENU
, select the title and press
PLAY/PAUSE .
REC MODE
SOURCE
USB
TOOLS
1Connect 2Set up
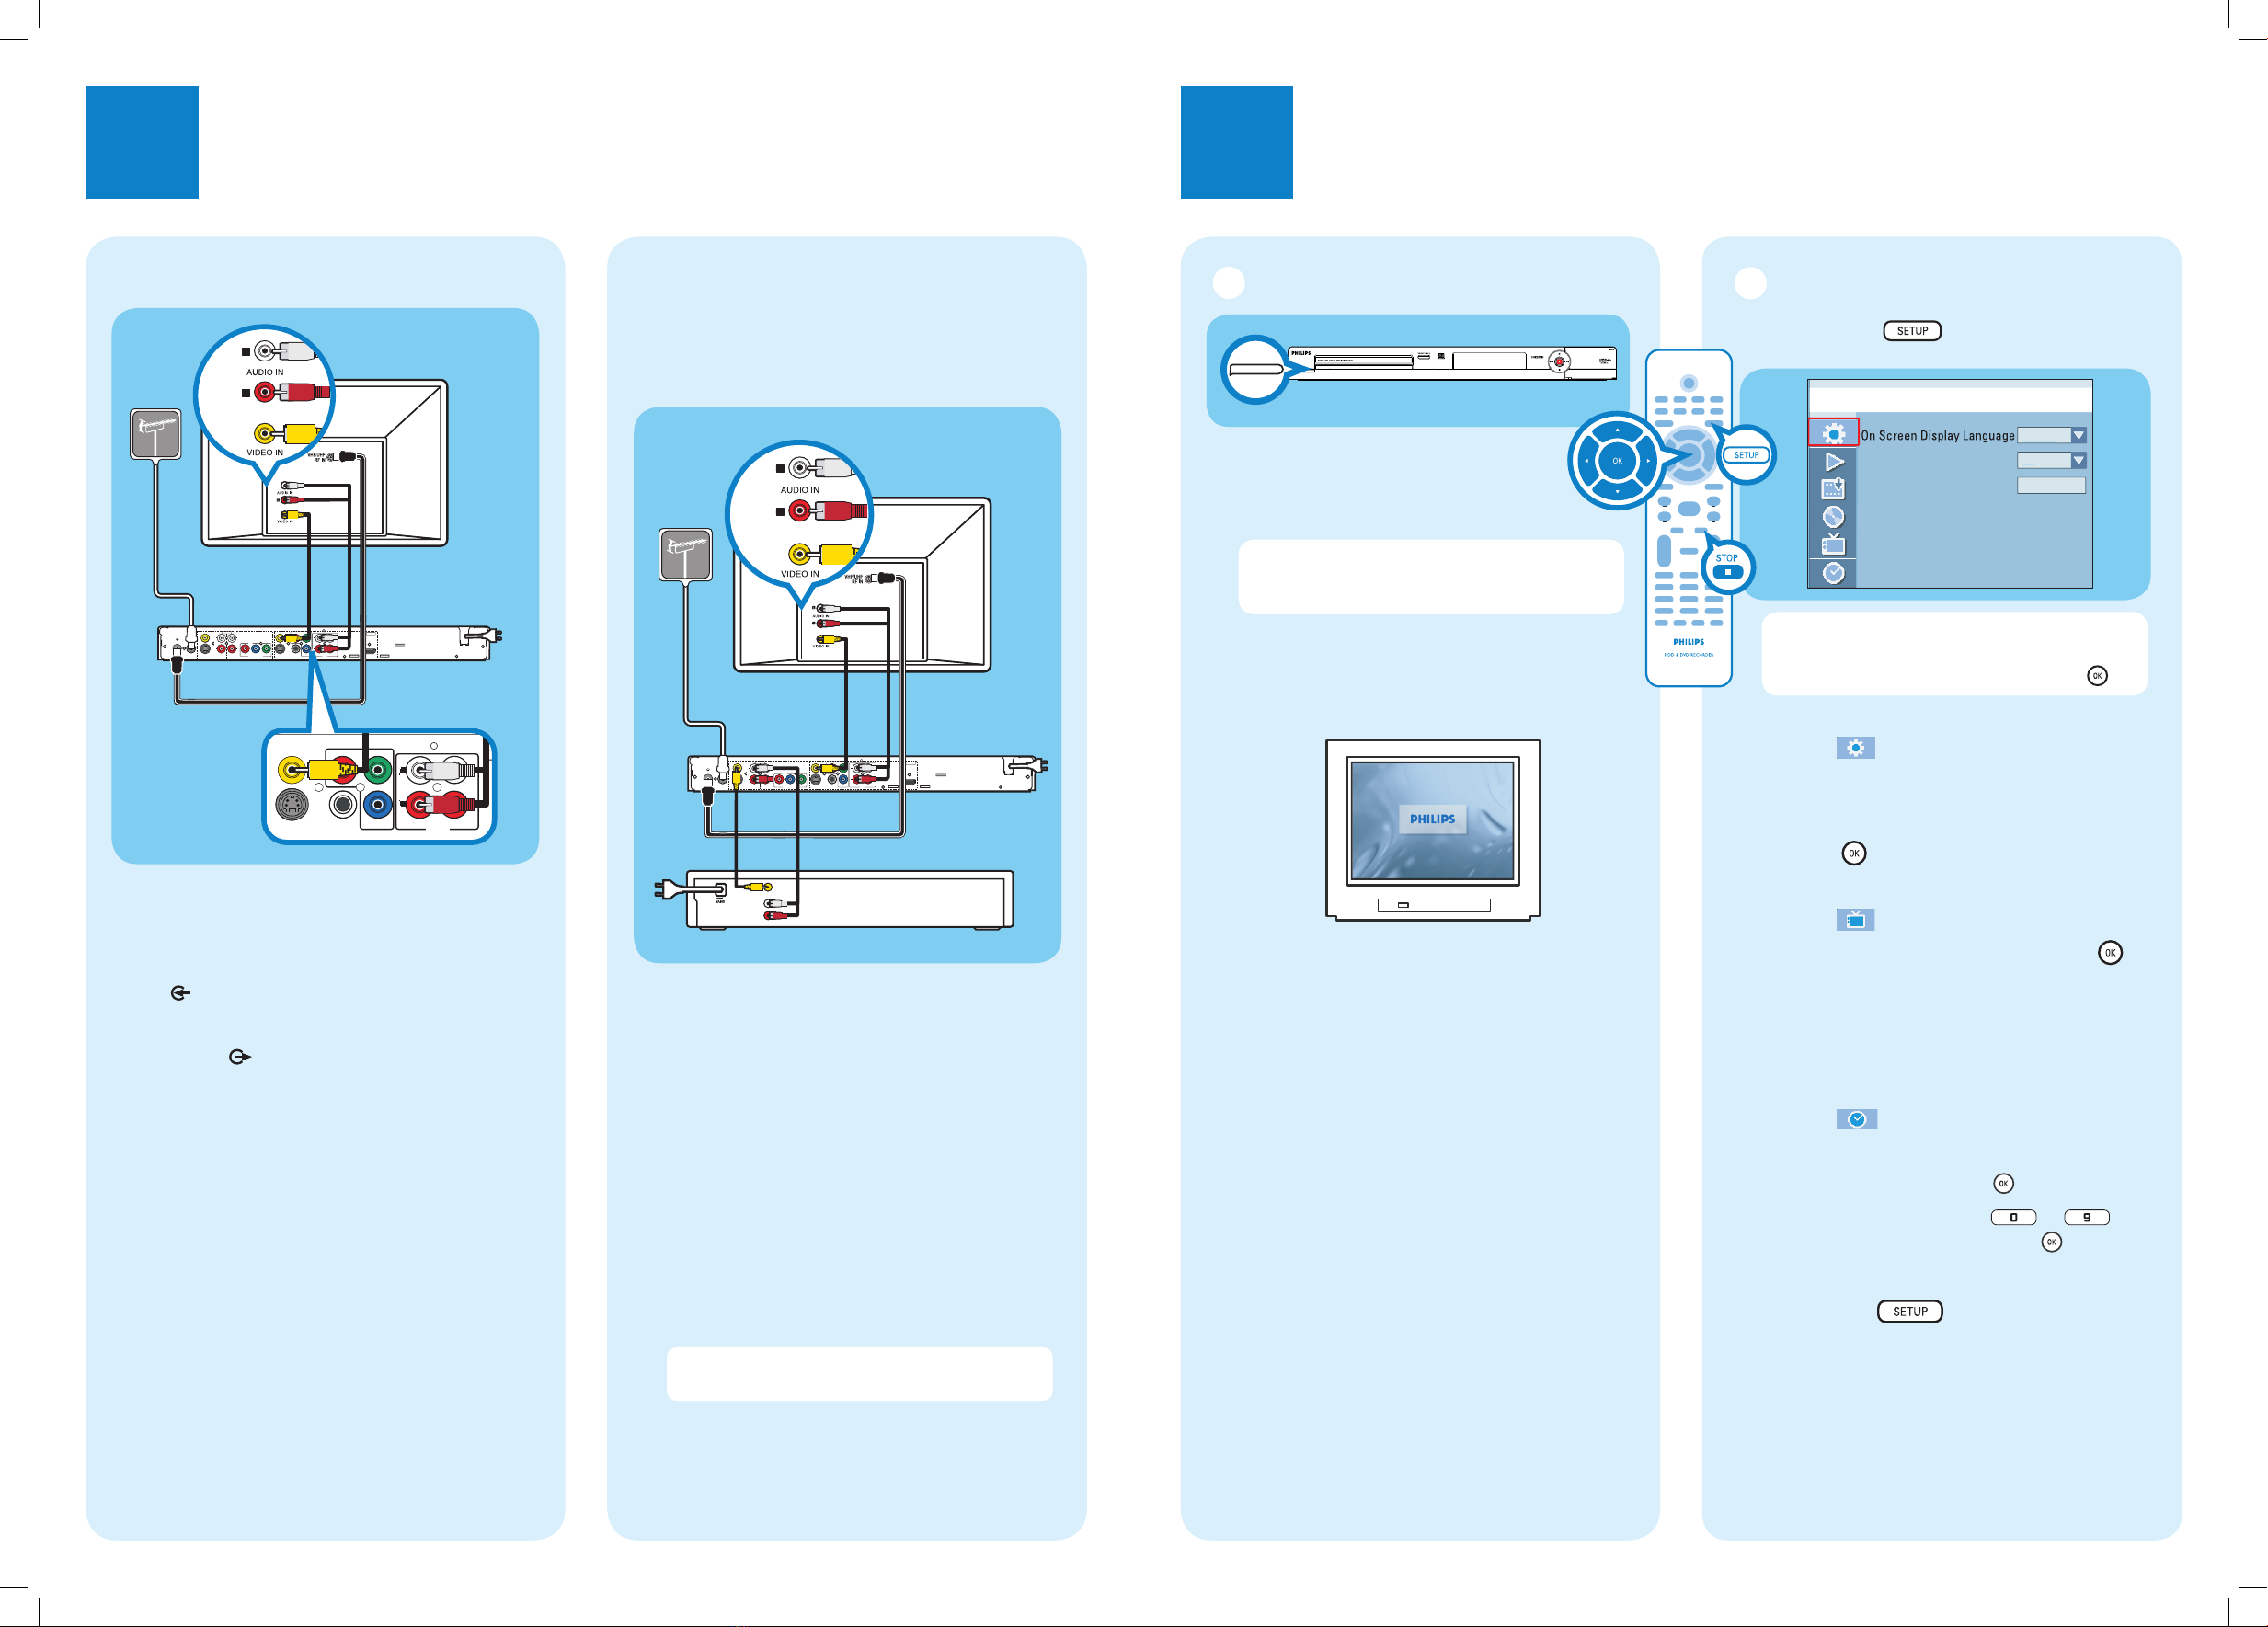
Start with the ‘Basic Connection.’
If you have a VCR, follow the instructions for ‘Connection with a VCR or similar device’.
R
L
R
L
YP
B
P
R
Y
P
B
P
R
VIDEO (CVBS)
COMPONENT
VIDEO
EXT 2
S-VIDEO (Y/C)
VIDEO (CVBS)
S-VIDEO (Y/C)AUDIO
HDMI
COAXIAL
R
L
R
L
~
MAINS
(DIGITAL AUDIO)
INPUT OUTPUT
EXT 1
EXT 3
COMPONENT VIDEO
AUDIO AUDIO
ANTENNA-IN
TV-OUT
L
R
Y
P
B
P
R
COMPONENT
VIDEO
VIDEO (CVBS)
S-VIDEO (Y/C) COAXIAL
R
L
R
L
(DIGITAL AUDIO)
OU
OUT 2
OUT 1
AUDIO
Television (rear)
To antenna
or set-up
box
Philips recorder
(rear)
R
L
R
L
YP
B
P
R
Y
P
B
P
R
VIDEO (CVBS)
COMPONENT
VIDEO
EXT 2
S-VIDEO (Y/C)
VIDEO (CVBS)
S-VIDEO (Y/C)AUDIO
HDMI
COAXIAL
R
L
R
L
~
MAINS
(DIGITAL AUDIO)
INPUT OUTPUT
EXT 1
EXT 3
COMPONENT VIDEO
AUDIO AUDIO
ANTENNA-IN
TV-OUT
L
R
R
L
R
VIDEO OUT
(CVBS)
AUDIO
OUT
Philips recorder
(rear)
VCR or similar device (rear)
AFollow the steps under ‘Basic Connections’ to
before you proceed to step Bbelow.
BUse a yellow video cable (not supplied) to
connect the VIDEO (CVBS) INPUT jack on
this recorder to the yellow VIDEO OUT jack on
the VCR.
CUse another red and white audio cable (not
supplied) to connect the AUDIO INPUT jacks
on this recorder to the red and white AUDIO
OUT jacks on the VCR.
DConnect the power cable from your VCR to an
AC power outlet.
Note In this setup, the VCR cannot record TV
programs.
For additional connection diagrams, see the
accompanying User Manual.
Philips recorder (front panel)
AFinding the viewing channel
APress STANDBY-ON on the
recorder.
BTurn on the TV set.
Note If connected to your VCR, make sure
it is turned off or in standby mode before
proceeding.
CPress ‘0’ and then the Channel Down button on
the TV’s remote control repeatedly until you
see this screen. This is the correct viewing
channel for the recorder.
To AC
power
Basic Connection Connection with a VCR or
similar device
Your new Philips recorder replaces the VCR for your
recording needs. First, unplug all the connections from
your VCR.
STANDBY-ON
ABefore connecting, unplug the antenna cable
that is currently connected to your TV.
BConnect the antenna cable to the ANTENNA-
IN jack on the recorder.
CUse the supplied RF coaxial cable to connect the
TV-OUT jack on this recorder to the
Antenna In jack on the TV.
DUse the supplied video cable (yellow plug) to
connect the VIDEO (CVBS) OUTPUT jack on
this recorder to the VIDEO IN jack on the TV.
EUse the supplied audio/video cable (red/ white
plugs) to connect the AUDIO OUTPUT jacks
on this recorder to the AUDIO IN jacks on the
TV.
FConnect the power cable from the recorder to
an AC power outlet.
To AC
power
Television (rear)
To antenna
or set-up
box
B
C
D
E
F
B
C
D
BInitial Installation
APress SETUP on the remote
control.
Screen Save
r
Reset Menu Settin
g
s
Setu
p
Menu - Genera
l
En
g
lis
h
On
OK
Note Use up Sand down Tkeys to toggle
through the options. Select an item by pressing
right X. To conrm a setting, press OK .
BSelect the OSD language.

Highlight and press right X.
Select { On Screen Display Language }
and press right Xto access the options.
– Select the desired language option and
press OK to conrm your selection.
CSetup and install TV channels.
Highlight and press right X.
Select { Channel Search } and press OK
to start automatic TV channel search.
– This process may take several minutes.
Once complete, the total number of channels
found and stored appears on the TV.
DSet the date and time.
 Highlight and press right X.
Select { Date (dd/mm/yy) } or { Time
(hh:mm:ss) } and press OK .
Use the numeric keypad 0 -9 to
input the date/time, then press OK to
conrm.
EPress SETUP to exit.