HECHO EN CHINA
Philips y el emblema de escudo Philips son marcas registradas de Koninklijke Philips
N.V. y se usan bajo licencia. Este producto ha sido fabricado y se comercializa bajo
responsabilidad de Jasco Products Company y Jasco Products Company LLC, 10 E.
Memorial Rd., Oklahoma City, OK 73114, es el garante en relación a este producto.
Este producto tiene una garantía limitada de 1 año.
Visite www.philips.com/support para conocer los detalles de la garantía.
Si tiene problemas o dudas, comuníquese con nuestro Centro de atención
al cliente con sede en EE. UU. al 1-844-816-0320, opción 1 de lunes a viernes,
de 7 a.m. a 8 p.m., hora estándar del centro (CST).
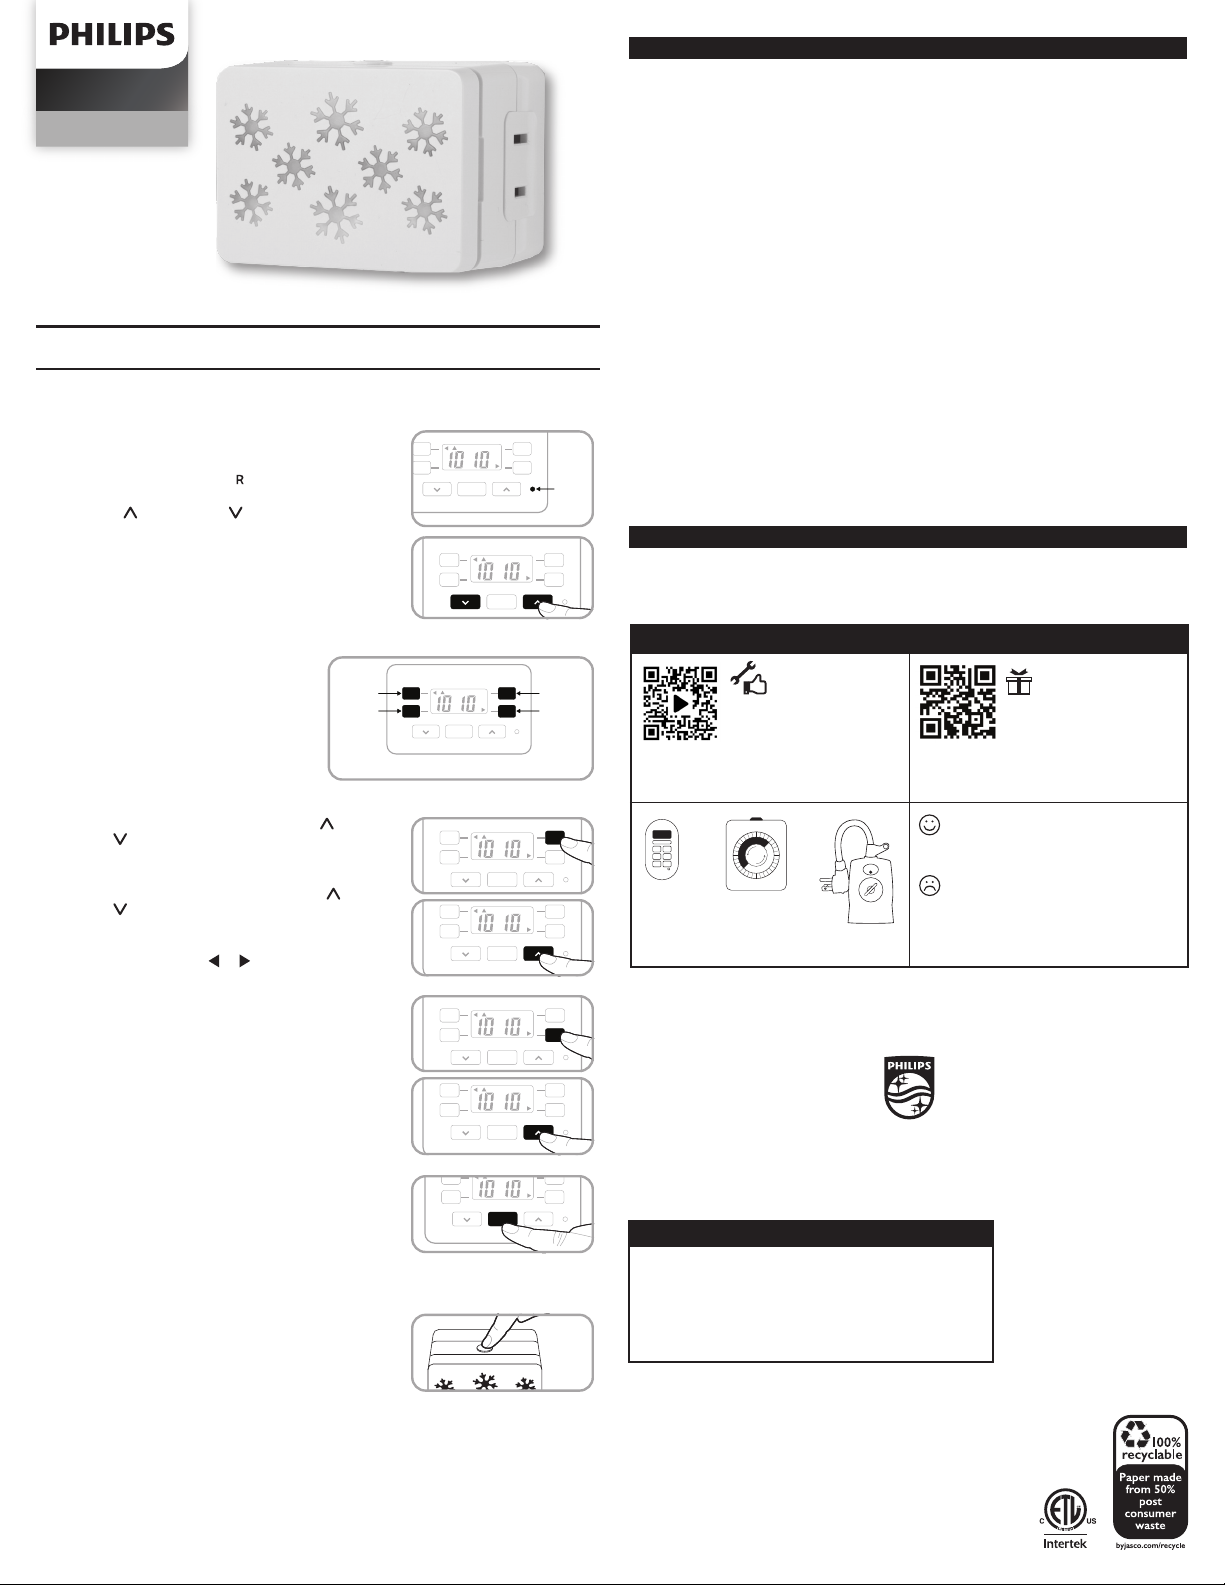
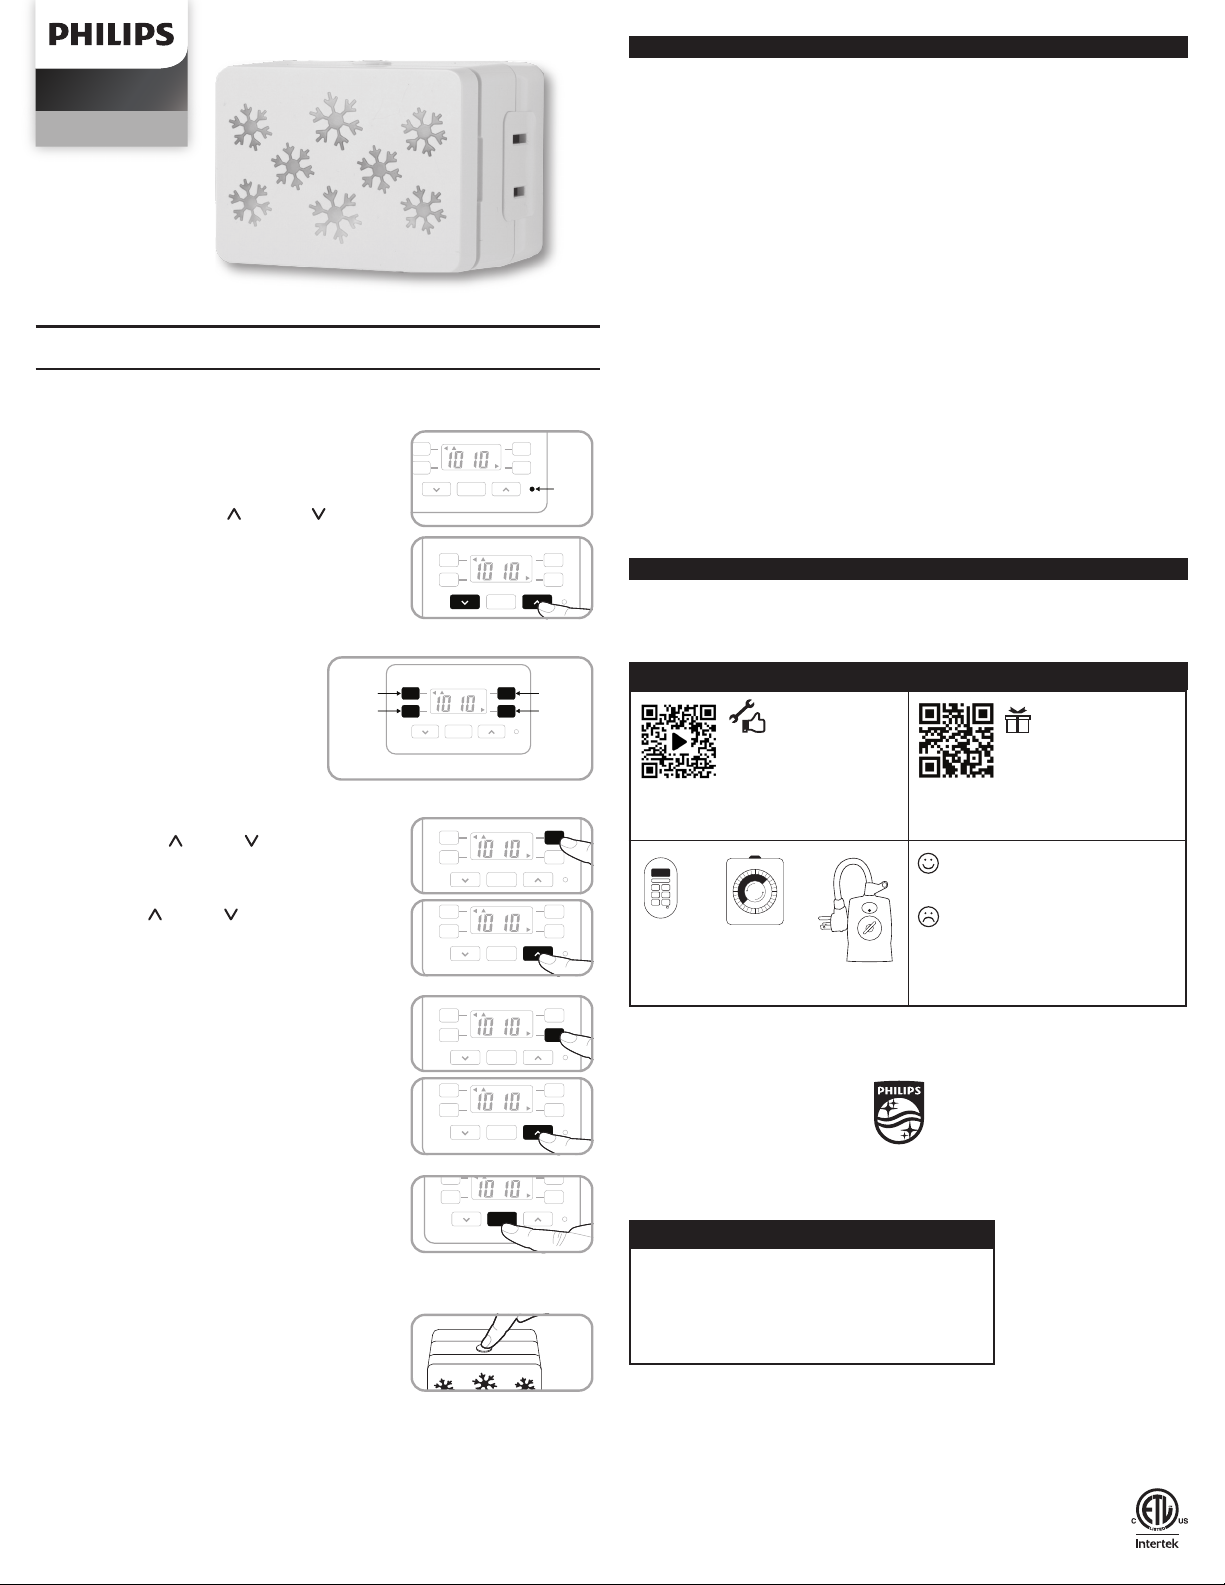
CONFIGURE LA HORA
1. Si no hay números visibles en pantalla, enchufe el
temporizador en un tomacorriente y cárguelo durante 1
hora. Una vez cargado, presione el botón de reinicio (R)
en la esquina inferior derecha con un palillo o un lápiz.
2. Utilice las echas arriba ( ) y abajo ( ) para
congurar la hora. Tenga en cuenta si es AM o PM.
Nota:Después de cargar el temporizador, puede
desenchufarlo del tomacorriente para facilitar
la programación. Vuelva a enchufarlo cuando
haya terminado
OPCIONES DE PROGRAMACIÓN
TEMPORIZADOR PREDETERMINADO
Dos programas de encendido y
apagado (ON/OFF) tienen conguraciones
predeterminadas. Para activar las horas
predeterminadas, presione el botón
ON TIME u OFF TIME. Aparecen echas
indicadoras en la pantalla para mostrar los
programas que están congurados. Para
desactivar una conguración, presione el
botón deseado nuevamente.
TEMPORIZADOR PERSONALIZADO
Presione cualquiera de los botones ON TIME, luego
use las echas arriba ( ) y abajo ( ) para congurar
la hora de encendido. Presione el botón ON TIME
nuevamente o espere cinco segundos para almacenar el
programa y volver a la pantalla de reloj.
Presione cualquiera de los botones OFF TIME, luego use
las echas arriba ( ) y abajo ( ) para congurar la hora
de apagado. Presione el botón OFF TIME nuevamente
o espere cinco segundos para almacenar el programa y
volver a la pantalla de reloj.
Nota: Aparece una echa indicadora (el símbolo del
botón se insertará aquí) en pantalla para mostrar las
conguraciones que están activas.
OPCIONES DE ANULACIÓN
Anule los programas congurados y opere manualmente
los dispositivos conectados mediante el botón ON/OFF
bajo la pantalla de visualización o presionando la puerta
decorativa.
Si un programa congurado está en curso y el dispositivo
está encendido, presione la puerta cerrada o el botón ON/
OFF para apagar el dispositivo. El dispositivo permanecerá
apagado hasta que comience el siguiente programa
congurado o se presione de nuevo el botón.
Si un programa congurado está en curso y el dispositivo
está apagado, presione la puerta cerrada o el botón ON/
OFF para encender el dispositivo. Este permanecerá
encendido hasta que nalice el siguiente programa
congurado o se presione de nuevo el botón.
Cuando no hayan programas activos, presione la puerta
cerrada o el botón ON/OFF para encender o apagar el dispositivo manualmente.
OPCIONES DE COLORES
Cuando está enchufado, la retroiluminación LED se
desplaza en ciclo por todas las opciones de colores. El
ciclo puede detenerse para seleccionar un color o apagar
la retroiluminación. Los LED solo funcionan cuando el
temporizador está conectado a un tomacorriente.
• Presione el botón sobre el temporizador una vez para
detener el ciclo.
• Presione el botón nuevamente para cambiar el color del LED.
• Repita para desplazarse manualmente entre todos los colores.
• Presione el botón durante tres segundos para apagar el LED.
• Presione el botón una vez para encender el LED en la última conguración.
AM
CLOCK
ON
TIME
ON
TIME
OFF
TIME
OFF
TIME
ON/OFF
R
SET
RESET
BUTTON
AM
CLOCK
ON
TIME
ON
TIME
OFF
TIME
OFF
TIME
ON/OFF
R
SET
AM
CLOCK
ON
TIME
ON
TIME
OFF
TIME
OFF
TIME
ON/OFF
R
SET
6:00PM
6:00AM
5:00PM
ON TIME 1
OFF TIME 1
ON TIME 2
OFF TIME 2
12:00AM
AM
CLOCK
ON
TIME
ON
TIME
OFF
TIME
OFF
TIME
ON/OFF
R
SET
AM
CLOCK
ON
TIME
ON
TIME
OFF
TIME
OFF
TIME
ON/OFF
R
SET
AM
CLOCK
ON
TIME
ON
TIME
OFF
TIME
OFF
TIME
ON/OFF
R
SET
AM
CLOCK
ON
TIME
ON
TIME
OFF
TIME
OFF
TIME
ON/OFF
R
SET
AM
CLOCK
ON
TIME
ON
TIME
OFF
TIME
OFF
TIME
ON/OFF
R
SET
FCC/IC - ESP
ESPECIFICACIONES
RIESGO DE DESCARGA ELÉCTRICA
• ENCHÚFELO DIRECTAMENTE A UN
TOMACORRIENTE ELÉCTRICO
• NO UTILIZAR EN LUGARES HÚMEDOS.
• SOLO PARA USO EN INTERIORES.
• DESCONECTE EL TEMPORIZADOR ANTES
DE LIMPIAR
RIESGO DE INCENDIO
• NO UTILICE PARA CONTROLAR
APARATOS QUE INCLUYAN RESISTENCIAS
ELÉCTRICAS APARATOS DE COCCIÓN,
CALEFACTORES, PLANCHAS, ETC.
• NO SUPERAR LOS VALORES NOMINALES
ELÉCTRICOS.
• NO USE UN CABLE DE EXTENSIÓN
ADVERTENCIA
Home power
SPC1247AT/27
Instrucciones
Escanee para ver un video instructivo
paso a paso o visite
https://byjasco.com/49791i
Para ofertas exclusivas, que solo
encontrará en Internet y ¡más! Escanee o
visite byjasco.com/deals
¿Le gusta nuestro producto?
Déjenos una reseña en Amazon.com
o el sitio web de su comercio favorito.
¿Tiene problemas y necesita
ayuda?
Llame a nuestros expertos en los
EE. UU., de lunes a viernes, de
7 a. m. a 8 p. m. (hora del centro)
1-844-816-0320
Instrucciones fáciles
¡Si desea ver más temporizadores
navideños Philips, visite nuestro sitio web!
byjasco.com/timers
¿Necesita más
temporizadores navideños?
Registre su
producto Philips
GRACIAS POR SU COMPRA
DECLARACIÓN DE LA COMISIÓN FEDERAL DE COMUNICACIONES (FCC):
Declaración de conformidad del proveedor | Modelo #: SPC1247AT/27 | Jasco Products
Co., 10 E. Memorial Rd, Oklahoma City, OK 73114, www.byjasco.com
Este dispositivo cumple con las Especicaciones del apartado 15 de las normas de la FCC
y con las especicaciones de las normas radioeléctricas (RSS) del Ministerio de Industria
de Canadá aplicables a aparatos exentos de licencia. El funcionamiento está sujeto
a las siguientes dos condiciones: (1) este dispositivo no debe provocar interferencia
perjudicial, y (2) este dispositivo debe aceptar toda interferencia que reciba, incluso la
que pudiera causar un funcionamiento no deseado.
NOTA DE LA FCC: El fabricante no se hace responsable de ninguna interferencia de radio
o TV ocasionada por modicaciones no autorizadas efectuadas a este equipo. Dichas
modicaciones podrían anular la autoridad del usuario para utilizar el equipo.
NOTA: Este equipo ha sido probado y cumple con los límites para aparatos digitales de
Clase B, de conformidad con el apartado 15 de las normas de la FCC. Estos límites están
diseñados para proveer protección razonable contra interferencias perjudiciales en una
instalación residencial. Este
equipo genera, usa y puede irradiar energía de radiofrecuencias y, si no se instala
y usa según las instrucciones, puede provocar interferencia perjudicial a las
radiocomunicaciones. No obstante, no hay garantías de que no ocurrirá interferencia en
una instalación en particular. Si este equipo provoca
interferencia perjudicial a la recepción de radio o televisión, lo que puede determinarse
encendiendo y apagando el equipo, se recomienda que el usuario intente corregir la
interferencia por medio de la implementación de una o más de las siguientes medidas:
— Reorientar o reubicar la antena receptora.
— Incrementar la separación entre el equipo y el receptor.
— Conectar el equipo a un tomacorriente de un circuito diferente del circuito al que está
conectado el receptor.
— Consultar al distribuidor o a un técnico con experiencia en radio/televisión para
solicitar asistencia.
CAN ICES-3(B)/NMB-3(B)
125VCA, 60Hz, 15A 1875W general/resistiva
5A 625 W tungsteno, motor de 1/2HP
Funciona con bombillas LED y CFL