PHILODO H8 User manual

OWNERS MANUAL
Philodo H8
ALL WHEEL DRIVE E-BIKE
V1.0 | 2022

- 1 -
Thanks for your purchase of a
Philodo electric bike.
We really appreciate your business cooperation with us
and we wish you a good time with the eBike.
This manual will help you assemble and operate your
new electric bike. Be sure to read all of the information
in this manual before riding.
CONTACT INFORMATION
Email: suppo[email protected]
Website: www.philodo.com
www.philodobikes.com
Please record your bike’s serial number in the space
below. The serial number is located on the bottom axis
connecting the pedals. Refer to the chapter of serial
number in this manual for a photo showing the
location of the serial number.
SERIAL NUMBER

- 2 -
Contents
Contents...........................................................................................................................2
Product Safety Notice..................................................................................................3
Warning Message.......................................................................................................... 4
Package Contents......................................................................................................... 5
Product Overview.......................................................................................................... 6
Assembly.......................................................................................................................... 6
Recommended Torque Values...............................................................................13
Serial Number..............................................................................................................14
Charge Your E-Bike................................................................................................... 14
Preparing to Ride........................................................................................................17
Operate Your E-Bike..................................................................................................19
Troubleshooting.......................................................................................................... 26
Error Codes...................................................................................................................28
Safety..............................................................................................................................28
Warranty & Disclaimer............................................................................................. 30
- 3 -
Always wear a helmet when riding your electric bike.
Keep the keys properly. If the unique keys are lost,
you will not be able to turn on the bike or replace the
battery. If necessary, you should get more spare keys.
We don't have a backup key.
Make sure your electric bike has a full battery before
taking it out to ride.
Always be aware of local road laws, and follow them.
Do not ride the eBike under the influence of drugs
or alcohol.
Always respect pedestrians.
Do not ride under wet conditions. The electric bike
may slide from under your feet causing injury.
Wet conditions may damage the electronics and void
the warranty.
NOTE TO ALL RIDERS UNDER 18 YEARS OF AGE:
It's very important that you get parental
permission before riding your electric bike.
Product Safety Notice
Don't Ride Until You Read This

- 4 -
Warning Message
Read this entire manual before assembling or using your new
electric bike. Do not modify, disassemble, or replace the original
electrical components on your eBike. Doing so will invalidate your
warranty and could put you in danger. Riding any type of eBike
comes with some risks which can’t be predicted or avoided.
Taking proper care of eBike components can lower the risk of
sudden failure of components but cannot prevent it. These
sudden failures could cause serious harm, injury, or death to the
rider. If you notice abnormalities in any component on the eBike,
take it to a licensed mechanic to be repaired or replaced
immediately. Philodo Bike LTD assumes no liability for harm,
injury, or death of the rider.
This manual is not intended to function as a detailed service
manual. Philodo Bike recommends having your local bike shop
mechanic perform a detailed safety check of your eBike before
your first ride. Ensure your local mechanic is experienced and
reputable.
The Philodo H8 can withstand most rain showers without
sustaining damage. The eBike has an IP rating of 56. This means it
is dust tight and can withstand jetting water. See the IP code for
more details.
It does not mean that the eBike and its mechanical and electrical
components are waterproof. We do not recommend storing or
using the eBike in excessively wet conditions. The warranty does
not cover water damage.

- 5 -
Package Contents
Carefully check the package contents, if anything is missing or
damaged, please contact Philodo customer service for support:
support@philodo.com
1x Electric bike
1x Front wheel
1x Headlight
1x Saddle
2x Pedals
1x Charger
Tools
2x Battery keys
2x Ignition keys
1x Rear rack
1x Front fender
1x Battery

- 6 -
Product Overview
Assembly
Seat post
For better pedaling, safety and overall riding comfort, positioning
the seat at the right height is important. The rider's leg length is
used to determine the seat's position. When you pedal, your hips
should remain level and your legs should be almost fully extended
at the boom of the pedal stroke, but not over-extended.
To determine the right seat height, sit on the eBike with one pedal
at its lowest point and place the ball of your foot on the pedal.
Your leg should be almost fully extended with a slight bend at the
knee.
- 7 -
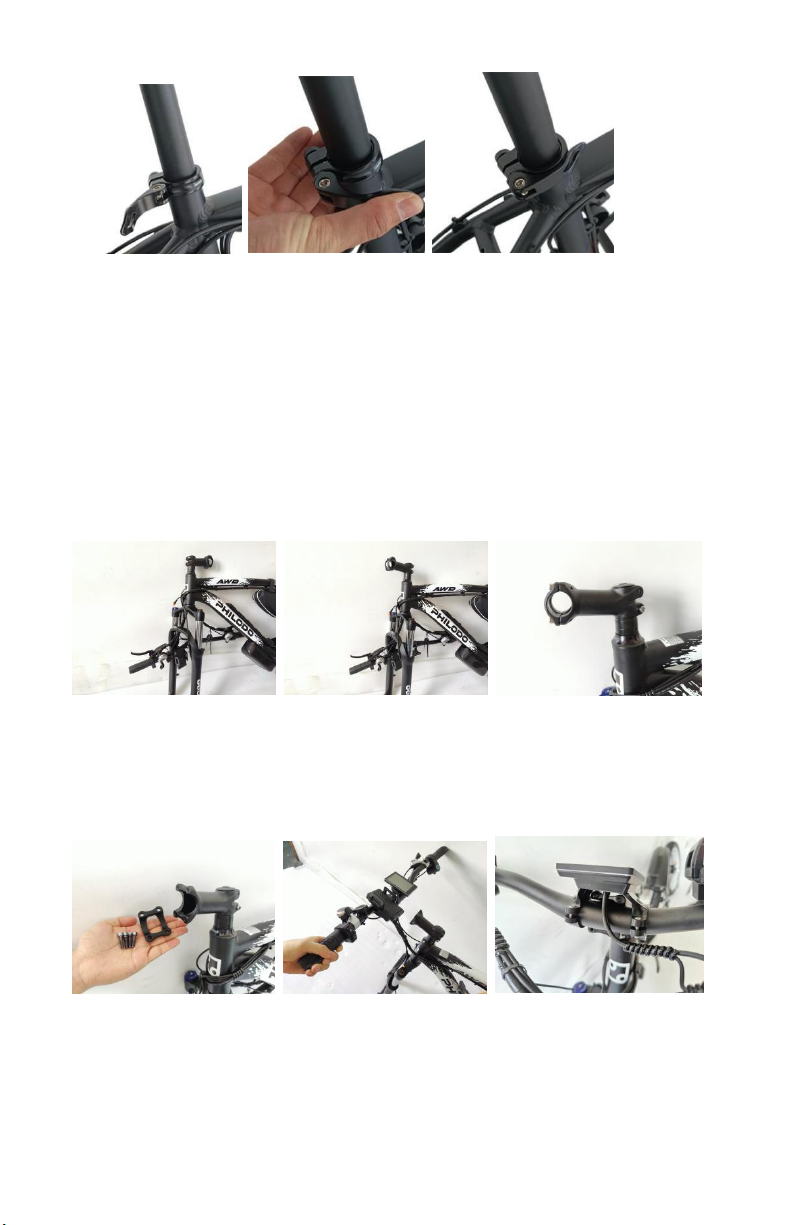
1. Open the quick release lever. Insert the seat post into the seat
tube.
2. Adjust the height of the seat. Do not raise the seatpost beyond
the minimum insertion marking on the seat post.
3. Tighten the nut on the quick release until the lever becomes
firm to close. Close the quick release lever by your palm or finger.
Handlebar
1. Turn the stem to the front. Make sure the front fork brace is at
the front of the bike, not at the back.
2. Remove the faceplate of the stem.
3. Take care to note that the cables should run cleanly from the
handlebar. They should not be twisted. Don't remove or detach
the cables.
4. Insert the handlebar then reattach the faceplate of the stem.
- 8 -
5. Tighten the 4 screws. You should keep swapping between the
screws to ensure that the faceplate has a consistent gap from the
stem along all edges and tighten securely. The handlebar should
be aligned so that the once front wheel is installed, the brake
levers are at 45 degrees to the ground.
6. Tighten the screw under the black rubber cover where on the
top of the fork.
7. Align the stem with the front wheel. Tighten the two screws on
the stem.
Front wheel
1. Turn the bike upside down on the ground. Put the soft foam
under the handlebar to prevent crushing the display, phone
holder and other parts.
2. Remove the nuts and washers at both sides of the front wheel
motor. Keep the protruding washers on the axle.
3. Lift the bike, then insert the disc rotor into the caliper. Insert
the axle into the hooks on the bottom of the fork. Make sure that
they engage on the fork nicely. The protruding washers are inside
the forks. The protruding part are in the hooks of the fork.
4. Put the flat washers and the nuts on both sides of the axle.
Tighten the nuts with a wrench. Keep the wheel in the center of
the front fork when tightening it.

- 9 -
5. Align the arrows on the cable of front motor. Then connect it.
6. The disc rotor should not touch the brake pads. Roll the front
wheel. If the disc rotor makes a metal friction sound, you need to
check that the front wheel is installed correctly.
Headlight
1. Make sure the front fork brace is at the front of the bike, not at
the back.
2. Place the headlight and the fender at a right position, then
tighten the bolt and the nut. The headlight can be adjusted up
and down to change the illumination angle.
3. Align the arrows on the cable of the headlight. Then connect it.
4. The horn is integrated into the headlight.
Pedals
Table of contents
Other PHILODO Scooter manuals


