Piaa LP530 User manual

-1-
PKI-0007-3
LP530
InstallationInstructions
ThankyouverymuchforpurchasingPIAAproduct.
Pleasereadthisentiremanualbeforeinstallationanduseofthisproduct.
Pleasereadthecautionarypointsbeforeinstallationtoensuresafeutilizationoftheproduct.
● Thelampandtheswitchharnessareintendedforautomobileuse.Donotuseforanyotherpurpose.
● Thislampisintendedforuseinrain(dayornight),duringfoggyorsnowyconditionswherevisibilityishampered.
Donotuseduringnormaldrivingconditions.
● Donotoperatetheswitchwhiledriving.
● Ifthelampiskeptonwhentheengineisnotrunning,itmaydrainthebattery.
● Makesurethelampisinstalledsecurelybeforedrivingthevehicle.Ifanabnormalityisfound,adjustitimmediately.
● Checkforanyloosescrewsthatholdthelampinplacebeforedriving.Ifyoufindanyloosescrewsorbolts(ifabracketis
used),tightenthemsecurely.Ifyounoticealoosepartwhiledriving,inspectthesectionimmediatelyandmakethenecessary
adjustments.
● Avoidrepeatedlyturningthelampoffandonasitmayreducetheoveralllifeofthebulb.
● Someofvehiclesareproducedhighvoltagesofelectricchargewhenyoustartengine.Avoidloadingextravoltagetolamps,
pleaseturntheswitchoffwhenyoustartengine.
● Avoidneedlessdisassemblyofthelamportheswitchharnessasitmaycauseittofail.
● Ifthelampand/ortheswitchharnessisremovedandsetasideforsafekeeping,wipeawayalldustorgrimeandstoreinan
placefreeofmoisture.
● Ifthelensiscrackedordamagedinanyway,verifywhetherthereisanydamagetotheharnessortheswitchharnessthatitis
connectedto.Ifthereisanydamagetothecordcovering,replaceitimmediately.
● Avoidinjurywhenreplacingtheharnessandtheswitchharness.Pleasedisposeofitasanon-combustibleitem.
※ The and marksindicatedinthismanualare
cautionarypointsrelatedtotheinstallationoftheproduct.
Toensuresafeandsecureinstallationoftheproduct,pleasefollowthesepointsclosely.
Touser … Pleasekeepthismanualandareceiptwhichcanberecognizedthe
shopnameyouboughtat.
Whengivingthisproducttoathirdparty,alwaysincludethismanual
togetherwiththeproduct.
Toshopownersinstallingtheproduct … Afterinstallationoftheproduct,makesurethecustomerisprovided
withthisownerʼ smanual.
● Donottouchthebulbwhilelitorimmediatelyafterswitchingitoffbecausethelampremainsextremelyhot.Severeburnsmay
occurasaresult.Also,careshouldbetakentopreventwaterfrommakingcontactwiththelens.Thismaycausethelensto
crackorimpairproperfunctioning.
● Thelampbecomesveryhotwhenturnedon.Whenparkingyourcarnearflammableitemssuchasdriedleaves,turnoffthe
lampasitmaycauseafire.
● Donotlookdirectlyintothelightforlongperiods.Doingsomaycauseeyeirritationorvisualimpairment.

-2-
PKI-0007-3
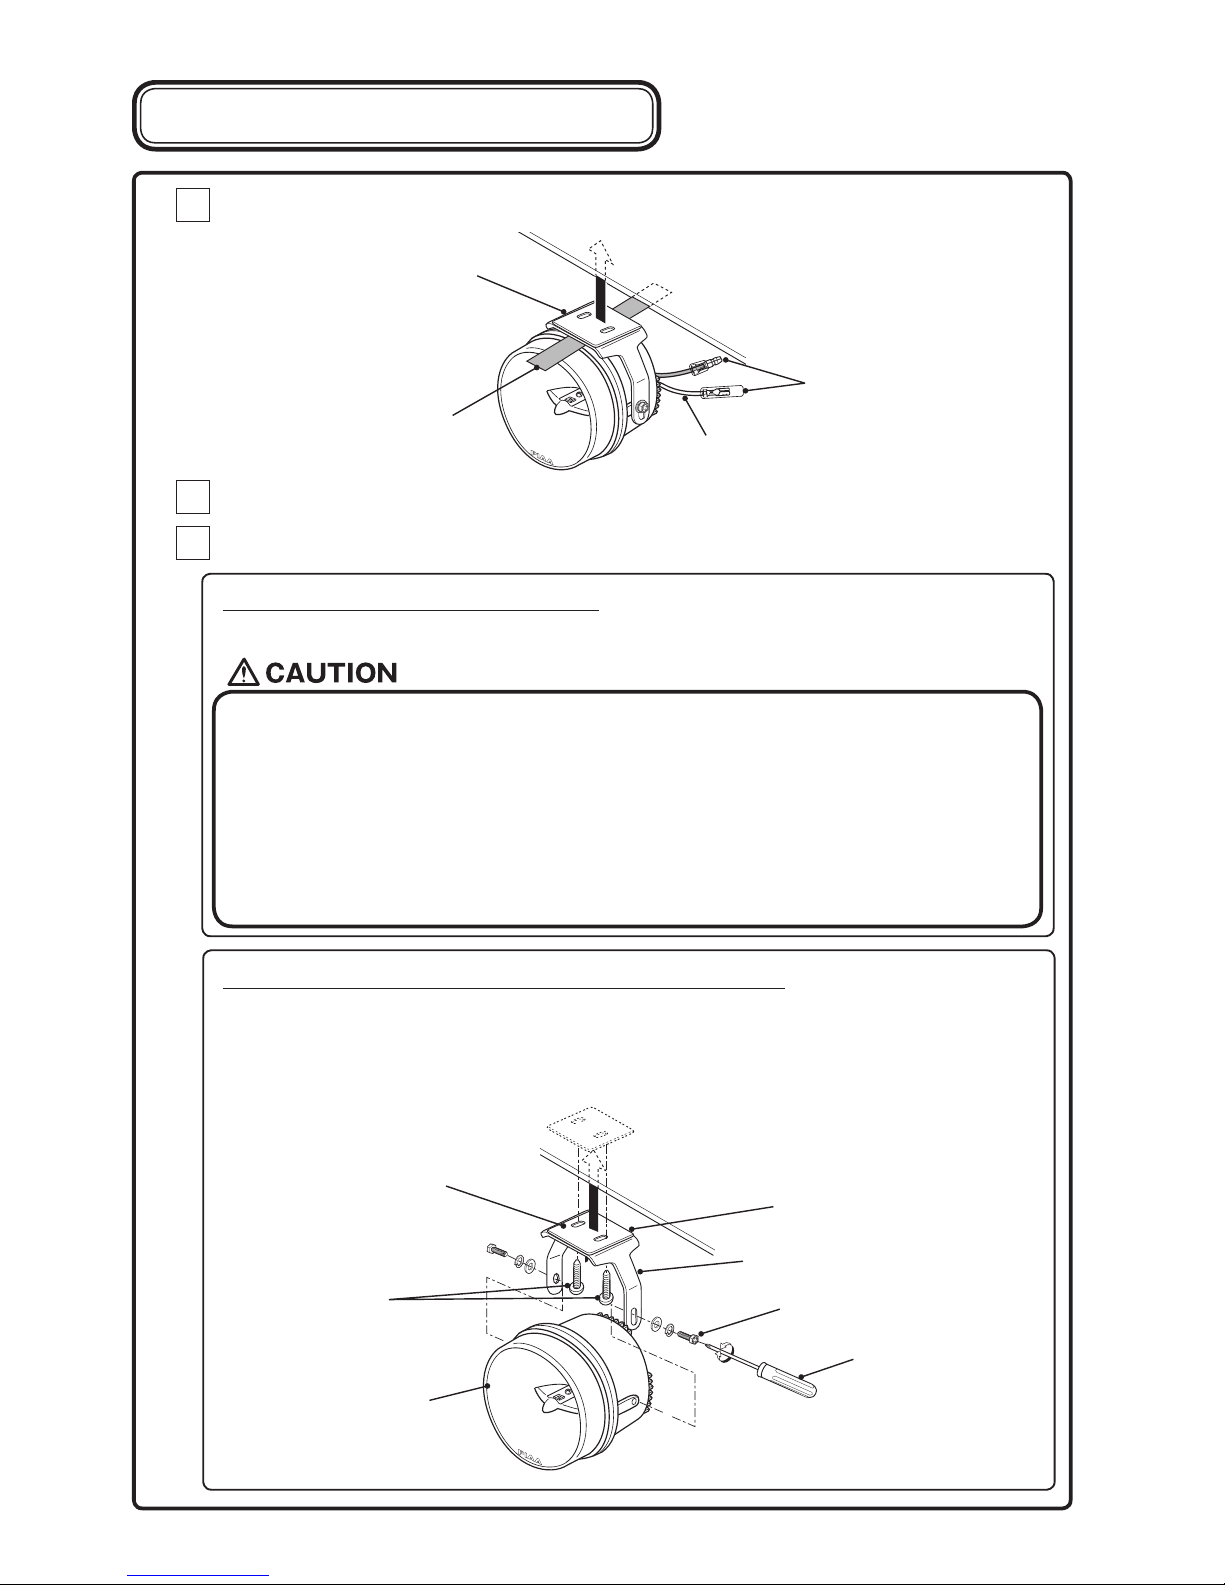
● Thislampisahangingtypeandusesabracket.Ifusingitupright,setthebracketupcorrectlysothatthePIAAlogois
properlydisplayed.
●Inorderforthelamptoperformatitsfullpotential,userelayharnessesmanufacturedbyPIAA.
●Allworkproceduresshouldbecarriedoutinalocationwithadequatespace.Placetheshiftleverinneutralorintheparking
position.Turnofftheengineandsetthesidebrake.
●Makesuretheenginecompartmentisadequatelycoolbeforestartingwork.Donotbeginworkifenginepartssuchasradiator,
oil-coolerorturbopartarestillhot.
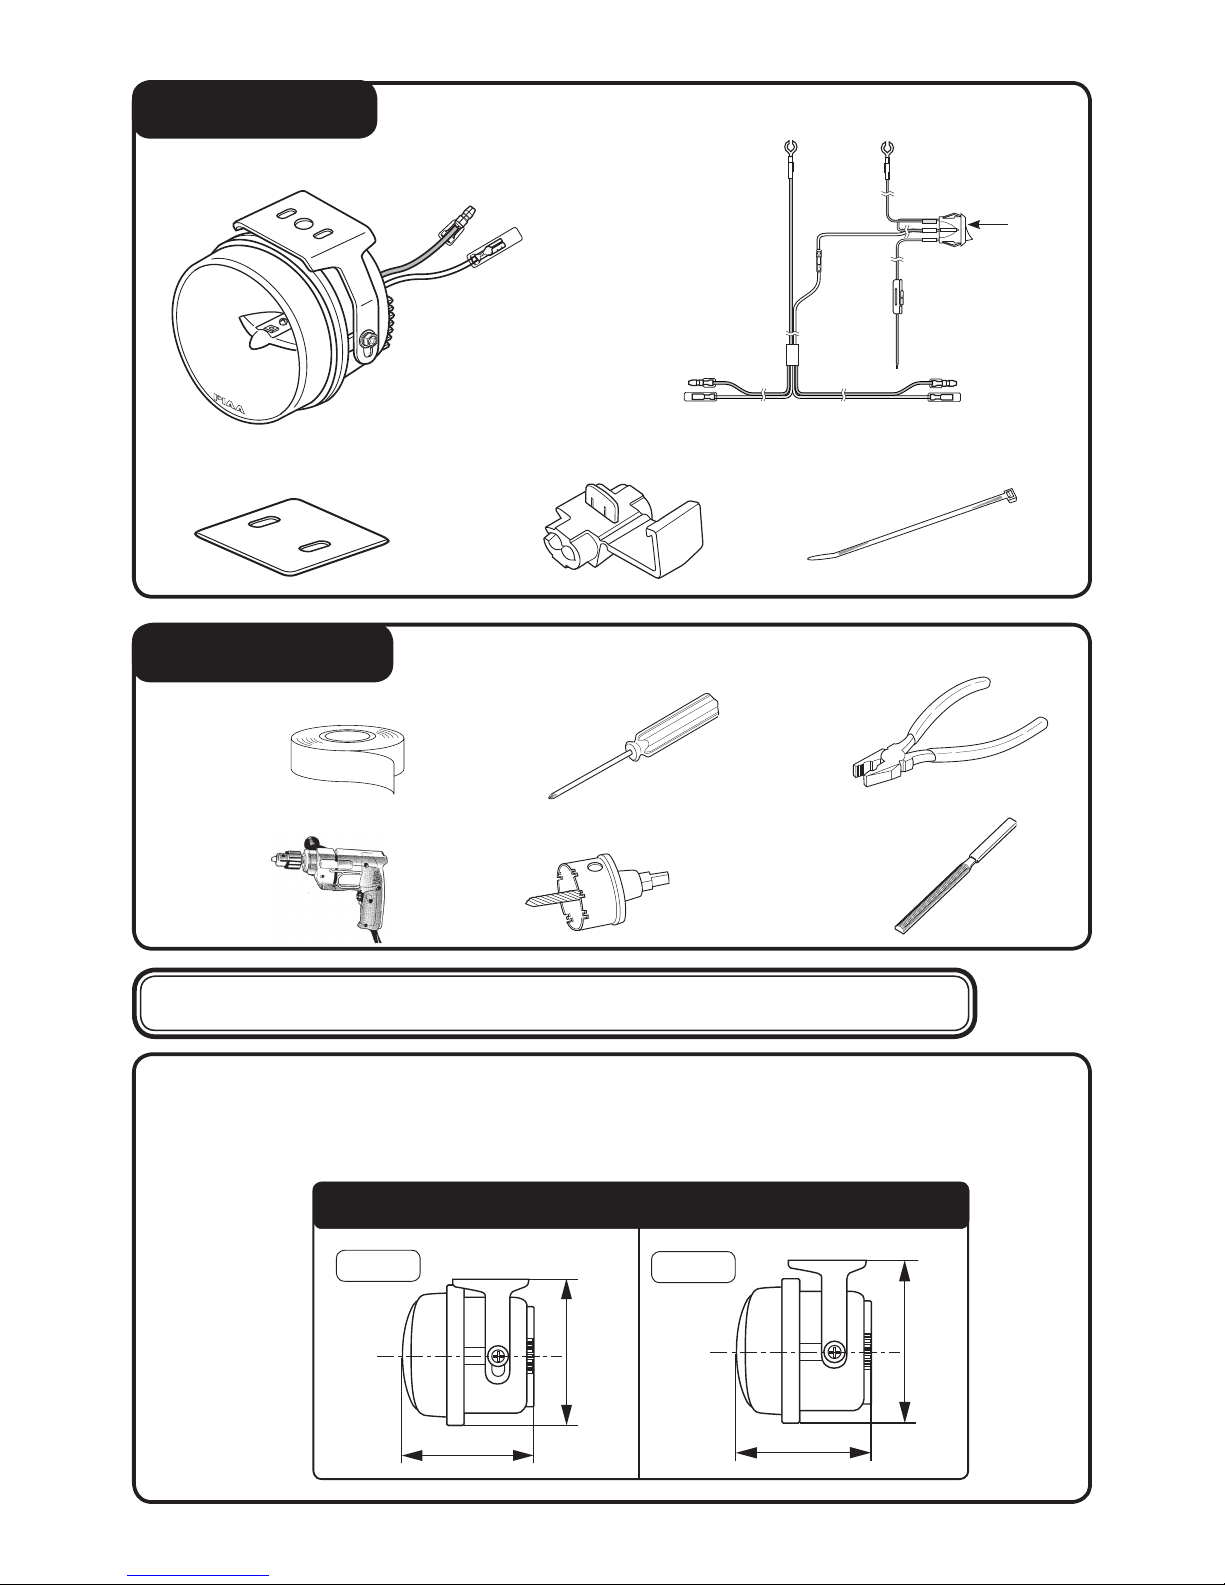
Beextremelycarefulwhenhandlingthelampandtheswitchharness.Ifdroppedorexcessiveshockisappliedtothelens,
thebulbortheswitchharness,itmaycauseirreversibledamage.
●Donotaddadditionalholestothemainbodyofthelamp.Also,donotapplyadhesivesorstickerstothelampparts.
●Donotmodifythelampharnessortheswitchharnessinanyway.Suchmodificationsmaycauseittooverheatorshort.Insome
cases,itmaycausethevehicletocatchfire.PIAAwillnotbeliablefordamagecausedbysuchmodifications.
●Whenremovingthebatteryterminals,donottouchthe(-)and(+)terminalssimultaneously.Anelectricalshockmayoccur.
Wearrubbergloveswhencarryingoutsuchworkprocedures.
●Makesurethe(-)and(+)terminalsdonotmakecontactwithmetal.Itcanbeextremelydangerousifashortoccurs.
●Makesureallboltsaretightlysecure.Ifthereareanylooseboltstightenthemaccordingly.
●Afterinstallingthelamp,adjustthelampsothebeamshinesatleast40minfrontofthevehicle.Also,adjustthelampalittle
towardtheleftsothatitdoesnotshinedirectlyintotheeyesoftheopposingdriverofavehicle.(astrafficlawsstipulate-
refertop.8foradjustmentprocedures)
●Afterinstallingthelamp,makesuretheheadlamps,wipersandhornareworkingnormally.
●Whenthebatteryterminalisremoved,memoryrelatedtotheclock,radio,audiosystemetc,willbeaffected.Afterallwork
proceduresarecompleted,resettotheoriginalsettings.(Foradjustmentproceduresrefertoyourcarʼ sinstructionmanual)
Pleasereadtheinstallationproceduresthoroughlybeforehand.
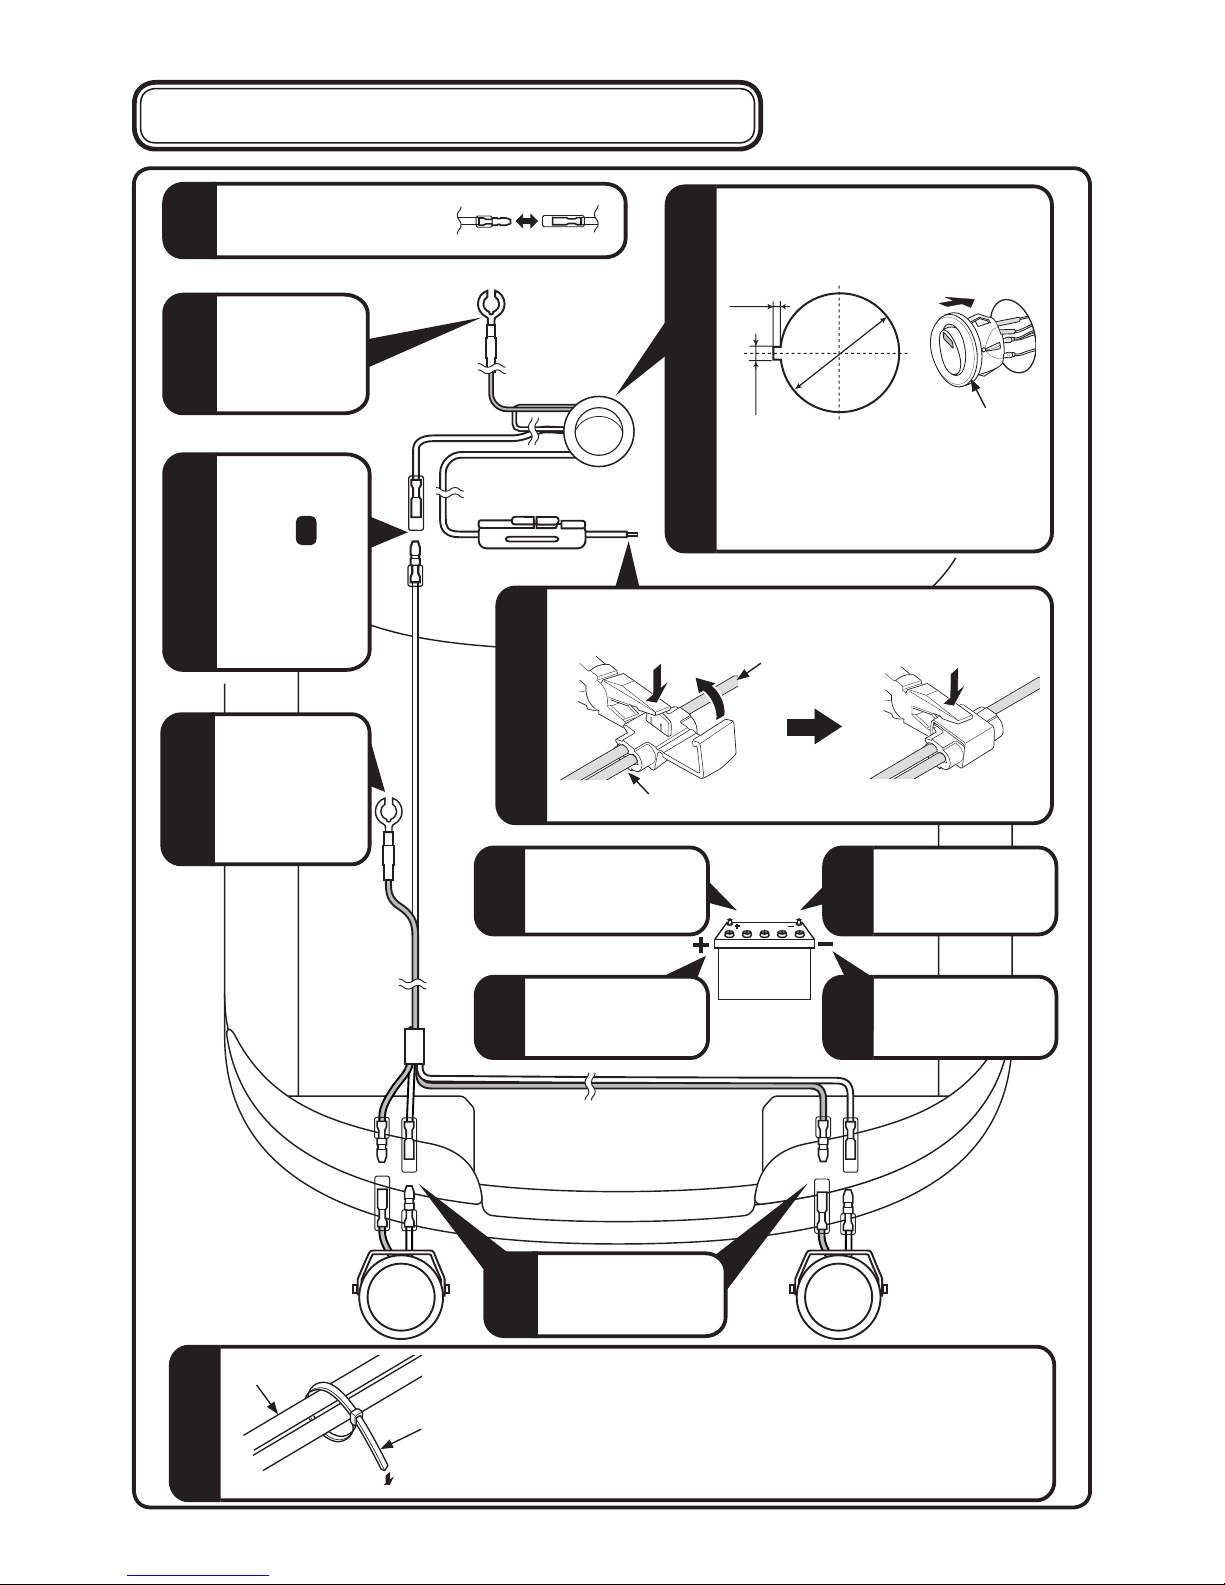
● Beforeyoubeginalwaysremovethe(-)and(+)terminals.
Alwaysremovethe(-)terminalfirstandmakesureashortdoesnotoccur.
●Whenremovingthebatteryterminals,alwaysturnthekeytoOFFandremoveit.Turnallotherelectricalunitsoffsuchas
thelightswitch.
●Whenremovingthebatteryterminals,ifacord(foranelectricalunit)isconnected,windalengthofvinyltapearoundthe
(-)and(+)terminalstoclearlyidentifythem.
●Verifythe(+)terminal(white)andearth(black)beforeconnecting.
●Donotobtain(+)voltagefromthealternator.
●Obtainthe(+)currentnecessaryfortheswitchfromthe(+)currentusedforthelightswitch.
(Donotusethesamecurrentusedforacomputer,radiooraudiosystem)
●Installtheswitchharnessinapositionwhereitwillnotmakecontactwithhightemperaturesurfacessuchastheengine,
radiatororenginecompartment.
●Arrangetheswitchharnesssothatitdoesnotmakecontactwithmovingparts.
●Donotplacetheswitchharnessonhigh-voltagewiressuchasbrakeorair-conditioningwires.
●Iftheswitchharnessmakescontactwithapartoftheengine,applyalengthofordinarycushionedtapearoundtheharness.
●Whenconnectingtheconnector,insertuntilyouhearanaudible“click”
●Whenremovingtheconnector,holdthemainbodyoftheconnectorandpullitout.Ifexcessforceisusedtopullthecord,it
maydamagetheconnection,whichcouldcauseittooverheat.
●Makesuretheharnessdoesnotsag.Useaharnessbandofvinyltapetosecureitinplacetowiringinsidetheenginecompartment.
●Beforeconnectingittothebattery,verifythewiringarrangement.
●Whenconnectingthebatteryterminalandorotherelectricalunits,donotmistakethe(-)and(+)terminals.Alwaysstartwith
the(+)terminal.
●Afterallwiringiscomplete,confirmthatitworksproperly.Ifitfailstoactivate,referto “【4】Troubleshooting” section
ofthismanual.
●Whendoingwiringwork,strictlyfollowthecautionarypointsmentionedbelow.Incorrectorfaultywiringmaycausethelamp
tooperateimproperly.Insomecases,itmaycausethevehicletocatchfire.
CautionRegardingWiring/Pleasereadthoroughly

-3-
PKI-0007-3
※ Pleaseusethetoolsindicatedbelow.
● Phillipsheaddriver
※ Verifyallthepartsareincluded.Ifapartismissing,pleasecontactyourlocaldistributor.
ProductDetails
switch
● Tape ● Pliers
ToolsRequired
① Lampmainunit(2units) ② Switchharnessset
[1set]
④One-touchconnector(1pc) ⑤ Wiretie(5pcs)
③Double-sticktape(2pcs)
● Electricdrill ● File● Holesaw( φ 20mm)
● Usingtheholesinthelampbracket,theheightfromthelampbodytotheinstallationsurfacecanbe
adjusted.Dependingonthetopandbottommeasurementsaswellasshape.
● Incasethemountingsurfaceisnotflatpositionorisnotenoughspaceofitʼ ssurface,pleasemake
suretofixthelampstablybyusingdouble-sticktapeandscrews(sellseparately).
【1】Lampinstallationpreparationsandtemporarysetup
Type A
91mm
74mm
100mm
74mm
Mountingthatcombinesbracketandlamp
TypeB

-4-
PKI-0007-3
● Whenusingabracketavailableonthemarket,makesuretheboltsyouremovefromthevehicledoes
nothinderitsperformance.
● Donotinstallonanunstablelocation,itmaycomelosewhile
driving.Thismayaffecttheoveralllifeofthebulb.Inaddition
itmaydamagethevehicleorthemainbodyofthelamp.
Makesureyouinstallthelamponastableandsecurelocation.
● Donotinstallonavertically-surface(refertheimage
onrighthand).
◆Whenyouhavedecidedtheinstallationmethod……
(1) Rearrangethebracketaccordingtoyourneeds,
andapplydouble-sidetape(Item3)andone-side
tapeasshowninthediagrambelow.
(2) Holdthelampuptowhereitwillbeinstalledonthe
vehicle.Verifythegapbetweenthelampand
surroundingobstacles.
Check!
Makesuretheinstallation
positioniscorrectandthe
logowillnotbeupsidedown.
Bracket
Lampbody
Phillipsheaddriver
Double-sticktape
(Item3)
●ランプを市販のテープや両面テープ等で仮止めしてください。
tape
● Temporarilysetthebracketwithtape.
● Makesuretosetpositionproperlybeforepermanently
settingthelamp.Also,
thoroughlycleanthesurfaceof
theinstallationpositionbeforehand.
● Makesuretoremovethetapeglueonthevehiclebody
afterinstallation.
● Makesurethelampcanbeadjustedupanddown
(beammustbeadjustedsothatitshinesatleast
40maheadofthevehicle.)Ifitcannotbeadjusted,
itmustbere-installed.
● Theremustbebetween30mmto35mmoneither
sideofthelamptoallowforproperadjustment.
● Ifusingascrew,makesurethereisadequatespace
betweenthebracketandthelamp(wherescrew
willbeinserted).

-5-
PKI-0007-3
1
4
8
3
2
6
5
11
9
12
7
10
バッテリー 端子を
取り外してください。
Switch
❷
❸
2mm
1mm
φ 20mm
❶Vehicle
(+)cord
1
Afterlamphasbeeninstalled,verifytheswitchharnessdoesnot
makecontactwiththeengineʼsmovingpartsorsectionsthat
emitextremeheat.Usethewiretieincluded(Item5)andsecure
toharnessesinsideenginecompartment.
Harness
Wiretie
(-)cord(Black)
(-)cord(Black)
Battery
Removethe(+)
terminalfromthe
battery.
Attachthe(-)terminal
tothebattery.
Removethe(-)
terminalfromthe
battery.
Attachthe(+)terminal
tothebattery.
Takethe(+)cord(white)andusingtheone-touchconnector
(Item4),tieittogethertothevehicleʼ s(+)cord.
Connectbullet
connectorstothe
lampharnesses.
Switchharness
Thenumbersshowninthefigurebelow
indicatethesequencethepartsshould
beinstalled.
【2】SwitchHarnessInstallationSequence
Switch
Removethebulletconnector
of“theswitchharness” .
Attachthe(-)
cordtothe
bodyearth.
Bringthebullet
connectorwhich
tookon into
theinteriorofthe
vehicleand
connecttothe
bulletconnector.
Drillaholeof20mmdiameterinthe
dashboardorinteriorswitchcover,
thenmounttheswitchstably.
※ Iftheholeisbiggerthan20mm
diameter,theswitchdoesnotfix
stably.Recommendtomakea
smallerhole,thenadjustthesize
byinches.
Switchharness
(+)cord
LampLamp
Attachthe(-)
cordtothe
bodyearthor
the(-)battery.
Fusebox

-6-
PKI-0007-3
1
【3】LampInstallationProcedures
Bracket
Lampharness
2
3
Removethelampharnessbulletconnectorsandtakeoutthelamp.
Installthelampaccordingtothemarkingmadepriortoinstallation.
◆Ifusingonlythedouble-sidetape.
Peeltheprotectivesheetfromthedouble-sidedtape(Item3)andapply.
●Whenusingthedouble-sideadhesivetape,cleanthesurfacewheretapewillbeapplied.Useacleanclothor
spongeandmakesuredirt,grease,waxetc.,arecompletelyremoved.Ifsubstancescannotberemoved,it
maynotadhereproperly.Inparticular,avoidusingleatherwax,tirewaxandalsoanytypeoforganicsolvent.
●Whenusedinlowtemperatures,theadhesivesubstancetendstoloseitsstrength.Useadrierorsimply
warmuptheadhesivesurfacebeforeapplying.Whenusingadrier,avoidmovingittooclosetothebumper
asitmaycauseittodeform.
●Afterinstallation,avoidexcessspeedsanddonotwashfor1to2days.
●Ifappliedincorrectly,aspecialdouble-sidedadhesivetapeisavailableatyourlocalPIAAdealer.
(1) Loosen(+)boltwithPhilipʼ sheaddriverandremovethebracketfromthelamp.
(2) Peelofftheprotectivesheetfromthedouble-sidedtapeandapplyittothebracket.
(3) Fixthebracketinplacewiththescrews.
(4)Installthelampontothebracket.
Bracket
Lampbody
Phillipsheaddriver
Double-sticktape
(Item3)
Temporarilysetthebracketwithtapeandthenmarkthecorrectpossition.
Temporarilysetwithtape
Bulletconnectors
◆Ifusingscrews(M4boltorscrew)tofixlampstably.
Protectivesheet
○+ bolt
Screw
(M4boltorScrew)

-7-
PKI-0007-3
1 Afterinstallation,ifthelampdoesnotactivate
→ Checkthewiringandmakesuretherearenofaultyorirregularconnections.
● Iftheswitchilluminationdoesnotlightup.
→ Verifythe(+)wirefromtheswitchisproperlyconnected.Ifitisnotcorrectlyconnectitwillnotactivate.
→ Verifythefuselocatedonthevehicleʼ swiringsystem.(theswitchʼ s(+)wireshouldbeconnectedtothe
fusebox).Ifitisburnedout,connectittoanothercircuit.
→ Iftheswitchitselfisfaulty,thesamesymptomsmayexist.Werecommendthattheentireswitchunit
bereplaced.
→ Checkthefusefortheswitchharness.Ifitisburnedout,followinstructionsindicatedin
[3FusereplacementProcedures].
● Theswitchilluminationlightsupbutwhenoperatingdoesnotwork.
→ Checktheconnecting(-)cordtothebodyearth.
→ Theremaybecaseswhereeachterminalrelatedtospecificsectionsmaybeincorrectlyconnected.
Checkforanylosewiresandalsofordirtorgrime.
→ ChecktheswitchopelationIfanabnormalityisfound,replaceitaccordingly.
FogLightAiming
Therearetwoimportantissuestoaddresswheninstallingfoglights,thefirstistominimizetheamountofreturn
glareintothedriverseyes,andtheotheristominimizeglareintooncomingeyes.Bothofthoseissuesmustbe
accomplishedwhileputtingasmuchlightaspossibleontheroad.
Thesefog/foulweatherlightaiminginstructionsaresuggestionstakenfromcommonpracticeandtheS.A.E.
standardJ583.
Somemodificationstotheseinstructionsmaybenecessarytominimizeglare.
Visualaimismadewiththetopofthebeam4inchesbelowthelampcenterat25feetwiththelampfacingstraight
forward.(Seebelow.)
● Onlyusefoglightsifthey
areaimedproperly.
Foglightsshouldneverbe
theonlyforewordlight
source.Foglightsshould
beusedwithheadlamp
lowbeams.
Verifyeachsectionaccordingtothefollowing.
【4】Troubleshooting……
Typically,drivinglightsaremountedabovethefrontbumperabout14cm-30inchesfromthegroundtoprovide
extrahighbeamillumination.Drivinglightscanbemountedbelowthebumper,althoughtheywillnotbeaseffective
becausethelightwillhitthegroundsoonerandreducetherangeofthelight.
Visualaimismadewiththecenterofthebeamhotspot1.5inchesbelowthelampcenterat25feetwiththelamp
facingstraightforward.(seebelow.)
● Donotusedrivinglightsinto
oncomingtraffic.
Drivinglightsshouldneverbe
theonlyforwardlightsource.
Drivinglightsshouldonlybe
usedwiththeheadlamphigh
beams.
1.5
4DRIVING / SpotLightAiming

-8-
PKI-0007-3
2 Ifthebulbsuddenlyfailstolightup…
→ Checkthefuselocatedonthevehicleʼ swiringsystem.Ifitisburnedout,replaceaccordingly.
→ Checkthefusefortheswitchharness.Ifitisburnedout,followinstructionsindicatedin
[3FusereplacementProcedures].
→ Theremaybecaseswhereeachterminalrelatedtospecificsectionsmaybeincorrectlyconnected.
Checkforanylosewiresandalsofordirtorgrime.
→ Checktheswitchopelationifanabnormalityisfound,replaceitaccordingly.
3 FusereplacementProcedures
→ Ashortcircuitmayhaveoccurred.Checkthewiringsystem.Ifanytypeofdamageis
foundreplaceaccordingly.(Non-replacementmayposeapotentialdanger)(Shortcircuitsaremainly
causedwhenwiresarecaughtintheassemblyorwhenthereisagapinthesleeveconnectedtothe
lampharness).
Table of contents
Other Piaa Automobile Accessories manuals