THANK YOU!
We are delighted that you opted for our Ace Wire-
less loudspeakers. Use this guide for a quick and
easy dive into your personal sound adventure.
HOW TO GET STARTED
Simply follow the step-by-step instructions below to
start using your Ace Wireless loudspeakers or refer
to the comprehensive manual on our website if you
require further information.
1 UNPACK YOUR LOUDSPEAKERS
Make sure that the following items are included
in the scope of delivery:
2 SET UP AND CONNECT TO POWER
Start by positioning your speakers and connecting them to the
power supply.
Option: WIRELESS-MODE
Select your preferred mode by flipping the WIRELESS-switch:
· choose «ON» to enable all wireless functions and keep
Bluetooth and WiFi active
· choose «OFF» to disable certain wireless functions.
Refer to the online manual for further details.
Please note that all WIRELESS-functions should be
active during the installation process, so make sure
to select «ON» on both speakers.
3 PAIR YOUR LOUDSPEAKERS
To couple your units, start by pushing the «PAIR» button on the
Rx-Speaker. The indicator starts to flash.
Then push «PAIR» on the Tx-Speaker and wait for the indicator
to flash.
The connection is now being established automatically.
After approx. 20 seconds, the indicator stops blinking
and remains lit when the units are connected.
4 CONFIGURE YOUR LOUDSPEAKERS
1. A music signal consists of two audio channels, a left and
a right one. This is how to set them up:
To assign the channels use the «SELECT» button and
choose from:
LEFT: for the loudspeaker on the left
MONO: for the use of only one single loudspeaker
RIGHT: for the loudspeaker on the right
QUICK GUIDE
speaker power cable
infrared interface (Tx)external antenna with stand
and cable (Tx)
DO YOU NEED FURTHER INFORMATION TO
SUCCESSFULLY COMPLETE THE INSTALLATION?
A comprehensive manual on every model, including additional
instructions and FAQs, can be our website.
WARRANTY REGISTRATION
We don’t want you to miss out on our warranty period of 6 years
or 3 years on electronics, so don’t forget to register your product
on piega.ch/en/warranty-registration
WE WISH YOU AN
UNFORGETTABLE
SOUND EXPERIENCE!
6 HOW TO HOOK UP YOUR TV
By using an HDMI cable, you can connect your loud-
speakers to the HDMI output (HDMI ARC or HDMI eARC)
on your TV. Upon receiving a signal, your TV will auto-
matically start playing audio output through the speaker
set-up, to adjust the volume simply use your remote.
Make sure the HDMI output on your TV is active if you’re
having trouble establishing a connection. If there is no
HDMI output on your TV, connect your devices using an
analogue or optical digital input.
Refer to the detailed product manual to learn more
about hooking up your TV and find out how to use
your TV remote with your Ace speakers.
HDMI 1
HDMI 2
HDMI 3
(ARC)
PAIR
LEFT
MONO
RIGHT
PAIR
WIFI
SELECT
WIFI
NETWORK
AUX/OPT
COAX
REMOTE
Ace
Tx
SOUND
NEUTRAL
WALL
SUB
WIRELESS
ON
OFF
HDMI eARC
SERVICE
ACE WIRELESS SERIES
ACE WIRELESS SERIES
EXPECT MORE
ENGLISCH
FÜR DEUTSCH BITTE WENDEN
QUICK
GUIDE
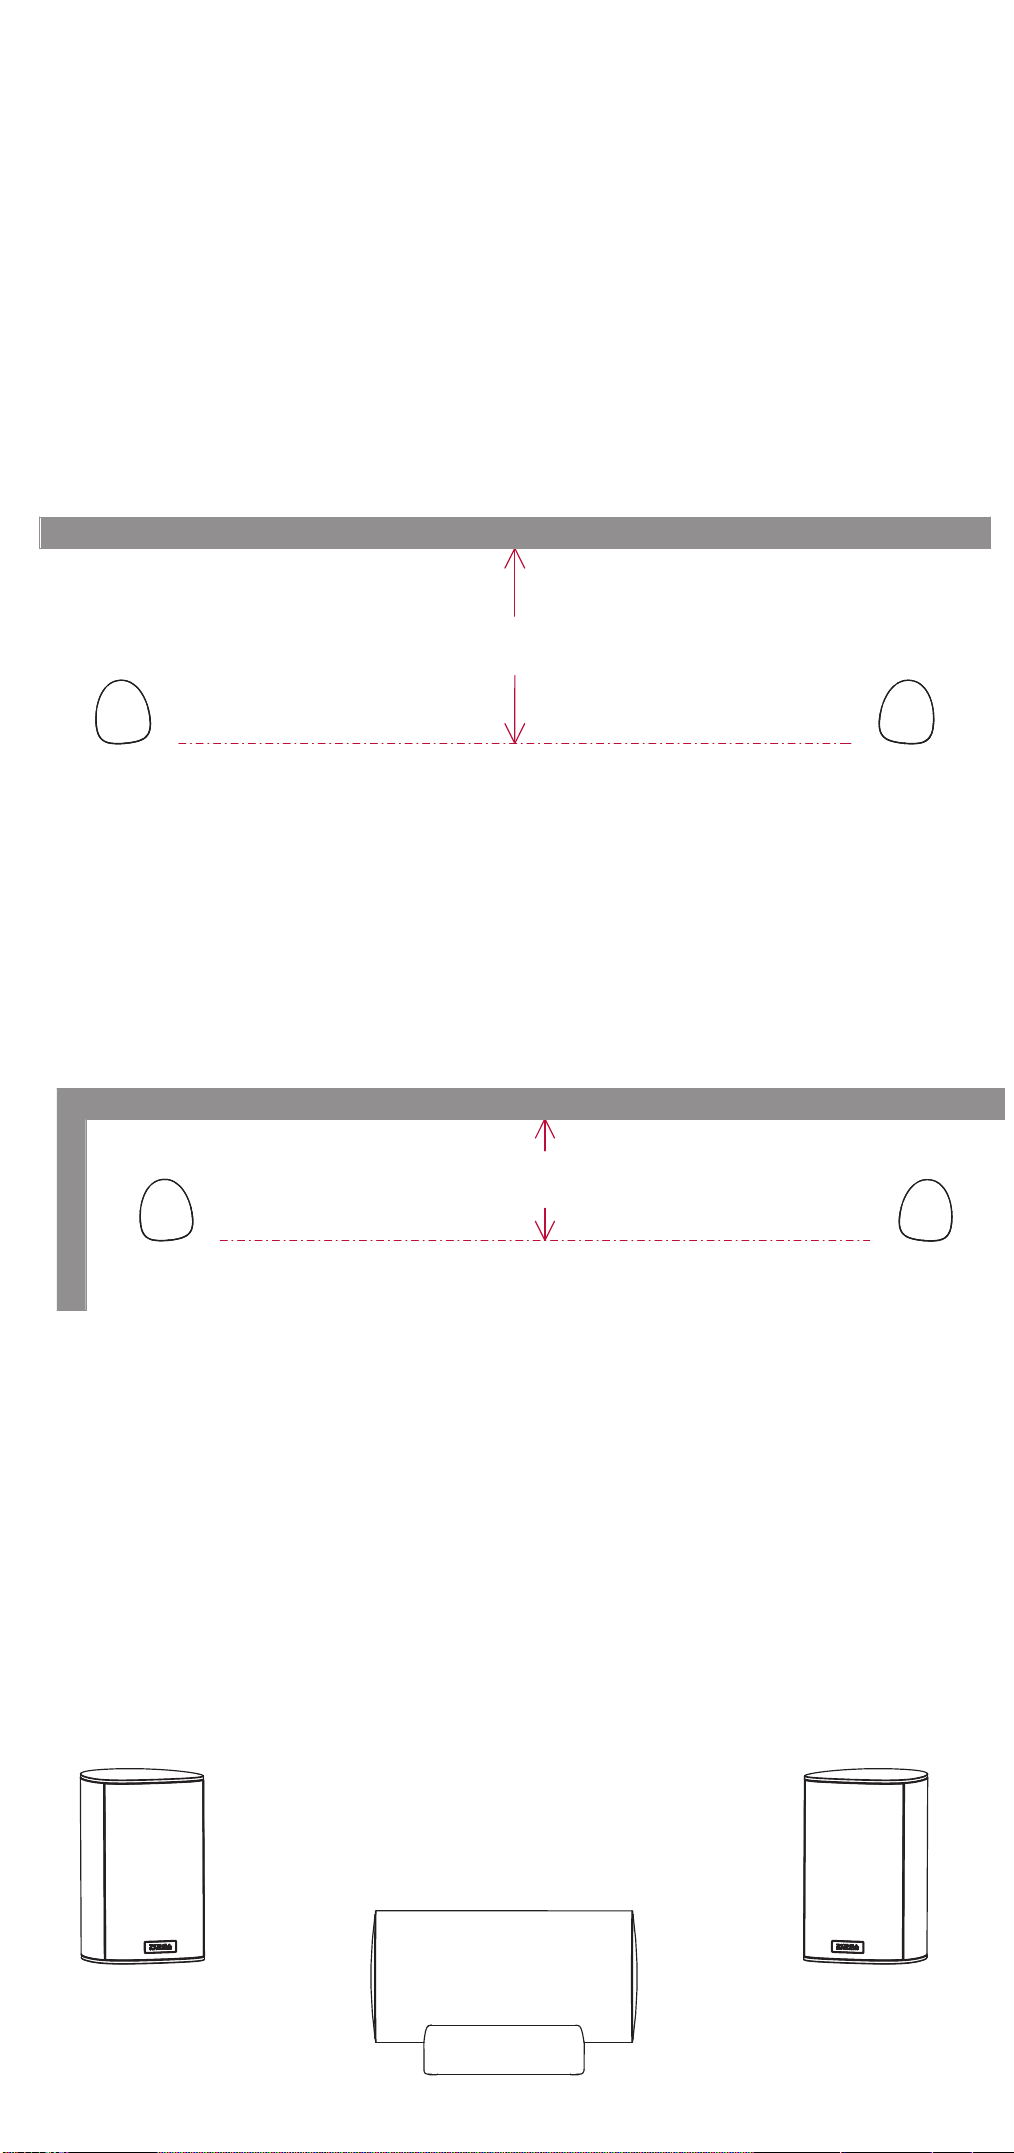
2. For the best possible listening experience, choose
the loudspeaker setting that best suits the speaker
placement in your room:
NEUTRAL: This setting is recommended for speakers
that are placed at least 50 cm from the wall.
WALL: This setting is recommended for speakers that are
placed less than 50 cm from the wall. The bass is ever so
slightly decreased in this case.
SUB: This setting is recommended when using a subwoofer
in combination with your loudspeakers. In this case,
bass tones below 50 Hz are being suppressed.
If you generally prefer a tuning with little bass, this is your
best choice.
LEFT SpeakerRIGHT Speaker
Distance from Wall
less then 0.5m
LEFT SpeakerRIGHT Speaker
Distance from Wall
in excess of 0.5m
LEFT
MONO
RIGHT
PAIR
PAIR
SELECT
SOUND
NEUTRAL
WALL
SUB
WIRELESS
ON
OFF
ANALOG IN
AUDIO IN
AUDIO OUT
Ace
Rx
SERVICE
PAIR
LEFT
MONO
RIGHT
PAIR
WIFI
SELECT
WIFI
NETWORK
AUX/OPT
COAX
REMOTE
Ace
Tx
SOUND
NEUTRAL
WALL
SUB
WIRELESS
ON
OFF
HDMI eARC
SERVICE
LEFT
MONO
RIGHT
PAIR
PAIR
SELECT
SOUND
NEUTRAL
WALL
SUB
WIRELESS
ON
OFF
ANALOG IN
AUDIO IN
AUDIO OUT
Ace
Rx
SERVICE
PAIR
LEFT
MONO
RIGHT
PAIR
WIFI
SELECT
WIFI
NETWORK
AUX/OPT
COAX
REMOTE
Ace
Tx
SOUND
NEUTRAL
WALL
SUB
WIRELESS
ON
OFF
HDMI eARC
SERVICE
LEFT
MONO
RIGHT
PAIR
PAIR
SELECT
SOUND
NEUTRAL
WALL
SUB
WIRELESS
ON
OFF
ANALOG IN
AUDIO IN
AUDIO OUT
Ace
Rx
SERVICE
PAIR
LEFT
MONO
RIGHT
PAIR
WIFI
SELECT
WIFI
NETWORK
AUX/OPT
COAX
REMOTE
Ace
Tx
SOUND
NEUTRAL
WALL
SUB
WIRELESS
ON
OFF
HDMI eARC
SERVICE
Now open the Google Home app.
Should the speakers not appear automatically, push «+» at
the top left of your screen to add them in.
Then select “set up device” and follow the instructions in
the Google Home app.
The ACE Wireless loudspeakers are now connected to
your network and can be selected from various streaming
services such as Spotify. For alternative streaming options
refer to the detailed online manual.
5 STREAMING OPTIONS
If you are planning to integrate your speakers into your WiFi,
we recommend downloading Google Home from the IOS
or Android store. Please note the loudspeakers should
have been operating for at least 1 minute to proceed with
the following steps.