PiiGAB 810 User manual

www.piigab.com
PiiGAB Processinformation i Göteborg AB • Anders Carlssons gata 7 • S-417 55 Göteborg • Sweden
Tel: +46(0)31 559977 • Fax: +46(0)31 227071 • email: inf[email protected]e
Getting started PiiGAB 810

Getting started PiiGAB 810 Rev 1.00.01
© PiiGAB Processinformation i Göteborg AB Page: 2
Contents
1. DOCUMENT INFORMATION ............................................................................................ 3
1.1 VERSIONS..................................................................................................................... 3
2. REQUIREMENTS............................................................................................................... 3
2.1 OPTIONAL REQUIREMENTS............................................................................................. 3
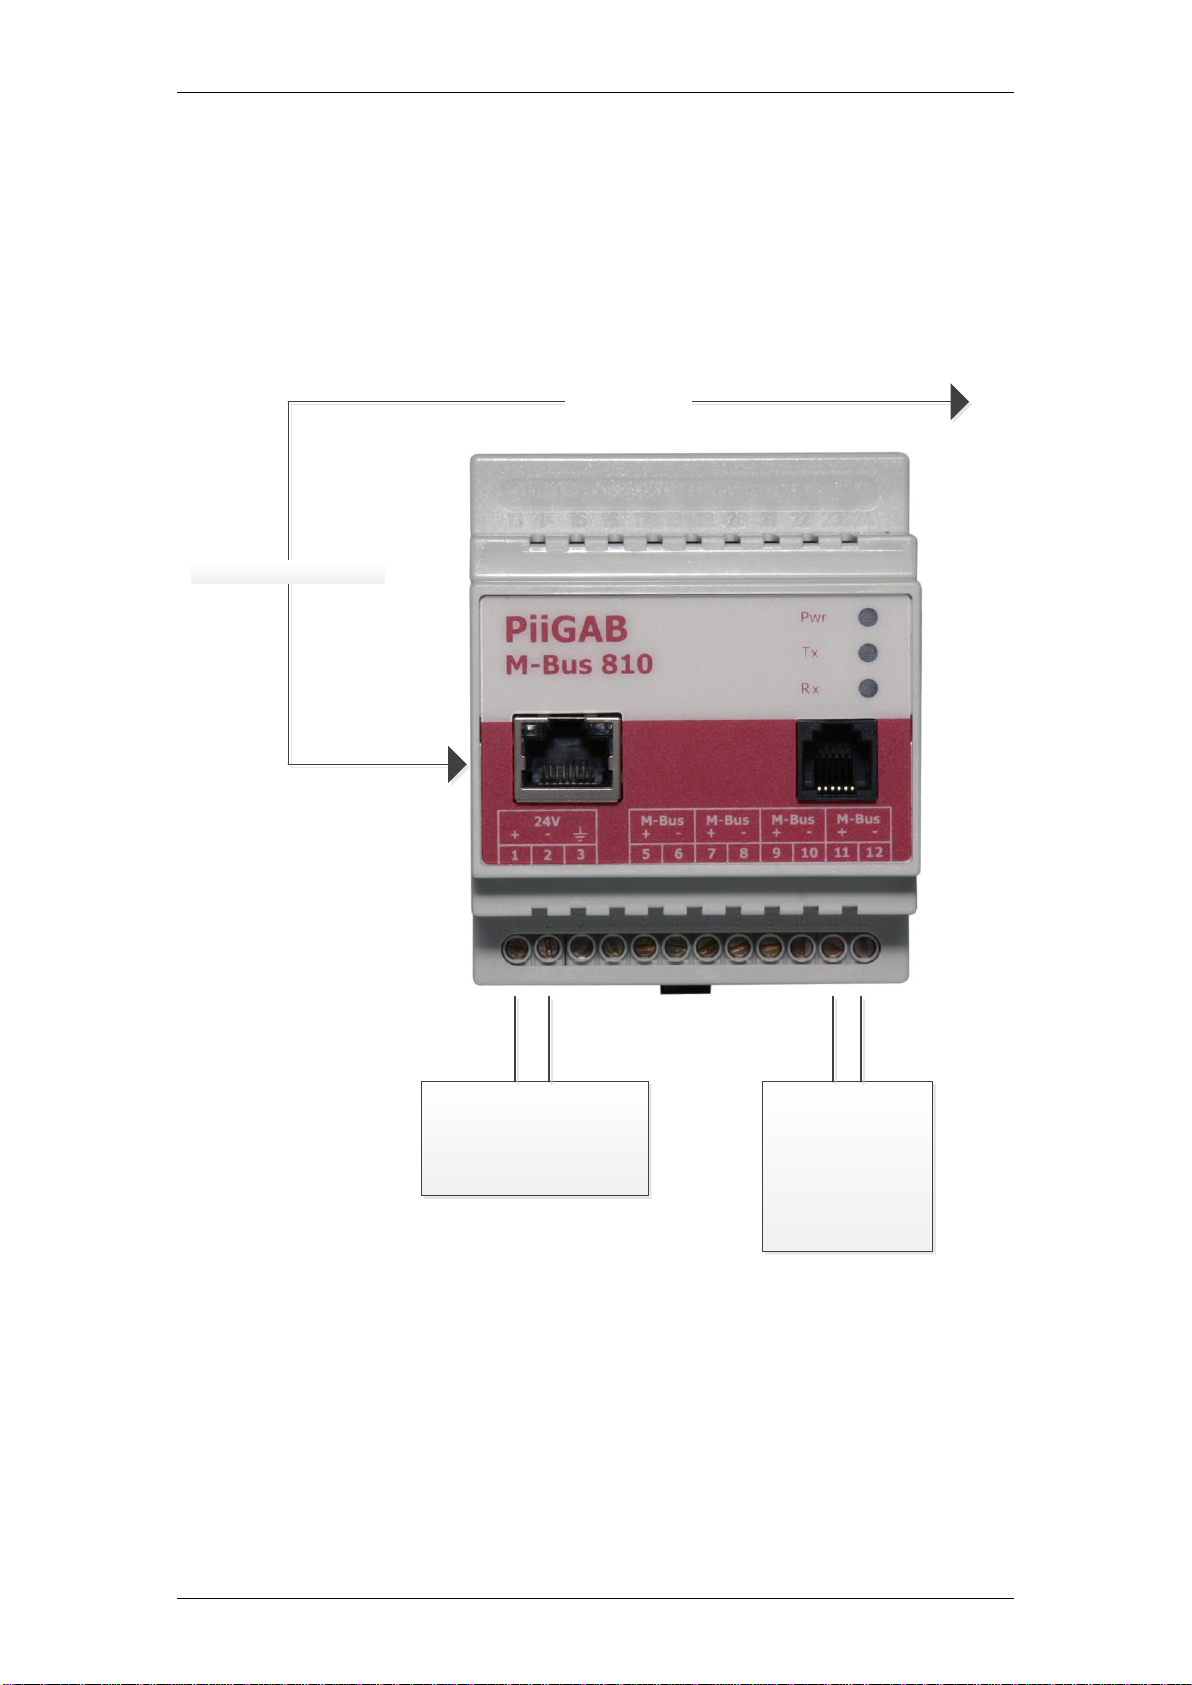
3. INSTALLATION AND CONNECTIONS ............................................................................ 4
4. PIIGAB 810’S MAC-ADDRESS......................................................................................... 5
5. IP-CONFIGURATION ........................................................................................................ 5
5.1 DHCP NETWORK........................................................................................................... 5
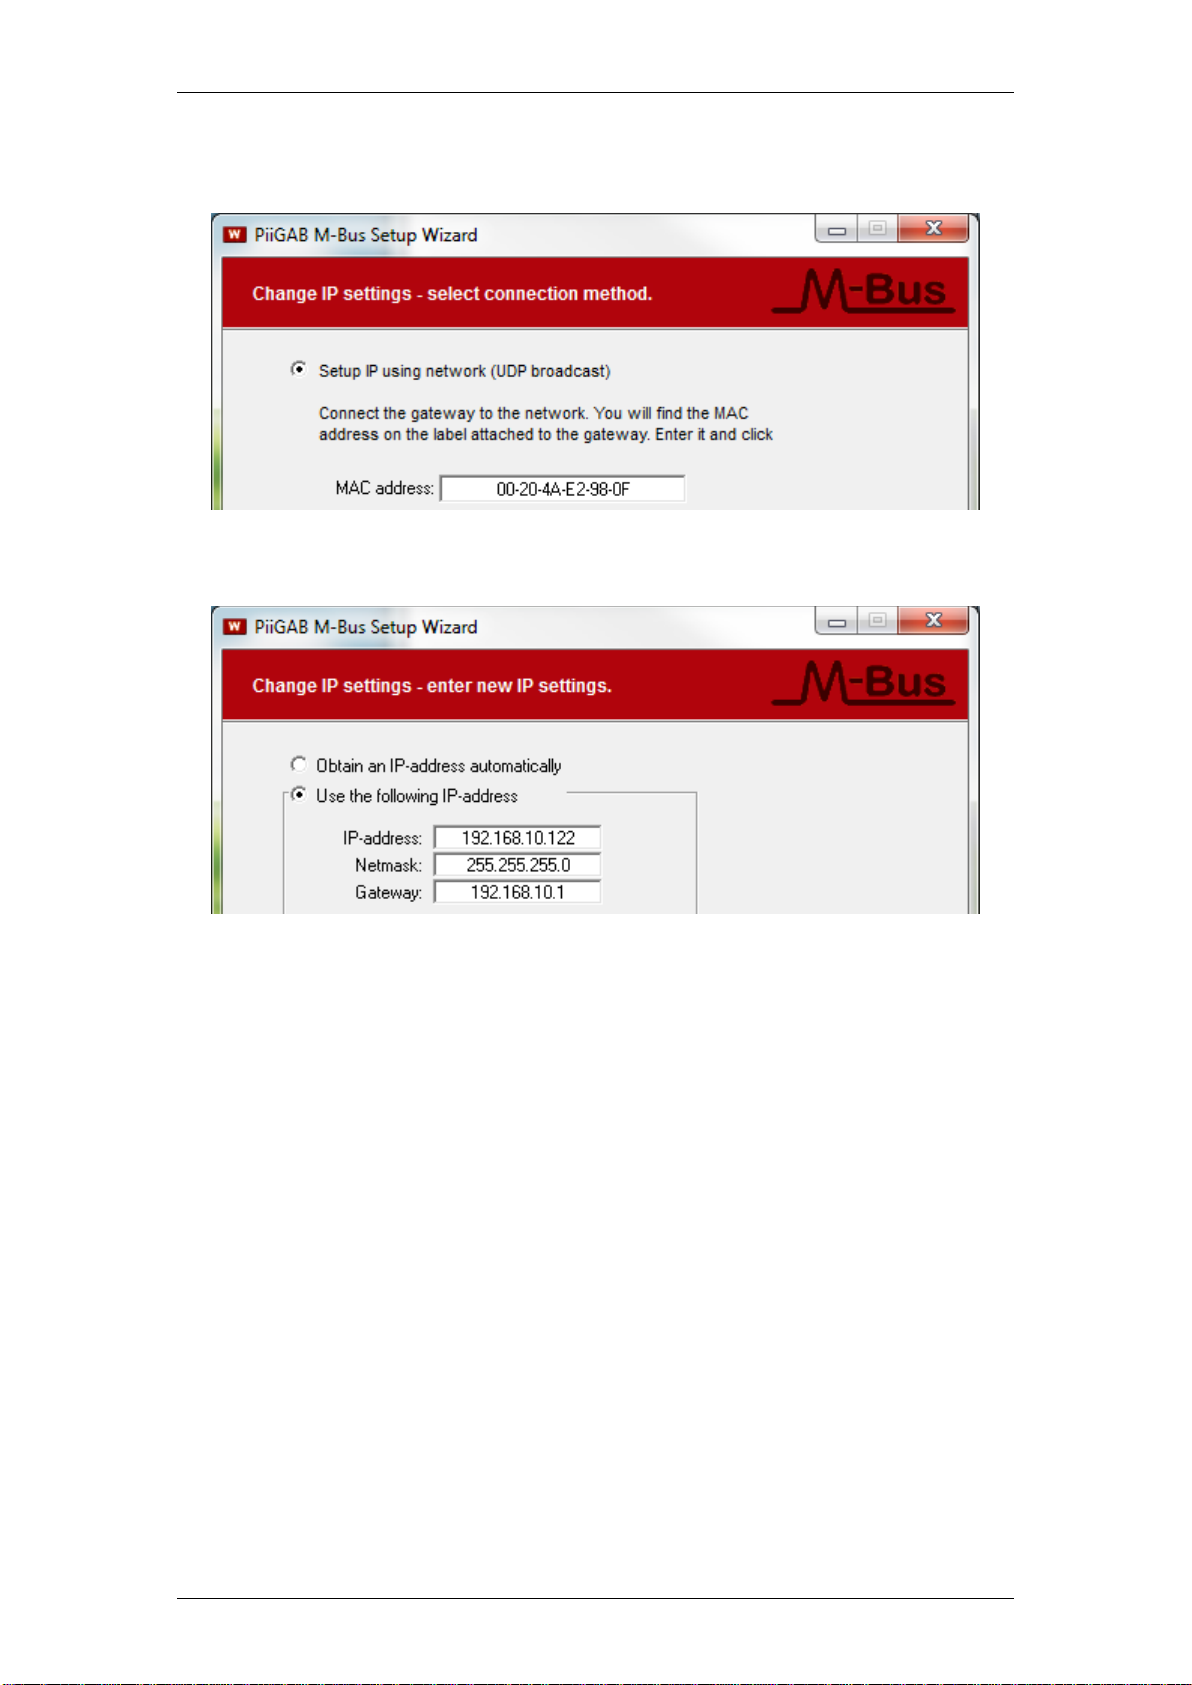
5.2 STATIC IP ..................................................................................................................... 5
6. FIND YOUR PIIGAB 810 ON YOUR NETWORK.............................................................. 8
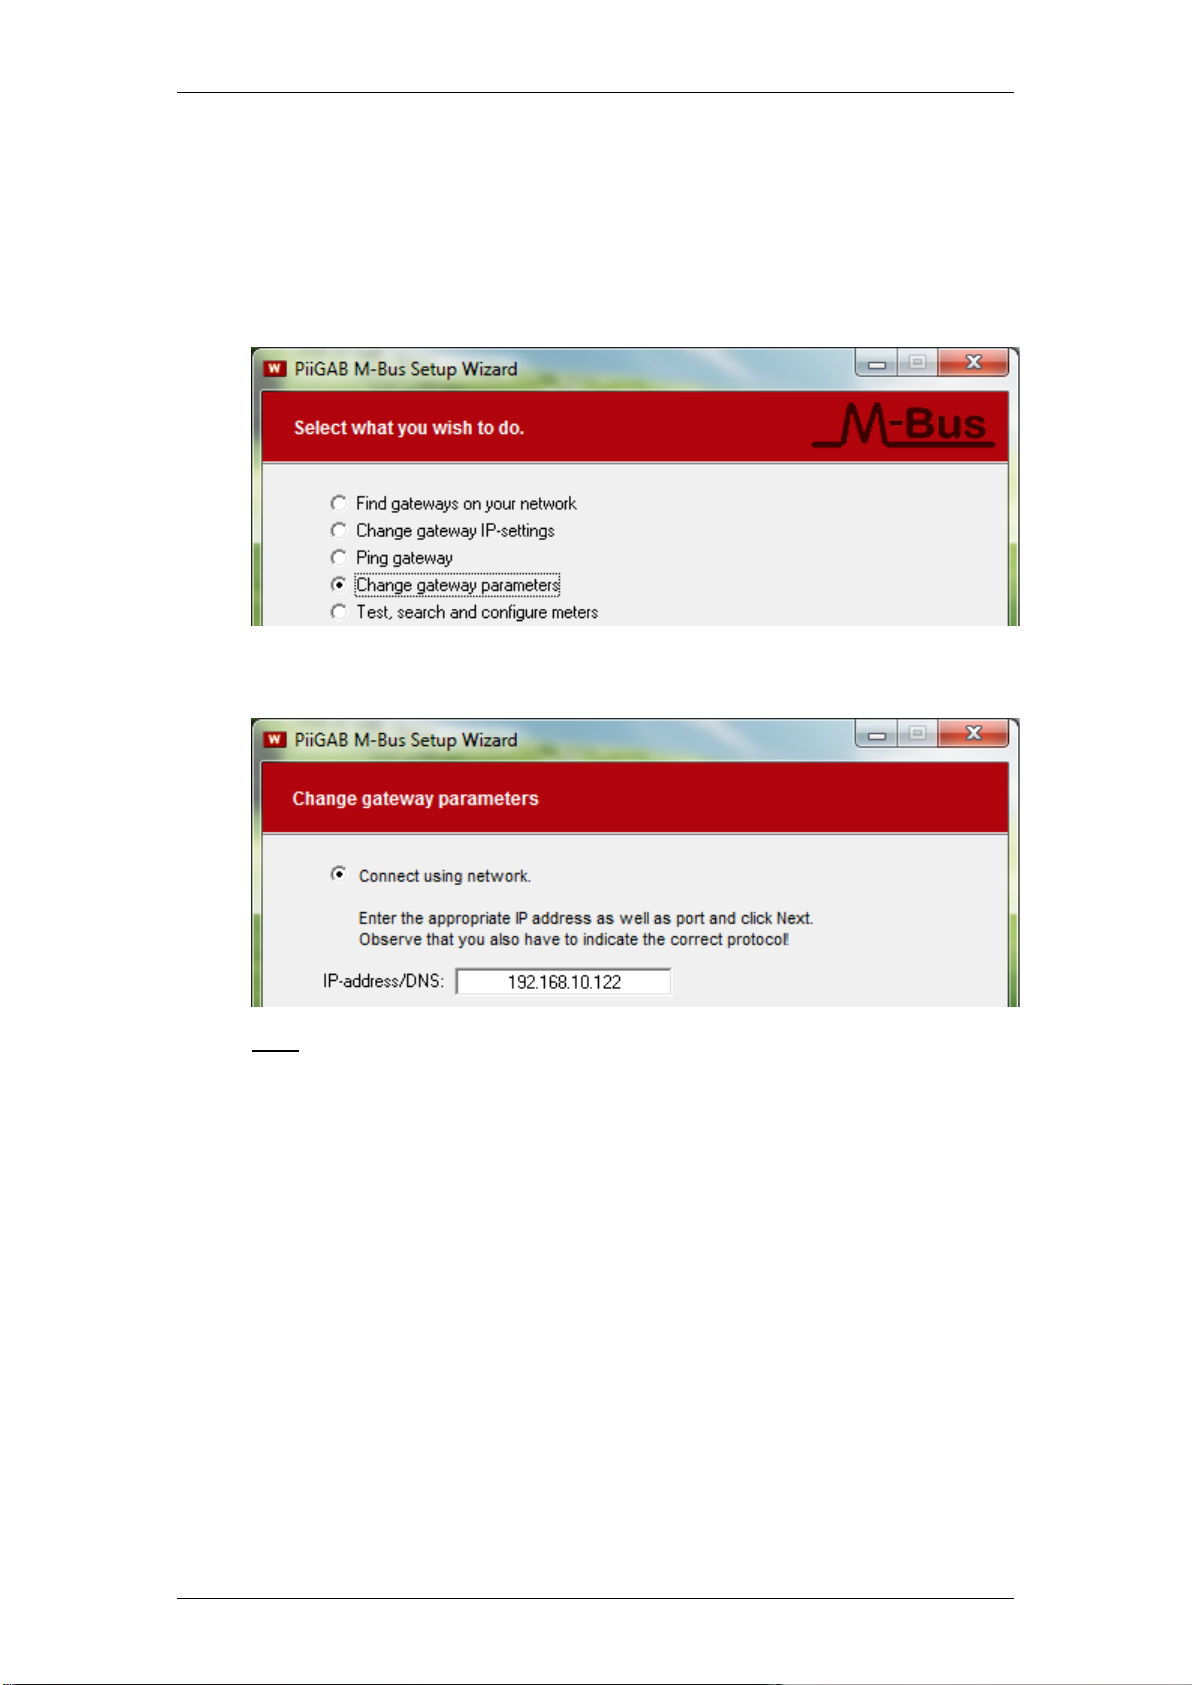
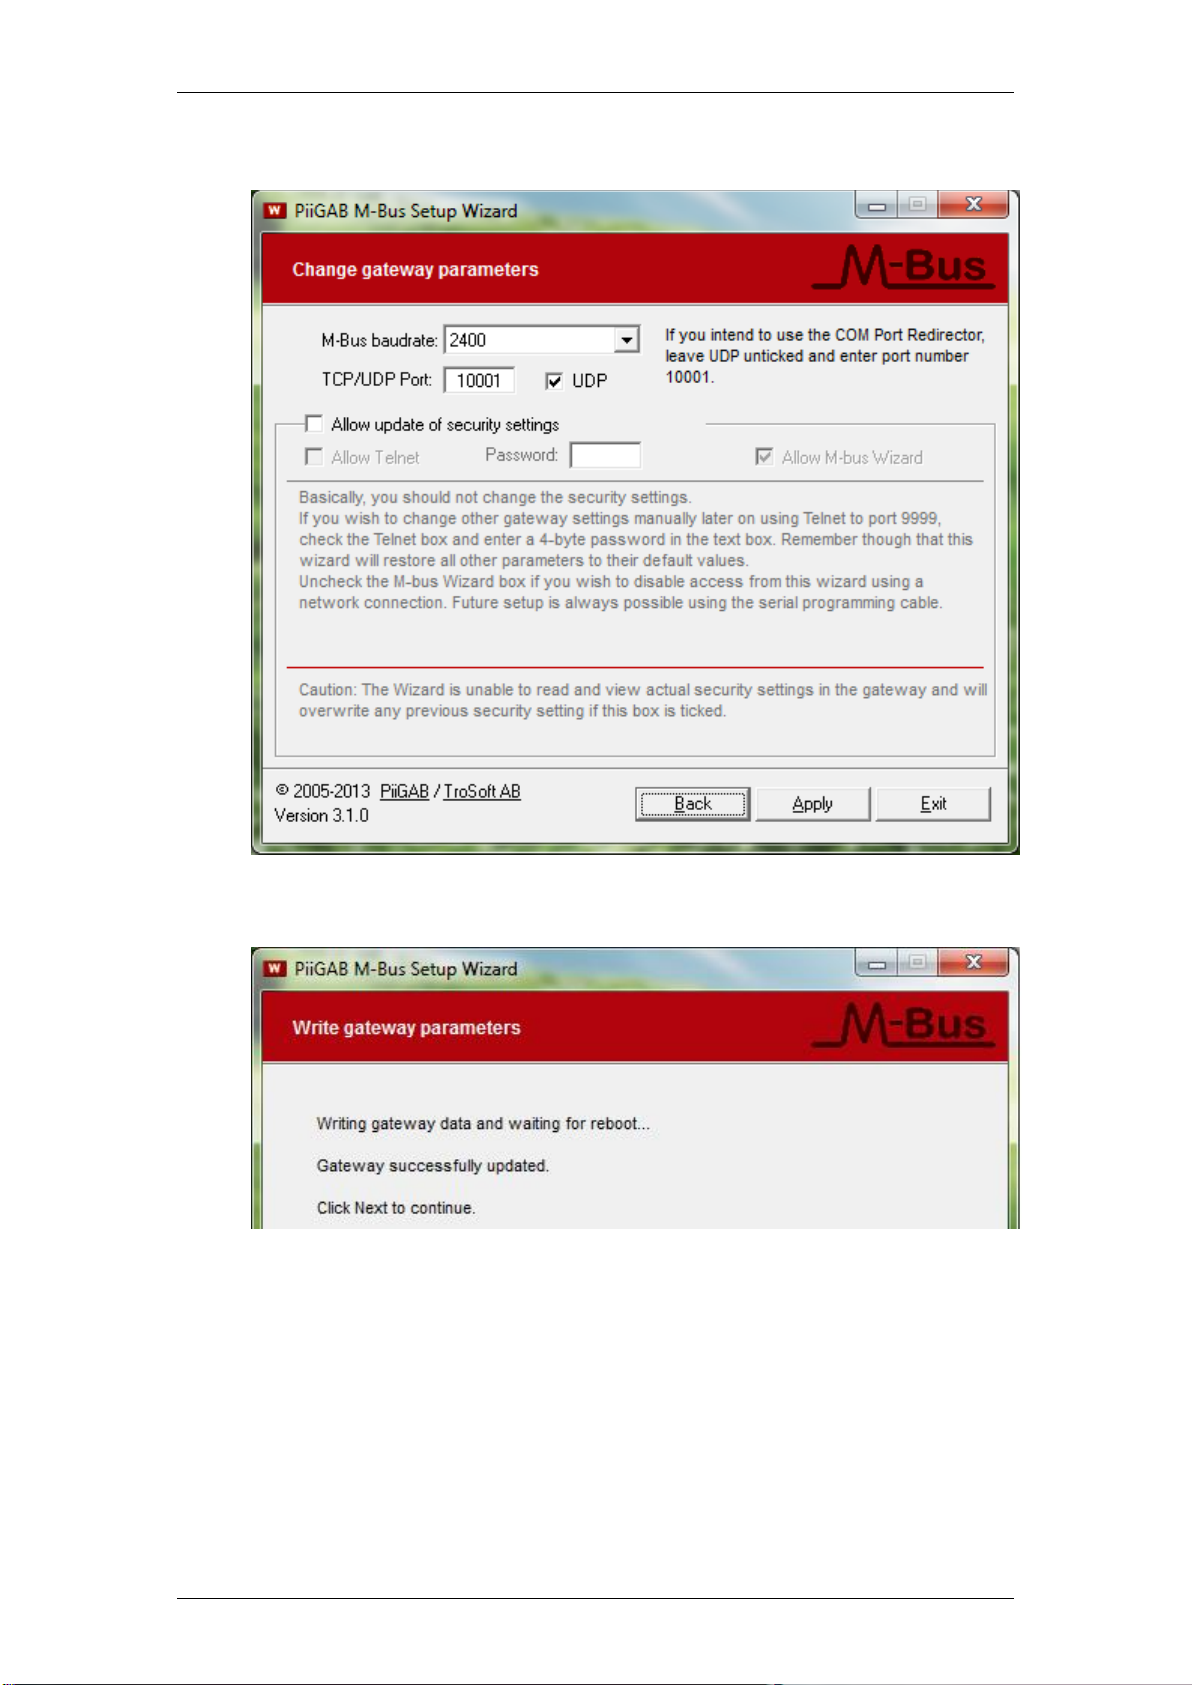
7. CONFIGURE THE PIIGAB 810......................................................................................... 9
8. PIIGAB M-BUS SETUP WIZARD –M-BUS COMMUNICATION ................................... 11
8.1 COMMUNICATE WITH TEST AND DIAGNOSTIC ADDRESS................................................... 12
8.2 COMMUNICATE WITH THE METER’S ACTUAL PRIMARY ADDRESS ...................................... 13
8.3 IDENTIFY THE METER’S ADDRESSES IN THE PIIGAB M-BUS SETUP WIZARD.................... 14
8.4 PARTS IN THE SECONDARY ADDRESS............................................................................ 14
8.5 SECONDARY ADDRESS –IDENTIFICATION NUMBER AND WILD CARDS............................... 15
8.6 ENTIRE SECONDARY ADDRESS ..................................................................................... 15
8.7 WILD CARD WITH SECONDARY ADDRESS ....................................................................... 16
9. APPENDIX ....................................................................................................................... 17
9.1 CONTACTS.................................................................................................................. 17

Getting started PiiGAB 810 Rev 1.00.01
© PiiGAB Processinformation i Göteborg AB Page: 3
1. Document Information
This document will describe how to configure the PiiGAB 810 for M-Bus communication with
one M-Bus meter using static IP or DHCP.
If you see something that is not correct in this document, that misleads you or if you are
missing something please contact us so we can improve this document continuously. See
contact information at the end of the document.
1.1 Versions
Version
Modified by
Details
1.00.00
Stefan Eriksson
Initial version
1.00.01
Stefan Eriksson
Edited distributor contact information
2. Requirements
Object
Detail
One PiiGAB 810
One M-Bus meter
Supports EN13757
One power supply
24V AC/DC
A patch cable
PiiGAB M-Bus Setup Wizard
Version 3.1.0 or later
2.1 Optional requirements
Object
Detail
A local area network (LAN)
With DHCP
One network switch

Getting started PiiGAB 810 Rev 1.00.01
© PiiGAB Processinformation i Göteborg AB Page: 4
3. Installation and connections
1. Install PiiGAB M-Bus Setup Wizard
2. Connect PiiGAB 810 gateway to your computer with the patch cable
3. Connect the M-Bus meter to the PiiGAB 810
4. Connect PiiGAB 810 gateway to a 24V AC or DC power supply
5. Turn the power supply on
6. Wait for PiiGAB 810’s Pwr LED to go steady red
M-Bus
meter
Power supply
24V AC/DC
Network
Patch cable

Getting started PiiGAB 810 Rev 1.00.01
© PiiGAB Processinformation i Göteborg AB Page: 5
4. PiiGAB 810’s MAC-address
On the right gable of the PiiGAB 810 you’ll find a label containing the MAC-address of your
PiiGAB 810. You can use this to identify your PiiGAB 810 with the PiiGAB M-Bus Setup
Wizard software.
Object
Starts with
MAC-address - old
00-20-4A-XX-XX-XX
MAC-address - new
00-80-A3-XX-XX-XX
5. IP-configuration
You can either connect your PiiGAB 810 gateway to a static or DHCP network. The most
common IP-configuration of the PiiGAB 810 gateway is for static IP-address. The gateway is
by default set to DHCP when delivered.
5.1 DHCP network
If you have a network with DHCP you can connect your PiiGAB 810 gateway to it and the
gateway will receive the IP-configuration automatically.
5.2 Static IP
If you don’t have a network with DHCP you must set your PiiGAB 810 gateway to a static IP-
address.
Note: If you have an old computer you might need a network switch between your
computer and the PiiGAB 810 gateway.
1. Set your computer to a static IP-address
2. Start the PiiGAB M-Bus Setup Wizard and go to the main menu
3. Select Change gateway IP-settings
4. Press Next to continue

Getting started PiiGAB 810 Rev 1.00.01
© PiiGAB Processinformation i Göteborg AB Page: 6
5. Select Setup IP using network (UDP broadcast)
6. In the MAC-address field specify the PiiGAB 810 gateway’s MAC-address
7. Press Next to continue
8. Select Use the following IP-address
9. Specify the IP-configuration. The PiiGAB 810 gateway should match your computer’s
IP-address
10. Press Next to continue

Getting started PiiGAB 810 Rev 1.00.01
© PiiGAB Processinformation i Göteborg AB Page: 7
11. Press Apply to set the IP-configuration
12. Wait for the PiiGAB 810 gateway to reboot
13. Press Next to continue to the main menu

Getting started PiiGAB 810 Rev 1.00.01
© PiiGAB Processinformation i Göteborg AB Page: 8
6. Find your PiiGAB 810 on your network
You can use the PiiGAB M-Bus Setup Wizard to find your gateway on the network. This will
work for both a network with DHCP or static IP-address configuration.
1. Go to the main menu in the PiiGAB M-Bus Setup Wizard
2. Select Find gateways on your network
3. Press Next to continue
4. Your PiiGAB 810 gateway should be listed
5. Find your PiiGAB 810 by the MAC-address column
6. Select your PiiGAB 810 gateway and press Next
Note: If you placed your PiiGAB 810 gateway on a different sub network you might not find it
in the list of available gateways.

Getting started PiiGAB 810 Rev 1.00.01
© PiiGAB Processinformation i Göteborg AB Page: 9
7. Configure the PiiGAB 810
This section describes how the PiiGAB 810 should be configured for M-Bus communication
for 2400 baud, UDP and port 10001.
1. In the PiiGAB M-Bus Setup Wizard’s main menu click the Change gateway
parameters
2. Press Next to continue
3. Select Connect using network
Note: Make sure the PiiGAB 810 gateway’s IP-address is shown in IP-address/DNS
field
4. Press Next to continue

Getting started PiiGAB 810 Rev 1.00.01
© PiiGAB Processinformation i Göteborg AB Page: 10
5. Configure the PiiGAB 810 with these settings
6. Press the Apply button to continue
7. Wait for the program to finish the configuration of the PiiGAB 810 gateway
8. Press Next to continue

Getting started PiiGAB 810 Rev 1.00.01
© PiiGAB Processinformation i Göteborg AB Page: 11
8. PiiGAB M-Bus Setup Wizard – M-Bus
communication
This section will use the PiiGAB M-Bus Setup Wizard to verify if the PiiGAB 810 and an M-
Bus meter respond to M-Bus communication.
1. In the main menu select Test, search and configure meters
2. Press Next to continue
3. Select Connect using network and configure the connection as shown in the picture
below
Note: Your PiiGAB 810’s IP-address may not be 192.168.10.122. The PiiGAB M-Bus Setup
Wizard only fills in the IP-address automatically as you selected in Find your PiiGAB 810 on
your network, step 6.
4. Click Next to continue

Getting started PiiGAB 810 Rev 1.00.01
© PiiGAB Processinformation i Göteborg AB Page: 12
8.1 Communicate with Test and diagnostic address
There is a specific primary address which all M-Bus meters should respond to. This address
is called Test and diagnostic and has the value 254. This address is very useful if only one M-
Bus meter is connected to the M-Bus master and the meter’s actual primary address is
unknown.
1. Configure as the picture shown below
2. Press the Find button to test communication with the M-Bus meter
For this example the M-bus meter responded and its primary address is 1.

Getting started PiiGAB 810 Rev 1.00.01
© PiiGAB Processinformation i Göteborg AB Page: 13
8.2 Communicate with the meter’s actual primary address
Always make sure the M-Bus meter responds to the actual primary address.
1. Configure as the picture shown below
2. Press the Find button to test communication with the M-Bus meter
As expected the meter responded to primary address 1.

Getting started PiiGAB 810 Rev 1.00.01
© PiiGAB Processinformation i Göteborg AB Page: 14
8.3 Identify the meter’s addresses in the PiiGAB M-Bus Setup
Wizard
The PiiGAB M-Bus Setup Wizard always shows the meter’s actual primary and secondary
addresses. In the previous example the meter’s addresses are:
Address
Value
Primary
1
Secondary
00922082.4ECD.09.04
8.4 Parts in the secondary address
The secondary address is based on four fields. These fields make the meter’s secondary
address entirely unique. These fields are:
Field
Value
Identification number
00922082 (BCD)
Manufacturer
4ECD (Hex)
Version
09 (Hex)
Media
04 (Hex)

Getting started PiiGAB 810 Rev 1.00.01
© PiiGAB Processinformation i Göteborg AB Page: 15
8.5 Secondary address –Identification number and wild cards
As the same with primary addresses, make sure the meter responds to the actual secondary
address. For the secondary address there is often just enough to specify the identification
number.
1. Configure as the picture shown below
2. Press the Find button and test the communication with the meter.
8.6 Entire secondary address
If the meter doesn’t respond to the identification number you can enter the entire secondary
address.
1. Configure as the picture shown below
2. Press the Find button and test the communication with the meter.

Getting started PiiGAB 810 Rev 1.00.01
© PiiGAB Processinformation i Göteborg AB Page: 16
8.7 Wild card with secondary address
Very few M-Bus meters don’t support usage of primary addresses. If that is the case then the
meter’s secondary address must be used. The opposite of Test and diagnostic from primary
addresses usage is wild cards in the secondary address.
1. Configure as the picture shown below
2. Press the Find button to test communication with the M-Bus meter
As expected the meter responded.

Getting started PiiGAB 810 Rev 1.00.01
© PiiGAB Processinformation i Göteborg AB Page: 17
9. Appendix
9.1 Contacts
PiiGAB Processinformation
Anders Carlssons gata 7
417 55 Göteborg
Sweden
Phone + 46 31 55 99 77
www.piigab.com
Distributors
Please contact our distributors in respective countries:
Germany
Relay GmbH
Stettiner Str. 38
33106 Paderborn
Germany
Phone +49 5251 17670
www.relay.de
Norway
Autic Systems AS
Stoltenbergs gate 48
3110 Tønsberg
Norway
Phone +47 33 30 09 50
www.autic.no
Czech Republic
Papouch store s.r.o.
Strasnicka 3165/1b
102 00 PRAGUE 10
Czech Republic
Phone +420 267 314 267-8
www.papouch.com
Table of contents
Other PiiGAB Gateway manuals