Pilous ARG 330 SAF User manual

ARG 330 S.A.F. ARG 330 plus S.A.F. • ARG 380 plus S.A.F.
ARG 400 plus S.A.F. • ARG 500 plus S.A.F.
•
Pilous - pásové pily, spol. s r.o., Železná 9, 619 00 Brno, Czech Republic
tel.: 00 420 543 252 010 , www.pilous.cz, e-mail:pilous@pilous.cz
INSTRUCTION MANUAL


Contents:
6. Machine Maintenance
6.1. Cleaning
6.2. Removal/disposal of chips
6.3. Coolant system cleaning
6.4. Lubrication
6.4.1. Lubrication Plan for ARG 330 S.A.F.,
ARG 330 plus S.A.F.
6.4.2. Lubrication Plan for ARG 400 plus S.A.F.
6.4.3. Lubrication Plan for ARG 380, 500 plus S.A.F.
6.5. Principles of Hydraulic Unit Maintenance
6.5.1. Work safety
6.5.2. Commissioning
6.5.3. Hydraulic Liquids
6.5.4. Hydraulic Mineral Oils
6.5.5. Service intervals
6.5.6. Oil Refill and Filter Replacement
7. Faults and Remedies
7.1. Repairs
7.2. Failures - Potential Causes and Remedies
8. Saw Blades
8.1. Saw Blade Design
8.2. Selection of Tooth Size
8.3. Optimum Workpiece Clamping
8.4. Running-in New Saw Blades
8.5. Factors Influencing Saw Blade Service Life
8.6. Values Recommended for Cutting
9. Nameplate
10. Electrical Wiring Diagram
11. Hydraulic Unit Wiring Diagram
11.1. Hydraulic Unit Wiring Diagram
ARG 330 S.A.F., ARG 330 plus S.A.F.,
ARG 400 plus S.A.F.
11.2. Hydraulic Unit Wiring Diagram
ARG 380, 500 plus S.A.F.
12. Accessories
12.1. Laser Guideline Light
12.1.1. Activation and deactivation of the laser beam
12.1.2. Laser indication on the machine
12.1.3. Adjustment
12.2. Oil Mist Lubrication
12.3. Vertical vice for HVP bundle cutting
0. General
0.1. Safety Provisions
0.2. Scope of Use / Use According to Designation
0.3. Requirements on Operators
0.4. Machine Requirements - Safety Devices
0.5. Protective Covers
1. Transport and Storage
1.1. Surface Protection
1.2. Packing
1.3. Disassembly/Repacking
1.4. Disposal
2. Technical Data
3. Installation
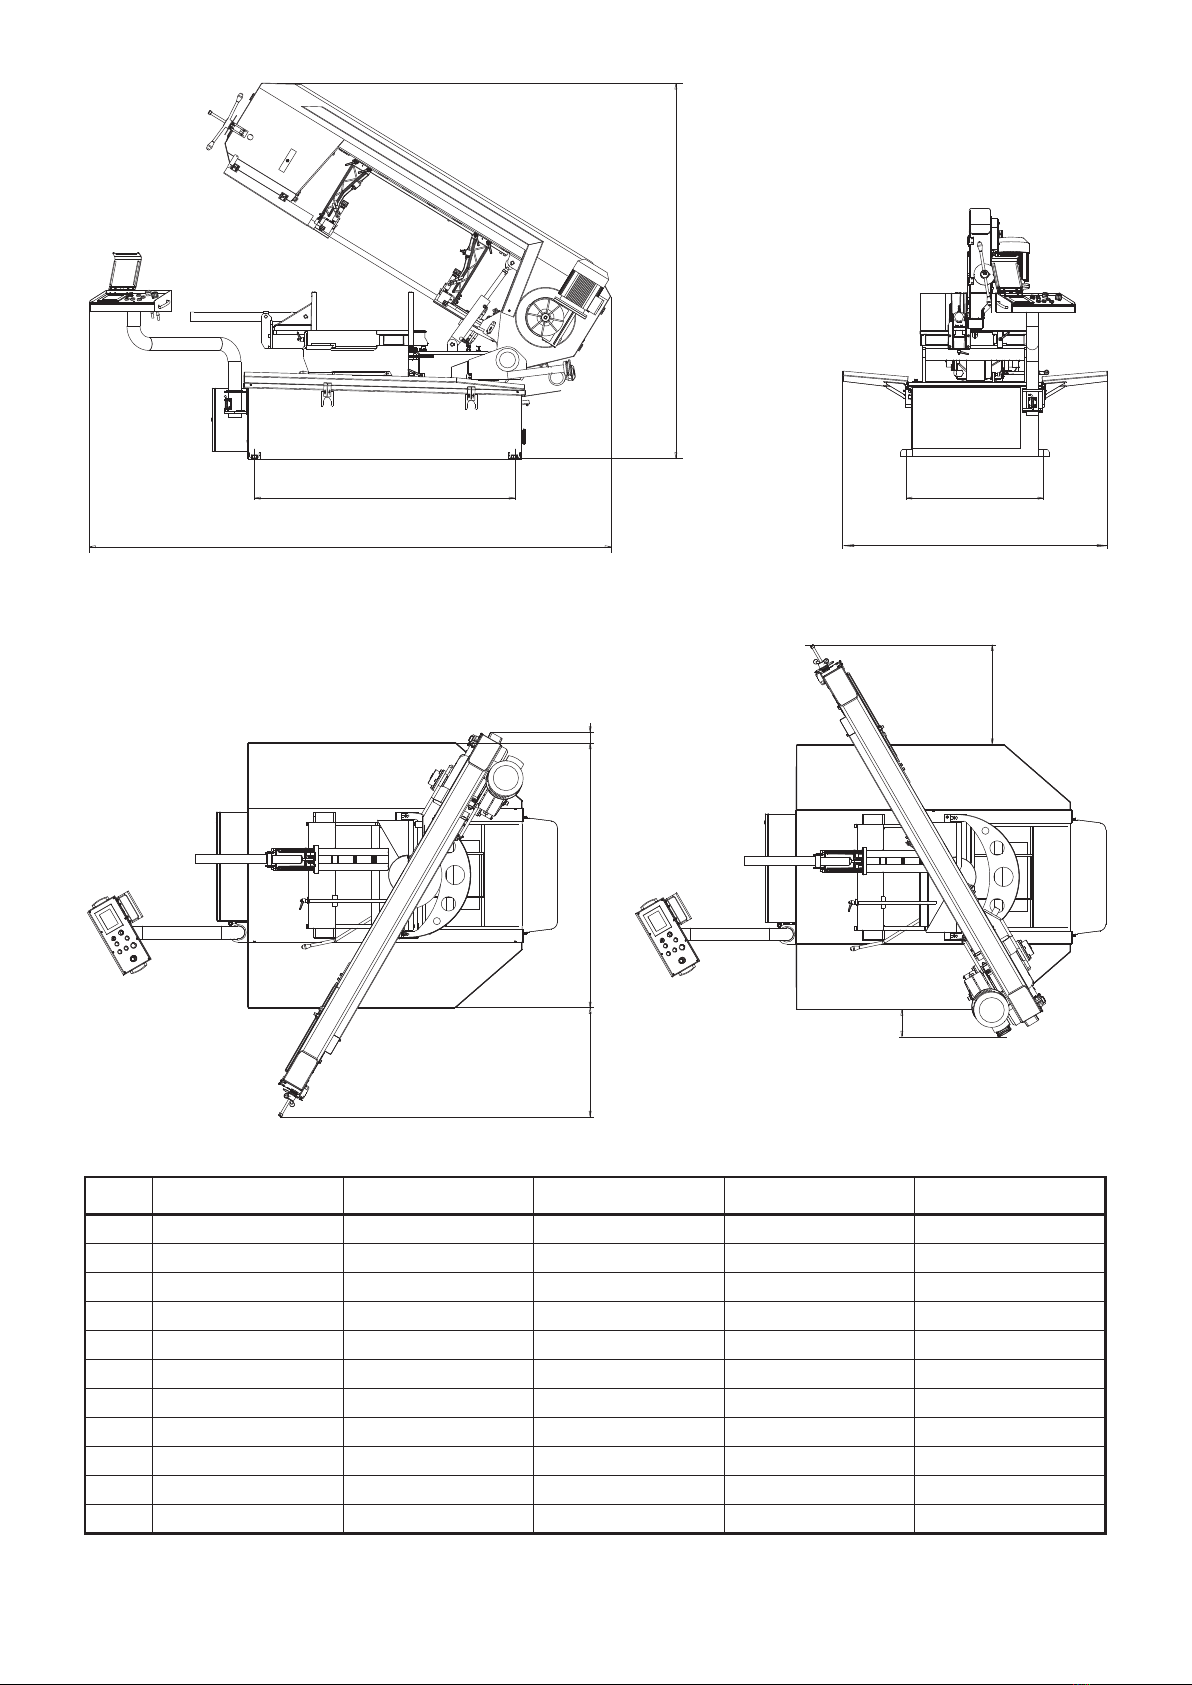
3.1. Space Requirements
3.2. Removal of Temporary Transport Beams
and Fixation of the Machine
3.3. Machine Installation
3.4. Connection to the Mains
3.5. Arm release in ARG 380, 400, 500 plus S.A.F.
4. Machine Description
4.1. Control Panel
4.2. Control Valve - Saw Blade Feed to the Cut
4.3. Saw Blade Feed Pressure Control
4.4. Vice
4.4.1. Adjustment od the Lateral Play of the Vice in ARG 330 S.A.F.
and ARG 330 plus S.A.F.
4.4.2. Cutting Angle Settings
4.5. Arm - saw blade guidance
4.6. Removal of Protective Housing
4.6.1. Removal of Protective Housing of the Saw Blade Arm
ARG 330 S.A.F., ARG 330 plus S.A.F., ARG 400 plus S.A.F.
4.6.2. Removal of Protective Housing of the Saw Blade Arm
ARG 380, 500 plus S.A.F..
4.7. Replacement, Tensioning and Adjustment of the Saw Blade
4.8. Guide Heads - Adjustment
4.9. Hydraulic Unit
4.9.1. Vice Clamping Force Setting
4.10. Cooling System
5. Commissioning
5.1. Security Check
5.2. Cutting Procedure
Dear customer,
thank you for purchasing our product. We wish you a lot of success with it in your business. Please pay close attention to
the following instructions in order to ensure faultless operation of the machine.
© 2016 All rights, particularly the right to make copies of, to distribute and translate this instruction manual, are
reserved. No part of this instruction manual may in any form (printing, copying, microfilm or other means) be reproduced
or stored, processed, copied or distributed using electronic systems without a permission by PILOUS.
ver. 1/6/2016
ORIGINAL INSTRUCTION MANUAL

Use protective gloves! Before using the bandsaw, read this instruction
manual carefully and make sure you
understand its content!
Use boots or work shoes with a steel toe.
And with anti-slide soles.
Use hearing protection!
Use protective goggles!
Warning: Dangerous spot -
Use the highest caution! Caution: Dangerous voltage!
Health hazard by flying particles!
Danger of injury by compression!
Danger of injury by cutting!
0. General
This instruction manual provides the user with assistance and information about the PILOUS metal-cutting band saw and the
possibilities of use corresponding to its purpose. The instruction manual contains important instructions on a safe, adequate and
economically efficient operation. Observing the operating instructions will prevent risks; the repair and outage time costs will be
reduced and the machine reliability and life increased. The instruction manual contains instructions based on the valid national
safety regulations and environmental standards. The instruction manual must be always available at the machine site. The
instruction manual must be read and used by the staff entrusted with the machine installation, transport and storage, use / operation,
maintenance and disposal. In addition to the instruction manual and binding safety regulations in force in the user's country and at
the service site, it is also necessary to observe the approved rules for safe and professional work.
Letter of Guarantee - Service
The Letter of Guarantee is a separate annex to the instruction manual.
Guarantee Period - see Letter of Guarantee
Conditions for Maintenance of Claims under Guarantee
• Transport and storage of the machine in accordance with the instruction manual.
• Use and operation of the machine in accordance with the instruction manual.
• Connection of the machine to the power supply in accordance with the instruction manual.
The guarantee does not apply to:
• Violent and mechanical damage of the machine caused by interference of the user or other persons.
• Inevitable events (natural disaster).
• Damage to the machine during transport.
• Storage or installation of the machine in humid, chemical or any other inappropriate environment.
• Wear parts (see the Letter of Guarantee).
Potential claims concerning guarantee and after-guarantee repairs should be made by phone, post or e-mail to the
address: see the Letter of Guarantee.
Note for the User:
The Seller is obliged to hand over to the User the Letter of Guarantee immediately with the purchase of the product. The Letter of
Guarantee must be properly and legibly filled out and confirmed by the Seller’s stamp, signature and date of purchase. The Seller is
obliged to inform the Buyer about the use and handling of the product.
Data Necessary for Claiming Guarantee (After-Guarantee) Repair:
• Machine type
• Letter of Guarantee Number (identical with the serial number of the machine)
• Date of issue of the Letter of Guarantee
0.1. Safety Provisions
The machine design complies with the technical status and the approved safety and technical rules. In spite of this, the user's or the
third persons' health can be endangered and/or the machine or other tangible goods may be unfavorably influenced during the
operation of the machine. In order to prevent such hazards, it is absolutely necessary to observe the safety instructions in this
instruction manual. These safety instructions must be read and understood by the respective persons before the machine has been
put into operation. Failure to observe these instructions may lead to serious health and property damage! The safety instructions in
this instruction manual are marked with safety symbols / danger spot signs.

0.2. Scope of Use / Use According to Designation
The machine is intended solely for cutting (primarily metal) workpieces. Any other use is considered as inadequate to the purpose.
The manufacturer is not responsible for damages arising from such use, the risk is borne by the user alone. The use complying with
the purpose includes also observing the operating instructions and the check and maintenance conditions.
Examples of materials that can be cut: structural steel • cementing steel • nitriding steel • free-cutting steel • heat-treated steel •
roller bearing steel • spring steel • tool steel • high-speed steel • cast steel • cast iron • copper • brass • aluminium • plastics.
Consider the recommendations for use as prescriptive values. In case of special cases, consult the manufacturer.
0.3. Requirements on operators
The machine may only be operated if it is in perfect condition with respect to technical safety. The user is obliged to check the
machine for visually detectable damages and faults at least once per shift. Immediately report to your manager any damages and
faults on protective devices and changes in the operation of the machine that threaten safety. No safety devices may be removed,
moved, put out of operation or changed during the machine operation. Otherwise any warranty claims shall be null and void! If any
safety device has to be removed during operation or maintenance, secure the in the „OFF" position by a padlock or
disconnect the machine from the mains and secure it against restart.
• Remove loose parts of clothes, cover long hair.
• Make sure that all other persons stand or move at least 2 meters from the saw blade, protect them from flying chips and prevent
harm to them in case the saw blade breaks.
• All persons helping you at the site must be made familiar with all the safety rules.
• The safety rules must be provided on a visible place at the site.
• Keep hands at a safe distance from the saw blade; never adjust the device when the motor is running. Switch off the motor and
secure it against restart before you start handling the saw blade.
Only persons with adequate electrician qualifications are allowed to open protective covers of the electrical
equipment and to work on it.
0.4. Machine requirements - Safety devices
Danger of Injury!
No cover on the saw blade in the cutting area! High risk of injury in the operating area of the arm!
Before you open protective devices, wait until the saw blade and the grinding wheel stop.
Never use the sharpener when you are tired, exhausted, under the influence of medicaments, drugs or alcohol!
Horizontal metal band saw is a cutting machine equipped for saw blade cutting. In order to complete the manufacturing process the
grinding wheel must reach the saw blade in the machining area. You can install the protective covers against contact with the saw
blade only outside the machining area.
0.5. Protective covers
The saw blade and its wheels are protected against contact outside the machining area. You can remove protective covers only if the
is turned off and secured against restart or if the machine is disconnected from the mains and the saw blade is still.
Before leaving the band saw, all covers must be closed. The protective cover of the arm and wheels with the saw blade are secured
by an end switch. If the covers are not completely closed, none of the machine’s drives will start.
To stop the machine in case of emergency, press TOTAL STOP button. You can put the machine back to operation only after you
manually unlock the switch by turning it clockwise. Fixed and movable bars of guide heads are fitted with solid protective covers that
protect the area outside the machining area.
Manual cleaning and removal of waste when the machine is working or running down is prohibited. A first-aid
kit must be available at the workplace. You have to wear suitable work clothes, shoes and adequate protective
equipment (eye protection, hearing protection, gloves, steel-toed work shoes) at work. Observe valid health
rules concerning the air quality at the workplace.
MAIN SWITCH
MAIN SWITCH
The machine may only be operated by persons that have been appropriately trained and instructed in safety at work!

1.1. Surface Protection
Machine parts are protected against corrosion by powder coating or a primer and two-component polyurethane varnish. Sliding
surfaces are coated with anti-corrosive oil. Surfaces of other parts and components of the machine are treated by galvanization or
blackening.
1.2. Packing
The machine is supported on wooden beams, which provide a space of approximately 100mm from the ground for the purpose of the
transport and loading with a forklift. The machine is packed in a stretching foil that protects it against weather influence
during transport.
Standard accessories:
• 1 pc. metal saw blade, bimetal M42 (mounted),
• 1 pc. band saw instruction manual
• 1 pc. length stop - only ARG 330 S.A.F., ARG 330 plus S.A.F..
1.3. Disassembly / Repacking
Disconnect the machine from the mains • empty and clean the metal chip tank and the coolant tank • clean the machine • apply
anticorrosive oil on the sliding surfaces • before the transport, unscrew the filling cap from the hydraulic unit and replace it with
a transport cap, see section 4.9. • fix the arm for transport see section 3.5. • lift the machine and place it on beams • observe the
distance of approximately 100 mm from the ground for the transport with the forklift • make sure that all protective covers
of the machine are in place and fastened • add the machine accessories
Caution: used coolants belong to the category of special waste!
Only a person with adequate electrician qualifications can disconnect the machine from the
mains!
1.4. Disposal
When the machine has been definitely put out of operation, it should be disposed of in accordance with the provisions valid in the
respective country. We recommend that you contact a specialist waste disposal service.
2. Technical data
Machine noise - measured in conformity with ČSN EN ISO 3746:2011
The acoustic pressure level at the workplace: 76 dB (A), acoustic power level: 91 dB (A).
The measured values exceed the value specified in the Government Regulation No. 176/2008, section 1.7.4.2, article u) and
therefore ear protection must be used during the machine operation. The measurement was carried out while the machine was in
a steady state and the saw blade speed was 80m/min. During the operational state with a technical load, the most frequently used
technological process was measured. Noise levels measured on the machines may vary depending on the type of cut material, saw
blade speed and other factors.
1. Transport and Storage
You can transport and lift the machine only with a forklift. In ARG 330 S.A.F, ARG 330 plus S.A.F. slide the forks under the machine
base from the back to prevent damage; see the picture. In ARG 380, 400, 500 plus S.A.F. it is possible to slide the forks also from the
side. When handing the machine with a forklift, always make sure that the machine is balanced on the forks.
DANGER OF DAMAGE !
You can transport and lift the machine only with a forklift. THE USE OF A CRANE PROHIBITED!

SAW BLADE SPEED
CUTTING ANGLE
RANGES
SAW BLADE
WHEELS
DIAMETER
SAW BLADE SIZE
ARM SWING
a
a
a
[mm]
a
b
a×b
90°
60°
60°
45° 45°
PUMP MOTOR
BRUSH MOTOR
HYDRAULIC UNIT
MOTOR
MAIN MOTOR
VICE OPERATING
HEIGHT
SAW BLADE TILT
OIL
IN THE HYDRAULICS
COOLANT TANK
MACHINE WEIGHT
460x300
ARG 400 plus S.A.F.
400
400
300x170
90°
4950x34x1,1
420 mm
90°
60°
60°
45° 45°
400 V, 50 Hz
0,12 kW
400 V, 50 Hz
90 W
400 V, 50 Hz
550 W
15 - 90 m/min
400 V, 50 Hz
3,0 kW
510x340
380
340
380
340
350x340
380
340
350x340
270
255
235x340
270
255
235x340
90° 45° 60°45° 60°
ARG 380 plus S.A.F.
1025 kg
860 mm
approximately 35 litres
5°
400 V, 50 Hz
0,12 kW
15 - 90 m/min
3870x34x1,1
420 mm
ARG 330 S.A.F.
400 V, 50 Hz
3,0 kW
Hydraulic oil
Olea OPTIMA HV 46
665 kg
940 mm
0°
approximately 35 litres
250 165
230 150
250x170 150x150
45° 60°
400x200
330
320
90°
90°
60°
60°
45° 45°
400 V, 50 Hz
0,12 kW
15 - 90 m/min
400x200
3870x34x1,1
420 mm
ARG 330 plus S.A.F.
240330 250 165
200320 230 150
250x140 250x170 150x150
90° 45° 60°45°
90°
60°
60°
45° 45°
400 V, 50 Hz
3,0 kW
720 kg
945 mm
0°
approximately 35 litres
Hydraulic oil
Olea OPTIMA HV 46
Hydraulic oil
Olea OPTIMA HV 46
Hydraulic oil
Olea OPTIMA HV 46
Hydraulic oil
Olea OPTIMA HV 46
400 V, 50 Hz
550 W
400 V, 50 Hz
550 W
400 V, 50 Hz
550 W
400 V, 50 Hz
550 W
400 V, 50 Hz
90 W
400 V, 50 Hz
90 W
400 V, 50 Hz
90 W
400 V, 50 Hz
0,12 kW
15 - 90 m/min
4300x34x1,1
500 mm
290 300 200
250 300 200
300x200 200x200
45° 60°45°
90°
60°
60°
45° 45°
400 V, 50 Hz
3,0 kW
1350 kg
795 mm
0°
approximately 35 litres
6040x41x1,3
540 mm
90°
60°
60°
45° 45°
400 V, 50 Hz
0,12 kW
400 V, 50 Hz
90 W
15 - 90 m/min
400 V, 50 Hz
4,0 kW
620x450
500
450
500
440
440x450
500
440
430x450
350
310
310x400
350
310
310x400
90° 45° 60°45° 60°
ARG 500 plus S.A.F.
1530 kg
870 mm
approximately 35 litres
5°

1 m
0,5 m0,5 m
1 m
1 m
0,5 m0,5 m
0,5 m0,5 m
3. Installation
3.1. Space requirements
You can install the machine on any suitable and even floor (concrete) in a factory hall. Observe the allowed floor load. The machine
should be aligned using the underlay sheets under the base anchors (not included in the shipment).
While preparing the cutting, the operating staff is allowed to move around the machine only when the machine is not running. When
the machine is running, the operator has to stay only at the control panel so that he/she is able to switch off the machine any time. The
operator must also ensure that no other persons are present in or near the working area of the machine. No unauthorised personnel
in the hazard space. To prevent injury, the danger zone must also be level and free from any foreign objects and obstacles.
Recommendations / requirements:
• Allow for sufficient space for the feeding and removal of the workpiece and the machine maintenance - the operator's working area
should be delineated at 1 m minimum around the machine and 0.5 m around the roller conveyors.
• In order to ensure safe handling of workpieces and protection of the space behind the cut from falling cut-off pieces, one or more
roller conveyors must be installed, possibly a container for falling cut workpieces.
• Install a lift mechanism for heavy workpieces.
• Ensure proper lighting at the workplace.
DANGER ZONE LIMITS

C min - the arm is lowered
C max - the arm is raised
D min - the arm is lowered, the vice is closed
D max - the arm is raised, the vice is opened
A
B
C min
C max
D min
D max
E
F
G
H
I
ARG 330 plus S.A.F.
ARG 330 S.A.F.
1366
1040
1690
2050
2380
2850
1870
540
250
250
400
850
945
1660
2060
2290
2660
1360
400
280
x
x
ARG 380 plus S.A.F. ARG 400 plus S.A.F. ARG 500 plus S.A.F.
1240
835
1450
2310
2650
3150
1520
690
80
630
240
1345
1330
1580
2140
2370
2370
1305
490
110
280
90
1765
956
1720
2610
3450
3630
1845
760
350
380
370
A
D
C
GG
EF
H
I
E
B

3.2. Removal of temporary transport beams and fixation of the machine
Use a pallet truck to lift the machine and place it directly on the desired location in the workplace. Unscrew the bolts that hold the
machine in place and remove the transport beams. Lift the machine with a crane, remove the beams and lower the machine onto the
floor. Level the machine by laying metal sheets under its legs, possibly anchor to the floor. Remove the anticorrosion film and dust
from sliding surfaces and apply oil. Ensure connection to the mains (see section 3.4.). Pour the coolant (maximum 30 litres) into the
tank; the fluid will gradually flow into the container in the base. The hydraulic unit is fitted with two filling holes that are covered by red
transport caps during the transport (see section 6.5.). The cap that is more accessible to the operator has to be removed and
replaced by a filling cap, otherwise a risk of making the entire system inoperable arises, along with the risk of pump damage.
When handling coolants, risks linked to hazardous substances cannot be avoided. Observe the national norms
and recommendations/manufacturer’s or your company’s operating instructions related to safe handling of
coolants.
3.3. Machine installation
Protect the machine against humidity, rain and dust!
The machine may be operated in the ambient temperature between + 5° and + 40°C. The average air temperature must not exceed +
35°C within 24 hours.
+ 35°C. In temperatures below + 5°C the conventional coolants should be replaced by coolants designed for such temperatures. In
addition to that, replace the oil in the hydraulic unit for a less viscous one.
3.4. Connection to the mains
Such operations must be carried out only by persons with electrician qualifications!
Make sure that the grid voltage, the voltage protection and the connection voltage comply with the power requirements specified in
the point 2. Technical parameters. Only current protection of S characteristics can be installed (for a frequency converter). When
connecting the machine to the mains (3 NPe 50 Hz, 400 V, TN-S), mind the colour coding of wires carefully: L1 brown, L2 black,
L3 grey, N blue, PE yellow-green. Improper connection of the neutral or PE wires may lead to damage of the electrical
equipment or to an electric shock! Connect the power cable to a protected 16 A socket, in case of direct connection to the mains it
is necessary to fit the supply with a lockable MAIN SWITCH. If the motor rotates in an incorrect direction, swap the conductors
L1 brown and L2 black on the machine junction box.
Failure to observe the aforementioned may lead to incorrect rotation of the bandsaw and the coolant pump.
Danger: Damage to the machine!
3.5. Arm release in ARG 380, 400, 500 plus S.A.F.
The arm is secured against movement for transport. Demount the yellow console by unscrewing the screws/helix in order to release
the arm. In ARG 400 plus S.A.F. unscrew also the clamp and the handle of the console and fasten it into the hole of the helix. In case
of transport, secure the arm against movement the same way.
ARG 400 plus S.A.F. ARG 380 plus S.A.F., ARG 500 plus S.A.F.

4. Machine Description
Horizontal metal-cutting band saws allow for cutting of a wide range of different materials. Pressing a single switch will execute the
complete cutting cycle - workpiece clamping, saw blade start, cutting, saw blade stop, arm uplift to the upper (adjustable) position
and vice unclamping. In connection with the hydraulic feed of the saw blade into the cut, these measures significantly increase
cutting productivity, particularly as regards solid materials. All functions can be controlled separately. The feed of the workpiece is
manual. The vice pressure control is included in the basic version of the machine. As the cutting tool, a welded saw blade is used,
which is tensioned mechanically via a blade wheel. The saw blade is driven by the blade wheel, which is driven by a single-speed
motor via a worm-gear unit (conical face gearbox in the version of ARG 500 plus S.A.F. with optional accessories). In the machining
zone, the saw blade guided through the saw blade guide heads. Outside the machining zone the saw blade is protected by moving
and fixed guards. The standard equipment of these machines includes a frequency converter which enables a continuous saw blade
speed control within the range of 15-90 m/min. The optimum setting of the saw blade speed substantially increases the productivity
of the machine, cutting accuracy and the saw blade service life.
ARG 330 S.A.F.
H turntable
I base
J coolant tank
with pump
K control panel
L angular scale
M arm swing locking lever
N hydraulic cylinder of the vice
O hydraulic stroke cylinder
P fixed bar
Q movable bar
R movable bar clamping lever
S switchboard
A hydraulic unit
B saw blade
C saw blade tensioning
D gearbox
E motor
F vice
G arm
ARG 330 plus S.A.F.
C BF E
I H
DG
L
O
M KN
PQ
S
R C BF E
I H
DG
JL
O
M KN
PQ
A S
R
JA

ARG 400 Plus S.A.F.
C BQF E
I
R
HA
DPG
JK L
ON R
M
S
H turntable
I base
J coolant tank
with pump
K control panel
L angular scale
M arm swing locking lever
N hydraulic cylinder of the vice
O hydraulic stroke cylinder
P fixed bar
Q movable bar
R movable bar clamping lever
S switchboard
A hydraulic unit
B saw blade
C saw blade tensioning
D gearbox
E motor
F vice
G arm

ARG 380, 500 plus S.A.F.
C BQF E
IHA
DP G
JK L
ON
S
R
M
H turntable
I base
J coolant tank
with pump
K control panel
L angular scale
M arm swing locking lever
N hydraulic cylinder of the vice
O hydraulic stroke cylinder
P fixed bar
Q movable bar
R movable bar clamping lever
S switchboard
A hydraulic unit
B saw blade
C saw blade tensioning
D gearbox
E motor
F vice
G arm

4.1. Control panel
CONTROL VALVE
START TOTAL STOP
SAW BLADE SPEED
CONTROLLER
TOUCH SCREEN LAMP
SAW ARM END STROKE
SWITCH/ARM UPLIFT
CYCLE END / FREQUENCY CONVERTER INDICATOR LAMP
EMERGENCY BUTTON
HLAVNÍ MENU
0 9 : 2 0 : 0 3 0 8 / 1 0 / 2 0 1 6
MAIN
SWITCH

MAIN SWITCH
On
Off
Use for emergency stop of the saw blade motor, coolant pump and
hydraulic unit motor (i.e. the whole machine).
You can put the machine back to operation only after you manually unlock
the switch by pulling or twisting!
TOTAL STOP
Before you start the saw blade motor, always make sure that
the saw blade is not in contact with the workpiece at the
point of cutting.
SAW ARM END STROKE SWITCH
EMERGENCY BUTTON
The button actuates a safety relay. When you activate the safety relay the machine will become
operational and MAIN MENU will appear on the panel.
START
Press the button in S.A. mode to start the operating cycle (clamping the material, start of the saw blade
motor and the coolant pump, arm feed towards the cut, lifting the arm into the specified position,
switching off the saw blade motor and coolant pump, vice release).
In the MANUAL MODE, the saw blade will start upon pressing the button.
You can change the cutting speed using a saw blade speed controller (using a frequency converter) on the
control panel.
The display continuously shows the selected value within the range 15-90 m/min.
SAW BLADE SPEED CONTROLLER
Press the STOP button in S.A. MODE to interrupt the operating cycle. If the END STROKE SWITCH is in
position 1, the saw blade will stop and the arm will travel upwards to the specified position.
If the END STROKE SWITCH is in position 0, the saw blade will stop and the arm will remain in the current
position.
Upon pressing the STOP button in the MANUAL MODE, the saw blade will stop.
STOP
MANUAL MODE: position 0 - controls the arm only by the touch screen (up and down); position 1 - arm uplift
independent of the touch screen.
S.A. MODE: after the finishing cut the arm remains in the lower position - position 0, or travels to the
adjustable upper position - position 1.
Note 1: when transferring from the MANUAL to S.A. MODE (not during cutting) and by turning the switch
from 0->1 the machine will not respond, because the S.A. MODE uses the height specified in the MANUAL
MODE. In order to lift the arm, you have to edit the arm uplift height afterwards.
Note 2: when transferring from the S.A. MODE into the MANUAL MODE (not during cutting), while the
switch is in position 1, the arm will travel upwards only after you switch from 0->1 again.

Close the arm cover,
unlock TOTAL STOP and
press the yellow
illuminated button
SAFETY
MAIN MENU
0 9 : 2 0 : 0 3 0 8 / 1 0 / 2 0 1 6
0 9 : 2 0 : 0 3
0 8 / 1 0 / 2 0 1 6
SEMI-AUTOMATIC MODE
ARM LIFTING HIGH SETTING H
SAW BLADES
MACHINE SETTINGS
FAILURE SCREEN
SERVICE CONTACT
H
H
TOUCH SCREEN
Upon starting the machine with the and loading the system, a yellow screen will appear. That means the safety relay
is not activated.
Activate the safety relay by pressing the yellow backlit button. When you activate the safety relay, the machine will become
operational and MAIN MENU will appear on the panel.
The yellow screen also appears during the operation of the saw, anytime the machine is stopped using the safety relay - by opening
the arm cover or pressing TOTAL STOP. After the elimination of the cause the machine will become operational upon pressing the
yellow backlit button.
MAIN SWITCH
MAIN MENU
On the Main Menu screen you can access all machine functions regarding operation, settings or service. Control the screen by
putting your finger on the area of a particular button.
After you press the TIME box, a screen with data about the operating status of the machine appears (applies to all screens in all
modes).
Upright font - information box (not affected by touch)
Italic (symbol) font - buttons (touch to initiate the function, or jump to a different screen)
Note: Some information boxes or buttons are present on multiple screens. Each of them is described only once in the manual,
because they possess the same function on all screens.
TIME
DATE
HYDRAULIC UNIT
START/STOP
MANUAL MODE

HYDRAULIC UNIT
START/STOP
Press the hydraulic unit START/STOP
icon to start or stop the hydraulic unit.
65
6,5 A
320 125
62%
S.A. MODE
0 9 : 2 0 : 0 3 0 8 / 1 0 / 2 0 1 6
15 90
m/min
m m
m m
65
15 90
m/min
Saw blade speed 15-90 m/min
6,5 A 62%
Ammeter - measures the saw band motor load
320 125
m mm m
Arm uplift height setting (editable)
Current height of the arm
320
125
H
21
50
0.0
0.0
ANGLE - Accessories
Shows the screen angle of the saw blade.
Press the icon in order to perform the
calibration.
If you set the arm uplift to a higher value in the semi-
automatic mode, the arm will ascend to the required
height after pressing the Enter button.
If you set the arm uplift to a lower value in the semi-
automatic mode, the arm will remain in the same position
after pressing the Enter button and will ascend to the
required height after performing the cut.
ARM UPLIFT HEIGHT H SETTING
Press the icon in order to display a table for
optimal setting of the height of the cut log.
H
WORKPIECE COUNTER
Vice
closed
If the vice is open, pressing the START
button in the S.A. MODE executes the cycle
and after its completion the vice remains open.
If the vice is closed, pressing the START
button in the S.A. mode executes the cycle
and after its completion the vice remains closed.
1
Min.1 Max.2
Esc
+/-
0
1 2 3
4 5 6
7 8 9
Clr
Enter
Esc
Enter
Window cancelation
Correct the set value
Confirm the set value
Go to main menu, or a level higher.
Vice
open
Number of completed workpieces
Set number of workpieces
21
50
SEMI-AUTOMATIC MODE
Active features of the mode
Hydraulics ON
Saw blade upwards
Saw blade downwards
Saw blade ON
By pressing this button, you can only open
the vice. This button is only in machines
with full-uplift vice: ARG 380, 500 plus
S.A.F.

MANUAL MODE
MANUAL MODE 0 8 / 1 0 / 2 0 1 6
0 9 : 2 0 : 0 3
62%
15 90
65
6,5 A
0
m/min
m m
H
0.0
Vice
closed
Vice
open
Press the vice icon (contact pressure)
to change the vice status
to OPEN/CLOSED.
MACHINE SETUP
0 9 : 2 0 : 0 3 0 8 / 1 0 / 2 0 1 6
SYSTEM
COOLANT/
OIL MIST
PRESSURE
SWITCH
TIME+
DATE
LANGUAGE
ANGLE
COUNTER
OPERATING HOURS
0 HOU.
MACHINE SETUP
LANGUAGE - switch to the screen, selection of several languages.
ANGLE - enables displaying of the set angles on the display
(accessories)
COUNTER - counts the number of cut workpieces in the current
series
OPERATING HOURS - displays the time of operation of the
hydraulic unit (regular changes of oil)
BUNDLE CUTTING HVP - HVP accessories actuation
COOLANT/OIL MIST - you can switch between cooling by coolant
(red cross) or oil mist (accessories) (green tick)
PRESSURE SWITCH - switch to the screen with vice pressure
switch settings
TIME + DATE - switch to the screen with system date and time
settings
SYSTEM - switch to the system settings screen with converters,
servo motors, PLC settings. The screen is locked - only the
manufacturer or the distributor can edit the data.
SCREW CONVEYOR OF CHIPS - switch to a service screen for
maintenance and cleaning of the machine
After switching on the hydraulic power unit, the START button
lights up green. This indicates the machine is on. Blue boxes next
to icons indicate reaching the particular extreme position
(uplift/descent of the arm or switching the vice pressure switch).
If you initiate any function that is logically preceded by a different
function (that has not been activated yet), the button of the
preceding function will start flashing to indicate error.
START/STOP uplift or descent of the arm
The ARM STROKE END SWITCH
must be in position 0.
Saw blade upwards
STOP
Saw blade downwards

Input the current time in dark grey boxes in the red-outlined box.
After you input the time, press the TIME INPUT button to enter the
set time into the system.
Input the current date in dark grey boxes in the red-outlined box.
After the input, you have to press the DATE INPUT button to enter
the specified date into the system.
ARM LIFTING HIGH SETTING H
0 9 : 2 0 : 0 3 0 8 / 1 0 / 2 0 1 6
ESC
D
70
75
80
85
90
95
100
105
110
115
120
125
130
135
H
65
69
74
78
82
86
91
95
99
103
107
111
115
119
D
140
145
150
155
160
165
170
175
180
185
190
195
200
205
H
123
127
131
135
138
142
146
150
154
157
161
165
168
172
D
210
215
220
225
230
235
240
245
250
255
260
265
270
275
H
176
179
183
186
190
194
197
201
204
208
211
215
218
221
D
280
285
290
295
300
305
310
315
320
325
330
H
225
228
232
235
238
242
245
249
252
255
258
H
D
ARM LIFTING HIGH SETTING H
Set or currently displayed arm height (H) is measured at the fixed
jaw. When cutting a log, it is possible to set a lower arm uplift
according to the table and thus the arm does not need to ascend
unnecessarily high.
Example: pipe/log in diameter 320 mm. According to the table,
set the height of the arm uplift only to 252 mm. You save the
cutting time significantly.
ARM LIFTING HIGH SETTING H
ANGLE
ANGLE
0 9 : 2 0 : 0 3 0 8 / 1 0 / 2 0 1 6
12.1
SETSET
SET ESC
Setting the cutting angle sensor - calibration
Using a framing square, align the orthogonality (90°) of the belt
against the fixed vice jaws and press the middle SET button.
Turn the saw arm to the stop on the right (60°) and press the right
SET button.
Turn the saw arm to the stop on the left and press the left SET
button.
Recommendation: Using the space between the ends of the
calibrated framing square and measuring the angle between the
saw blade and the fixed jaw.
TIME+DATE SETTING
TIME+DATE SETTING
0 9 : 2 0 : 0 3 0 8 / 1 0 / 2 0 1 6
000
0 0 0
TIME
INPUT
DATE
INPUT
H M S
DD MM YYYY

The display that informs the user about the machine manufacturer
and distributor - contacts regarding the service in emergency.
The screen is locked - only the manufacturer or the distributor can
edit the data.
The screen CHANGE BLADE activates upon pressing the FAILURE Blade-tension sensor. The failure occurs in the event of saw
blade breakage or loosening of the saw blade tensioning star nut.
FAILURES
FAILURES
0 9 : 2 0 : 0 3 0 8 / 1 0 / 2 0 1 6
FAILURE DATE TIME
SERVICE
SERVICE
0 9 : 2 0 : 0 3 0 8 / 1 0 / 2 0 1 6
MANUFACTURER:
DISTRIBUTOR:
PILOUS-pásové pily spol. s r.o.
Železná 9
CZ-619 00 Brno
web:
e-mail:
tel:
www.pilous.cz
+420 543 25 20 10
PILOUS-pásové pily spol. s r.o.
Železná 9
CZ-619 00 Brno
web:
e-mail:
tel:
www.pilous.cz
+420 543 25 20 10
CHANGE BLADE
CHANGE BLADE
0 9 : 2 0 : 0 3 0 8 / 1 0 / 2 0 1 6
62%
15 90
65
6,5 A
0
m/min
m m
FAILURE
Blade-tension
sensor
The latest failure always appears on top and is not deleted. In the
case of a new failure the previous failure will move to a line below.
The system stores 200 failures. You can browse through the list
using buttons.
The failures are displayed in colour:
red - current unresolved failure
green - resolved failure stored in the system
Move to the next/previous line
Jump to the last/first item in the list
This manual suits for next models
4
Table of contents
Other Pilous Saw manuals
Popular Saw manuals by other brands

Porter-Cable
Porter-Cable PCE380 instruction manual

Graphite
Graphite 59G824 instruction manual

Makita
Makita 2416S instruction manual

Diamond Products
Diamond Products CC7574DK Series Operator's manual

Pattfield Ergo Tools
Pattfield Ergo Tools PE-1200HKS Original instructions

Porter-Cable
Porter-Cable PCB375SS instruction manual