pitsco DRONE MAKER User manual

92140

Written by David Meador.
Content advising by Paul Uttley.
Build creation and SolidWorks® Composer™ and KeyShot® renderings by Tim Lankford
and Jason Redd.
Desktop publishing by Todd McGeorge.
©2022 Pitsco Education, LLC, 915 E. Jefferson, Pittsburg, KS 66762
All rights reserved. This product and related documentation are protected by copyright
and are distributed under licenses restricting their use, copying, and distribution. No
part of this product or related documentation may be reproduced in any form by any
means without prior written authorization of Pitsco Education, LLC.
All other product names mentioned herein might be the trademarks of their respective
owners.
V1.0
07/22
WARNING
This device complies with Part 15 of the FCC Rules. Operation is subject to the following two conditions:
(1) this device may not cause harmful interference, and (2) this device must accept any interference
received, including interference that may cause undesired operation.

Table of Contents
Drone Parts ............................................................................................................................... 2-3
Getting Started............................................................................................................................ 4
Drone Assembly...................................................................................................................... 5-7
Controller Functions.............................................................................................................. 8-9
Drone Flight......................................................................................................................... 10-11
Beyond the Build......................................................................................................................12
Troubleshooting .......................................................................................................................13

2© 2022 Pitsco Education, LLC. All rights reserved.
Part Part Name Quantity
90-degree
connector 10
90-degree
through connector 10
Propeller guard 8
Drone body 1
Motor mounts with
black and white wires 2
Motor mounts with
red and blue wires 2
Charger 1
DRONE PARTSDRONE PARTS

3
© 2022 Pitsco Education, LLC. All rights reserved.
Part Part Name Quantity
Micro USB
cable 2
Battery 2
Propeller A 4
Propeller B 4
Body tube
(colors vary) 16
Remote
control 1
DRONE PARTSDRONE PARTS

4© 2022 Pitsco Education, LLC. All rights reserved.
Drones in the Air
Up, up, and away! Drones have taken everybody’s imagination by storm in recent years.
Promises of packages being delivered to your door with everything from hot fresh pizza
to a new item from your favorite retailer, as well as the ability of first responders to reach
remote locations with lifesaving equipment in a moment’s notice – these are the dreams
of a future with drones. But what is needed for any of this future to happen, engineering
drones for these and other tasks? Welcome to the world of aerospace engineering, you
now have the opportunity to figure out this future!
Did You Know?
In remote areas of Africa, drones are used for delivering medical shipments because it
would take longer to deliver the items over land. You can read more about this lifesaving
use for drones here: https://dronedj.com/2022/02/18/zipline-expands-drone-deliveries-
of-medical-supplies-to-kenya/.
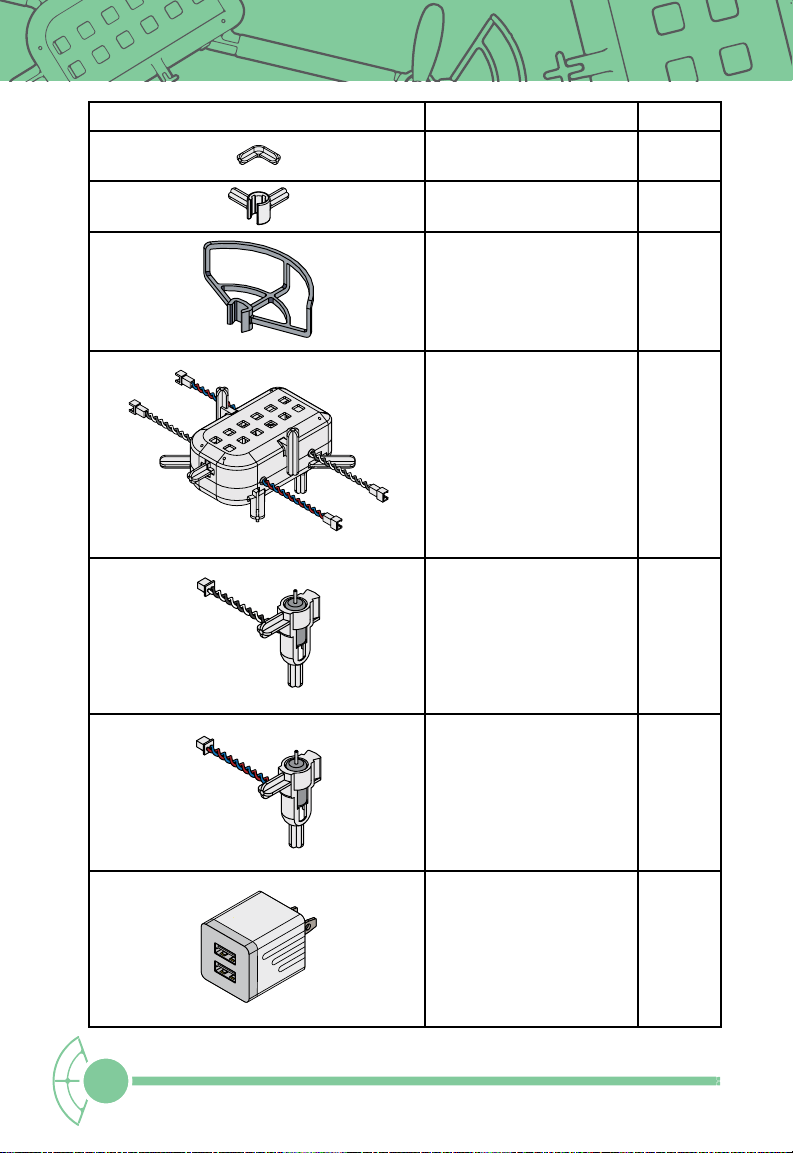
Design and Iterate
You have a system for building and adding to your drone that makes it quick and simple
to make changes to the basic design of the drone. This will enable you to design, build,
and test a drone and then make improvements to test the drone again. This design,
test, and redesign process is known as iteration. Depending on the time you have
available, the system you have will enable you to compare multiple possible solutions to
a problem based on how well each solution is likely to meet the parameters that have
been set.
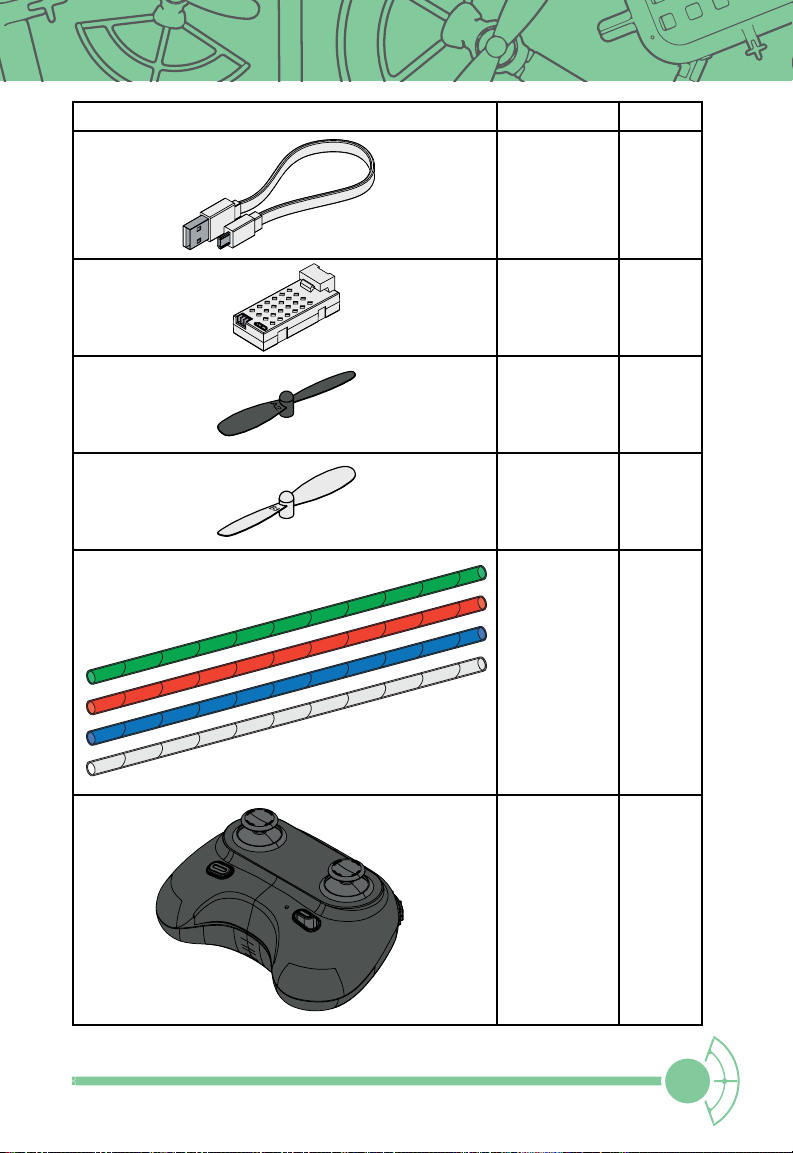
Batteries and Charging
In order for your drone to operate at maximum capacity, the batteries should be fully
charged. Locate the charger, Micro USB cable, and batteries. Plug these in while building
your drone.
Glossary
terms:
Aerospace Engineer – an engineer who
works with designing, building, and testing
aircraft, including drones, to meet goals
iteration – refining a product or process
by tweaking the later version and then
starting over
GETTING STARTEDGETTING STARTED

5
© 2022 Pitsco Education, LLC. All rights reserved.
Building a Basic Drone
What You’ll Need
The following is the list of parts you will need to build the basic drone.
Drone Parts
Part Name Quantity
Propeller guard ...................................4
Drone body .......................................1
Motor mounts with black and white wires........2
Motor mounts with red and blue wires ...........2
Battery ............................................2
Propeller A ........................................2
Propeller B ........................................2
Body tube.........................................4
Remote control ...................................1
DRONE ASSEMBLYDRONE ASSEMBLY
Putting Your Drone Together
Cut four body tubes to equal lengths. 45mm is a good length to start with. The tubes will
attach to the drone body and motor mounts by sliding snugly over the connection points.

6© 2022 Pitsco Education, LLC. All rights reserved.
Prop A rotation on clockwise rotation
motor with red and blue wire
Prop B rotation on counterclockwise rotation
motor with black and white wire
Prop A rotation on clockwise rotation
motor with red and blue wire
Prop B rotation on counterclockwise rotation
motor with black and white wire
Prop A rotation on clockwise rotation
motor with red and blue wire
Prop B rotation on counterclockwise rotation
motor with black and white wire
Slide on
Slide on Slide on
Counterclockwise Propeller Mark
Counterclockwise Motor
(black and white wires) Clockwise Motor
(red and blue wires)
Propeller Guard Propeller Guard
Clockwise Propeller Mark
Propeller and Propeller Guard
Before mounting the props, you should slide the propeller guards onto the motor
mounts from the top.
Motor/Propeller/Guard Assembly
The props need to be pressed onto the motor axle. You should match the props to the
motors first. The props labeled “A” should be mounted on the red-and-blue wired motors,
and the props labeled “B” should be mounted on the black-and-white wired motors.
BA
DRONE ASSEMBLYDRONE ASSEMBLY

7
© 2022 Pitsco Education, LLC. All rights reserved.
Aligning the Motors and Drone Body
When connecting the motors to the drone body, it is important to align them correctly.
The motor wire coloring should match the wire coloring coming from the drone body.
This is because the motors spin in opposite directions. Be careful when connecting and
disconnecting the wires to prevent them from breaking. You will want to ensure that
the motors are aligned with the body because any deviations can cause a reduced flight
time from the batteries or an inability to take off.
DRONE ASSEMBLYDRONE ASSEMBLY
Basic Drone Design
To build a basic drone that will fly, use the following diagram.
45 mm
Drone Front
Counterclockwise Motor
Black and White Wire to
Black and White Wire
Black and White Wire to
Black and White Wire
Blue and Red Wire to
Blue and Red Wire
Blue and Red Wire to
Blue and Red Wire
Clockwise Motor
Counterclockwise Motor Clockwise Motor

8© 2022 Pitsco Education, LLC. All rights reserved.
CONTROLLER FUNCTIONSCONTROLLER FUNCTIONS
Yaw Left Roll Right
Drone Controller Functions
Refer to this diagram for the functions on the drone controller included with your kit.
Flips modeSpeed (slow, medium, fast)
Headless/Normal Mode
(press)
Takeoff/Land
Emergency Stop
(push and hold)
On/Off Tune/Normal Mode
(press)
Ascent Pitch Forward
Pitch Backward
Roll Left
Yaw Right
Descent
Ascent
Descent
Roll
Yaw
Forward
Backward

9
© 2022 Pitsco Education, LLC. All rights reserved.
CONTROLLER FUNCTIONSCONTROLLER FUNCTIONS
Speed – The drone’s responsiveness to the controller’s commands is adjusted into three
different modes by pressing and releasing this button.
• Slow – The drone operates more gently to the commands input at the controller.
This mode is recommended for a beginner drone pilot.
• Medium – The drone operates intuitively to the commands input by the
controller. This mode is recommended as you gain experience as a drone pilot.
• Fast – The drone operates rapidly to any commands input by the controller. This
mode is recommended only after extensive experience as a drone pilot.
Flips – When this button is pressed, the drone enters flip mode. While in flip mode, the
right joystick on the controller can be used to perform a flip by pressing one of the four
directions forward, backward, left, or right.
Ascent/Descent – This is the throttle; it controls the speed of the motors. Pushing up
causes the drone to go straight up; pushing down causes the drone to go straight
down.
Yaw Left/Yaw Right – Rotates the drone around the center of the drone body. It is used
to change the direction the drone is pointing. Pushing left rotates the drone to the left;
pushing right rotates the drone to the right.
Pitch Forward/Pitch Backward – Tilts the drone forward or backward. Pushing up tilts
the drone forward, and it moves forward. Pushing down tilts the drone backward, and
the drone moves backward.
Roll Left/Roll Right – Tilts the drone to the left or right. Pushing right tilts the drone to
the right, and it moves to the right. Pushing left tilts the drone to the left, and the drone
moves to the left.
Takeoff/Land – Pushing and releasing this button will make the drone take off when
not flying and land when flying. Pushing and holding when the drone is in flight will
activate the emergency landing feature, and the drone’s motors will immediately stop
spinning, and the drone will fall directly to the ground.
Power On/Off – Pushing and releasing this button will turn the remote on or off.
Headless/Normal Mode – In normal mode, left and right are always in reference to the
drone’s left and right. In headless mode, left and right are in reference to the controller’s
left and right when facing the drone.
Tune/Normal Mode – In normal mode, the controls operate the motors to cause
movement in the drone. In tune mode, the power sent to each of the motors is adjusted
to balance the flight characteristics of the drone. Each time the drone is restarted, the
previous tuning returns to the default.

10 © 2022 Pitsco Education, LLC. All rights reserved.
4. Power on the remote. The remote will beep once.
5. To pair, push the left joystick fully upward until you hear a beep and then fully
downward until you hear a second beep. The indicator lights on the drone will change
from blink to solid indicating a successful pair.
6. Press the Takeoff/Land button to start flight. The motors will begin spinning and the
drone will rise one meter above the surface and hover.
7. Use the left and right joysticks to control the flight.
8. Flight time is approximately six to seven minutes depending on weight of drone.
9. Drone lights will blink to indicate low battery.
10. Drone will land automatically when battery is depleted, or press the Takeoff/Land
button to land the drone.
11. Have a safe flight!
Pairing the Remote and Taking Flight
Follow these steps to pair your remote and fly it. Remember to wear safety glasses when
operating the drone.
1. After the drone is built, make sure the battery is fully charged before flying. Then,
insert the battery into the drone body.
2. After the battery is in place, press and hold the power button on the bottom of the
drone to power up the drone. The LED lights on the bottom will flash when the drone
is powered up.
3. Turn on the drone and place it on a level surface. The drone indicator lights will blink
slowly, which indicates it is waiting for pairing.
Takeoff/Land
Pairing
DRONE FLIGHTDRONE FLIGHT

11
© 2022 Pitsco Education, LLC. All rights reserved.
DRONE FLIGHTDRONE FLIGHT
First Flight Activity
You’re ready to fly! Use the following checklist to check off when you practice each of
the skills as you practice flying your drone. Rate your skill from one to five on each skill.
As with any skill, practice makes you better, so don’t be discouraged if you aren’t a five
the first time. You might need to align your motors when taking off for the first time.
Make sure the props on the motors are aligned with the drone’s body. (Hint: You can use
the connectors on the motor mounts and drone body to help you line up the motors
and the body.) If the drone flies unpredictably or not at all, see the troubleshooting
section of this guide for help.
Activity Extension
Find a way to construct the drone to make it easier to tell which is the front of the drone
and which is the back of the drone when it is in flight. What’s the biggest drone you can
build and get in the air? What’s the smallest drone you can build and get in the air?
Skill Status
Pairing 1 2 3 4 5
Takeoff 1 2 3 4 5
Landing 1 2 3 4 5
Yaw left 180° 1 2 3 4 5
Yaw right 180° 1 2 3 4 5
Ascend one meter 1 2 3 4 5
Descend one meter 1 2 3 4 5
Roll left one meter 1 2 3 4 5
Roll right one meter 1 2 3 4 5
Pitch forward one meter 1 2 3 4 5
Pitch backward one meter 1 2 3 4 5
Navigate around an obstacle in Slow Speed Mode 1 2 3 4 5
Navigate around an obstacle in Medium Speed Mode 1 2 3 4 5
Navigate around an obstacle in Fast Speed Mode 1 2 3 4 5

12 © 2022 Pitsco Education, LLC. All rights reserved.
BEYOND THE BUILDBEYOND THE BUILD
Do Some Engineering!
On the drone body and the motor mounts are connection points where you can attach
additional support beams. You can use these to engineer supports for carrying packages
for delivery or adding landing struts to the drone. Your imagination is your limit! You
also have some frame expansion connectors you can use to help design and build other
capabilities into your drone.
The tubes will also fit snugly into the through portion of the 90-degree through
connectors. These connectors can be used to create extensions for the drone. These
extensions can be used to create drone features designed to carry payloads, extend the
drone’s landing footprint, or add accessories.
Design and build a drone to deliver some objects. But be careful – the more weight
you add, the less flight time your drone will have. After you are successful, try and
improve your design and make changes to your drone to make it more efficient in
carrying the load.
Drone Frame Expansion Connectors

13
© 2022 Pitsco Education, LLC. All rights reserved.
Problem Possible Solutions
Drone won’t
take off.
The drone is too heavy. The maximum weight the drone can lift
is between 65 and 75 grams. The drone with the battery in its
lightest configuration is about 50 grams.
The props are flipped. If the A and B props are on the wrong
motors, they will push down instead of up, preventing the drone
from taking off.
The battery is too low. When the battery is critically low, the drone
will land automatically and will not take off.
Drone flips over
on the ground
when taking off.
Two of the props are not on the correct motors. The A and B props
must be on the correct motors; if two are correct and two are
incorrect, the drone will flip over during takeoff.
Drone flies
erratically or
spins after
taking off.
The motors might not be aligned correctly. If one or more motors
are not aligned in the same plane as the others, the drone will fly
erratically; drift left, right, forward, or backward; or fly in circles
after takeoff. This can also happen if one or more drone arms are
damaged or bent. This will require replacing the damaged drone
arm to fix.
Drone drifts
toward one of
the motors.
This usually indicates that one of the arms of the drone is a
different length than the others. You should ensure all the drone
arms are the same length. This can also happen if one of the drone
motors is damaged and not spinning as fast as the other motors.
The only solution to this is replacing the motor.
Troubleshooting
TROUBLESHOOTINGTROUBLESHOOTING

There are a variety of ways
to get in touch with us:
Call us at 800-358-4983.
Email us at support@pitsco.com.
Chat with us on Pitsco.com/Support.
HAVE
QUESTIONS?
Table of contents
Other pitsco Educational Equipment manuals
Popular Educational Equipment manuals by other brands

laerdal
laerdal SimNewB user guide

BOXLIGHT
BOXLIGHT Mimio MyBot Assembly instructions

laerdal
laerdal Ultimate Hurt Directions for use

Dräger
Dräger Oxyboks KT 35 Instructions for use

FrameCo
FrameCo Mat Master 560B System Owner's manual & operating instructions

RoboMaster
RoboMaster S1 Education Expansion Set Core quick start guide