Planet Halo PH4 User manual


보
·····························01
···········································02
···············································04
····················································05
·······················································06
··················································07
·········································07
보
············································08
············································09
···············································10
··············································11
·············································16
······················································16
····················································17
···········································17
······················································18
및
·········································19
······································· ············20
····································· ···········21
▶Thisproductisadeviceforrecordinghigh-resolutionvideo,designedtomonitordrivingbehaviorand
captureincidentsthatcouldoccurwhileyourvehicleisontheroadorparked.Therecordedevidencemay
or may not hold any legal validity in the court of law. Bear in mind that we are not responsible for any
disputesorlossincourtfromrecordedorunrecordedvideodata.Besafe,drivesafe!
01. Product Information
▪Instructions Before Operating this Product
▪Warranty and Safeguard
▪Product at a Glance
▪Specifications
▪Installation
▪Identifying Parts
▪Key Functions and Features
02. Operations and Functions of Viewer
▪Key Functions of Viewer
▪Upgrading the Product
▪To View Video Data
▪Setup Configurations
▪Printing a Video Image
▪AVI Backup
▪Smart Backup
▪Capturing a Video Image
▪GPS Tracker
03. Warranty Policy and After Services
▪Frequently Asked Questions
▪Warranty Policy
▪Warranty Limitations
Table of Contents

• Thank you for purchasing our product. This manual also includes our product
warranty information, so please keep this manual for future reference.
• Please read the safety instructions completely before operating this product.
• This product is a device for recording video and audio and is to be installed on the in
side of your vehicle. Optional cameras may be mounted on the outside of the vehicle.
This product is to help drivers monitor their driving behavior. The recorded audio and
video hold no legal validity.
• The purpose of this product is to record surroundings of your motor vehicle when
driving or parked. There is no guarantee that the product will capture every desired
image.
• This product may not record as an event during a mild impact or a minor collision.
We recommend to categorize a certain situation by pressing the emergency button.
• We cannot guarantee any product defects if a memory card other than the one
provided with the camera is used.
1. Product Information

Main body
Side camera Camera Bracket
User’s manual
Table of Contents

SD memory card / Cable holder / Holder adhesive tape
Cigarette plug (power cable) / Video cable / Video extension cable
Direct power cable (controls power voltage to prevent battery discharge for continuous recor
ding)
SD memory card (8G / 16G / 32G)
SD memory card reader
External HDD
Optional accessories
Table of Contents

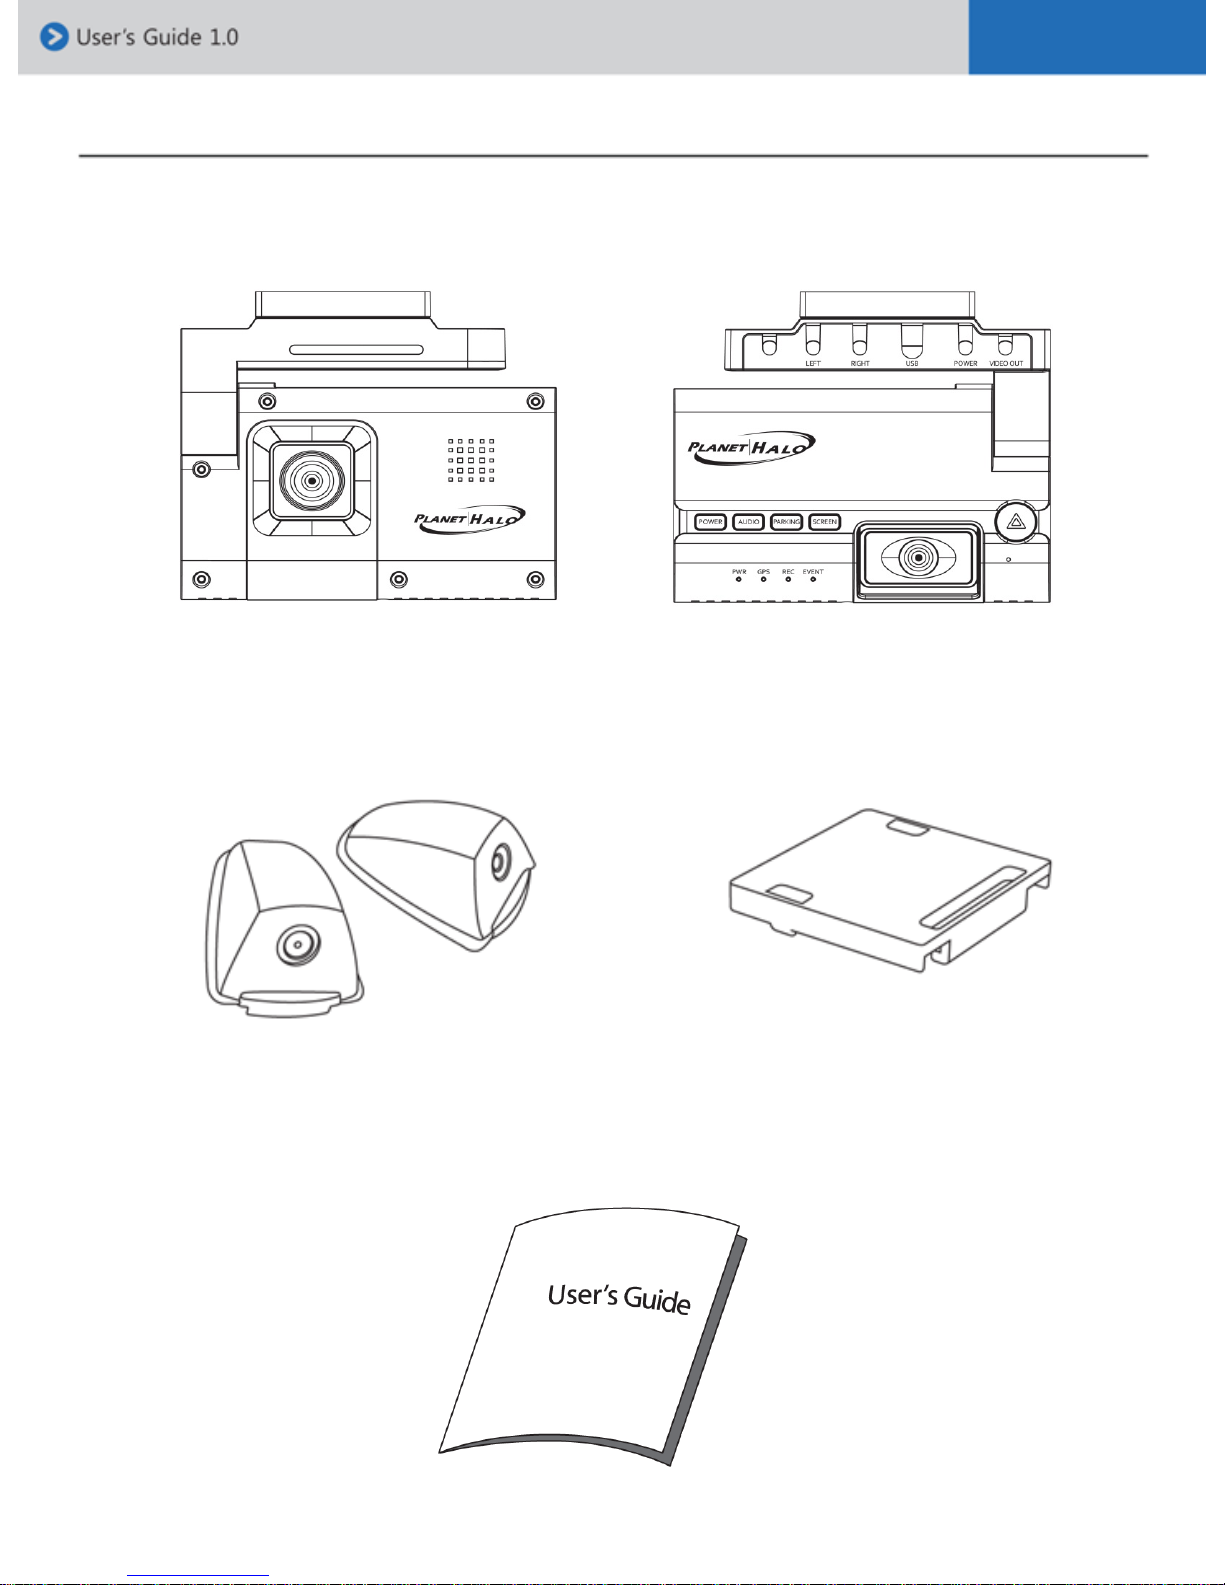
[Checking LED lamp signal]
• Power : The LED light will flicker during the reboot once the power is supplied after turning t
he engine on. The LED light will be turned on once the rebooting is completed. (If there is a
problem with the battery, or the battery protection mode is on, the LED light will continue to
flicker)
• GPS : The green LED light will appear while receiving GPS reception. (The LED light will
be turned off after 10 seconds if there is no GPS reception)
• Video recording : The red LED light will appear during video recording. (The LED light will
flicker every 1 second during driving mode and will flicker every 3 seconds while in park
mode)
• Event recording : The blue LED light will appear during event recording. (The LED light will
be turned off if the event recording mode is off)
[Product button functions]
• Power button
: Pressing the ‘power’ button for 3-4 seconds, will turn on/off the product.
• Audio button
: Press the ‘audio’ button to turn on/off audio.
• Parking button
: If you press the ‘parking’ button once, the recording mode will change to parking mode.
*Pressing the ‘parking’ button for 3-4 seconds, will turn on/off the audio.
: If you press the ‘parking’ button once more, then it will change back to the normal recording
mode.
Parking mode is a function that allows you to record for a longer period of time than
normal recording mode by reducing the frames per second. The parking mode records at 3
frames per second
If you set ‘0’ (do not use) for parking mode in the configuration, it will not change the
recording mode even if you press the ‘park’ button.
• Screen button
: The screen button allows you to switch the displaying screen mode; full(1ch.), 2ch. and 4ch
when you see the playback via video out device.
• Emergency button
: This function enables you to store data for a longer period than the normal recording by
creating an ‘event’ occurrence while driving or parking.
: If you press the ‘event’ button from the time of accident, it categorize the event. This means
that you can store data for a longer period than the normal recording.
Table of Contents

• This product provides real time high-resolution recording with the option to record up to 4
cameras (front, internal, left and right). Recording begins after you connect the unit with the
power cable and turn on the engine. The product stops recording when you turn off the
engine. The last few seconds will be recorded after the power disconnects. When the
memory card is full, the recording cycles to the beginning and begins to overwrite the data.
[4 channel high-resolution video image]
: The product is able to record clear images by processing the video in Variable Bit Rate
(VBR).
[Recording 4 different directions simultaneously: front, internal, left and right]
: Easy to install cameras with multiple angles and directions for recording.
[Simultaneous playback mode : full, 2ch. and 4ch. screen mode]
: The viewer allows you to watch video playback in single channel mode, 2 channel or four
channels.
[Automatic parking mode]
: Set the parking mode time in the menu of the Viewer program, to when you want park
mode to be activated.
[Built-in GPS and high-sensitivity G-SENSOR]
: View the location (linked to Google maps), speed and acceleration of your vehicle by using
the embedded GPS. Events are categorized with g-sensors.
[Vehicle battery monitoring]
: Prevents the vehicles battery from discharging by monitoring the battery voltage.
[External camera]
: Low power consumption design.
: Best quality resolution by using embedded a deinterlace filter.
: The auto mirror function allows for the external cameras to be placed and adjusted to the
appropriate direction
Key Functions and Features

1) Select the desired location to mount the camera, and then attach the sliding bracket to
the windshield.
2) Slide the product on to the bracket.
3) Place the side and rear cameras on the appropriate position and connect the camera
cables to the camera input terminal by using the provided extension cables.
4) Insert the SD card into the main body if it has not been inserted already. (Ensure that the
SD card is inserted the correct way).
[Note : Using the SD memory card]
: In order to remove the SD card, the LED lights on the camera must be completely turned off
: The SD card contains both the Viewer program and the update program. Please copy and p
aste the programs to your PC.
: Using either damaged or low-quality SD cards could damage the recorded data, could skip
data and decrease the speed of video playback.
: Please be aware of the fact that the SD card does not last forever, and will wear out after us
ing it for an extended period of time. It also may cause errors when recording. Try to conduct
a format and run virus checking programs from time to time to prevent the SD card from
malfunctioning. SD card related problems are not under the manufacturer’s guarantee and
the manufacturer or the supplier is not responsible for your data loss or missing recordings.
: We recommend you to make a back up of your files and save them to other storage
mediums such as your PC, in the event of an external power shortage.
: Do not put heavy pressure on the SD card and never use a wet SD card.
5) Connect a cigarette plug to the power terminal of the product.
6) Insert the cigarette plug into the cigarette jack of your vehicle.
7) Check the LED lamp.
8) Use cable holders to tidy up cables.
Prior to attaching the holder, please be aware that cold weather, cond
ensation, and dust may cause the holder from sticking properly.
Table of Contents

Camera
Front: ¼” CMOS image sensor (105 degree)
Internal: ¼” CMOS image (infrared) sensor (142 degree)
Side camera input: up to 2 PH-SC (see below)
Recording Resolution
720x480 / 1CH : 30 fps, 2CH: 15 fps per channel,
4CH: 10 fps per channel / *5 fps per channel (Parking mode)
Recording Format
H.264 VBR Recording
Output Device
CVBS output (1V Vp-p 75 ohm)
GPS
Built-in type GPS module
G-Sensor
Built-in 11BIT 3 Axis (X, Y, Z axis), acceleration sensor
Detects sudden start & stop / impact / overspeed / emergency
Recording Medium
SD memory card: SD, SDHC : 2GB~32GB support
External HDD support
Audio Recording
Built-in high-sensitivity microphone
PCM COMPRESSION
Audio Announcement
Built-in high-quality speaker for notice announcement
Recording Mode
Normal (continuous), Parking mode, Event mode
Time Setting
GPS embedded model :
Before GPS connection : run by internal RTC time
After GPS connection : automatic internal RTC time setting
Power
Rated voltage : DC 12V ~ 24V cigar plug
Operating voltage : DC 7V ~ 28V
Power Consumption
12V : 350~390mA
Temperature Range
Storage (-30℃~80℃)
Operating (-10℃~70℃)
Other Functions
Auto update, battery protection, auto parking mode
PH-SC (Side camera)
Camera
¼” CMOS image sensor (92 degree)
Recording Resolution
720x480
Output Display
CVBS output (1V Vp-p 75 ohm)
Power
Operating voltage : DC 4V ~ 5V
Power Consumption
140mA
Temperature Range
Storage (-30℃~80℃), Operating (-20℃~70℃)
Other Functions
Deinterlace filter, auto mirror
Main body [PH-4]
Specifications

• Insert the SD card in to your PC, or use a memory card reader to connect the SD card to
your PC. Open the SD card folder and then double click on [planethalo.exe] file to run the
viewer program.
[Setup configurations]
1) Click the ‘Configuration’ icon
2) ‘Select Drive’ window appears. Select drive and then click the [ok] button.
Operations and Functions of Viewer

3) ‘Configuration’ window appears. Select each function and its settings, then press save.
The updated settings are saved to the SD card. Insert the SD card into the SD card slot of
the product and turn the power on. The product will be updated with the new settings.
Operations and Functions of Viewer (Cont.
)
Please be aware that if the [index.dat] file gets deleted from the SD
card, it will not save the configuration settings. The [index.dat] file can
be created again when the SD card is inserted into the product and
the power is turned on, but the settings will not be applied.
Operations and Functions of Viewer (Cont)

• Recording frame setting (default setting : maximum)
- Maximum recording mode (max. normal recording mode function)
: This is the normal recording mode at 10 frames per second (fps) for 4 channels.
- Mid-recording mode (mid.)
: records at 7.5 fps for 4 channels.
- Minimum recording mode (min.)
: record 5 fps for 4 channels.
• G-Sensor sensitivity setting (default setting : while driving / parking (X)6, (Y)6, (Z)6
- X-axis / Y-axis / Z-axis.
- This feature adjusts the sensitivity of the shock sensor. Select the sensitivity level from 1
(min.) to 10 (max.) to save the video recording as an ‘event’.
The higher the sensitivity level the more event recordings.
Operations and Functions of Viewer (Cont)

• Auto parking mode (default setting : 0)
- Configuration setting : 0 (do not use) ~ 30mins (max.)
- This function records at 3 frames per second when the vehicle is parked. The camera will
record at the normal frames if it senses an impact to the vehicle. It will also change from park
mode to the auto driving mode when the vehicle turns on.
• Event save ratio (default setting : 30)
- Configuration setting : 0 (do not use) ~ 30% (max.)
- This function sets the total event recording capacity
(%) out of the whole capacity of the SD card. For instance, if you set ‘30’ as the event
recording ratio, all event recorded data will not be deleted prior to reaching 30 percent of the
SD card. If the total event recorded data reaches beyond 30 percent of the SD card, the
data will begin to delete starting with the oldest events first in consecutive order.
• Connected camera (default setting : 4 cameras)
- Choose the cameras that you want to record.
If you select ‘0 (do not use)’ for the configuration setting, this will disable parking
mode. Pressing the ‘parking’ button on the camera will also have no affect if the
auto parking is set to ‘0’.
Operations and Functions of Viewer (Cont)

• Change Password
- The password function prevents unauthorized users from viewing your recorded data.
• Information
- You can insert information such as company name, vehicle type, license plate and drive
name or ID to be displayed on the screen or screen shot.
• Audio recording (default setting : to save)
- Option to turn on or off audio recording.
:Pressing the ‘parking’ button for 3-4 seconds can change the audio recording function to
on or off.
• Speaker volume (default setting : 4)
- Adjusts the volume of the audio announcement and operation status melody.
Operations and Functions of Viewer (Cont)

• Time zone : regional time setting (default setting : +9(Seoul))
* GMT(Greenwich Mean Time)
- Pressing [Get GMT] will adjust the time of your camera to your time on your computer
- Time Zone setting will also automatically set, through the camera’s GPS.
• Time settings
- When you change the time, please ensure ‘□set’ is checked in order to activate your
updated time.
• Voltage check (default setting : (Normal/Parking mode) do not check)
- This function allows for avoiding battery discharge protecting your vehicle’s battery.
- Driving mode and parking mode are configured separately.
- Not check: operates without battery protection.
- 10.5V : Camera stops operating when the voltage drops below 10.5V, but starts again when
the voltage goes over 10.5V.
- 11.0V : similar to above at 11.0V.
- 11.5V : similar to above at 11.5V.
- 12.0V : similar to above at 12.0V.
Operations and Functions of Viewer (Cont)

• Access to function keys
- Select ‘Block’ option to prevent unauthorized persons from using the function keys on the
camera.
• Auto shutdown timer
- Select a time period you wish to use the ‘auto shutdown timer’ function. This allows your
camera to shutdown after a certain period of time when the engine is turned off.
You may need to set the clock ahead of the current time, in order to adjust the
time difference that is taken to insert the SDcard into the product and reboot
the system. This is irrelevant with internet access
Operations and Functions of Viewer (Cont)

Click on ‘Viewer Setting’ under ‘Configuration’. Select the functions you desire and press
save on the configuration settings. The updated settings are saved to the SD card. Insert the
SD card into the SD card slot of the product and turn the power on. The product will be
updated with the new settings.
Operations and Functions of Viewer (Cont.
)
Please be aware that if the [index.dat] file gets deleted from the SD memory card, it
will not allow you to save the configuration settings. The [index.dat] file can be
recreated when the SD card is inserted into the product and the power is turned on,
but the configuration settings will not be applied.
Operations and Functions of Viewer (Cont)

• Select the folder for AVI, Snapshot and Smart Backup to be saved.
• Video display mode (default setting : Direct Draw)
- DirectDraw – select this option if you are using a high-quality graphic card.
- DIB – select this option if you are using a low-qualify graphic card.
• Speedometer (default setting : MPH)
- Adjust the speed of your vehicle in kilometers per hour (Km/h) or miles per hour (MPH) in
accordance with your local road code.
• Mirror
- Mirror function allows you to switch the viewing mode between actual image and mirror
image. Choose the camera that you would like to view as a mirror image.
Operations and Functions of Viewer (Cont)

[Playing the recorded data]
1) Click the ‘OPEN’ button to load the data from the SD card when connected to your PC.
3) [Select drive] window appears. Select the SD card drive and then click the ‘OK’ button.
5) A list of playback appears. Select the file to watch by double clicking on a file.
* All- Normal+Event files
* Event- event recorded files
* Normal- normal recorded files
Operations and Functions of Viewer (Cont)

[Printing the video image on display]
1) Click the ‘PRINT’ icon to open print option, then click the [OK] button. This allows you to
print the video image on display during playback.
[AVI Backup]
1) This allows the files to be exported and converted to a file readable for a PC media player
such as Windows Media Player or VLC. Click the ‘AVI’ button to open AVI Backup window.
Select the following options: Save Folder/ Filename/ Caption (Date, Time, Speed, Coordinate
)/ Audio Save and the channels to be selected and click ‘Convert’. The file will then be saved
to your designated folder
2) Filename will be saved as (user’s input)_CHn.AVI [n:Ch.1(front)/ 2(rear)/ 3(left)/ 4(right)]
- 1 : Browse (folder) location
- 2 : Enter the filename
- 3 : Select save option: Date,Time/Speed/Coordinate
- 4 : Audio save option
- 5 : Status bar of saving
- 6 : Overwrite filename option
- 7 : Select which channel to save / all channels
1
2
3
4
56 7
Operations and Functions of Viewer (Cont)
Table of contents
Other Planet Halo Dashcam manuals