Plotmaster Hunter 600 User manual

The Plotmaster 600™
Users Manual
Safety Instructions &
Planting Tips
Plotmaster Systems, Llc.
478-864-9108 or 1-888-629-4263
www.theplotmaster.com

We would like to thank you for
your purchase of the
Plotmaster 600™ !
The information in this booklet is designed to
Provide you with a better understanding of
Your Plotmaster 600™,as well as to provide
You with safety instructions and tips for
planting your food plots.
If at anytime you have questions about your unit,
Please call us at 478-864-9108
We’ll be glad to answer any questions that may arise!
Plotmaster 600™

READ FIRST!!!
READ OPERATING
INSTRUCTIONS CAREFULLY
BEFORE USE!!
Safety and Operating Instructions:
DO NOT operate the PLOTMASTER 600™ over 10
MPH.
DO NOT sit or stand on the PLOTMASTER 600™
while in use.
DO NOT ride on the PLOTMASTER 600™ at anytime.
Keep your feet and hands clear of the PLOTMASTER
600™ when raising or lowering the unit and when
Raising snd/or lowering the cultipacker and drag.
DO NOT put hands in Seeder attachment while in use
or while seeder motor is on.
Recommended for 30-60 HP tractor
DO NOT put lime or fertilizer in seeder attachment.
Maximum capacity of seeder is 150 lbs.
DO NOT Operate on Inclines Greater than 10°

Quick Tips for Planting
Wildlife Foodplots
Always mow or remove unwanted grasses and vegetation
prior to discing or plowing soil.
Discing and plowing will be much easier when done after a
rain or when moisture content of soil is high
Try not to disc or plow your foodplots when soil is hard or
dry.
Hard soil or heavy vegetation cover may require several
passes with PLOTMASTER 600™ to achieve best results.
Best results will be achieved when using the chisel plow on
hard or grassy soils in lieu of the sweep plow or cultivator
points.
If the plow attachments begin to clog up due to unwanted
vegetation, simply remove several plow points and remove
the plow attachment completely.
For a firm seed bed use the cultipacker attachment to plant
small seeds such as chicory, clover, rape or other seeds
which require little or no cover.
Use the drag attachment to plant large seeds such as wheat,
oats, peas, beans, Lab Lab and corn that require more
cover. (1”- 2”)
Put seed (up to 150 lbs) in electric seeder or on top of the
carrying rack for extra weight and improved tillage.

Details About Your Plotmaster 600™...
A. The PLOTMASTER 600™ consists of a sturdy MAIN
FRAME with various components and attachments
that may be added or removed.
Each PLOTMASTER 600™ is equipped for use with a
3-point hitch only. This model uses the 3-point hitch
draft to set depth of tillage and cultivation.
B. The PLOTMASTER 600™ unit is designed to
ALWAYS be used with the 3-point hitch on a large
tractor that has enough weight on the front of the
tractor to counterbalance the 1060 pounds. The draft
on the 3-point lift is used for depth settings of the
harrows and plows. The top link of the 3-point hitch
is used to level the PLOTMASTER 600™ to the
conditions required
(HINT: We have found that in hard soil keeping the
unit level as possible works best for most application.)
You can put more pressure on the disc by shortening
the top link of the 3-pt. hitch. You can put more
pressure on the plows by lengthening the top links. The
top link can also be used to adjust the amount of
pressure on the drag and/or cultipacker.
C. The PLOW ATTACHMENT attaches to the
PLOTMASTER 600™ behind the harrow using two
point hitch pins located on the side of the main
frame. The plow attachment has four holes for
depth adjustments. The two middle adjustments
work best for most applications.
The plow attachment comes with (3) different
types of plow points:

1. Five (5) narrow, reversible CHISEL POINTS
for hard, rough soils.
2. Five (5) medium-sized CULTIVATOR
POINTS for cultivating prepared soils
3. Five (5) 9-inch SWEEP PLOW POINTS for
plowing cultivated soils with little or no
vegetation.
(HINT: If plow points load up with vegetation,
discing and plowing are reduced. The points can be
cleaned simply by raising the unit.)
(HINT: The smaller chisel points work much better
than the larger sweep plows for plowing if vegetation
exists. You can also remove one or more plow
s-tines, leaving the outside and middle s-tine. This
will allow the vegetation to pass through without
clogging up. You can also remove the entire plow
attachment if plow points continue to load up or
collect too much vegetation.)
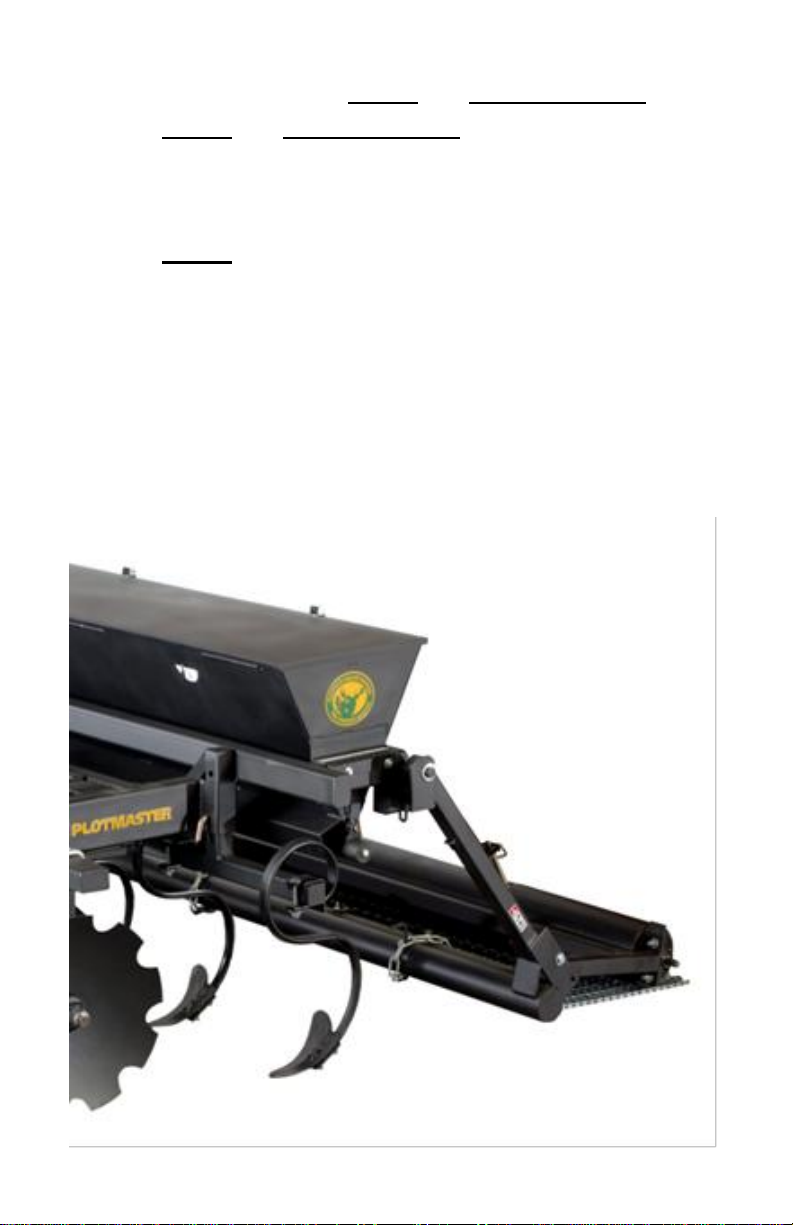
D. Each of the units comes with an ELECTRIC
SEEDER to distribute and plant seed. The seeder
motor turns the agitator at a constant RPM. The
seed flow is regulated by the opening of the seed
gate and the speed of planting.
E. The SEED FLOW CONTROL attached on the left
side of the unit is used to open and close the seed
gate for dispensing the seed. There are ten (10)
detents or settings on the seed flow control for
distributing different sizes of seed. It is also used
to adjust your application rate for seed distribution.

For proper seed gate adjustment, loosen the nut on
the end of the seed gate handle. Put the seed gate
handle in the “0” position, making certain the seed
gate is fully closed. Retighten.
(NOTE: DO NOT put more than 150 lbs. of seed in the
seeder at one time. The seeder is designed to hold a
maximum of 150 pound of seed.)
(NOTE: The electric seeder was not designed to
distribute lime or fertilizer. DO NOT put lime or
fertilizer in the electric seeder. It will rust the seeder
components and/or cause the seeder to work
improperly)

F. Each unit comes with a DRAG and CULTIPACKER.
The DRAG and CULTIPACKER can be used
independently or in combination.
The DRAG is used to level soil and to cover larger
seed such as wheat, rye, Lab Lab, beans, peas
and oats. It can be used with the grating by
disconnecting the grating from the hangers and
allowing it to be placed between the drag bar and
the ground. It can also be used with the drag bar
only. See the picture below.

The CULTIPACKER and DRAG can be used in
combination by removing the hitch pins with handles
as shown below and allowing the cultipacker to follow
the drag. See illustration below.
The CULTIPACKER can be used only by using the
hitch pins with handles that maintain the cultipacker
In the stowed position to pin the cultipacker hinge
point in a straight position as shown below.

IMPORTANT MAINTENANCE:
Grease the fittings on the cultipacker
and tighten all nuts and bolts
every 6 hours of operation
Plotmaster Systems, Llc.
Provides a one-year warranty against any
manufacturer’s defects.
Please be sure to fill out and return your
warranty card.

More Helpful hints For Using
Your Plotmaster™…
Soil Preparation
Once the location of your foodplot is determined, you
are ready to begin preparing the soil for planting. You should
always burn, mow and spray with herbicide, or use other
techniques to remove unwanted grasses and vegetation prior to
discing or plowing the soil. This step will eliminate competition
between wanted and unwanted plants. Reduction of vegetation
will also improve discing and plowing, taking less time and
doing a better job. Having some soil moisture will also increase
discing and plowing capabilities.
Aggressiveness of cut will vary depending on soil type.
There are also four depth adjustments on the plow attachment.
For normal cut, we use the second hole from the bottom. If soil
is hard, you may want to put more pressure on the plow tips.
More pressure can be added by dropping the plows and using
the third or fourth adjustment holes. If you have really hard
soils, we suggest putting the disc in the third position or heavy
duty mode and using the chisel plow points on the plow
attachment. The chisel plow points will dig down easier to
break up hard soils. If vegetation is clogging up the plow
attachments you may want to use the chisel points, since

they are narrow they will let more debris pass through. In
grown up areas where mowing is not possible, some of the plow
tines can be removed and build-up should not occur. The plow
attachment may also be removed when only discing is required.
Planting
Once the ground has been prepared for planting,
the PLOTMASTER™ unit is designed to make planting a “one-
pass” operation. The unit should be level. This will make all
parts work together and plant properly. The disc should be in
the second setting.
The seeder can be adjusted to plant seeds ranging from
clover size to bean size seed. The seed gate is adjusted using the
seed flow control lever. There are ten settings that lock the
seed gate into place, making seed rates consistent. The first two
settings are ideal for planting small seeds such as clover,
chicory, alfalfa and other small seeds. The middle settings are
great for planting seeds such as wheat, oats rye and sorghum
size seeds. The remaining settings are for larger seeds such as
oats, beans, Lab Lab, corn or chufa.
(HINT: The bigger the seed, the bigger the opening.)

Planting previously planted areas is a “one-pass” operation
if vegetation is not a problem. The disc should be in the Light
or Medium Disc Mode and the plow attachment in the second
or third position. Set desired planting depth using the draft on
the 3-pt. hitch. Adjust the seed flow control lever to the proper
setting and turn on seeder motor. You are now ready to begin
planting!
Congratulations and have fun!
PLOTMASTER™ inventor, Blaine Burley, with
HUGE 14-point buck harvested in small plot.

Let Us Hear From You!!!
The PLOTMASTER™ makes planting foodplots and
gardens easy and fun. The PLOTMASTER™ allows you to
plant areas you could never plant before. Planting foodplots
close to established bedding areas, where large bucks spend
most of their time, will increase your chances of taking a
buck-of-a-lifetime.
The PLOTMASTER™ is truly the most versatile
planting machine on the market. SAFETY and PRPOER USE
of the PLOTMASTER™ should ensure many years of quality
service.
We know that the PLOTMASTER™ will be used in a
variety of ways. We would like to hear your innovative ideas
and how well it has performed for you.
Drop us a line at:
We again thank you for your purchase and hope that you
Enjoy your PLOTMASTER™ for many years to come.
Wishing You The Very Best,
~Everyone at Plotmaster Systems, Llc.
Plotmaster Systems, Llc.
P O Box 111
Wrightsville, Ga. 31096

VIDEO OFFER !
“GROWING MONSTER PLOTS”
THE PROVEN 10-STEP PLAN
A Comprehensive Foodplot Video
‘Growing Monster Food Plots” is a
comphrehensive foodplot video which
contains a wealth of information on foodplot
planning, site selections, site preparation,
equipment requirements, seed selection,
foodplot planting, liming, fertilization and
Much more.
Only $14.95 + Shipping and Handling
Mastercard, Visa, American Express and Discover
Accepted
Orders may be placed by calling
Plotmaster Systems, Llc. at
1-478-864-9108
or by sending a check or money order to:
Plotmaster Systems, Llc.
P O Box 111
Wrightsville, Ga. 31096
Table of contents
Other Plotmaster Farm Equipment manuals
Popular Farm Equipment manuals by other brands

Pottinger
Pottinger NOVACAT V 9200 Original operating instructions

AGCO
AGCO Glencoe ULTRAMULCHER UM43 21' Operator's manual

Econo-Wrap
Econo-Wrap EW-450A Operator's manual

Berthoud
Berthoud TRACKER manual

DK-TEC
DK-TEC HGRAKE Translation of original manual

Priefert
Priefert Horse Walker Operation instructions