Plotmaster Hunter 800 User manual

1
PLOTMASTER™ Systems, LLC.
Wrightsville, GA 31096
1-478-864-9108 or 1-888-629-4263
A
Product
of
HUNTER 600—800
(3 point Hitch) MODEL
USERS MANUAL, SAFETY INSTRUCTIONS &
PLANTING TIPS

2
TABLE of CONTENTS
Page 1………Hunter 600/800 Tractor Version (I Match Compatible)
Page 2……...Table of Contents
Page 3 ……..Introduction to
Plotmaster™
(Q/A Section)
Page 4………Operating Instructions (Read Carefully)
Page 5………Operating Instructions (continued) (Read Carefully)
Page 6………Details on components of your H-600
Plotmaster™
Page 7………Details on components of your H-600
Plotmaster™
(continued)
Page 8………Diagram of the Main components of your
Plotmaster™
Page 9………List of Components Matching Diagram
Page 10…….Details on components of your H-800
Plotmaster™
Page 11…….Details on components of your H-800
Plotmaster™
(continued)
Page 12…….Diagram of the Main components of your
Plotmaster™
Page 13…….List of Components Matching Diagram
Page 14…….Versa Seeder Splatter Shield Assembly
Page 15…….Illustrations of Versa Seeder Parts and Components
Page 16…….Illustrations of Cultipacker and 3 Point Hook Up
Page 17…….Illustrations of Gang Assembly’s
Page 18…….Illustrations of Available Plow Points
Page 19…….Description of Plow Point Uses
Page 20…….Hunter 600 Specifications
Page 21…….Hunter 600 Seed Planting Chart
Page 22…….Hunter 800 Specifications
Page 23…….Hunter 800 Seed planting Chart
Page 24…….Seasonal Seed information on planting times
Page 25…….Quick Guide on How to Calibrate your Seeder
Page 26…….Contact Information

3
Q. What type seeds can I plant with the PLOTMASTER™ ?
You can plant a wide variety of seeds, from very small seeds (clover, rape, chicory, etc.) to
large seeds (up to the size of soybeans, peas or corn). With the Versa Seeder you can also
plant Native Warm Season Grasses, (NWSG) See seed charts located on pages 22 and 23.
Q. What is the weight of the PLOTMASTER™ ?
The Hunter 300---616# empty, Almost 654# with seed in the seeder. The Hunter 400---666#
empty almost 706# with seed in the seeder. The PM600---1378# empty, almost 1450# with
seed in the seeder. The PM800---1450# empty, almost 1530# with seed in the seeder.
Q. What are the dimensions of the PLOTMASTER™ ?
Hunter 300**Width: 38"----Length: 68”----Height: 42”
Hunter 400**Width: 48”----Length: 68”----Height: 42”
Hunter 600**Width: 80”----Length: 124”----Height: 47”
Hunter 800** Width: 104”--Length: 124”----Height: 47”
Q. Will the PLOTMASTER™ Hunter 300, 400 fit in the back of a truck?
Yes, with the tongue folded back it will easily fit in a small pickup truck.
Q. Are spare parts available?
Yes, We have a complete inventory of spare parts. We also have customer service personnel
that can assist you with any problems you may have.
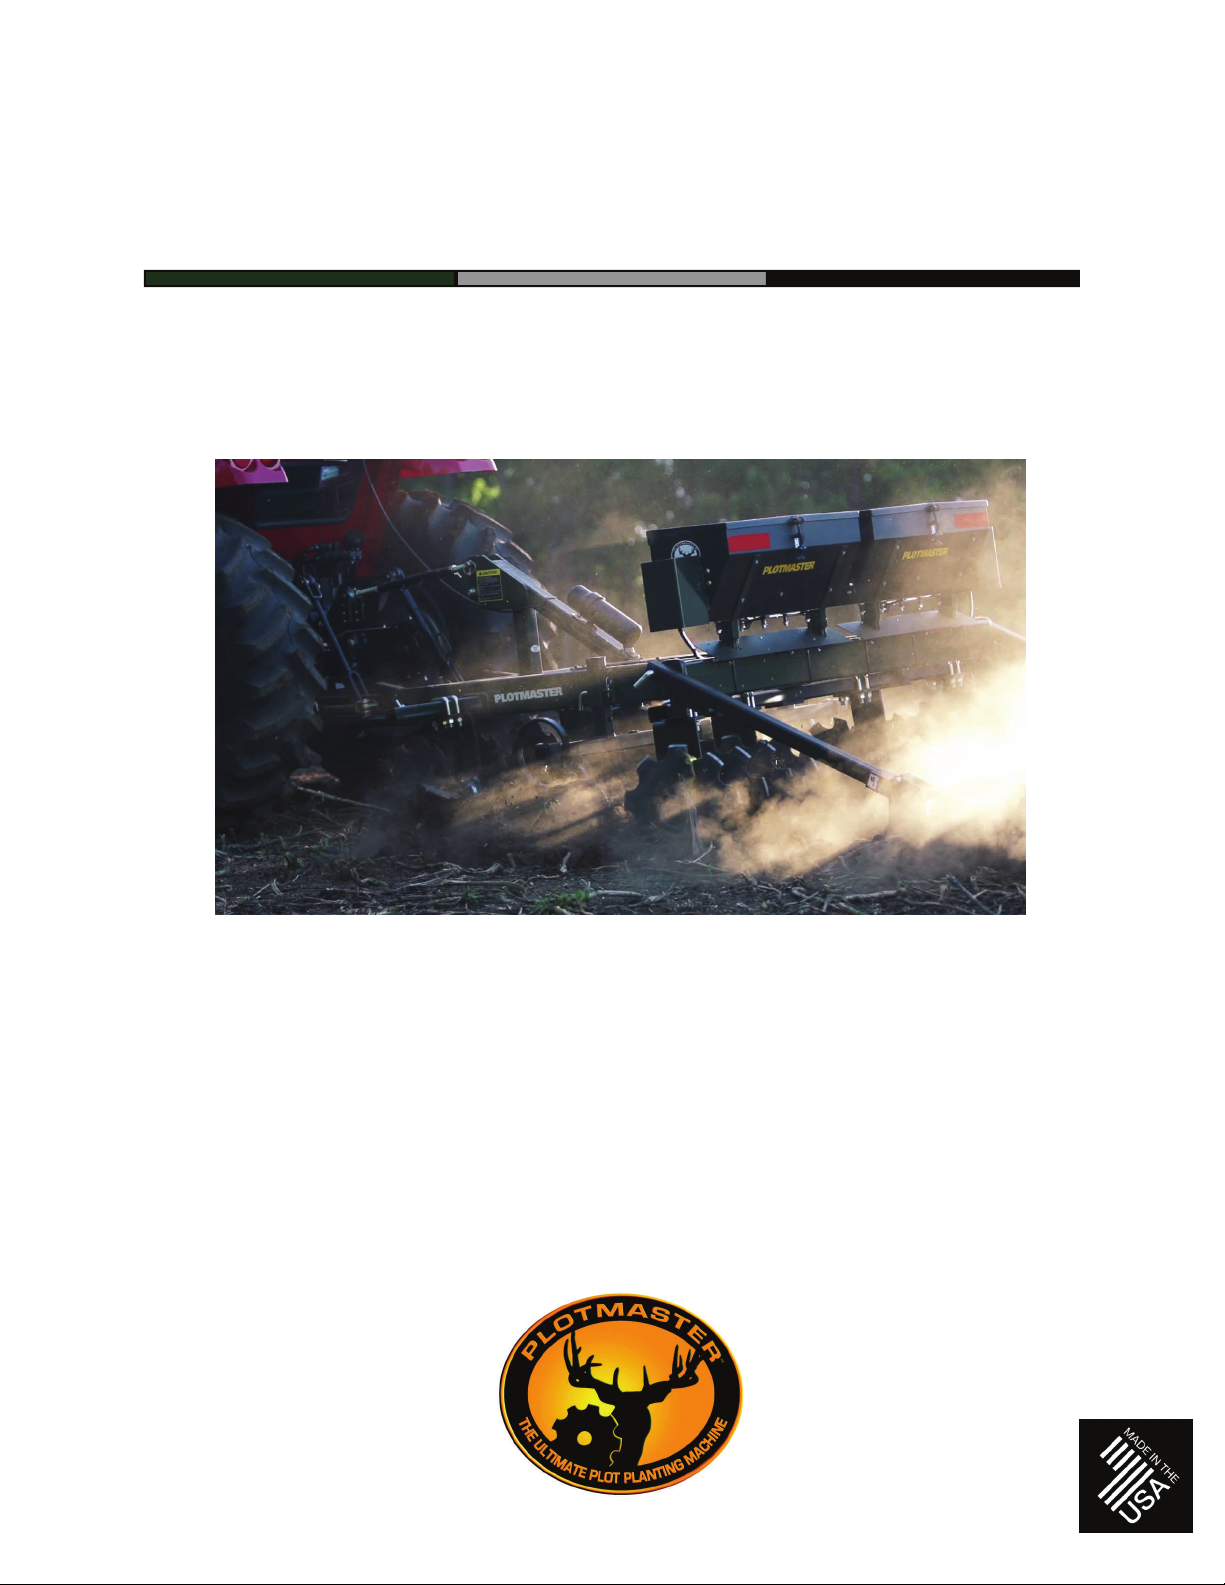
Q. Will the PLOTMASTER™ cut really hard soil?
Yes, due its weight-to-size ratio, the PLOTMASTER™ has more pounds per square inch cut-
ting capacity than most 8' to 10' drag harrows. (Sold separately are 2 Plow Attachments)
Q. How wide does the PLOTMASTER™ unit’s disc?
The Hunter 300 will break and/or plow a maximum of 36” wide, The Hunter 400 will
break and/or plow a maximum of 48” wide, The Hunter 600 will break and plow a maxi-
mum of 72” wide and the Hunter 800 will break and plow a maximum of 96” wide.
Q. How do you ship the PLOTMASTER™
We currently ship the PLOTMASTER™ throughout the United States using common LTL
carriers, but we also have a number of dealers and distributors throughout the US. We ship
our units fully assembled and ready to use with minimal set-up.
Q. What is the warranty for the PLOTMASTER™
The “PLOTMASTER”, Hunter 300, 400, 600 and 800 are all warrantied for one year
against manufacturing defects.
Here you will find some answers to questions you may have regarding
“The Plotmaster™” Hunter PE-302, PE-402, PM-603 and PM-803

4
READ OPERATING INSTRUCTIONS
CAREFULLY BEFORE USE!!!
• DO NOT OPERATE
PLOTMASTER™
OVER 10 MPH.
• DO NOT SIT, STAND OR RIDE ON THE
PLOTMASTER™
WHILE IN USE
• MAXIMUM CAPACITY OF HUNTER SERIES SEEDER
H-600 SEEDER 100 LBS
H-800 SEEDER 120 LBS
• DO NOT PUT HANDS IN SEED BOX WHILE SEEDER
MOTOR IS IN THE ON POSITION.
• DO NOT PUT LIME OR FERTILIZER IN SEEDER
Adding lime or fertilizer to your seeder will void the Warranty of “all” parts associated with
the seeding system. Fertilizer is a corrosive and can cause premature failure of Seeder compo-
nents. In addition the density of Lime and Fertilizer is much greater than seed and can bind
your brush shaft causing the motor to stall. Seed is far loftier and will not compact around
your Versa Seeder Brush and Cause damage to your seed motor like lime/fertilizer can.
***
*HELPFUL HINT ON PLANTING SMALLER SEEDS*
When planting seeds such as, clover, rape, vetch, turnips etc. Using a filler such as oil absorb
or basic kitty litter, helps create air pockets and keeps the tiny seed from packing around the
Versa brush. Also, by using this as an additive it ensures your pounds per acre on very tiny
seed as well as holds moisture in the soil for seeds that only require ¼” planting depth or less
and too, it is lofty enough that it does not bind the Versa Brush. Using additives such as dirt
or sand is NOT recommended as the density is greater and can cause damage to your Seeding
System.
DO NOT OPERATE YOUR
PLOTMASTER™
ON INCLINES GREATER
THAN 10°.

5
• KEEP HANDS AND FEET CLEAR WHEN RAISING AND
LOWERING UNIT.
• KEEP HANDS AND FINGERS CLEAR WHEN
RAISING OR LOWERING THE DRAG AND/OR
CULTIPACKER TO AVOID PINCHING
• MAKE SURE THAT THE BATTERY CLIPS ARE
CONNECTED TO THE PROPER TERMINALS TO AVOID
DAMAGE TO YOUR UNITS ELECTRICAL SYSTEM
AND/OR YOUR TRACTOR
• HUNTER 600
RECOMMENDED FOR 40 HP AND UP TRACTORS
• HUNTER 800
RECOMMENDED FOR 60 HP AND UP TRACTORS
(RED POSITIVE TERMINAL—BLACK NEGATIVE TERMINAL)
***
AVOID COMING IN CONTACT WITH ANY OTHER
METAL PARTS ON THE ATV WHEN CONNECTING THE
BATTERY CLIPS TO YOUR BATTERY
***
READ OPERATING INSTRUCTIONS
CAREFULLY BEFORE USE!!!

6
DETAILS ABOUT YOUR PLOTMASTER™
HUNTER SERIES 600
The Mainframe and its attachments are made of heavy gauge steel
components. (Drag, Cultipacker Roller, Seeder Assembly).
(refer to the diagram on page 8 to locate each of the below listed)
(A. Cultipacker Roller)
The roller is designed for compaction of the soil over the seed for greater germination of
what has been planted. The roller can also be used for added weight during tillage.
(B. Leverage Tool)
The Leverage Bar is used to aid in folding and unfolding the Cultipacker Roller. The (2)
studs on the Leverage Bar can be used to lock the Roller to the Drag Bar when in the
folded position. Use designated holes for desired use.
(C. Drag Bar w/Metal Grating)
The Drag bar and/or Metal grating is used for either leveling uneven areas or for
covering larger seed such as beans, peas, oats and rye that require more soil coverage to
germinate. The Drag Bar can be used with or without using the Metal Grating.
(D. Disconnect for Drag/Cultipacker)
These Bent pins can be removed to disconnect the Drag/Cultipaker Components from the
unit if the user wishes to do tillage only without dragging or rolling the area tilled.
(E. Seeder Motor w/Cover) (PT# SA-29-2823)
The Electric Seeder Motor’s are activated by the in-line ON/OFF switch. These motors (1
per seeder assembly) drive the spiral brush that dispenses the seed.
(Versa Seeder)
(F. Seed Flow Control Handle)
The Seed Control Handles allow you to adjust the rate of seed dispensed depending upon
the size seed you are planting. The 0-10 Scale helps in determining the diameter of the
opening. Smaller seed will be the low end, 0-2, and Larger seed will be the high end, 3-10.
(G. -R/L- Electric Seeder Assembly)
The Seeder is where your seed is dispensed from;
The H-600 maximum capacity is 50# of seed per Seeder Box. (100# total)
The H-800 maximum capacity is 60# of seed per Seeder Box. (120# total)

7
(H. Linkage Rod Connections for Seeder Assembly)
The Seed Flow Control Handle connects to the Slide Adjustments located on each box. The
Control Handle and Linkage Rods in conjunction with the Slide adjustment activates the
seed flow control from the Seeder Assembly.
(I. “V” Shaped Rear Gang Assembly)
(8—4 per axle) 16” Disk on a 1” Axle with stamped sealed bearings for longer life and
extended use of your equipment for many years. The rear disk are set up to pull tilled soil
inward, this is the soil that the front disc have tilled and thrown outward.
This tillage
design creates an optimal seed bed for any type seeds to be planted including Grass Seed!
(J. Plow Carrier with (3) H-600 (5) H-800 4” Sweep Plow Tips)
The Sweep Plow gives tillage three advantages; (1) It works as a center buster between the 2
sets of disk gangs. (2) It helps pull the unit into the ground for increased tillage. (3) Aids in
breaking up roots and heavy vegetation prior to planting.
(K. Plow Carrier Depth Adjustment)
The Sweep Plow has (4) depth adjustments. No matter the amount of vegetation your are
working with or the depth you wish to till your soil these adjustments will help you achieve
your goal.
(L. Storage)
This is where your Instruction Manual is kept for in-field reference. It can also be used to
store extra plow tips, hardware or small tools.
(M. Adjustment for Front Gang Assembly)
The Front Gang Assembly can be adjusted to (4) positions depending on the amount of
tillage desired . Shown with gang set in first pin position this is the least aggressive, each
position that the top plate is moved back the tillage becomes more aggressive.
(N. Adjustable Front Gang Assembly)
(8—4 per axle) 18” Disk on a 1” Axle with stamped sealed bearings for longer life and
extended use of your equipment for many years.
(O. On/Off Switch with Extensions)
The In-Line Switch is used to turn ON/OFF the seeder motor.
Replacement Fuse—30 AMP SLOW BLOW FUSE—On/Off Switch and Fuse Holders can be purchased separately……...
DETAILS ABOUT YOUR PLOTMASTER™
HUNTER SERIES 600

8
DIAGRAM OF HUNTER SERIES 600

9
A. CULTIPACKER ROLLER
B. LEVERAGE BAR FOR ROLLER
C. DRAG BAR WITH METAL GRATING
D. CONNECTING PIN FOR DRAG/CULTIPACKER
E. SEEDER MOTOR WITH COVER
F. SEEDER GATE HANDLE
G. RIGHT/LEFT SEEDER ASSEMBLY
H. LINKAGE ROD
I. “V” SHAPED REAR GANG ASSEMBLY
J. PLOW BAR WITH 4” SWEEP PLOW TIPS
K. PLOW BAR ADJUSTING POINT
L. INSTRUCTION MANUAL CARRIER
M. ADJUSTMENT FOR FRONT GANG ASSEMBLY
N. ADJUSTABLE FRONT GANG ASSEMBLY
O. ON/OFF SWITCH WITH EXTENSIONS
REFER TO PAGES 6, 7, 14, 15, 16 & 17 FOR MORE DETAILS ON COMPONENTS.

10
DETAILS ABOUT YOUR PLOTMASTER™
HUNTER SERIES 800
The Mainframe and its attachments are made of heavy gauge steel
components. (Drag, Cultipacker Roller, Seeder Assembly).
(refer to the diagram on page 8 to locate each of the below listed)
(A. Cultipacker Roller)
The roller is designed for compaction of the soil over the seed for greater germination of
what has been planted. The roller can also be used for added weight during tillage.
(B. Leverage Tool)
The Leverage Bar is used to aid in folding and unfolding the Cultipacker Roller. The (2)
studs on the Leverage Bar can be used to lock the Roller to the Drag Bar when in the
folded position. Use designated holes for desired use.
(C. Drag Bar w/Metal Grating)
The Drag bar and/or Metal grating is used for either leveling uneven areas or for
covering larger seed such as beans, peas, oats and rye that require more soil coverage to
germinate. The Drag Bar can be used with or without using the Metal Grating.
(D. Disconnect for Drag/Cultipacker)
These Bent pins can be removed to disconnect the Drag/Cultipaker Components from the
unit if the user wishes to do tillage only without dragging or rolling the area tilled.
(E. Seeder Motor’s w/Cover) (PT# SA-29-2823)
The Electric Seeder Motor’s are activated by the in-line ON/OFF switch. These motors (1
per seeder assembly) drive the spiral brush that dispenses the seed.
(Versa Seeder)
(F. Seed Flow Control Handle)
The Seed Control Handles allow you to adjust the rate of seed dispensed depending upon
the size seed you are planting. The 0-10 Scale helps in determining the diameter of the
opening. Smaller seed will be the low end, 0-2, and Larger seed will be the high end, 3-10.
(G. -R/L- Electric Seeder Assembly)
The Seeder is where your seed is dispensed from;
The H-600 maximum capacity is 50# of seed per Seeder Box. (100# total)
The H-800 maximum capacity is 60# of seed per Seeder Box. (120# total)

11
DETAILS ABOUT YOUR PLOTMASTER™
HUNTER SERIES 800
(H. Linkage Rod Connections for Seeder Assembly) (Older Models)
The Linkage Rods connect the Seed Flow Control Handle to the Slide Adjustments lo-
cated on each box. The Control Handle and Linkage Rods in conjunction with the Slide
adjustment activates the seed flow control from the Seeder Assembly.
(I. “V” Shaped Rear Gang Assembly)
(8—4 per axle) 16” Disk on a 1” Axle with stamped sealed bearings for longer life and ex-
tended use of your equipment for many years. The rear disk are set up to pull tilled soil
inward, this is the soil that the front disc have tilled and thrown outward.
This tillage de-
sign creates an optimal seed bed for any type seeds to be planted including Grass Seed!
(J. Plow Carrier with (3) 4” Sweep Plow Tips)
The Sweep Plow gives tillage three advantages; (1) It works as a center buster between the 2
sets of disk gangs. (2) It helps pull the unit into the ground for increased tillage. (3) Aids in
breaking up roots and heavy vegetation prior to planting.
(K. Plow Carrier Depth Adjustment)
The Sweep Plow has (4) depth adjustments. No matter the amount of vegetation your are
working with or the depth you wish to till your soil these adjustments will help you achieve
your goal.
(L. Storage)
This is where your Instruction Manual is kept for in-field reference. It can also be used to
store extra plow tips, hardware or small tools.
(M. Adjustment for Front Gang Assembly)
The Front Gang Assembly can be adjusted to (4) positions depending on the amount of
tillage desired . Shown with gang set in first pin position this is the least aggressive, each
position that the top plate is moved back the tillage becomes more aggressive.
(N. Adjustable Front Gang Assembly)
(8—4 per axle) 18” Disk on a 1” Axle with stamped sealed bearings for longer life and ex-
tended use of your equipment for many years.
(O. On/Off Switch with Extensions)
The In-Line Switch is used to turn ON/OFF the seeder motor. Re-
placement Fuse—30 AMP SLOW BLOW FUSE—On/Off Switch and Fuse Holders can be purchased separately……...
(H. Linkage Rod Connections for Seeder Assembly)
The Seed Flow Control Handle connects to the Slide Adjustments located on each box. The
Control Handle and Linkage Rods in conjunction with the Slide adjustment activates the
seed flow control from the Seeder Assembly.
(I. “V” Shaped Rear Gang Assembly)
(12—6 per axle) 16” Disk on a 1” Axle with stamped sealed bearings for longer life and
extended use of your equipment for many years. The rear disk are set up to pull tilled soil
inward, this is the soil that the front disc have tilled and thrown outward.
This tillage
design creates an optimal seed bed for any type seeds to be planted including Grass Seed!
(J. Plow Carrier with (5) 4” Sweep Plow Tips)
The Sweep Plow gives tillage three advantages; (1) It works as a center buster between the 2
sets of disk gangs. (2) It helps pull the unit into the ground for increased tillage. (3) Aids in
breaking up roots and heavy vegetation prior to planting.
(K. Plow Carrier Depth Adjustment)
The Sweep Plow has (4) depth adjustments. No matter the amount of vegetation your are
working with or the depth you wish to till your soil these adjustments will help you achieve
your goal.
(L. Storage)
This is where your Instruction Manual is kept for in-field reference. It can also be used to
store extra plow tips, hardware or small tools.
(M. Adjustment for Front Gang Assembly)
The Front Gang Assembly can be adjusted to (4) positions depending on the amount of
tillage desired . Shown with gang set in first pin position this is the least aggressive, each
position that the top plate is moved back the tillage becomes more aggressive.
(N. Adjustable Front Gang Assembly)
(12—6 per axle) 18” Disk on a 1” Axle with stamped sealed bearings for longer life and
extended use of your equipment for many years.
(O. On/Off Switch with Extensions)
The In-Line Switch is used to turn ON/OFF the seeder motor.
Replacement Fuse—30 AMP SLOW BLOW FUSE—On/Off Switch and Fuse Holders can be purchased separately……...

12
DIAGRAM OF HUNTER SERIES 800

13
A. CULTIPACKER ROLLER
B. LEVERAGE BAR FOR ROLLER
C. DRAG BAR WITH METAL GRATING
D. CONNECTING PIN FOR DRAG/CULTIPACKER
E. SEEDER MOTOR WITH COVER
F. SEEDER GATE HANDLE
G. RIGHT/LEFT SEEDER ASSEMBLY
H. LINKAGE ROD CONNECTOR (Older Models)
I. “V” SHAPED REAR GANG ASSEMBLY
J. PLOW BAR WITH 4” SWEEP PLOW TIPS
K. PLOW BAR ADJUSTING POINT
L. INSTRUCTION MANUAL CARRIER
M. ADJUSTMENT FOR FRONT GANG ASSEMBLY
N. ADJUSTABLE FRONT GANG ASSEMBLY
O. ON/OFF SWITCH WITH EXTENSIONS
REFER TO PAGES 6, 7, 14, 15, 16 & 17 FOR MORE DETAILS ON COMPONENTS.

14
THE “SPLATTER PLATE” IS DESIGNED TO ALLOW SEED TO SCATTER
AND SPREAD EVENLY.
THE PLATE IS ADJUSTABLE AND CAN DETERMINE THE DIRECTION OF
THE SEED WHEN DISPENSING. VERTICAL: DROPS SEED DIRECTLY
BEHIND THE UNIT HORIZONTAL: SPLATTERS SEED MORE WIDELY.
THE “SPIRAL BRUSH” IS DESIGNED TO MOVE, MIX AND DISPENSE
SEED TO THE TEAR DROP HOLES IN THE BOTTOM OF THE SEED BOX.
THIS INSURES AN EVEN DISTRIBUTION OF SEED AS WELL AS
BLENDING MIXED SIZED SEEDS.
Additional Seeding Note:
For lofty seed (Wheat, Rye, Oats, Grasses etc…) it may be necessary to remove the
Augur Shield inside the seeder (this is the scalloped plate that covers the Spiral
Brush) so that the seeds do not bridge between the brush and the shield causing
the motor to stall.
The reason that this happens is the dispense rate of these seeds is less than that of
the motor revolution rate. This sometimes happens with various types of Soybeans
as well but by removing the shield the issue is rectified.
VERSA SEEDER ASSEMBLY

15
VERSA SEEDER ASSEMBLY
(Above) Seed Gate Control Handle
(Above) Secondary Linkage rod connecting
Primary Linkage rod to Slide Adjustment on
second Seed Box (Pre 2015 Models)
(L) Seeder Motor Cover
(R) ON/OFF Switch, Battery Clips and
Cable Extensions to control Seeder Motor
TWO SEPARATE MOTORS FOR
SEEDING. THIS IS ALSO FOR STRIP
PLANTING OF TWO
SIMILAR SIZE SEEDS.
Adjusting Bolts located on Seeder “Y”
Brackets are for adjusting the Single
Splatter Shield all at once.

16
CULTIPACKER ASSEMBLY
(Above) Cultipacker Stop on Main Frame
(Above) Pillow Block Bearing Set Screw
needs to be tighten after initial use. Make
periodic checks thereafter
(Above) Hard Rubber Stop for Cultipacker
Roller to rest on Drag Arm when not in use.
Grease Zerk on Pillow block bearing needs
to be filled periodically
(Above) Leverage Bar helps in Folding up and
folding back the Cultipacker Roller
(Above) Pin Assembly that holds Drag/Cultipacker
This Pin can be removed if the user wishes to do
Tillage only w/o Leveling with the Drag
3 POINT HOOK-UP
(Right) Top Link Pin with Clip and bolt
for I-Match Connection.
(Left) Lift Arm Pin with Clip and (2) Size
Sleeves for correct fit of Lift Arms.
I-Match Compatible

17
GANG ASSEMBLY
(Above) Non-Greasable Sealed Bearings are used on both
front and rear gang assemblies. These increase longer life
and dependable use of your unit for years to come.
(Above) The Front Gang Assembly has (4) positions
that the Gang Assembly can be adjusted. The Front
Pin Hole (Shown Above) is the least aggressive and
each pin hole moving back will put the gang assembly
into more aggressive positions.
(Above) The Rear “V” Shaped Gang Assembly has a
fixed position and is set at a pre-determined angle for
maximum tillage. The rear disk can also be used to
place soil on top of seed. Depending on travel speed
and top link adjustment the soil disturbance can help
the dirt flow on top of the seed.
(Above) Side view of unit showing the front gang
assembly set to throw tilled dirt outward and the rear
gang assembly set for additional tillage and for pulling
the tilled dirt from the front gang assembly inward,
thus creating an optimal seed bed.

18
AVAILABLE PLOW TIPS
Reversible Tooth Point Tips
Right Turning Plow Tips

19
Turning Plow Tips – Part# TP-2R
Are used for increased tillage and for added down pressure. This
Turning Tip also works great on breaking up virgin soils and cultivat-
ing areas with sod and/or vegetation prior to preparing your plots for
planting. These turning tips act like small moldboard plows cutting
and turning over sod and/or vegetation which makes it easier for you
to cultivate and plant your plots. These turning tips also increase the
down pressure on your Plotmaster forcing the discs deeper into your
soils for increased tillage.
Reversible Tooth Spikes/Chisel Plow Tips– Part# PA-9
Are also used for increased tillage and for added down pressure. This
Reversible Tip works great to break up hard, compacted soils as well as
virgin soils prior to preparing your plots for planting. These extra sharp
spikes/chisel points penetrate the soil with ease and increase the down
pressure forcing the discs deeper into your soils for increased tillage.
Additional Hardware needed to attach these tips to your existing “S” Tines
Tip Lock (1) Per “S” Tine
7/16” x 2” Plow Bolt (2) Per “S” Tine
7/16” Nylock Nut (2) Per “S” Tine

20
PLOTMASTER™ HUNTER 600
Recommended use: Tractor 40 HP and up
Unit Includes:
• 3 Point Hitch, I Match compatible, Dual Disc Harrow, Center Plow with (3) 4”
Sweep Plow Tips, Electric Versa Seeder, Cultipacker/Drag with Metal Grating.
Dimensions:
• Length w/Cultipacker Folded: 100 ”
• Length w/Cultipacker Extended: 124 ”
• Width: 80”
• Height: 46”
• Weight: 1378#
Disc Harrow:
• 16 Heavy-Duty Notched Disc with Sealed Bearings
• (Front Disc Adjustable/Rear Disk Fixed/Adjustable Plow Attachment)
• Maximum cutting width: 72”
Versa Seeder System:
• New, Patent-Pending Versa Seeder, Reverse Auger Brush System
designed to plant all types of seeds and seed blends.
This manual suits for next models
1
Table of contents
Other Plotmaster Farm Equipment manuals
Popular Farm Equipment manuals by other brands

Major
Major MJ31-280 Operator's manual and parts list

Crary
Crary Air Reel 1010 owner's manual

MacDon
MacDon R216 installation instructions

Betterbee
Betterbee Colorado Bee Vac Product instructions

Brinly
Brinly DT-48BH owner's manual

Farmi Forest Corporation
Farmi Forest Corporation 90 OPERATION, MAINTENANCE AND SPARE PARTS MANUAL