Plum Mobile Gator 7 User manual


Content
Assembling.....................................................................................................4
Install the SIM card and Memory card.................................................... 4
Charge the battery....................................................................................5
Getting started...............................................................................................5
Use the touch panel................................................................................. 6
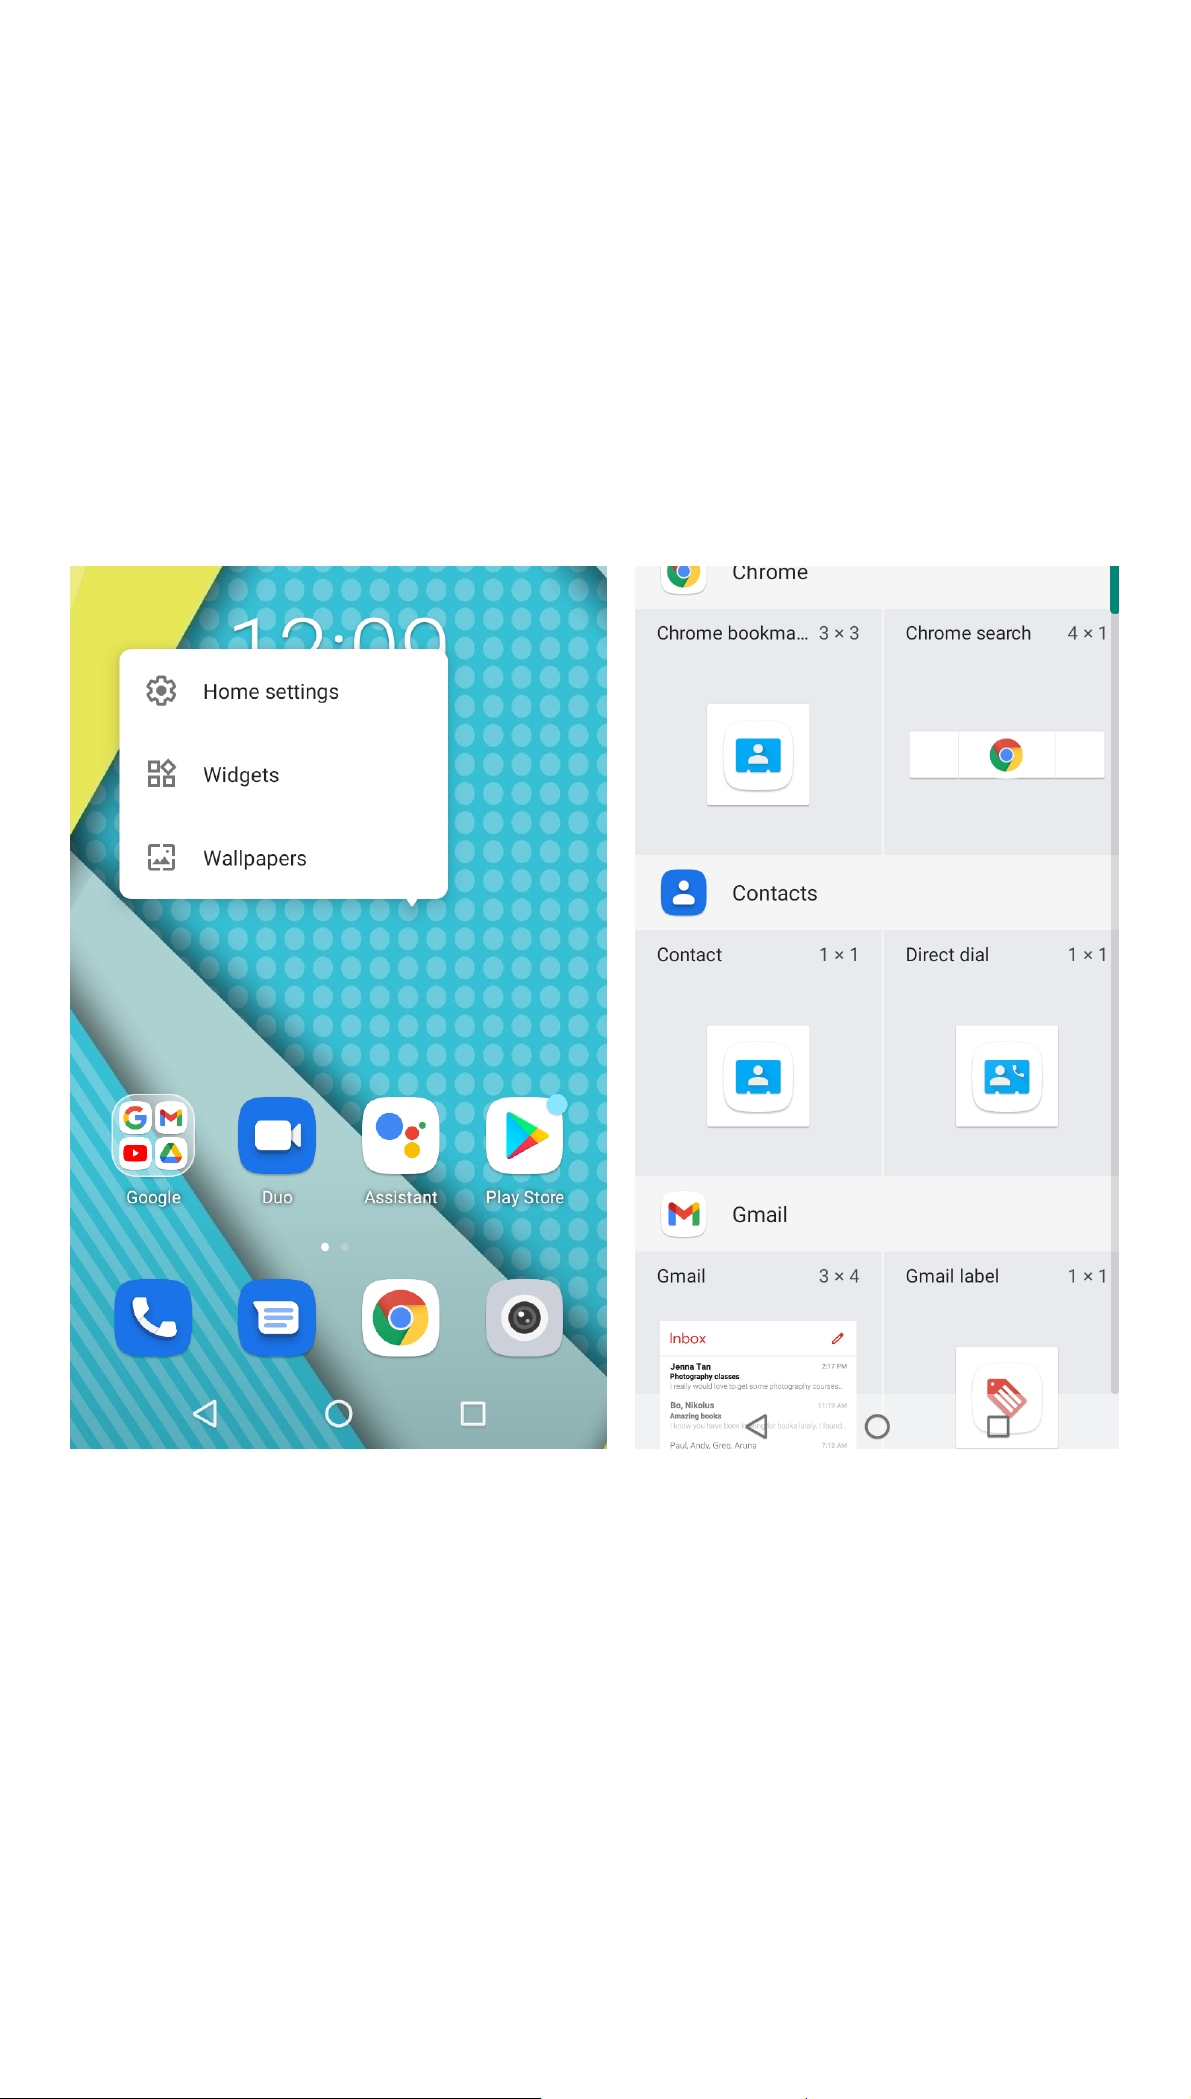
Home screen.............................................................................................7
Notification panel..................................................................................... 8
Lock & unlock the screen.............................................................................. 9
Security.......................................................................................................... 9
Enter text..................................................................................................... 10
Manage applications................................................................................... 10
Reset device.................................................................................................10
Communication........................................................................................... 11
Phone...................................................................................................... 11
Contacts.................................................................................................. 12
Import/Export contacts..........................................................................13
Messages................................................................................................ 13
Gmail....................................................................................................... 15
Play Store..................................................................................................... 16
Entertainment..............................................................................................16
Play a video.............................................................................................16
Camera....................................................................................................16
Tools............................................................................................................. 19
Calendar..................................................................................................19
Alarm.......................................................................................................19
Files......................................................................................................... 20
Sound Recorder...................................................................................... 20

Calculator................................................................................................20
Connectivity.................................................................................................21
Wi-Fi........................................................................................................ 21
BT.............................................................................................................21
NFC.......................................................................................................... 22
Safety Precautions....................................................................................... 22
Care & Maintenance....................................................................................23
Other Warning............................................................................................. 24

Assembling
Open the MicroSD/ SIM rubber plug on the top left of the device
Insert the SIM ejector tool into the small hole then press in to eject the SIM/
MicroSD Card tray.
Now you can insert the SIM and MicroSD card into the tray
!!! Warning
Please make sure to close the rubber plug properly after inserting
the SIM tray to keep the device water proof
Install the SIM card and Memory card
You need to insert the SIM card to enable the Phone function
And the memory card for the extra storage.
Ensure the SIM and the memory card are placed into the tray correctly.

Charge the battery
Please make sure always turn off the power before installing or
replacing the SIM card and Memory card.
1. You can charge the device with a travel adapter or by
connecting the device to a PC with a USB cable.
2. Battery full icon will show when finished if your device is
power off.
Warning:Please use original charger and battery.
Unapproved accessories and Battery can cause explode or
damage your device.
Getting started
Turn your device on and off
Press and hold the power key to turn on your device, to turn
off your device, press and hold the power key then tap Power
Off.
Airplane mode
The Airplane Mode will interrupt all the wireless
communication on your device. Please follow the
instructions below to turn on flight mode:
Tap SettingsAirplane mode to enable/disable Airplane mode.

Use the touch panel
You can operate the icon, button, keyboard by the
touch panel.
Including:
Touch:
To access an application, touch it with your finger. For
example: Touch an application icon, you can open the
application.
Touch and Hold:
To enter the available options for an item, touch and hold
the item.
Slide/Swipe:
Slide the screen to scroll up and down the applications,
images, and web-pages… at your convenience. You
could slide the screen horizontally too.
Drag:
Place your finger on the screen to drag an object to another
location.
Pinch/Spread:
Place your fingers of one hand on the screen surface and
draw
them apart or together to scale an element on the screen.

Home screen
You can bring all the items (applications, shortcuts, folders and
widgets) you want to your Home screen for quick access.
Slide the Home screen horizontally left and right to get a
complete view of the Home screen.
To add the widget, press and hold on the screen, then
choose the Widgets button
You are able to change the wallpaper by choose the wallpapers in the above
interface also.

Notification panel
Slide the notifications area down to open the notification panel
shown below. You can access a list of notifications.
You may tap the related icons to activate or deactivate
Wireless connection features or other function like the
Airplane mode or Flashlight.

Lock & unlock the screen
To lock/awake the screen manually, press Power key once.
Tap and hold the lock icon, then slide it up to unlock the device.
Security
You can protect your device and data by
setting screen lock or encrypting your device.
Set a screen lock
To set a screen lock, tap SettingsSecurityScreen lock from
application list.
None:Deactivate the screen lock.
PIN:Enter a numeric PIN to unlock. When prompted, enter the
PIN to unlock the screen.
Pattern:Draw a pattern to unlock. Follow the instructions to
draw your lock pattern. When prompted, draw the pattern to
unlock the screen.
Password:Enter a passcode to unlock. When prompted, enter the
passcode to unlock the screen.
Face unlock:To enable the face unlock function,
Go to SettingSecurityFace unlock, then add the face for the unlock
feature
Screen time-out
Select SettingsDisplayAdvancedScreen Timeout
from application list, you can set the time before the screen times out
and goes into lock mode.
Auto rotation
If you rotate the device while using some features, the interface will
automatically rotate as well. To prevent the interface from rotating, open
the notifications panel and select Auto-rotate,then scroll it to Off.

Enter text
You can enter text by selecting characters on the virtual
keyboard. Tap the text input field to display the virtual
keyboard.
From a text field, you can use the copy and paste feature for fast
inputting.
Manage applications
To manage the applications installed on your device, tap
SettingsApp& Notification. To uninstall an application, select the
application and tap Uninstall, tap OK to confirm.
To stop or change the settings of an application, select the
application and click Force stop.
Reset device
You can reset system and desktop settings to their original values
by the following steps:
Select SettingsSystemAdvanceReset options from application list.
Tap Erase all data (Factory reset).
Tap Erase all data
The device resets to the factory default settings automatically.
Warning!: Factory data reset will erase all data from your device
and SD card, including your google account, system and
application data and settings, and downloaded applications.

Communication
Phone
To use calling functions, tap Phone from application list.
Make calls
To make calls, you can use any of the three ways:
1. Enter numbers by using the virtual numeric keypad on the screen
2. Make a call from call log (Recent).
3. Make a call from contacts.
Answer a call
To answer a call, swipe the circled button up
To decline a call, swipe the circled button down.
To end a call in progress, tap the red button.
Call settings
To change call settings, tap the option button at the upper
right inside the call interface.
Ringtone & Vibrate
Select SettingsSound from application list.
You can set different ringtones for incoming calls. Select Phone
ringtone to open a list of ringtones, select the desired ringtone,
and then select OK to confirm.
Tap "Vibrate for calls" and select always vibrate and the device
will vibrates to notify you of incoming calls
Dial pad touch tones
Tap Dial pad touch tones to create a checkmark and your device will
sound a tone once you tap the dial pad.

Contacts
Tap Contacts from application list to access the interface.
Add new contact
1. Access Contact.
2. Tap + icon(+).
3. Enter necessary fields.
4. Tap Save.
Edit a contact
1. To edit a contact, scroll to the contact you want to change.
2. Tap Edit Contact.
3. Change necessary fields.
4. Tap Save.
Create Label
1. Tap the option button at the upper left.
2. Tap Create label
3. Enter a category name
4. Tap OK

Import/Export contacts
Import from SD/ SIM card
To copy the contacts from the SIM card/ SD Card, tap the
option button at the upper left and then SettingsImport ,
and choose the location you want to import
Export to SD card
To export contacts from your device to a memory card, tap the
option button at the upper left and then select
ExportExport to SD card, select OK to confirm.
Search for contacts
Input the desired information at the upper bar of the contact
interface, the result will be shown in the lower interface
Messages
Learn to create and send a text or multimedia message, and
view or manage messages that you have sent or received.
View messages
1. Tap Messages from application list.
2. Tap the message to view the detailed information.

Create and send SMS
1. Tap Start Chat button
2. If you want to start a group chat, please press the “create
group” at the beginning, if no, please ignore this step
3. In To field, enter the recipient’s mobile phone numbers
manually (You may also press the related contact to start
the chat directly)
4. Then press the Send to… button.
(If you are creating a group, just press the OK/ tick icon
inside the input interface)
5. In Type message, enter the text of the message.
6. Tap(+) to send the message.
Create and send MMS
Multimedia message can include pictures, sound and text.
1. Tap Start Chat
2. After enter the SMS interface,
Tap (+) button at the title bar.
3. Select one of the items below.
Pictures: Insert image.
Capture picture:Capture new picture and insert the picture.
Videos: Insert video clip.
Capture video: Capture new video clip and insert the video clip.
Record audio: Press and hold the mic icon to record sound, release the
icon to end the recording
Tap to send the message.

Gmail
You can retrieve new email messages from the Google Mail
webmail service to your inbox. Before you can send or receive
mail on your device, you need to set up a Gmail account.
Create a Gmail account
If you don’t have a Google Account, tap New, then follow
the on- screen instructions to create a new one.
Set up a Gmail account
If you want to add an existing account, tap Existing, enter your
email address and password, and then select Next, when you
are finished setting up the email account, the email messages
are downloaded to your device.
View email messages
When you open the email account, the amount of unread
email messages is displayed at the title bar and the unread
email messages are displayed in bold.
Create and send an email
1. Tap the Compose icon.
2. In To field, enter the recipient’s email addresses manually and
separate them with a comma
3. Add more recipients by tapping Cc/Bcc.
4. To insert attachments, tap the paper clip icon button at the
upper right and select Attach file.
5. Enter the subject and the text.
6. Tap to send the email.

Play Store
Play Store allows you to easily download an abundance
of applications directly to your device. Before using the
Play Store, you must have a Google Account.
Note
All applications offered by Play Store are developed by third party. To
get the information about the developers, you can
read the descriptions of each application.
Our company is not liable for performance issues caused by third-
party applications.
Android, Google Play, and the Google Play logo are trademarks of
Google Inc.
Entertainment
Play a video
1. Go to Files
2. Select a folder.
3. Select a video to play.
4. Control playback with the virtual keys.
Camera
You may enter the Camera interface by click the
Camera icon
With the camera function, you can capture photos and take videos.

Capture a photo
1. Open the application list and select Camera.
2. Before taking a picture, you need to know some settings.
Place two fingers on the screen and spread them apart or move
fingers closer together to zoom in or zoom out.
3. Aim the lens at the subject and tap to take a photo.
The photo is saved automatically to the folder DCIM.
4. Select the image viewer icon at the upper right to view the
pictures.

Record a video
1. Open the application list and select Camera. Slide to
right for the video mode.
2. Tap to start recording. The length of the video
recording is restricted by the available space on your storage.
3. Tap to stop recording. The video is saved
automatically to the folder DCIM.
4. After recording videos, select the image viewer icon at
the lower right to view the recorded videos.

Tools
Calendar
With the Calendar feature, you can consult the calendar by day, week,
or month, create events, and set an alarm to act as a reminder, if
necessary.
To access the calendar, tap Calendar from the application list.
To create an event, tap the date and tap the pop up + icon.
Fill in the fields, and set category, date, time & an alarm.
After you finish, select DONE.
You can view calendar in different views, Day, Week, Month and All.
To delete an entry, tap the event to open it, and then tap the icon on the
right top corner, then select Delete.
Alarm
From application list, tap Clock, and then select . Tap the +
button on the bottom screen to add alarm.
Tap the numeric pad to set alarm time, and then select AM or PM, when
you are finished, tap OK.
Tap the time to change alarm time.
1. Set alarm time, repeat cycle, and alarm ringtone, taps OK
after finished.
2. Tap “cancel” to shut down the alarm, and tap “ring again”,
then the alarm will stop ringing for a few minutes.
3. Untick the clock to stop using the clock.
4. Long taping the clock then it can be deleted.

Files
Many features of the device, such as images, videos,
documents, received attachments and downloaded files or
applications, use memory to store data.
With File, you can store and browse files and folders in your
device, or edit, move, copy files; you can send files to
compatible devices as well.
Note: Some files formats are not supported depending on the
software of the device.
Some files may not play properly depending on how
they are encoded.
Sound Recorder
With Recorder, you can record a voice memo.
From application list, tap Sound Recorder.
To record a voice memo, tap .
To Pause the recording, tap .
To End the recording, tap .
To view all the voice recording, Tap
Calculator
With this feature, you can use the device as a calculator.
The calculator provides the basic arithmetic functions.
Tap the virtual numeric and calculation keys to perform
a calculation.
Table of contents
Other Plum Mobile Cell Phone manuals

Plum Mobile
Plum Mobile B106 User manual

Plum Mobile
Plum Mobile E100 User manual

Plum Mobile
Plum Mobile RAM 10 User manual

Plum Mobile
Plum Mobile RAM 8 User manual

Plum Mobile
Plum Mobile Caliber User manual

Plum Mobile
Plum Mobile Bubby User manual

Plum Mobile
Plum Mobile Coach Plus II User manual

Plum Mobile
Plum Mobile Axe Plus 2 User manual

Plum Mobile
Plum Mobile RAM PLUS User manual

Plum Mobile
Plum Mobile Buzz T200 User manual