PLUSLITE PLUSBAT-PL083 User manual

PLUSBAT-PL083 User Manual Page 2
PLUSBAT-PL083 Synopsis
Unpacking: Thank you for purchasing the PLUSBAT PL083 by PLUSLITE Products. Every
PLUSBAT PL083 has been thoroughly tested and has been shipped in perfect operating condition.
Carefully check the ship- ping carton for damage that may have occurred during shipping. If the
carton appears to be damaged, carefully inspect your fixture for any damage and be sure all
accessories necessary to operate the unit has arrived intact. In the case damage has been found or
parts are missing, please contact our toll free customer support number for further instructions. Do not
return this unit to your dealer without first contacting customer support.
Introduction: The PLUSBAT PL083 is a DMX intelligent, IP rated LED battery uplight fixture. This
fixture can be used in a stand alone mode or connected in a Master/Slave configuration. This par has
multiple operating modes: RGBW dimmer mode, Static Color mode, Auto Run mode, Color Macro
mode, and DMX control. This product is intended to be used by professionally trained personnel
only and isnot suitable for private use.
These instructions contain important safety information regarding the use and maintenance of this
unit. Please keep this manual with the unit, for future reference.
Caution! There are no user serviceable parts inside this unit. Do not attempt any repairs yourself,
doing so will void your manufactures warranty. In the unlikely event your unit may require service
please contact Più39.
PLEASE recycle the shipping carton when ever possible.
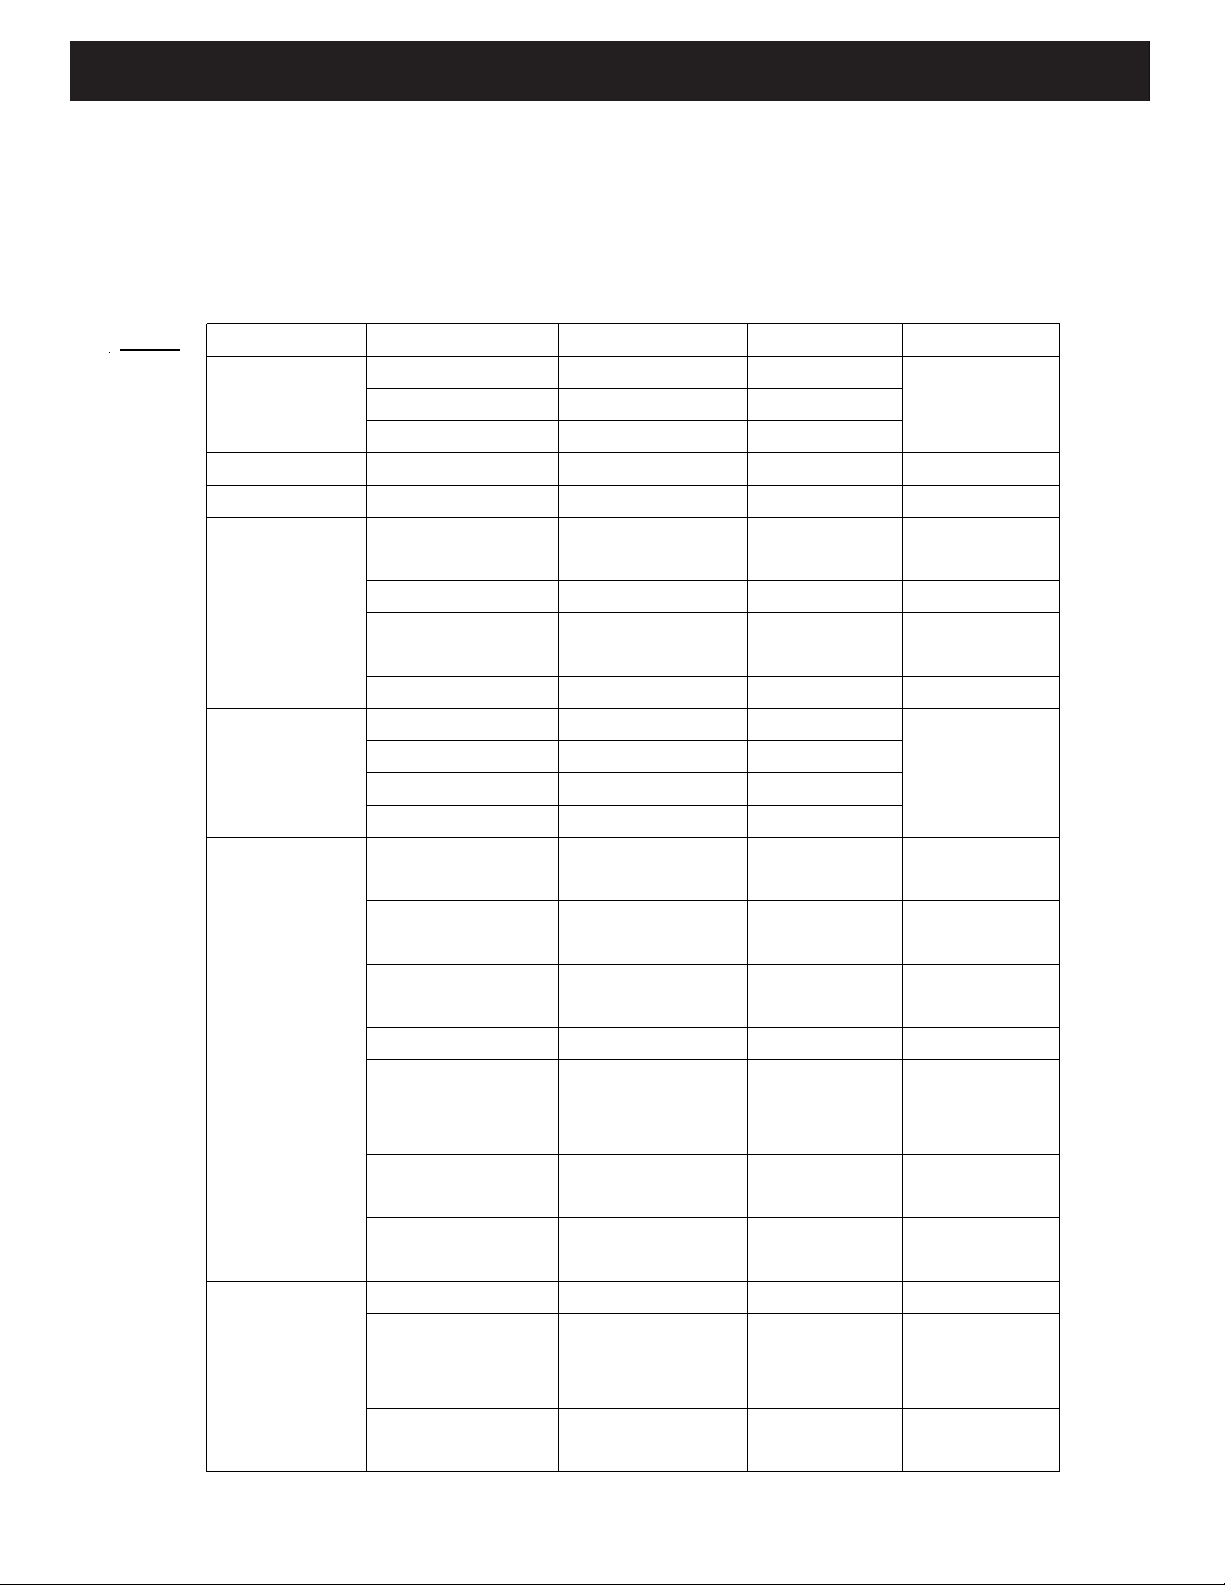
• Light source: 4 X 12W RGbW LEDs
• Drive current:650mA
• Liminus flux: 1580
• Long battery life Eco mode extended battery Life
• Input Voltage:I00-240V AC.50/60Hz
• Baltlery storage: 15.6Ah
• Operating time:8 hours at full RGBW on
• Charging time: 6 hours
• Battery type: Litium ion
• Vottage: 16.SV
• IP rating:IP54
• Wireless DMX
• OLED display
• Control Protocol:DMX512 via wireless/ DMX512
• DMX channels:4,6 or 10 channels
• Control modes: Built-in programs, Auto, Manual, Master/Slave, DMX, W-DMX
• Beam angle: 10°
• Dimmer: 0-100%
• Strobe: 0- 15Hz
• Housing: Back aluminum and iron
• Connections: 3-pin XLR IN/OUT IP54
• Cooling: Aluminum heatsink
• T° OperationT: -20°C -40°C
• Dimensions: 195 x 160 x 260 mm (LxWxH) Weight: 5.0 Kg

PLUSBAT-PL083 User Manual Page 2
PLUSBAT- PL083 Warranty Registration
PLUSBAT-PL083 Installation
The PLUSBAT PL083 carries a 2 years limited warranty. All returned service items whether under
warranty or not, must be accompany a return authorization (R.M.A.) number. The R.M.A. number must
be clearly written on the out- side of the return package. A brief description of the problem as well as
the R.M.A. number must also be written down on a piece of paper included in the shipping carton. If
the unit is under warranty, you must provide a copy of your proof of purchase invoice. You may obtain
a R.M.A. number by contacting. our customer support team on our customer support number. All
packages returned to the service department not displaying a R.M.A. number on the outside of the
package will be returned to the shipper. Shipping costs are charged to the customer.
The unit can be used onground or can be mounted using a mounting clamp (not provided).
The equipment must be installed by a professional, and it must be installed in a place where it is out
of the reach of people’s grasp.
Ensure ALL connections and end caps are properly sealed with a non-conductive dielectric
grease (available at most electrical suppliers) to prevent water ingress/condensation and/or
corrosion
Before plugging fhe unit in.always make sure that the power supply matches the product
specification voltage.
Do not attempt to operate a 120V specification product on 230V power.
Charging the built in baltery
1) In order to chorge the bottery you need the optional charger (not included)
2) Turnoff the power.
3) Connect the PLUSBAT on the charger
4) Please make sure that the battery socket from the PLUSBAT is perfectly fixed
5) Connect the chorger to a powetCON to Schuko power cable.
6) Then plug the other end of the powerCON to Schuko power cable into a proper electric power
supply socket.
7) Charge the batlery wtthin 6 hours.
8) The four LEO indicators from the charger will light up green when the PLUSBATis fully
charged.

PLUSBAT-PL083 User Manual Page 2
⚫
Always mount this unit in safe and stable matter.
⚫
Power-supply cords should be routed so that they are not likely to be walked on or pinched by
items placed upon or against them, paying particular attention to the point they exit from the unit.
⚫
Cleaning -The fixture should be cleaned only as recommended by the manufacturer. See page 24
for cleaning details.
⚫
Heat -The appliance should be situated away from heat sources such as radiators, heat registers,
stoves, or other appliances (including amplifiers) that produce heat.
⚫
The fixture should be serviced by qualified service personnel when:
A.
The power-supply cord or the plug has been damaged.
B.
Objects have fallen, or liquid has been spilled into the fixture.
C.
The fixture does not appear to operate normally or exhibits a marked change in performance.
D.
The fixture has fallen and/or subjected to extreme handling.
PLUSBAT- PL083 Safety Guidelines
⚫
Do not attempt to operate this unit if the power cord has been frayed or broken. Do not attempt to
remove or break off the ground prong from the electrical cord. This prong is used to reduce the risk of
electrical shock and fire in case of an internal short.
⚫
Disconnect from main power before making any type of connection.
⚫
Do not remove the cover under any conditions. There are no user serviceable parts inside.
⚫
Never operate this unit when it’s cover is removed.
⚫
Never plug this unit in to a dimmer pack
⚫
Always be sure to mount this unit in an area that will allow proper ventilation. Allow about 6”
(15cm) between this device and a wall.
⚫
Do not attempt to operate this unit, if it becomes damaged.
⚫
During long periods of non-use, disconnect the unit’s main power.

PLUSBAT PL083 User Manual Page 3
PLUSBAT-PL083 IP54 NotIce
IP54 RATED
An
IP
rated lighting fixture
is
one, which
is
commonly installed in
outdoor environments and has been designed with an enclosure
that effectively water. The
International Protection (IP)
rating system
is
commonly expressed as
"IP"
(Ingress Protection) followed by two
numbers (i.e. IP54) where the numbers define the degree of
protection. The first digit (Foreign Bodies Protection) indicates the
extent of protection against particles entering the fixture and the
second digit (Water Protection) indicates the extent of protection
against water entering the fixture. An IP54 rated lighting fixture
is
one, which has been designed and tested to protect against the
ingress of dust (5) and low-pressure water jets from any direction (4).
MAR
I
NE/COAS
T
AL ENV
I
RONMEN
TI
NS
T
ALLAT
I
ONS!
Please note although this fixture is IP rated, the fixture is NOT
suitable for marine and/or coastal environment installations.
Installing this fixture in a marine and/or coastal environment may
cause
corrosion and/or excessive wear to the interior and/or
exterior
components of the fixture. Damages and/or performance
issues
resulting from installation in a marine and/or coastal
environment
will void the manufactures warranty and will NOT be
subject to any
warranty claims and/or repairs.

PLUSBAT-PL083
Layout
PLUSBAT PL083 User Manual Page 4
3P Connector In/Out
Enter button
Top
Adjustment knob
4 x 12W RGBW LEDs
OLEO display + control buttons
Sideback
Wireless DMX receiving antenna
Bottom
Power ON/OFF button
3-pin DMX IP54 signal connector IN/OUT
Mounting hole
Battery charger socket

PLUSBAT-PL083 Control Mode
PLUSBAT-PL083 User Manual Page 5
Pin 3 = Data True (positive)
This fixture has affluent effect programs . It can be operated easily.
Menu Menu1 Menu2 Menu3 Menu4 Functions
1:DMX
1)Address: 001-512
DMX mode
2)Channels: 4/6/9-CH
3)W-DMX: On/Off
2:Slave Slave mode
3:AUTO Auto run mode
4:Program
1)Mode: 1-14 Built-in
program mode
2)Color:(Mode:1) 0-15 Static color
2)Speed:(Mode:2-1
4) 1-100 Speed
3)Strobe: 0-99 Strobe
5:Dimmer
1)Red: 000~255
Dimming mode
2)Green: 000~255
3)Blue: 000~255
4)White: 000~255
6:Settings
1)Curves Select: 1- 4 Dimming curve
selection
2)Dimmer Speed: Fast/ Smooth Dimming speed
selection
3)DMX Fail: Off/Hold DMX signal
option
4)ECO: On/Off Economy mode
5)DMX Sync: On/Off
DMX
synchronization
setting
6)Lock Yes/No Lock screen
setting
7)Factory: Yes/No Restore factory
set
7:Information
Versions: Vx.x.x Version display
Temperature: √/×
Temperature
control
detection
WDMX: On/Off Wireless DMX
mode
- Auto running mode
- Built-in program mode - DMX mode
- Slave mode
- Dimming mode
- Setting mode
- Information mode

PLUSBAT-PL083 Control Mode
PLUSBAT PL083 User Manual Page 6
A. OPERATION
Press the MODE, UP or DOWN button to transform menus.
Operation Mode illustration
Auto running mode
The light can run in according with the speed and strobe of built-in
programs Pr.02~ Pr.14.
Built- in Program mode
There are 14 built-in programs. Please press the setup button to
enter and up or down button to select them. As followings:
1. Mode:01 Static color effect program
Mode:0
1
Color : 00~15
Strobe: 00~99
0.Black 1.Red 2.Green 3.Blue 4.Whit
e
5.Ambe
r
6.Orang
e
.7Yello
w
8.Purpl
e
9.Pink 10.Cya
n
11.Lig
ht Red
12.Lig
ht
Green
13.Ligh
t Blue
War14.
m White
15.Cold
White
2. Mode:02~14 built-in effect programs.
Mode:02~1
4
Speed: 001~10
0
Strobe: 00~99
Slave mode “SLAV”
After connecting the DMX cable, the light will run with the main
fixture at the same step.
DMX mode
Press the setup button to enter and select by the up or down button.
DMX
Address : 001~512
Channels
:
4/6/9-ch

PLUSBAT- PL083 DMX Channel Sheet
PLUSBAT PL083 User Manual Page 7
DMX Channel Sheet
Function DMX
Value
Setting 4
Channel
s
6
Channel
s
9
Channel
s
Dimmer 000-255 0~100% 1 1
Red 000-255 0~100% 1 2 2
Green 000-255 0~100% 2 3 3
Blue 000-255 0~100% 3 4 4
White 000-255 0~100% 4 5 5
Color Preset
0~15 No function
6
16~31 R(255)G(0)B(0)W(0)
32~47 R(0)G(255)B(0)W(0)
48~63 R(0)G(0)B(255)W(0)
64~79 R(0)G(0)B(0)W(255)
80~95 R(255)G(150)B(0)W(0)
96~111 R(255)G(180)B(0)W(0)
112~127 R(255)G(255)B(0)W(0)
128~143 R(255)G(0)B(255)W(0)
144~159 R(255)G(0)B(140)W(0)
160~175 R(0)G(255)B(255)W(0)
176~191 R(255)G(0)B(0)W(210)
192~207 R(0)G(255)B(0)W(210)
208~223 R(0)G(0)B(255)W(210)
224~239 R(255)G(200)B(40)W(90)
240~255 R(255)G(255)B(255)W(255)
Program
0 No function
7
1~19 Program 02
20~39 Program 03
40~59 Program 04
60~79 Program 05
80~99 Program 06
100~119 Program 07
120~139 Program 08
140~159 Program 09
160~179 Program 10
180~199 Program 11
200~219 Program 12
220~239 Program 13
240~255 Program 14
Speed 0-255 Slow to fast Program 02-14 8
Strobe 0-10 No function 6 9
11-255 Speed: slow to fast

PLUSBAT PL083 Control Mode
PLUSBAT - PL083 User Manual Page 8
Dimming mode
Please press the setup button to enter and select by the up or down button. As
Follows:
Dimme
r
Red: 000~25
5
Green: 000~25
5
Blue: 000~25
5
White: 000~25
5
Setting mode
Please press the setup button to enter and select by the up or down button. As
Follows:
Setting
s
Curves Select
Dimmer Speed
DMX Fail
ECO (Economy)
Dmx Sync
Lock
Factory
1:Dimming curve setting
There are four available dimming curves. Please press the setup button to enter
and select by the up or down button. As follows:
Curves Select
1 )linear
2)Square Law
3)Inv Square Law
4)S-Type
a. linear dimming b. Square Law dimming c. Inv Square Law dimming d. S-curve dimming

PLUSBAT-PL083 Control Mode
PLUSBAT-PL083 User Manual Page 9
2:Dimming speed setting
Please press the setup button to enter and select by the up or down button.As
follows:
Dimmer Speed Fast
Smooth
3:DMX Fail console DMX signal clear.
Please press the setup button to enter and select by the up or down button. As
follows:
DMX
Fail
Off (DMX signal connection fail,light off)
Hold (DMX signal connection fail,lighting
keeps current state)
4: ECO mode
Please press the setup button to enter and select by the up or down button.As
follows:
ECO On
Off
5:DMX Sync
In DMX mode, several lights can also operate at the same step, even though no
DMX control for a period of time.
Please press the setup button to enter and select by the up or down button. As
follows:
DMX Sync On
Off
6:lock screen setting
Lock Yes
No
7:Restore factory set
After carry out this function, all data will restore initial state.
Please press the setup button to enter and select by the up or down button. As follows:
Factory Yes
No

PLUSBAT-PL083 Control Mode
PLUSBAT-PL083 User Manual Page 9
Information mode
Save related messages.
B.
Wireless DMX Usage
a. When the W-DMX is on, press WDMX for 3 seconds, unlock WDMX match condition.
b. When the W-DMX is off, the light don’t receive WDMX signal.
C. Notice
a. When products are power on, pressing the “MODE” and “SETUP” buttons for some
seconds at the same time. Then they can restore factory settings and the data will be
initialized.
b. If no press any button in 30s, it will lock screen automatically and display percentage
0-100 of “ lock” and “electric quantity”(These data is reference value. The electric
quantity will change obviously when the lighting is on or off.)
c. The products power on or open the light. If the LED display flash “temperature×” , to
make sure they can operate normally, please check whether lines of internal
temperature control connect well.
d. The products power up. If the LED display will flash“fail”,the wireless DMX
detection is wrong. Please check whether the wireless DMX is normal.
e. In order to avoid any problem, please follow the user manual to make sure it is in
safety operations.
f. If the environment temperature is not in the using range, please reduce the using time
of the full power to prevent products damaging because of overheating.
g. In order to prevent the accident, please don’t tear down the light under the condition
of charging.
Information
Versions :x.x.x
Temperature:√/×
WDMX:HOST/SLAVE

Dimensional Drawing
PLUSBAT-PL083
PLUSBAT-PL083 User Manual Page 10
*NOT TO SCALE unit : mm
187
278
179
304
104

PLUSBAT-PL083User Manual Page 11
PLUSBAT-PL083 Cleaning
Due to fog residue, smoke, and dust cleaning the internal and external optical lenses must be car-
ried out periodically to optimize light output.
1.
Use normal glass cleaner and a soft cloth to wipe down the outside casing.
2.
Clean the external optics with glass cleaner and a soft cloth every 20 days.
3.
Always be sure to dry all parts completely before plugging the unit back in.
Cleaning frequency depends on the environment in which the fixture operates (i.e. smoke, fog resi-
due, dust, dew).

PLUSBAT-PL083 User Manual Page 12
PLUSBAT-PL083
Please Note: Specifications and improvements in the design of
this unit and this manual are subject to change without any prior
written notice.
Model: PLUSBAT-PL083
Voltage:
LEDs:
IP Rating:
Drive current:
Charging Time:
Operating Time:
Weight:
Dimensions:
Colors:
DMX Channels:
Warranty:
110V ~ 240V/50~60Hz
4x12W RGBW LED’s
IP54
650mA
6 hours
8 hours on full RGBW
5Kgs.
195 x 180 x 280mm
RGBW Color Mixing
DMX 512 4/6/10 ch
2 Year
Technical Specifications
www.pluslite.eu
Table of contents