PLUSLITE BAT LED User manual

BAT LED
Battery Led Light
User Instructions
https://www.piu39av.com/pluslite-lighting/

2
TABLE OF CONTENTS
1.
S
af
ety
I
nst
r
uctions
................................................................................................2-4
2. Technical Specifications
.........................................................................................4
3. How To Control The Unit
..................................................................................5-6
4. Menu.......................................................................................................................7-9
5.Conrtol method.......................................................................................................9-12
6.DMX control........................................................................................................12-13
7
. Trouble shooting
....................................................................................................14
8
. Fixture Cleaning
....................................................................................................15
9. Precautions.........................................................................................................15-16
Statement
The product has well capability and intact packing when leave
factory. All of the user should comply with warning item and manual, any
misuse cause of the damages are not included in our guarantee, and
also can not be responsible for any malfunction & problem owing to
ignore the manual.
1.
S
af
ety
I
nst
r
uctions
Please keep this User Guide for future consultation. If you sell the unit to another
user, be sure that they also receive this instruction booklet.
Unpack and check carefully there is no transportation damage before using
the unit.
Before operating, ensure that the voltage and frequency of power

3
supply match the power requirements of the unit.
It’s important to ground the yellow/green conductor to earth in order
to avoid electric shock.
The unit is for indoor use only. Use only in a dry location.
The unit must be installed in a location with adequate ventilation, at
least 50cm from adjacent surfaces. Be sure that no ventilation slots are
blocked.
Disconnect main power before replacement or servicing.
Make sure there are no flammable materials close to the unit while operating as
it is fire hazard.
Use safety cable when fixes this unit. DO NOT handle the unit by taking its head
only, but always by taking its base.
Maximum ambient temperature isTa:40℃.DONOT operate itwhere the
temperature ishigher than this Unit surface temperature may reach upto85℃.
DO NOT touch the housing bare-hand during its operation. Turn off the power
and allow about 15minutes for the unit tocool down before replacing or serving.
In the event of serious operating problem, stop using the unit
immediately.Never try to repair the unit by yourself. Repairs carried out by
unskilled people can lead to damage or malfunction. Please contact the
nearest authorized technical assistance center. Always use the same type
spare parts.
DO NOT touch any wire during operation as high voltage might be causing
electric shock.
Warning:
To prevent or reduce the risk of electrical shock or fire, do not expose the unit to
rain or moisture.
DO NOT open the unit within five minutes after switching off.

4
The housing, the lenses, or the ultraviolet filter must be replaced
if they are visibly damaged.
Caution:
There are no user serviceable parts inside the unit. DO NOT open the housing
or attempt any repairs yourself. In the unlikely event your unit may require
service, please contact your nearest dealer.
Installation:
The unit should be mounted via its screw holes on the bracket. Always ensure that
the unit is firmly fixed to avoid vibration and slipping while operating.
And make sure that the structure to which you are attaching the unit is secure
and is able to support a weight of 10 times of the unit’s weight. Also always use a
safety cable that can hold 12 times of the weight of the unit when installing the
fixture.
The equipment must be fixed by professionals. And it must be fixed at a place
where is out of the touch of people and has no one pass by or under it.
2. Technical Specifications
Light Sources: 4x12W 6in1 RGBWA+UV LED
Power Consumption: 48w
Power Voltage: AC 100-250V, 50/60Hz
Dimension: 14x13x27cm
Net Weight: 2.4Kgs
Beam angle : 25°
Control
DMX Channel: 6/10 Channels
Control Modes: DMX 512 / sound / master-slave / auto/ IRC/ WiFi(optional)
Battery : can last 6 hours after the light is charged.
Construction
Display: LCD Colorful display
Data In/Out socket: 3-pin
Protection Rating: IP20

5
3.Function introduction
1. DMX512, can control the light with Dmx cable or 2.4G wireless built-in
dmx512 receiver
2. Mater and slave can joint control through Dmx cableor 2.4G wireless built-in
dmx512 receiver
3. Control by cell phone with Wifi , support Android version above 2.3,Apple
Ios4.3 and above this version
4. App (Cell phone) : Led home language : Chinese or English
5. Static color option ( 6 colors,dimming value 0-255) + Strobe (Speed 0-20)
6. Macro function : 32 colors optional
7. Auto color skip function (Speed 0-20)
8. Color gradual change (Speed 0-20)
9. Color sudden change (Speed 0-20)
10. Strobe with RED,GREEN,BLUE,YELLOW (Speed 0-20)
11. 3 sound control function ( skip,gradual,strobe) +sound sensitivity
(0-100),adjust by Menu or IRC
12. 2.4G wireless switch : turn on or off the power of 2.4G wireless, and select
25G wireless mode on or off by the interface.

6
13. Wifi module electronic switch, through the menu to open or close the 2.4G
wireless power, through the upper left corner of the interface icon to see
whether to open or close the wireless module
14. White balance settings, the brightness of the six colors to make appropriate
adjustments (also fine-tuning the role of current), the value of (127-255)
15. The battery logo in the upper right corner of the interface, can be turned on
or off by setting the logo appears, such as the product without the battery can
be set to off
16. Screen saver settings, can be set to normally open or 5 seconds, 10
seconds, 15 seconds after the automatic closure of the display backlighting
17. Fan control, according to the temperature to open the fan or smart closed,
and can be forced to set to high-speed, medium speed, low mode
18. Infrared remote control function can be set through the menu to open or
close

7
4.Menu

8

9
Control interface
1.1.8 inch FTF display: Display menu functions and parameters
2. Press the key to define
Menu: Main Menu Function Selects / exits the submenu
UP: Selects the previous menu / parameter increment
Down: Selects the next menu / parameter decrement
Enter: Confirms the selected function / Goes to the next menu level
5.Operation method
To select a preset function, press the MENU button to enter the main menu,
the display will display the corresponding menu function, when you press
the MENU button again, select the next menu function, such as repeatedly
press the MENU button will continue to Press the ENTER button to
confirm or go to the next level menu function when the main menu mode is
selected or the UP / DOWN is used to select the main menu.
If the system parameter is set, press the ENTER button to return to the
previous menu function status automatically. System parameters are
automatically saved without pressing the enter key.

10
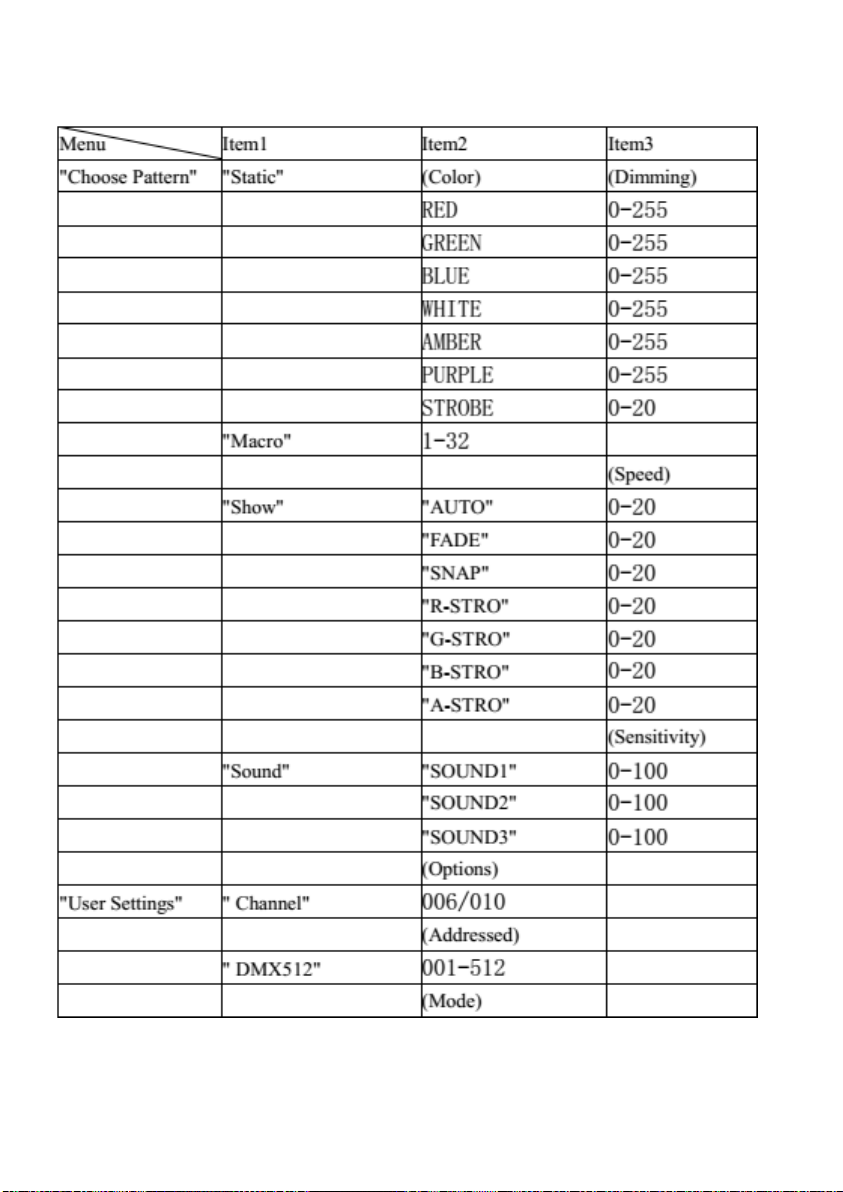
'Choose pattern' (Selection mode)
Select Choose pattern, press ENTER button to confirm, the display will
display the corresponding function menu. Such as static color, macro color
mixing, recognition mode, voice mode. Press the UP / DOWN button to
select between the functions. Pressing the ENTER key causes the display
to advance to the next level. Pressing the MENU key will exit to the
previous menu level and the parameter will be saved automatically.
'User setting'
Select 'user setting' (console control mode set up)
, Press the ENTER key to confirm, the display will enter the channel
option, use the UP / DOWN buttons to select '6 CH', '10 CH'. When the
ENTER button is pressed again, the menu will automatically jump to the
DMX512 address setting mode, UP/DOWN button, you can adjust the
required address code between 1 and 512. After selecting, the parameters
will be saved automatically.When you receive a 512 signal, the interface
will appear 'Connection’prompt. If you disconnect the 512 signal, the
interface will appear 'Disconnect' prompt, if you press the ENTER or
MENU button, the display will exit to the previous menu level mode.
Slave mode
Select 'slave' and press the ENTER button to confirm and 'OK' will be
displayed. The interface will appear 'connection' prompt, if the host signal
is disconnected, the interface will appear 'disconnect' prompt, if you press
the button, press the button to enter the main menu, ENTER or MENU
button, the display will exit to the previous menu mode
'System setting' mode
Select "System settings" and press the ENTER button to move to the next
level. Use the UP / DOWN buttons to select a different setting for each
function. Press the ENTER or MENU button to exit to the previous menu
mode

11
DMX512 control console control mode
In the 'User setting' interface, press the ENTER button to confirm. The
'Channel' mode is displayed. Use the UP / DOWN keys to select '6CH' or
'10CH'. Press the ENTER button to automatically jump to 'DMX512'
Address code setting), use the UP / DOWN buttons to adjust the address
code you want to set between 1 and 512. At this point you can receive
DMX512 console control signal.
If you want to use this function, please refer to the explanation below to set
DMX512 address of 4 fixtures
6CH mode: 1.: A001, 2: A007, 3: A013 4: A019
10CH mode: 1.: A001, 2: A0011, 3: A021 4: A031
Master-slave built-in program control
When connecting multiple fixtures with the commander mode, press the
ENTER button to confirm 'OK!', Except for the first fixture, and the other
fixtures in the back select 'Slave' (slave mode). When you receive the host
signal, the interface will appear 'connection' prompt, if you disconnect the
DMX512 signal, the interface will appear 'Disconnect' prompt, if press
ENTER or MENU button, the display will exit to the previous mode. The
first fixture is used as the master, and all the show modes can be selected.
The slave will be synchronized by the master to perform the same action.
WIFI operating mode
In the 'User setting' interface, press the ENTER button to select 'WIFI'
(WiFi mode) and press the ENTER button. To connect control, open the
phone settings function, find the wireless and network WLAN items,
connected to the name of LED-XXX device. As shown in the picture

12
When the connection is successful, exit the phone settings, open the APP
'LedHome', the first time you need to add scenes, select the 'entertainment'
scene after storage, and then select the direct control, there will be color
control interface, then the corresponding Mode operation. Different mobile
phone operation page may be somewhat different, but the function will not
change.
6. DMX512 control
6CH
Channel
Value
Function
1
0-255
RED
2
0-255
GREEN
3
0-255
BLUE
4
0-255
WHITE
5
0-255
YELLOW
6
0-255
PURPLE

13
10 CH
Channel
Value
Function
1
0-255
Dimmer, 9 channel(0-9)
2
0-9
Strobe off
10-255
Strobe, slowest 10, fastest 255
3
0-255
RED
4
0-255
GREEN
5
0-255
BLUE
6
0-255
WHITE
7
0-255
YELLOW
8
0-255
PURPLE
9
0-9
Dimming mode
10-29
Color selection : 10 channel select color
30-49
Jump change: 10 channel control speed
50-69
Gradual change:10 channel control speed
70-89
Sudden change :10 channel control speed
90-109
RED
110-129
GREEN
130-149
BLUE
150-169
WHITE
170-189
YELLOW
190-209
PURPLE
210-299
Skip change by sound control
230-255
Skip change + Gradual change by sound control
10
0-255
The function of this Channel depend on the value
of channel 9
When the value of channel 9 is 10-29,then this
channel is for color selection
When the value of channel 9 is 30-189, this channel
control the speed : 0 the lowest, 255 the fastest

14
7.Trouble shooting
F
ollo
w
ing
a
r
e
a
few
c
o
mm
on
p
r
oble
m
s
th
a
t
m
a
y
occu
r
d
uring
ope
r
a
tion
.
He
r
e
a
r
e
s
o
m
e
s
ug
g
es
tion
s
fo
r
eas
y
tr
ou
b
leshooting
:
A.
The
un
it
does
no
t
work
,
no
li
ght
a
n
d
t
he
f
a
n
d
o
es
no
t
w
o
r
k
1.
Ch
eck
th
e
c
on
nect
ion of p
owe
r
a
nd
m
a
in
fu
s
e
.
2.
M
eas
ure
th
e
m
a
ins
volt
a
g
e
on
th
e
m
a
i
n
co
nn
e
ct
o
r
.
3.
Ch
eck
th
e
pow
er
on
LED
.
B.
N
o
t
responding
t
o
D
MX
c
on
t
ro
ll
er
1.
D
M
X
LED
s
h
ou
ld
b
e
on.
If
no
t,
che
ck
D
M
X
co
n
nectors,
ca
b
l
es
to
s
ee
if
link
p
r
ope
r
ly
.
2.
If
th
e
D
M
X
LE
D
i
s
on
a
nd
no
r
espons
e
t
o
th
e
c
h
a
nn
el,
che
ck
th
e
a
dd
r
ess
s
etti
ng
s
a
nd
D
M
X
p
ol
a
r
ity
.
3.
If
y
ou
h
a
ve
i
nter
m
ittent
D
M
X
s
ig
n
a
l
p
r
oble
m
s
,
che
ck
th
e
p
ins
on
c
onn
ecto
r
s
or
on
PCB
of
th
e
u
nit
or
the
p
r
ev
iou
s
on
e.
4.
Tr
y
to
us
e
a
no
th
er
D
M
X
co
ntroller
.
5.
Ch
eck
if
th
e
D
M
X
ca
b
le
s
r
un
ne
a
r
or run
a
lon
g
s
id
e
t
o
h
ig
h
volta
g
e
c
a
b
les
th
a
t
m
a
y
c
a
us
e
d
a
m
a
g
e
or
in
terfer
ence
to
D
M
X
inter
face
circui
t.
C
.
One
of
the
cha
nn
el
s
is
no
t
w
o
r
k
ing
w
el
l
1.
Th
e
s
tep
p
er
moto
r
m
ig
h
t
b
e
dam
a
g
ed
or
the
c
a
b
le
c
on
nect
ed
to
th
e
PCB
is
b
r
oken.
2.
The motor’s drive IC on the PCB might be out of condition.

15
8. Fixture Cleaning
Th
e
clean
ing
o
f
inter
na
l
a
nd
ex
ter
na
l
optica
l
lens
es
a
nd/or m
ir
r
ors
m
u
s
t
b
e
c
a
rr
ied
ou
t
p
eriodica
lly
to
optim
iz
e
ligh
t
ou
tput
.
Cle
a
nin
g
f
r
eq
uency
d
e
p
end
s
on
t
h
e
environm
ent
in
w
hich
t
h
e
f
ixture
ope
r
a
tes
:
d
a
mp
,
s
m
oky
o
r
p
a
r
tic
ula
r
ly d
ir
ty
s
urr
ound
ing
c
a
n
c
a
us
e
g
r
eat
er accumulation
of dirt on the unit's optics
.
Cle
a
n
with
s
oft
clo
th
u
s
ing
no
r
m
a
l
g
l
a
ss
clea
ni
ng
fluid
.
A
lw
a
y
s
d
r
y
th
e
parts
ca
r
ef
ully
.
Cle
a
n
th
e
ex
ter
na
l
optic
s
a
t
leas
t
ev
ery
20
days.
Cle
a
n
th
e
in
ter
na
l
opti
cs
a
t
lea
s
t
ev
ery
30/60
days.
9. Precautions
Precautions for lithium battery
1
. Lithium battery for the first time into the lamp, you should put the end of electricity,
and then charging, the first charge should be a one-time full, not intermittent charge
2. Lithium battery pack is the best effect of charge and discharge 3 times.
3. Li-ion battery is prohibited to fall, prohibit the operation of the output line short-circuit
4. If the battery is stored for more than 3 months, it is recommended to charge it once
more
5. Battery pack to prevent stress. Warehouse stack away from other goods, because the

16
battery pack if short-circuit, easy to fire, so to separate storage
6. If the battery is damaged, please do not open the battery pack, please contact the
company's technical staff
Installation Precautions
1. Check the battery after unpacking for damage
2. Check the battery open circuit voltage is normal (normal should be 12V
±
10%)
3. When carrying the battery to hold the bottom, do not mention the terminal parts
4. The battery should be connected to prevent short-circuit ignition
5.Before shipping from factory the battery has been already put all electricity
discharged,So after receiving goods please charged its battery with 8 hours then start to
use

31
Model: BAT LED
Voltage:
LEDs:
IP Rating: Working
Position:
Power Consumption:
DMX Channel:
Control Mode:
Weight:
Dimensions:
Warranty:
100V ~ 250V/50~60Hz
4 x 12 W 6 in1 RGBW A +UV LED;
IP20
Any safe working position
48W;
6/10 Channels
DMX 512 / sound / master slave / auto/
IRC/ WiFi(optional)
Net 2.4Kgs, Gross 4.5Kgs
14cm × 13cm × 27cm
2 Year
Please Note: Specifications and improvements in the design of this unit and
this manual are subject to change without any prior written notice.
https://www.piu39av.com/pluslite-lighting/
Table of contents
Other PLUSLITE Lighting Equipment manuals
Popular Lighting Equipment manuals by other brands

Claypaky
Claypaky IGLOO - C61195 instruction manual

Eco-Smart
Eco-Smart 12A21100WCCT001 Use and care guide

Lightmybricks
Lightmybricks 71016 installation instructions

HAMPTON BAY
HAMPTON BAY HD22514 instructions

superbrightleds
superbrightleds WPGL Series user manual

WalimeXPro
WalimeXPro 15537 instruction manual