PLUSLITE VERO profile 700 User manual

USER MANUAL
VERO
profile
700
10.Maintenance Cleaning
The following points have to be considered during the inspection:
1)All screw for installing the devices or parts of the device have to be tightly
connnected and must be corroded.
2)There must not any deformations on the housing,color lenses,fixations
and installation spots(Ceiling,suspension,trussing)
3)Mechanically moved parts must not show any traces of wearing and must
not rotate with unbalances.
4)The electric power supply cables must not show any damage,material
fatigue or sediments
CAUTION!
Disconnct from mains before starting maintenance operation.
Futher instruction depending on the installation spot and usage have to be
adhered by a skilled installer and any safety problems have to be removed.
In order to male the lights in good condition and extend the life time, we
suggest a regular clearning to the lights.
1)Clean the inside and outside lens each week to avoid the weakness of the
lights due to accumulation of dust.
2)Clean the fan each week.
3)A detail electric check by approved electrical engineer each three month,
make sure the circuit contacts are good condition, prevent the poor contact
of circuit from overheating.
We recommend a frequent cleaning of the device.Please use a mosit,lint-free
cloth.Never use alcohol or solvents.
There are no seviceable parts inside the device.Please refer to the instructions
under Installation
instructions.
www.piu39av.com

1.Unpacking
Thank you for choosing VERO profile 700.For your own safty,please read this
mannual
before installing the device.This manual covers the important information on
installation and applications.Please operate the fixture with following instructions.
Meanwhile,please keep this manual well for future needs.
The VERO profile 700 is made of new type of high temperature strength of
engineer
plastics and cast aluminum casing with nice outlook.The fixture is
designed
and
manufactured strictly following CE standards,complying with
international
standard
DMX 512 PROTOCOL.It`s available independently
controlled
and
linkable
with
each other for coperation.And it is applicable for large-
scable
liveperformance, theater,studio,nightclubs
and
disco.
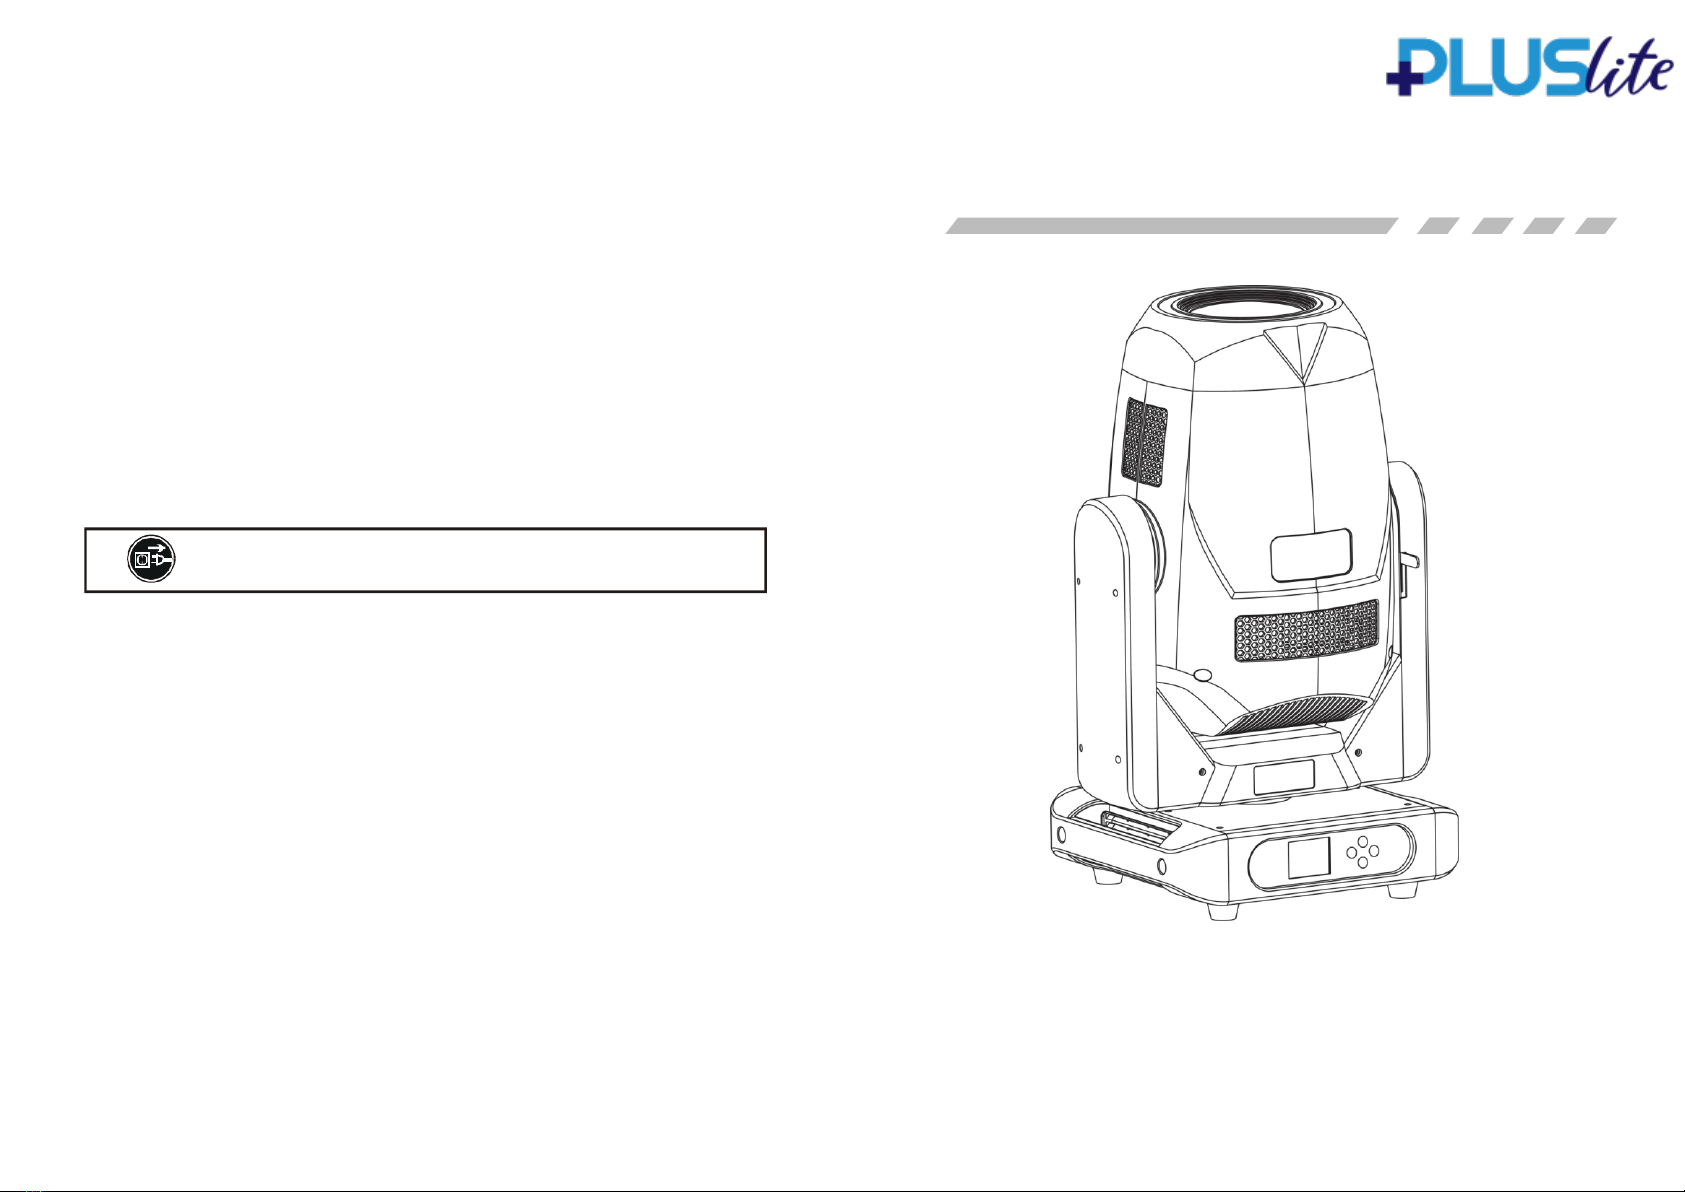
pVERO rofile 700 adopts powerful 580W LED which features high brightness and
stability.Please carefully unpack it when you receive the fixture and check whether it
is damaged during the transportation.And please check whether the following items
are including inside the box:
Moving head light -------------One
Omega---------------------------Two
Signal Cable--------------------One
Power Cable--------------------One
User Manual--------------------One
FEATURE
•Prism:1 pcs rotating prism(3,4,5,8,16 facet option)
•Iris: Linear adjustable with macro
•Soft lighting:1pcs independent scrim
•Focus: DMX 512 linear focus
•Dimmer: 0-100% linear dimmer
•Strobe: Electronic strobe,0.3-20Times/SEC
•Zoom: Smooth and fast speed
•Angle:6.5°-42°linear adjustment
•Prism angel can option
•Control mode: DMX512,Protocols RDM, Wireless and Art-Net
•Standard mode 38 channels, Sound control mode, Stand-alone,
Self-inspection mode
FRAMING SYSTEM
•Motorized framing system with 4 focal planes
•4 Blades that move separately
•Smooth, flexible blade movements at variable speed
•Framing system indexable 180 degrees
OTHER FUNCTION
•DMX Software update
•Show software version number
•Intelligent control of wind speed
•Display lamps and lanterns use time
•100% brightness without stroboscopic problem
•Manual programming function
•Manual fine calibration function
•DMX and RDM data in/out,artnet,wireless
POWER
•Input voltage:100V~240V AC 50/60Hz
•Rate power:800W@220V
HOUSING
•Intellectual property rights of appearance and structure design
•Environmentally friendly flame retardant materials
•High temperature resistant engineering plastics
IP GRADE
•IP:20
DIMENSION AND WEIGHT
•Carton size:750*460*520MM
•Flight case size(2in1):940X470X870(MM)
•Net weight:25KG
2
www.piu39av.com

CAUTION!
Be careful with your operations.With a dangerous voltage you can suffer a dangerous electric
shock whentouching wires
3.Operate on instruction
9.Specification
2.Safety instructions
This device has left the factory in perfect condition. In order to maintain this
condition to ensure a safe operation, it is absolutely necessary for the user
to follow the safety instructions and warning notes written in this user manual.
If the device has been exposed to temperature change due to enviromental
changes,do not switch it on immediately. The arising condensation could
damage the device.Leave the device switched off until has reached room
temperature.
-The moving head is for beam spot wash effect for onsite decoration purpose.
-Don't turn on the fixture if it’s been through severe temperature difference
like after transportation,because it might damage the light due to the environment
changes.
-So make sure to operate the fixture until it is normal temperature.
-This light should be keep away from strong shaking during any transportation or
movement.
-Don't pull up the light by only the head, or it might cause damages to the
mechanical parts.
-Don’t expose the fixture in overheat, moisture or environment with too much
dust when installing it.
-And don’t lay any power cables on floor. Or it might cause electrionic shock to the
people.
-Make sure the installation place is in good safety condition before installing
the fixture.
-Make sure to put the safety chain and check whether the screws are screwed
properly when installing the fixture.
-Make sure the lens are in good condition. It’s recommended to replace the
units if there are any damages or severe scratch.
-Make sure the fixture is operated by qualified person who knows the fixture
before using.
-Keep the original packages if any second shipment is needed.
-Don't try to change the fixtures without any instruction by the manufacturer
or the appointe drepairing agencies.
-It is no in warranty range if there are malfunctions from not following the
user manual to operate or any illegal operation, like shock short circuit,
electronic shock, lamp broke, etc.
OPTICS
•Light Source :580W White LED Module
•Lumen: 20,500
•Lifetime: 50000 Hours
•Color temperature:7000K
•-CRI: at least 70, CT 7000K
•-CRI: at least 90, CT 5700K
MOVEMENT
•Pan movement:540°(16 bit)
•Tilt movement :270°(16 bit)
•Automatic reset function
COLORS
•Linear CMY+CTO
•Colors wheel:1+6colors
GOBOS
•Gobos wheel:1pcs rotation Gobo wheel +1pcs fixed Gobo wheel
•Animation wheel
27 Frame 1B 0~255
28 Frame 2A 0~255
29 Frame 2B 0~255
30 Frame 3A 0~255
31 Frame 3B 0~255
32 Frame 4A 0~255
33 Frame 4B 0~255
34 Frame angle 0~7 No effect
8~239 Angle
240~255 Rotate left and right
35 Frame angle fine 0~255
36 Frame macro 0~3 No effect
4~255 Total 63 effects
37 Scan speed 0~255 Fast to slow
38 Reset 20~29 Reset all
3
www.piu39av.com

4.Mounting and Installation
Cautions:
For added protection mount the fixture in areas outside walking paths,seating
areas,or in area were the fixture might be reached by unauthorized personnel.
Before mounting the fixture to any surface,make sure that the installation area
can hold a minimum point load of 10 times the device’s weight.
Fixture installation must always be secured with a secondary safety attachment,
such as an appropriate safety cable.
Never stand directly below the device when mounting,removing,or serving the
fixture from a ceiling,or set on a flat level surface(see illustration below).Be sure
his fixture is kept at least 0.5m(1.5ft)away from any flammable materials
(decoration etc.)
Always use and install the supplied safety cable as a safety measure to prevent
accidental damage and/or injury in the event the clamp fails.
Mounting points:
Overhead mounting requires extensive experience, including amongst others
calculating working load limits,a fine knowledge of the installation material being
used,and periodic safety inspection of all installation material and the fixture.
If you lack these qualifications,do not attempt the installation yourself.Improper
installation can result in bodily injury.
Be sure to complete all rigging and installation procedures before connecting the
main power cord to the appropriate wall outlet
Clamp mounting:
The VERO profile 700 provides a unique mounting bracket assembly that integrates the
bottom of the base,the included OMEGE BRACKET,and the safety cable rigging point in
one unit(See the illustration below).When mounting this fixture to truss be sure to secure an
appropriately rated clamp clamp to the included omega braceket using a M10 screw fitted
through thecenter hole of the OMEGE BRACKET.
1
1 OMEGA-HOLDERS
2 CLAMP
3 SAFETY-ROPE
4 QUICK LOCK FASTENC
15 Strobe 0~3 Open
4~67 Strobe 1
68~99 Strobe 2
100~131 Strobe 3
132~175 Strobe 4
176~247 Strobe 5
248~251 Random strobe1
252~255 Random strobe2
16 Dimmer mode 0~63 Refresh rate 1200(dimmer auto delay)
64~127 (dimmer no delay)
128~`191 Refresh rate 13672(dimmer auto delay)
192~255 (dimmer no delay)
17 Prism 0~31 No effect
32~255 Prism
18 Prism rotation 0~3 Prism is 0
4~123 Prism angle
124~187 Rotate left
188~191 Stop
192~255 Rotate right
19 Zoom 0~255
20 Zoom fine 0~255
21 Focus 0~255
22 Focus fine 0~255
23 Iris 0~127 Open to close
128~135 Close
136~173 Iris movement 1
174~211 Iris movement 2
212~249 Iris movement 3
250~255 Close
24 Frost 0~9 No effect
10~255 Liner frost
25 Animation wheel 0~7 No effect
8~239 Animation effect
240~255 Rotate left and right
26 Frame 1A 0~255
4
www.piu39av.com

Note:
1.Above all projects to the actual lighting shall prevail, no notice if there is further
modification;
2.The programming function provides only a very limited operation, in the case of
no control units to use. Generally do not recommend
the use of manual programming;
3.In the absence of the DMX512 signal, only need to set up first items, namely the
address code can be used lamps.
5.DMX 512 Control connection
Connect the provice XLR cable to the female 3 pin XLR Output of your control and
the other side to the male 3-pin XLR input of the moving head,You can chain multiple
Movng head together through serial linking.The cable needed should be two core,
screened canle with XLR input and output connectors.Please refre to the diagram
below.DMX-512 Connection with DMX terminator.
For installations where the DMX cable has to run a long distance or is in an electri-
cally noisy enviromentsuch as in a disco,it is recommended to use a DMX terminator.
This helps in preventing corruption of the digital control singal by electrical noisy.
The DMX terminator is simply an XLR plug with a 120 resistor connected between
pins 2and 3,which is then plugged into the output XLR Socket of the last fixture in
the chain. Please see illustrations
120
PIN3
PIN2
8. 38 Control Channels
1 Pan 0~255
2 Pan fine 0~255
3 Tilt 0~255
4 Tilt fine 0~255
5 Colour wheel 0~63 6 colours
64~221 Colour Arbitrary positioning
222~239 Rotate left
240~255 Rotate right
6 Cyan 0~255
7 Magenta 0~255
8 Yellow 0~255
9 Colour temperature 0~255
10 Fixed gobo 0~71 8 gobos
72~143 Gobo Arbitrary positioning
144~199 Rotate left
200~255 Rotate right
11 Rotating gobo 0~63 7 gobos
64~135 Gobo Arbitrary positioning
136~195 Rotate left
196~255 Rotate right
12 Gobo rotation 0~3 No effect
4~123 Rotating gobo angle
124~187 Rotate left
188~191 Stop
192~255 Rotate right
13 Dimmer 0~255
14 Dimmer fine 0~255
5
www.piu39av.com

6
CE
MIC
1 -- Address
001
7.Menu for Control Display
The control Display
6.Top menu,present the current opertion
Press the <UP>or<DOWN>button repeated until you reach the desired menu
function. Press the <ENTER>button to select the menu function currently
displayed, or to enable menu option.To reture the previous option or menu
without changing the value.Press the<MODE/ESC>button
Address
001
1-DMX Address
2-LED TEST DMX Mode
Current position designation
Current mode
Press the <DOWN>Buttons to navigate the digit.
If it is chooser it will twinkle.
Press the <DOWN>Buttons to navigate the digit.
press the <UP>buttons to navigate the value.
MASTER PROJECT INSTRUCTION FOR USE
INFORMATION ADDRESS 1~512
RUNTIME TIME
VERSION
TEMPERATURE MAIN BOARD
LIGHT SOURCE
FAN SPEED G1
G2
SETTING RESET REBOOT
DEFAULT DATA
CHANNEL SET 38
SIGNAL DMX512/ARTNET/PROGRAM
OFFLINE SET HOME/HOLD
FAN MODE NORMAL/PERFORMANCE/QUIET
WIRELESS SET ON/OFF
ADJUST
ARTNET SET IP address
Subnet mask
Universe
LAMP AUTO ON NC
LIGHT UP NC
LAMP ADJUST NC
LAMP FAIL NC
DISPLAY LANGUAGE ENGLISH/CHINESE
BACKLIGHT ON/OFF/FLASH
REVERSE ON/OFF
USER SETTING LOCK input code
KEY LOCK ON/OFF
TEST ON/OFF
PROGRAM SELECT PROGRAM 1~8
PROGRAM 1~8
Power on the moving head light,press the <MODE/ESC> or<ENTER>button ,
no any movement.
www.piu39av.com
Table of contents
Other PLUSLITE Lighting Equipment manuals
Popular Lighting Equipment manuals by other brands

Creative Lighting Solutions
Creative Lighting Solutions CLS Atmosphere LED panel manual

WAC Lighting
WAC Lighting InvisiLED Classic LED-T24 Installation instruction

Glow Bricks
Glow Bricks Lego The Haunted Mansion 40521 installation guide

OttLite
OttLite B1FSB user manual

Fomei
Fomei FY3415 user manual

ULS
ULS ULSHIM manual