PNI House AHD880 User manual

DVR/NVR PNI House AHD880
EN User manual ......................................................... 3
BG ............................. 28
DE Benutzerhandbuch .............................................. 53
ES Manual de usuario ............................................... 79
FR Manuel utilisateur ............................................... 104
HU Használati utasítás .............................................. 129
IT Manuale utente .................................................. 154
NL Handleiding ........................................................ 179
PL Instrukcja obsługi ............................................... 204
RO Manual de utilizare ............................................. 229


3User manual
English
Main functions
• Simultaneous real-time recording on several channels, remote playback
and configuration
• Simultaneous video output on VGA and HDMI.
• Backup on USB drive and external HDD.
• Supports face and human shape detection and PTZ control (depending on
the surveillance camera)
• Possibility of connecting an external microphone and external speaker.
Technical specifications
Channels 8 analog / 16 IP
Registration resolution Analog: 8 x 4K-N
Hybrid: 8 x 4K-N analog + 4 x 5M IP
IP: 16 x 1080P or 8 x 5M
Playback resolution Max. 4K on HDMI output
Max. 1080P on VGA output
Video input 4 x BNC
Video output 1 x VGA / 1 x HDMI
Audio input 1 x RCA
Audio output 1 x RCA
Ethernet 1 x RJ45 100/100Mbps
USB 2 x USB2.0
Video compression H.265+
Audio compression G.711A
Recording mode Manual, alarm, motion detection, programmed
HDD 2 x HDD SATA (maximum 8TB each)
ONVIF Yes
Power voltage 12V / 2A
Current <15W (without HDD)
Dimensions 255 x 225 x 40 mm
Operating temperature -26°C ~ +80°C

User manual 4
English
Instructions for use
Installation of the storage unit
Before the first use, please install the storage unit.
Two SATA hard disks with a maximum capacity of 8TB each can be installed
inside the recording unit (the HDD is not included in the package).
Undo the screws and remove the DVR cover.
Connect the data cables and fix the hard disk in the screws.
Replace the DVR cover.
Connect the power and internet cables to the DVR.
Turning on the device
Insert the power cable into a 230V socket. The DVR will start. The indicator
LED will light up red.
Notes:
1. Check if the input voltage corresponds to the recommended voltage of the
device. The supply voltage is 230V±10% / 50 Hz 2A.
2. We suggest you use a UPS device to protect the device from voltage
variations.
Turning o the device
There are two methods of turning o the device.
1. Access the main menu (right click on the screen) and select the Logout -
Shutdown option
2. Turn o the power supply.
Special warnings:
1. Restarting after a voltage drop. If the device was closed abnormally, it creates
a backup copy and restarts from that status after the power is restored.
2. Replacing the battery on the motherboard. Before replacing the battery,
you must save the system settings (see Advanced-Import/Export chapter) and
turn o the power supply. The time of the device must be reprogrammed after
replacing the battery. We recommend that you replace the battery every year.

5User manual
English
Remote control of the device.
The DVR can be controlled locally or remotely from both smartphones and
computers with Windows operating system.
Operating system Application Download
Android, iOS XMEye Pro
Android iOS
Windows General CMS
The installation file can
be downloaded from
the CD included in the
package or from the
Download section of the
product web page (www.
pni.ro)
Quick Setup Guide
After turning on the device, the quick setup guide will start.
Note: We recommend configuring the system before installing the DVR and
the surveillance cameras in the final location.
Steps to follow:
1. Set the time, date and time zone.
2. In a short time, a popup will appear on the screen asking you to change the
authentication password in the system. Follow the steps on the screen or
press the ESC key on the DVR to exit the password setting interface.
Note: For the security of your system, we recommend changing the password
after the first login into the system.

User manual 6
English
Net Test
The system will start an automatic check of the network parameters. In case
of error, click on the Network button, tick the DHCP option or enter the
parameters manually.

7User manual
English
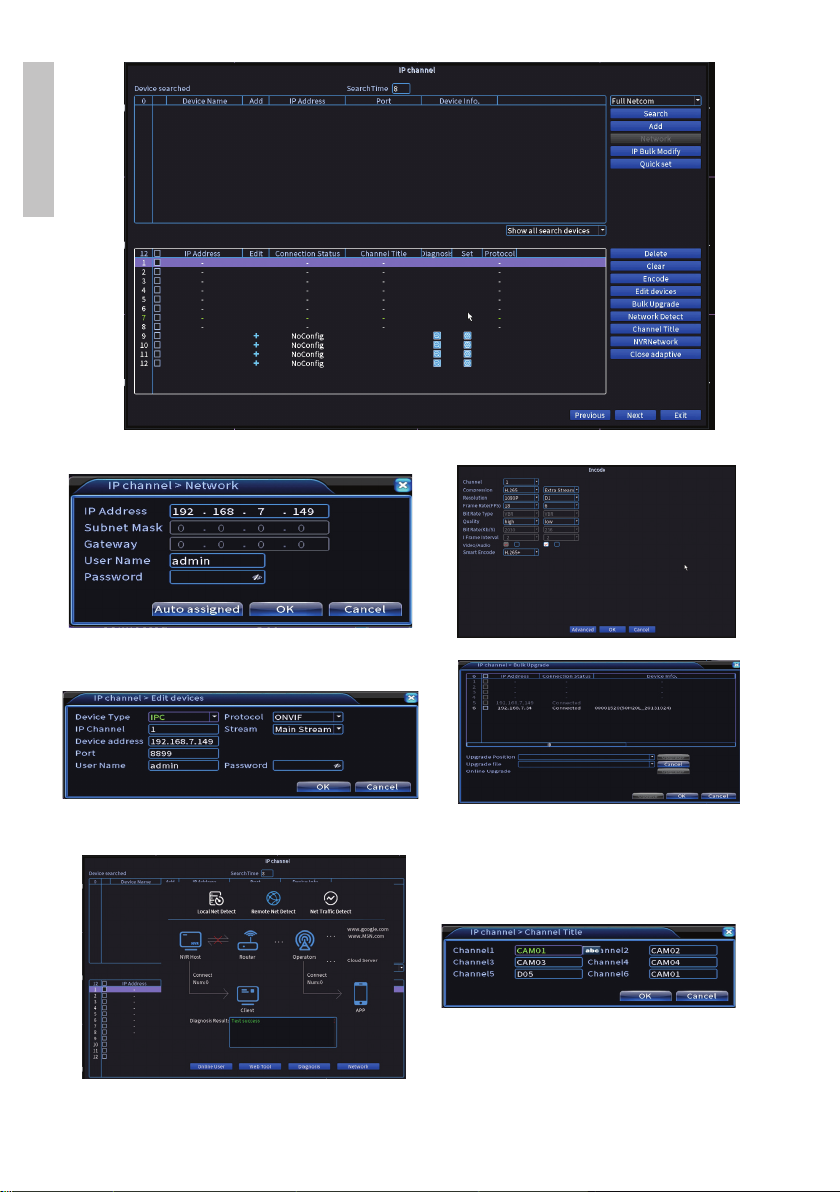
Add and quickly configure surveillance cameras
Add surveillance cameras interface
1. Select the communication protocol between DVR and surveillance cameras.
Options: NETIP, ONVIF, Full Netcom.
2. Search. Press the Search key to search for surveillance cameras connected
to the same router (same network) as the DVR.
3. Add. From the list of displayed surveillance cameras, select the desired
surveillance cameras and click on Add to add them to the system.
4. Network. Configure network parameters for surveillance cameras (IP
address, gateway, etc.)
5. IP Bulk Modify. Quick change of IP to several surveillance cameras
6. Quick set. Quick addition and configuration of surveillance cameras.
Channel management interface
1. Delete. Delete the surveillance camera from the selected channel. Click
Apply to execute.
2. Clear. Delete the information on the selected channel. Click Apply to
execute.
3. Encode. It displays the technical parameters of the connected surveillance
cameras (resolution, frame rate, video compression, quality, etc.).
4. Edit devices. Change IP and port for the selected channel.
5. Bulk upgrade. Firmware update for selected surveillance cameras.
6. Network detect. Network and Cloud server testing and diagnostics.
7. Channel title. Rename the surveillance cameras.
8. NVR Network. Configure DVR network parameters.
9. Close adaptive. Disables the IP adaptation function for the selected
surveillance cameras.

User manual 8
English

9User manual
English
The menu
In the main preview interface, right-
click with the mouse to access the
menu.
Main Menu
Options: Playback, Record Conf, Network, Date Time, XVI settings

User manual 10
English
Playback
The system oers you numerous filters and options for identifying the desired
recording. You can search by channel number, date and time interval or by file
type.
Record Conf.
The interface allows the following settings: the duration of a recording file, the
recording mode (scheduled or manual), the period (day and time interval) and
the type of recording (normal recording, motion detection and alarm).

11 User manual
English
Network
Manually set the network parameters (IP address, gateway, DNS, port, etc.)
or check the DHCP option for the automatic retrieval of the parameters.
Note: For the settings to take eect, restart the system. Right click on the
screen - Logout - Reboot.
Date time
Set the time zone, date, time and format.

User manual 12
English
XVI settings
Image settings (brightness, contrast, saturation, etc.), audio settings.
System
Options: General, Encode, Backup, Display, Account, RS232, PTZ Config,
Digital.

13 User manual
English
General
The interface allows the following settings: setting the menu display language,
the behavior in case of full hard disk (overwriting or stop recording), the
duration of a session and activation/deactivation of the quick configuration
guide at system startup.
Encode
Displays the technical parameters of the connected surveillance cameras
(resolution, frame rate, video compression, quality, etc.).

User manual 14
English
Backup
The USB memory or the external HDD must be installed in the DVR before
starting the backup copy. Press the Detect button to identify the storage
device, then the Backup button to execute the backup copy.
Display
In the local preview mode, the following can be displayed: time, channel name,
recording status, alarm status, transparency and display resolution.
Note: Before changing the resolution, make sure that your monitor supports that
resolution. If the resolution set in the DVR menu is higher than the resolution of
your monitor, nothing will appear on the monitor and you will no longer be able to
access the menu. If, however, this happens, connect the DVR to a monitor with a
higher resolution, access the menu and change the resolution.

15 User manual
English
Account
The interface allows managing the users who have access to the system, adding
users, changing user rights, changing the password, creating user groups and
setting an account security level by recording answers to certain predefined
questions. In case of password reset, the verification code can be sent in the
mobile application or to the set email address. To increase the level of security,
you can set a pattern (graphic model) for access to the system.

User manual 16
English
Digital
Options: Digital channels, Channel status and Channel Type.
Digital channels
Add a surveillance camera to a specific channel. Click on the Add button, then
on Search to find all the surveillance cameras connected to the same network
(same router) as the DVR.

17 User manual
English
Channel status
Displays the status (connected, not connected or not configured) for all 8
channels.
Channel type
Displays the maximum number of surveillance cameras and the resolution of
the surveillance cameras that can be connected to the system.
Analog: 8 x 4K-N
Hybrid: 8 x 4K-N analog + 4 x 5M IP
IP: 16 x 1080P or 8 x 5M

User manual 18
English
Alarm
Options: Intelligent Alert, Face detection, Abnormality, Traditional alarm,
Human detect.
Intelligent Alert
Set the behavior of the system in case of motion detection: registration and/
or notification in the application. Also set the motion sensitivity level and the
action area.

19 User manual
English
Abnormality
Set the system behavior in case of: storage device error, lack of space on the
storage device, lack of Internet connection or IP conflict. In such situations
you can set the sending of a notification in the application or an email.
Traditional alarm
Set the system behavior in case of no image or no video signal. In such situations
you can set to send a notification in the application or an email, start recording,
make captures or save the alarm recording on an FTP server.

User manual 20
English
Face detection
The system will send an alarm notification by email or in the mobile application
whenever it identifies a human face.
Advanced
Options: HDD info, Upgrade, AutoMaintain, Restore (Reset), Import/Export,
Digital, LOG, BPS and Version.
This manual suits for next models
1
Table of contents
Languages:
Other PNI DVR manuals