PNI HOUSE H804 User manual

PNI HOUSE H804
DVR / NVR
EN User manual ............................................. 2
BG Ръководство за потребителя ................ 27
DE Benutzerhandbuch ................................... 52
ES Manual de usuario .................................... 77
FR Manuel utilisateur ..................................... 102
HU Használati utasítás ................................... 127
IT Manuale utente ........................................ 152
PL Instrukcja obsługi ..................................... 177
RO Manual de utilizare ................................... 202

EN
2
MAIN FUNCTIONS
Real time surveillance
Surveillance via monitor: Analog output interface, VGA or HDMI
Storage
The HDD works only during recording, which reduces energy consumption and extends life
Note: The HDD is not included
Compression
Real-time compression on the storage device, which allows stable audio and video quality
Backup
Via the USB interface: on USB storage devices
Playback
Real time recording
Multiple play mode: 1 or 4 channels on the screen
Zoom on certain areas of the image
Communication interface
Standard internet interface
Intelligent operation
Control device from the mouse
Quickly copy settings from one channel to another
INSTRUCTIONS FOR USE
Installing the storage unit
At rst use, please install the storage unit. A single internal HDD of 6TB capacity (the HDD is not
included in the package) can be installed in the recording unit casing.
• Unscrew the screws
• Remove the lid
• Fix the HDD
• Connect the data cables
• Fix the lid
• Connect the power cord
Starting the device
Plug the power cord and turn on the device. The LED will turn on and you will hear a beep. By
default, 4 channels will be displayed on the screen.
If the start time falls within the preset recording schedule, then the recording function will start
automatically.
Notes:
1. Check that the input voltage corresponds to the recommended device voltage. The power
supply voltage is 230V ± 10% / 50Hz.
2. We suggest using a UPS to protect the device from voltage variations.

EN
3
Stopping the device
There are two ways to stop the device:
1. Go to the main menu (right-click on the screen) and select the Logout option - Shutdown
2. Turn o the power supply.
Special warnings:
1. Restart after power failure: If the device is abnormally shut it can create a backup and restart
from that status after the power returns.
2. Replacing the battery on the motherboard: Before replacing the battery, you must save your
system settings and turn o the power source. Device time must be rescheduled after replacing
the battery. We recommend replacing the battery every year.
Remote control:
You can control your camcorder in real-time as follows:
- through dedicated Windows-compatible CMS software
- through Internet Explorer
- through the dedicated XMEye-compatible app with iOS, Android.
System loghin
After turning on your device, log in to your system.
By default, the user admin it is protected by password 1234. If your password is entered
incorrectly 5 times in a row, your account will be blocked. By restarting your device or after half
an hour, your account will be unlocked automatically.
Note: For your system security, please change your password after your first login.
Channels preview
You can right click to change view mode: 1 or 4 channels. Or, double-click on one of the channels
to switch to full-screen mode.
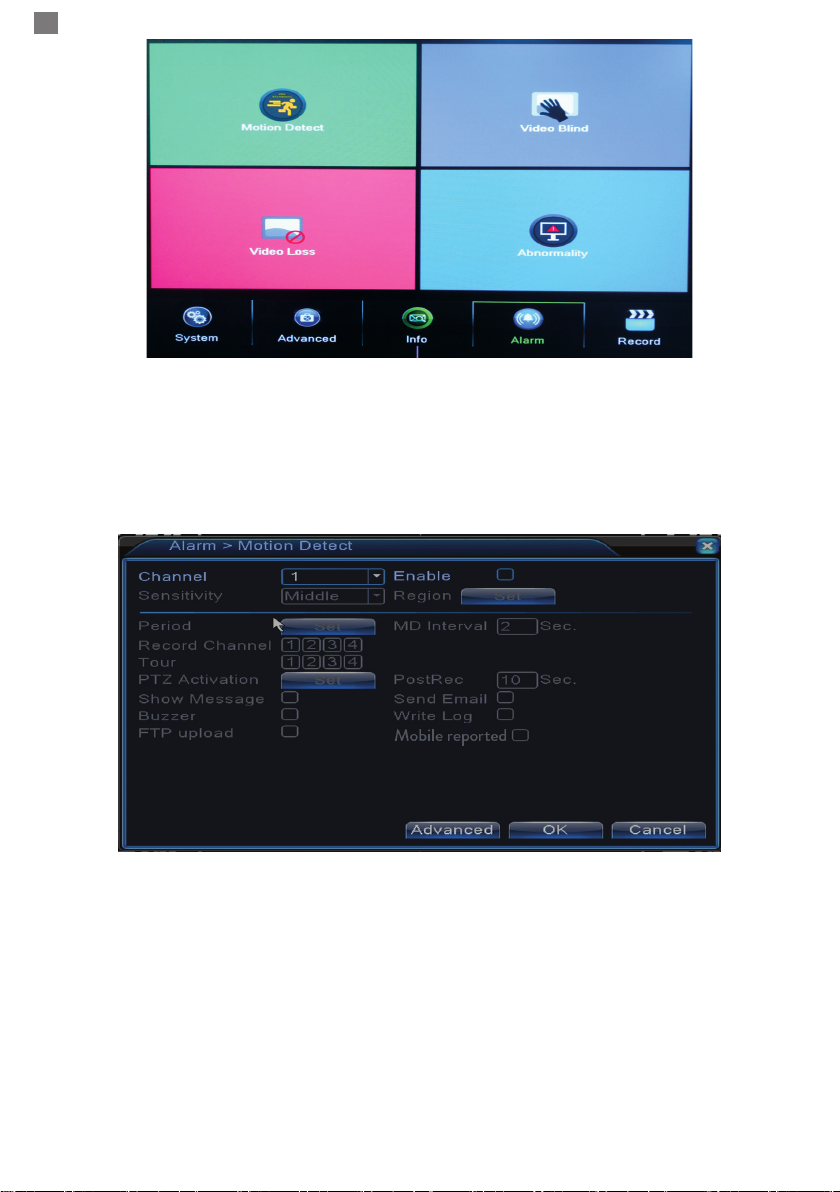
Recrding Image loss
Motion detection Blocked camera
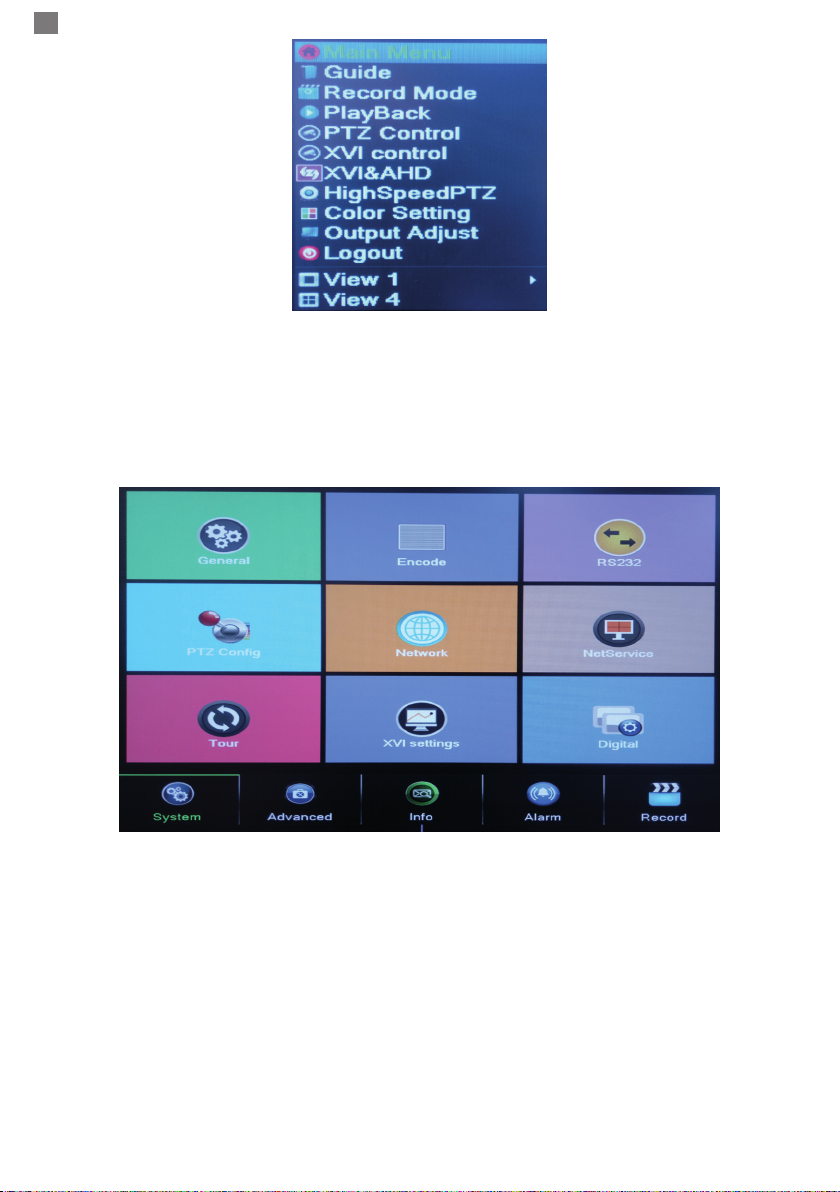
Menu
In preview mode, you can access the on-screen menu by right-clicking on the image below.

EN
4
The menu included:
Main menu, Guide), Record mode, Playback, PTZ control, XVI control, High speed PTZ, Color
settings, Output adjust, Logout, View 1/4
1. MAIN MENU
By accessing the main menu the interface will look like in the image below.
1.1 Record
The recording operations include: Record cong, Playback, and Backup.

EN
5
1.1.1 Record cong
Go to Main menu - Record - Record cong (Record setup)
Set recording parameters on each channel or all channels at the same time. The system is set to
start recording 24 hours continuously.
Note: The HDD must be set to read / write mode.
Channel: Choose the channel number for which you want to set up the recording. Choose All to
make settings for all channels at the same time.
Redundancy: The function is not active for this model
Length: Set the length of each recording le (in minutes). The default is 60 minutes.
Pre-Record: Recorded between 1 and 30 seconds before an alarm event
Mode: Set the recording type: programmed, manually, or o.
• Scheduled recording: You can choose 4 recording times (between 0:00 and 24:00 hours)
and 3 modes (normal recording, motion detection and alarm):
• Regular (normal recording): The device records in the set time. The video le type is ”R”.
• Detect: The device detects motion detection. Video le type is ”M”.

EN
6
• Alarm: The alarm recording function includes: Motion detection, lack of image, loss of video
signal.
• Manual recording: Click the button and the corresponding channel will record regardless of
the current status.
• Stop: Click the button and the corresponding channel will stop recording regardless of the
current status.
Note: The Advanced button opens the following menu: Up Window, Show desktop, Copy, Paste,
Default, Restore the Storage, configuration of the storage unit).
1.1.2 Playback
There are two ways you can play the recorded les on the internal HDD:
- Right click on the screen - Playback
- Right-click on the screen - Main Menu - Record - Playback
Note: The internal HDD you want to play records should be set in read-write mode.
Icon description:
Pause Back
Stop Slow playback
Fast forward Fast backward
Next frame Previous frame
Next le Previous le
Full screen Cyclic play

EN
7
Note: For frame-by-frame playback, the movie will have to pause.
Main functions:
Local Zoom: When the system displays a single channel on the screen, you can select a portion
of the screen with a mouse to enlarge it by clicking the left mouse button. You can then return to
the normal screen by double-clicking.
1.1.3 Backup
NOTE: The USB memory must be installed in the DVR before starting to run the backup. Once
executed, the created backup le can be played back individually.
Detect: detects the USB recording drive connected to the DVR
Erase: format the selected unit
Stop: stops the backup
Backup (Backup Conguration). By pressing this button, the backup conguration screen
appears:
1.2 Alarma
The alarm recording function includes: motion detection, image loss, video loss, abnormalities.

EN
8
1.2.1 Motion detect
When the system detects the move that reaches the set sensitivity threshold then it will start the
recording
Note: The Advanced button opens the following menu: Up Window, Show desktop, Copy, Paste,
Default config, Record config (shortcut to the interface configuration of the recording).
Channel: Choose the channel to be congured
Enable: means that the motion detection function is on
Sensitivity: Choose one of 6 levels of sensitivity
Period: enables motion detection within the specied range. You can set dierent time intervals
depending on the day of the week. Each day is divided into 4 time sections.

EN
9
In case of motion detection, you can choose the warning mode: displays message, sounds,
uploads to FTP server, sends email, saves the event in history.
1.2.2 Video blind
When the video image is inuenced by environmental conditions such as illumination or reaching
the sensitivity threshold, an alarm will be triggered in the system.
Settings are the same as motion detection.
Nota: butonul Advanced deschide urmatorul meniu: Up Window (Inapoi), Show desktop
(afiseaza interfata de previzualizare a canalelor), Copy (copiaza setari), Paste (Lipeste setari),
Default (restabileste setarile implicite), Record config (scurtatura catre interfata de configurare
a inregistrarii).
1.2.3 Video loss
When the equipment does not receive a video signal, an alarm will be triggered in the system.

EN
10
Settings are the same as motion detection.
Note: The Advanced button opens the following menu: Up Window, Show desktop, Copy, Paste,
Default cong, Record cong (shortcut to the interface conguration of the recording).
1.2.4 Abnormality
When an abnormal situation occurs, such as lack of storage, lack of storage space, IP conict or
no network connection, the device will alert you by a message or sound.
1.3 System
The following interface will appear:

EN
11
1.3.1 General
Time zone: Set the time zone
System time: Set the system date and time
Date format: choose the date format YMD (year, month, day), MDY (month, day, year), DMY
(day, month, year)
Separator data: Choose a separator type for the date format
Time format: Choose the time format: 12 or 24 hours.
Language: Set the display language of the menu
Storage full: HDD is full choose ”Stop record” to stop recording or
overwrite to continue writing over old les.
DVR No: device number
Standard video: PAL or NTSC
Auto logout: Set the maximum inactivity time after which the system will clear the account (0 -
60).
1.3.2 Encode
Set the audio and video compression parameters on each channel.

EN
12
Channel: Choose the channel number you want to set up
Compression: Compression standard H.264
Resolution (resolution): D1 / 960H / 1080N
Frame Rate: 1 to 25fps
Bit Rate Type: You can choose either limited ow or variable ow. When choosing variable ow,
you have 6 image quality options
Bit Rate: The higher the ow value, the better the image quality is: D1 1000 ~ 1500kbps, CIF 384
~ 1500kbps, QCIF (64 ~ 512kbps)
Video / Audio: Select the recording type
Note: The Advanced button opens the following menu: Up Window, Show desktop, Copy, Paste,
Default (restores default settings).
1.3.3 Network
Net Card: Select the Wire Netcard option
DHCP: Get the IP address automatically (not recommended).
IP address: set the IP address. The default address is 192.168.1.10

EN
13
Subnet mask: The default address is: 255.255.255.0
Gateway: The default address is 192.168.1.1
DNS setup: The domain name of the server transforms the domain name into the IP address.
The IP address is provided by the network administrator. This address must be set then restarted
the system to work.
Media port: default 34567
HTTP port: default 80
HS download
Transfer policy: choose self-adaptation, priority quality or priority ow continuity.
The data ow will be calibrated according to the settings. The self-adaptation strategy represents
the compromise between image quality vs. image uency. Image Fluency and Self-Adaptation
are only valid when the Data Flow Wizard is enabled. Otherwise, image quality will prevail.
1.3.4 NetService
Select the desired network and click the Set button to congure the network in advance or
double-click the Service button to congure the parameters.
NTP setup
Enable: check to activate this option
IP Server: Enter the IP address of the NTP server.
Port: 123 default. You can set the port according to the NTP server settings.
Update period: The update period is the same as the NTP server period. The default interval
is 60 minutes.

EN
14
Email
If the alarm is on or the connections are made, the system will send an email with alarm and
photo information to the set address.
SMTP server: the email server address. It can be an IP address or a domain name. The domain
name can only be used if the DNS settings are correct.
Port: port of the email server.
Need SSL: Decide if you want to use a secure protocol or not.
User name: enter the email address for the SMTP server.
Password: enter your email password
Sender: Enter the sender’s email address.
Receiver: Enter the recipient’s email address. You can set up to 3 recipients.
Title: enter a title for the alarm email.
IP lter
You can add IP addresses to blacklist or whitelist

EN
15
DDNS
Enable check to enable this option
DDNS: represents the dynamic domain name of the server.
Domain name: enter the domain name registered by DDNS.
User name: enter the user name registered by DDNS.
Password: enter the user password registered by DDNS.
When DDNS is successfully congured and turned on, you can enter the domain name in the
Internet Explorer browser to access it.
Note: DNS settings must be completed correctly.
FTP setup
FTP becomes active only when the alarm becomes active or when the alarm makes a screen
capture that it sends later through the FTP server.
Enable check to enable this option
IP server: IP address of the FTP server
Port: FTP domain port; the default is 21
User name: FTP user name
Password: the user password
Anonymous: Activates anonymous mode - no need to set your username and password
Max le length: maximum length of les to be archived. The default is 1024MB
Dir name: the directory where the le is going to be uploaded
Note: The user must have the authority to upload les.

EN
16
UPNP
The UPNP protocol is used to make automatic forwarding to the router. To use this feature make
sure this option is also enabled on the router.
Enable select the option to enable UPNP settings
HTTP Port: Routing will automatically distribute the device’s HTTP port, but monitoring via
Internet Explorer will also need to enter this port.
TCP Port: The router will automatically distribute the device’s TCP port, but monitoring CMS will
require this port.
Mobile Port: The router will automatically distribute the device’s Mobile port
but when you monitor over the phone you will need this port.
1.3.5 PTZ Cong
The function is not active for this kit.
1.3.6 RS232
The function is not active for this kit.
1.3.7 Tour
Activate this function to view a tour of all channels according to the set interval.
1.3.8 Digital
The Digital Interface displays the number and type of cameras supported by this model:

EN
17
Analog IP Hybrid
4 x 1080N 8 x 1080P
2 x 720P + 2 x 720P4 x 720P 12 x 960P
4 x 960H 8 x 720P
1.3.10 XVI Settings
The menu allows image control (brightness, contrast, saturation, etc.) on each channel.
1.4 Advanced
The menu includes: HDD management, user account, online users, video output settings, self-
maintenance, factory default settings, updates, device information, import / export.

EN
18
1.4.1 Storage
The interface displays information about the internal HDD: its number, type, status, and storage
capacity.
Choose your storage device and then click on the function you want to run.
Read / Write: The equipment can be written or read
Read-only: The equipment can only be read
Redundant: The function is not active
Format storage: format the HDD
Recover: Recovers information from HDD
Partition: Creates partitions on HDD
1.4.2 Display
Local preview mode includes: time display, channel name, recording status, alarm status,
transparency and the region covered.

EN
19
Channel title: assign a channel title. Up to 25 letters.
Time display: Displays the date and time of the system
Channel title: Displays the channel number
Record status: displays the status of the recording
Alarm status: Displays the status of the system alarm
Transparency: Choose the transparency of the on-screen menu: value between 128 and 255
Resolution: Set the screen resolution
Channel: Enter the channel number
1.4.3 Account
Note: 1. The length of a user’s name can be up to 8 characters long. Free or pre-empty spaces
are invalid. The free space in the middle of the name is valid. Allowed characters are: letters,
digits, lower dash, minus, point.
2. There is no limit to the number of users or groups of users. You can add or delete user groups
according to user settings. Factory settings include: user \ admin. You can set the team the way
you want. User can not assign group competencies.
3. User administration includes: group / user. Group and user name can not be the same. Each
user belongs to a single group.

EN
20
Modify user: Modify the name and rights of the selected user
Modify group: Modify group name and rights
Modify password: Modify the user password. You can set a password of up to 6 characters.
Pre-empty and word-free spaces are not valid. Spaces between words are valid.
Note: The admin user can change his or her own password and password for other users.
Add user: add a user. Set the name, password, group, and rights for it
Add group: adds a group of users and assigns rights
Delete user: deletes the selected user
Delete group: deletes the selected user
Update: updates user information
1.4.4 Online user
You can check the information about network users. You can also select a specic user to
disconnect. The disconnected user will only be able to connect after the system is restarted.
1.4.5 Auto maintain
The user can set the time for automatic restart of the system and automatic deletion of les.
1.4.6 Restore
The system can be brought to the factory default settings. You can select from the menu the
functions to reset.
1.4.7 Upgrade
Select the path to the update le.
Note: The le must be stored in the root directory of a USB memory
Table of contents
Languages:
Other PNI DVR manuals