PNI MyPet PT033PF User manual

PNI MyPet PT033PF
Smart pet feeder / Hranitoare inteligenta de mancare
EN User manual ............................................. 2
RO Manual de utilizare ................................... 7

User manual 2
English
Product description
Dessicant box
Grain barrel
Card slot Dry grain bucket lock
Automatic feedeing
device
Grain drum
separation switch
Feed button
Play button
Record button
Automatic feeding button
Main body
Food bowl Food bowl
Battery compartment
On/O Switch
Top cover
Usage instructions
1. Connect the pet feeder to a power source using the included power cord.
You can also supply the pet feeder with batteries (not included).
2. Install the food tank in the main compartment, which is in a vertical
position.
3. Add dry food to the tank.
4. Position the desiccant box on top. Note: replace the desiccant regularly.

3User manual
English
Button functions
1. Feeding button: press briefly to feed the bowl with food. Press and hold
for 5 seconds to reset the device.
2. Record button: press this button to register.
3. Play button: press to play the recorded sound.
Tuya Smart App
Download the Tuya Smart app by accessing Google Play or the App Store or
scan the QR codes below:
Android iOS
Add device in Tuya Smart application
4. Open the application, create an account and log in.
5. Add your device by clicking the + icon in the upper right corner of the
screen or by clicking the Add device button (this button only appears
when you do not have any devices added to the application).
6. Select the Small home appliances option on the left side of the screen.
7. From the list of devices on the right side of the screen, select Pet feeder.
8. Select the WiFi network you want to connect to and add the password.

User manual 4
English
9. In the next interface, in the upper right corner, select the EZ Mode
option.
10. Reset the device by pressing and holding the power button. The device is
now in pairing mode.
11. Check the Confirm indicator rapidly blinks option and click Next.
12. The application will scan nearby devices. After identifying your device,
you will receive the Added Successfully confirmation.
13. To finish, click the Done button.

5User manual
English
Device control in the application
The Tuya Smart application allows remote control of the feeder.
Options:
• Automatic feeding
• Manual feeding
• Scheduled feeding
• Checking feeding status
• Other settings such as: device sharing, network configuration, etc.
Device maintenance
• Periodically clean the food tank and the food bowl with water and a neutral
detergent, as bacteria that may grow inside can harm your pet’s health.
• Dry all feeder components well before reassembly and refilling with food.
Notes:
• The pet feeder was created only for dry food with a maximum diameter of
12mm. Do not use frozen dry food.
• The feeder has a capacity to feed pets with a maximum weight of 20 kg.
Safety warnings
• Place the pet feeder in a safe place so that the animal cannot overturn it.
• Clean the pet feeder regularly of food residues.
• Replace the desiccant regularly.
• Make sure the food tank is dry and has the lid tightly closed.
• Children can only use the pet feeder if they are supervised by an adult.
• To ensure the operation of the device in power failure conditions, install 3
AA batteries (not included).

User manual 6
English
Technical specifications
Power voltage DC 5V 1A
Volume 3l
Number of meals max. 6
Compatible dry food Ø max. 12mm
Operating temperature –10~40°C
Dimensions 205 x 205 x 430 mm
Weight 2.200 g
WiFi IEEE 802.11 b/n/g 2.4G Hz
EN:
EU Simplified Declaration of Conformity
SC ONLINESHOP SRL declares that Smart pet feeder PNI MyPet
PT033PF complies with the Directive EMC 2014/30/EU and RED
2014/53/UE. The full text of the EU declaration of conformity is available at
the following Internet address:
https://www.mypni.eu/products/7293/download/certifications

Manual de utilizare
Romana
7
Descriere produs
Desicant
Rezervor hrana
Slot card Deschidere
rezervor hrana
Dispozitiv de alimentare
automata cu hrana
Buton de separare
compartiment hrana
Buton alimentare automata
cu hrana
Buton redare (play)
Buton inregistrare
Buton pentru
alimentare manuala
cu hrana
Compartiment
principal
Bol hrana Bol hrana
Compartiment baterii
Buton pornire/oprire
Capac
Instructiuni de utilizare
1. Conectatihranitoarealao sursadecurentcuajutorulcabluluidealimentare
inclus. Puteti alimenta hranitoarea si cu baterii (nu sunt incluse).
2. Instalati rezervorul de hrana in compartimentul principal, aflat in pozitie
verticala.
3. Adaugati hrana uscata in rezervor.
4. Pozitionati cutia cu desicant deasupra. Nota: inlocuiti desicantul cu
regularitate.

Manual de utilizare
Romana
8
Descriere functii butoane
1. Butonul de alimentare cu hrana: apasati scurt pentru a alimenta bolul cu
hrana. Apasati lung timp de 5 secunde pentru a reseta dispozitivul.
2. Buton inregistrare: apasati acest buton pentru a va inregistra.
3. Buton redare: apasati pentru a reda sunetul inregistrat.
Aplicatia Tuya Smart
Descarcati aplicatia Tuya Smart accesand Google Play sau App Store sau
scanati codurile QR de mai jos:
Android iOS
Adaugare dispozitiv in aplicatia Tuya Smart
1. Deschideti aplicatia, creati-va cont si autentificati-va.
2. Adaugati dispozitivul dvs. apasand pictograma +din coltul dreapta sus al
ecranului sau apasand butonul Add device (acest buton apare doar atunci
cand nu aveti nici un dispozitiv adaugat in aplicatie).
3. Selectati din partea stanga a ecranului optiunea Small home appliances.
4. Din lista de dispozitive din partea dreapta a ecranului, selectati Pet feeder
.

Manual de utilizare
Romana
9
5. Selectati reteaua WiFi la care doriti sa va conectati si adaugati parola.
6. In interfata urmatoare, din coltul dreapta sus, selectati optiunea EZ Mode.
7. Resetati dispozitivul apasand lung butonul de alimentare cu hrana. Acum
dispozitivul se afla in modul de imperechere.
8. Bifati optiunea Confirm indicator rapidly blinks si faceti click pe Next.
9. Aplicatia va scana dispozitivele din apropiere. Dupa ce va identifica
dispozitivul dvs., veti primi confirmarea Added successfully.
10. Pentru a finaliza, faceti click pe butonul Done.

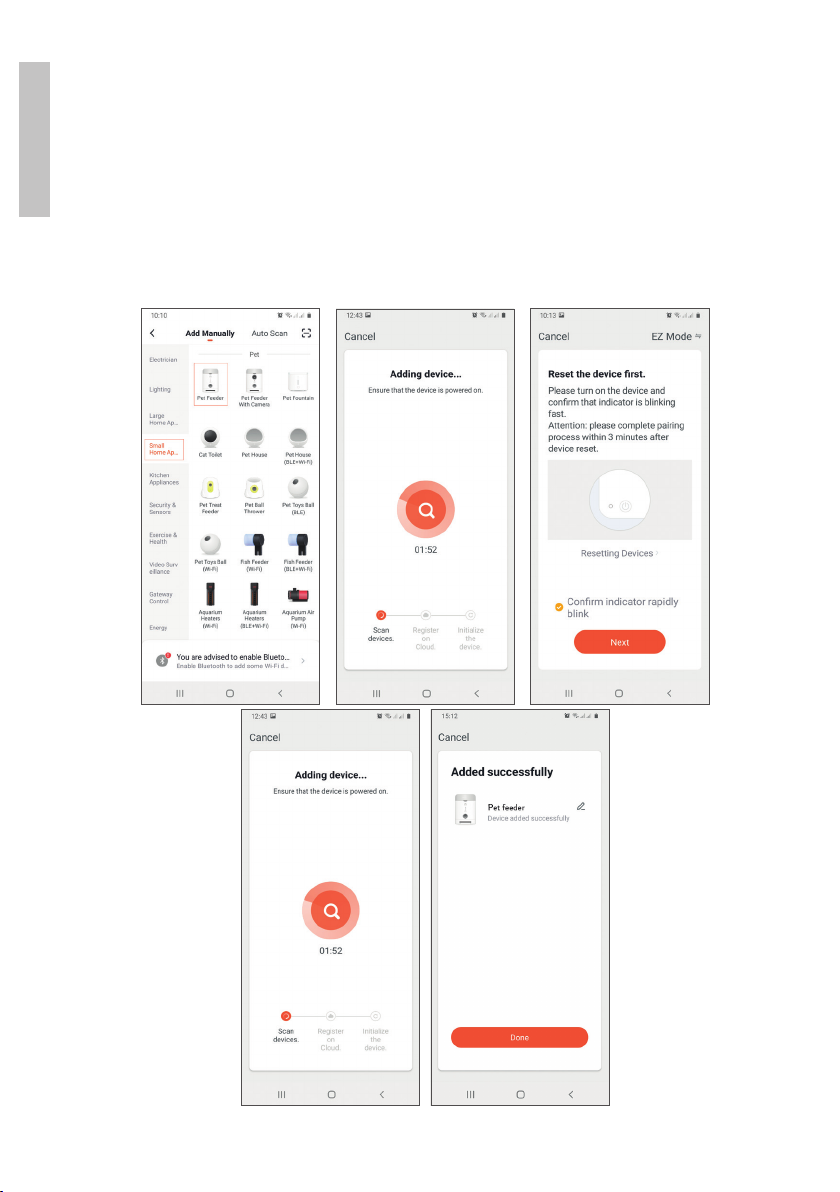
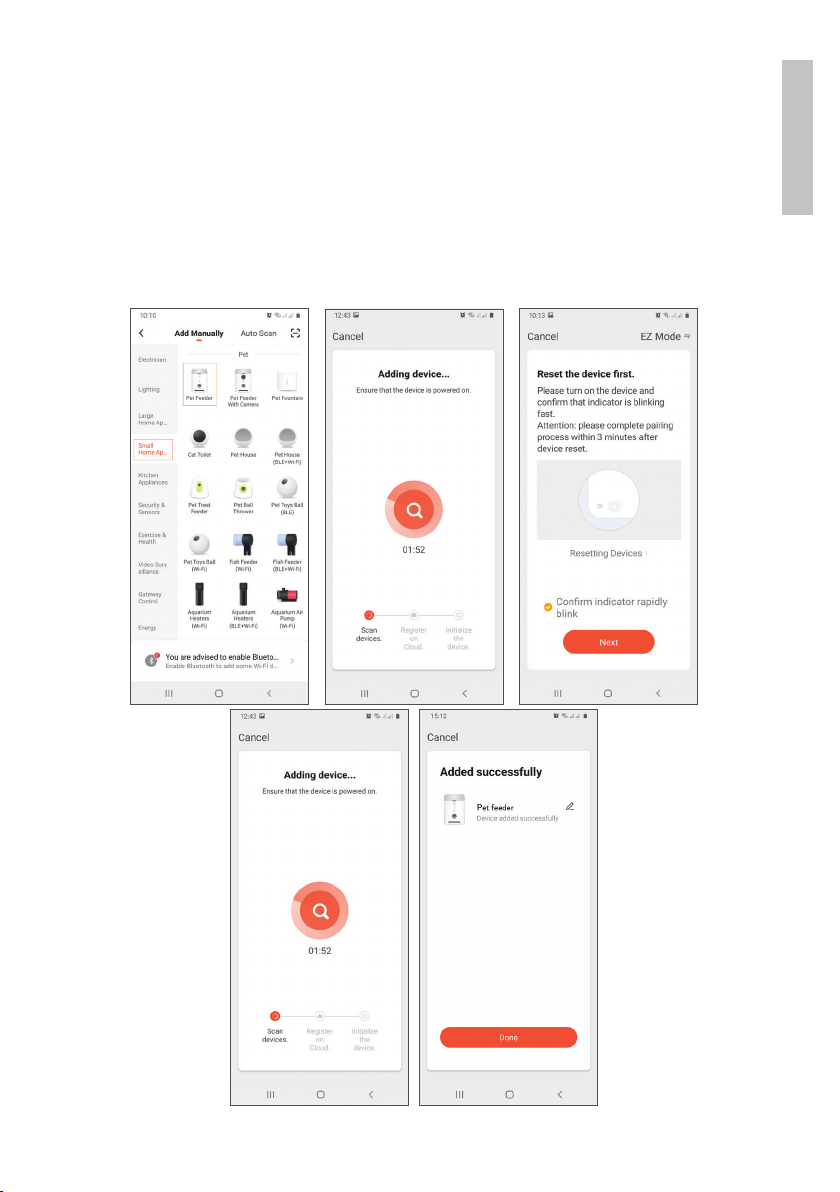
Control dispozitiv din aplicatie
Aplicatia Tuya Smart permite controlul de la distanta al hranitoarei.
Optiuni:
• Alimentare automata
• Alimentare manuala
• Alimentare programata
• Verificare informatii alimentare cu hrana
• Alte setari precum: partajare dispozitiv, configurare retea etc.
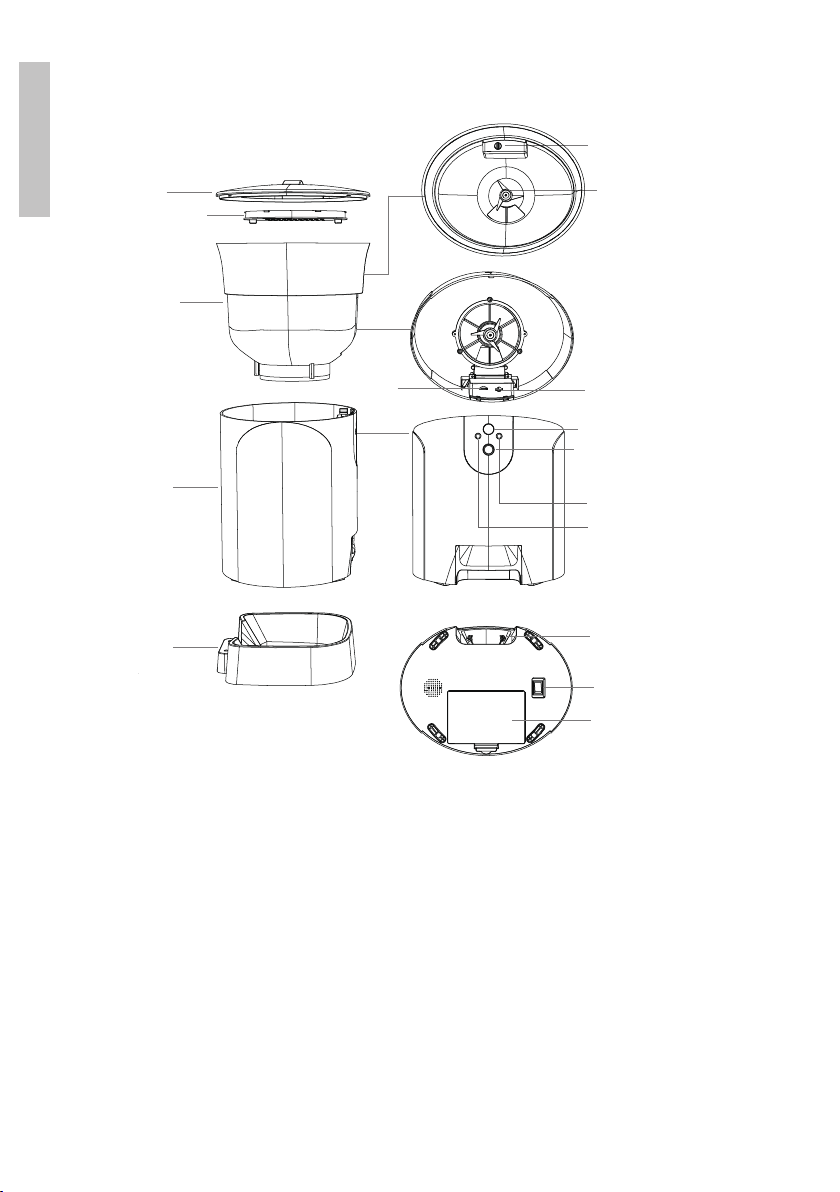
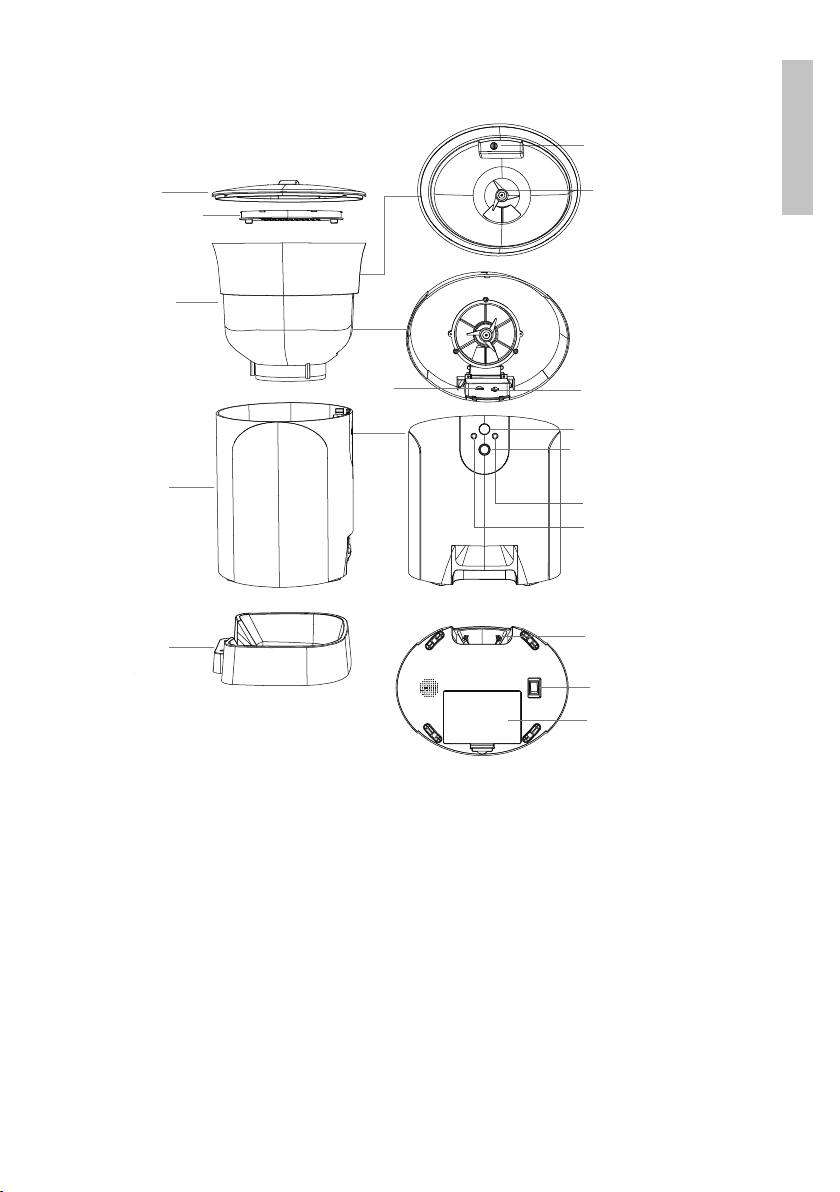
Intretinere dispozitiv
• Periodic curatati rezervorul si bolul pentru hrana cu apa si un detergent
neutru, intrucat bacteriile care s-ar putea dezvolta acolo pot dauna
sanatatii animalului dvs. de companie
• Uscati bine toate componentele hranitoarei inainte de reasamblare si de
reumplerea cu hrana.
Note:
• Hranitoarea a fost creata doar pentru hrana uscata cu un diametru maxim
de 12mm. Nu folositi hrana uscata congelata.
• Hranitoarea are o capacitate de hranire a animalelor de companie cu o
greutate maxima de 20 kg.
Atentionari de siguranta
• Amplasati hranitoarea intr-un loc ferit, astfel incat animalul sa nu o poata
rasturna.
• Curatati hranitoarea in mod regulat de reziduri de hrana.
• Inlocuiti desicantul cu regularitate.
• Asigurati-va ca rezervorul pentru hrana este uscat si are capacul bine
inchis.
• Copiii pot folosi hranitoarea doar daca sunt supravegheati de un adult.
• Pentru a asigura functionarea dispozitivului in conditii de pana de curent,
instalati 3 baterii AA (nu sunt incluse).

Manual de utilizare
Romana
11
Specificatii tehnice
Alimentare DC 5V 1A
Volum 3l
Numar mese maxim 6
Hrana uscata compatibila Ø max. 12mm
Temperatura de utilizare –10~40°C
Dimensiuni 205 x 205 x 430 mm
Greutate 2.200 g
WiFi IEEE 802.11 b/n/g 2.4G Hz
RO:
Declaratie UE de conformitate simplificata
SC ONLINESHOP SRL declara ca Hranitoare inteligenta de mancare PNI
MyPet PT033PF este in conformitate cu Directiva EMC 2014/30/EU si
RED 2014/53/UE. Textul integral al declaratiei UE de conformitate este
disponibil la urmatoarea adresa de internet:
https://www.mypni.eu/products/7293/download/certifications

Other manuals for MyPet PT033PF
1
Table of contents
Languages:
Other PNI Pet Care Product manuals