Podab WASHBASIC User manual

0000138874 rev. 1.0 1
WASHBASIC
EN
WashBasic
Dosing System for Professional Laundry Machines
Contents:
1.!GETTING STARTED ................................................................................................ 2!
2.!INSTALLATION ....................................................................................................... 3!
3.!ELECTRICAL CONNECTIONS................................................................................ 6!
4.!STARTUP, RUNNING AND PROGRAMMING MODE ............................................. 7!
5.!PROGRAMMING MENU .......................................................................................... 8!
6.!ALARMS ................................................................................................................ 10!
7.!MAINTENANCE & ACCESSORIES ....................................................................... 10!
8.!TROUBLESHOOTING ........................................................................................... 10!

0000138874 rev. 1.0 2
WASHBASIC
EN
1. GETTING STARTED
1.1 WELCOME
Get ready for a whole new experience. WashBasic has a fresh, new look and it’s easier than ever to use.
This proven chemical dispensing system is engineered to dispense one or two chemicals. Chemical feeds either by
a trigger signal directly from the washer or manually by the operator with the activating switches on the front cover.
It is also possible to activate the unit dispensing with a remote switch (optional) to be connected to the WashBasic.
A unique “Product Lockout” feature helps you control costs and product consumption.
This book explains how to install and set up the WashBasic and where to turn for help so you can enjoy the most
intuitive dosing system yet.
Ü
Please review this manual carefully. Pay particular attention to warnings and precautions. Always
follow good safety procedures, including the use of proper clothing, eye and face protection.
I
Please read through entire manual and choose operating mode before you begin installation.
1.2 WHAT’S IN THE BOX?
Before you start, check that your box contains the following items:
• WashBasic system;
• Instruction manual;
• Mounting kit;
• PVC tube: 8x12 mm (3/8"), 4 m (16.4 ft) each pump.
1.3 TECHNICAL FEATURES
• Power Supply: 100-240 Vac @ 50-60 Hz with main switch
• Maximum Power Consumption: 15W
• Protection of the System: IP54. The gasketed enclosure on the WashBasic is highly water resistant and the
electronics are further protected within the enclosure
• Fuse: 1,25A T 250V, 5X20 mm
• Weight: 3 kg (6.61 lb)
• Dimensions (L x D x H): 205 x 135 x 200 mm (8.07 x 5.31 x 7.87 in)
These symbols on or inside the unit mean:
Danger: high voltage.
Caution, replace fuse with same type and value
Power “ON” (supply)
Power “OFF” (supply)

0000138874 rev. 1.0 3
WASHBASIC
EN
1.4 WARNINGS
Caution! Risk of electrical shock
I
Check the voltage of the main power source and make sure that it matches the available input voltage
(100-240 Vac) of the transformer inside the WashBasic.
I
Adding or replacing pumps, pump tubes or other components should only be performed by qualified
personnel
I
All electrical connections to the WashBasic should first be verified with a meter. Application of
incorrect voltage will permanently damage the unit and is not covered under warranty. Avoid wiring to
any power source that has large fluctuations in voltage and/or is prone to surges. Refer to the wiring
diagram in this manual for all power and signal connections.
I
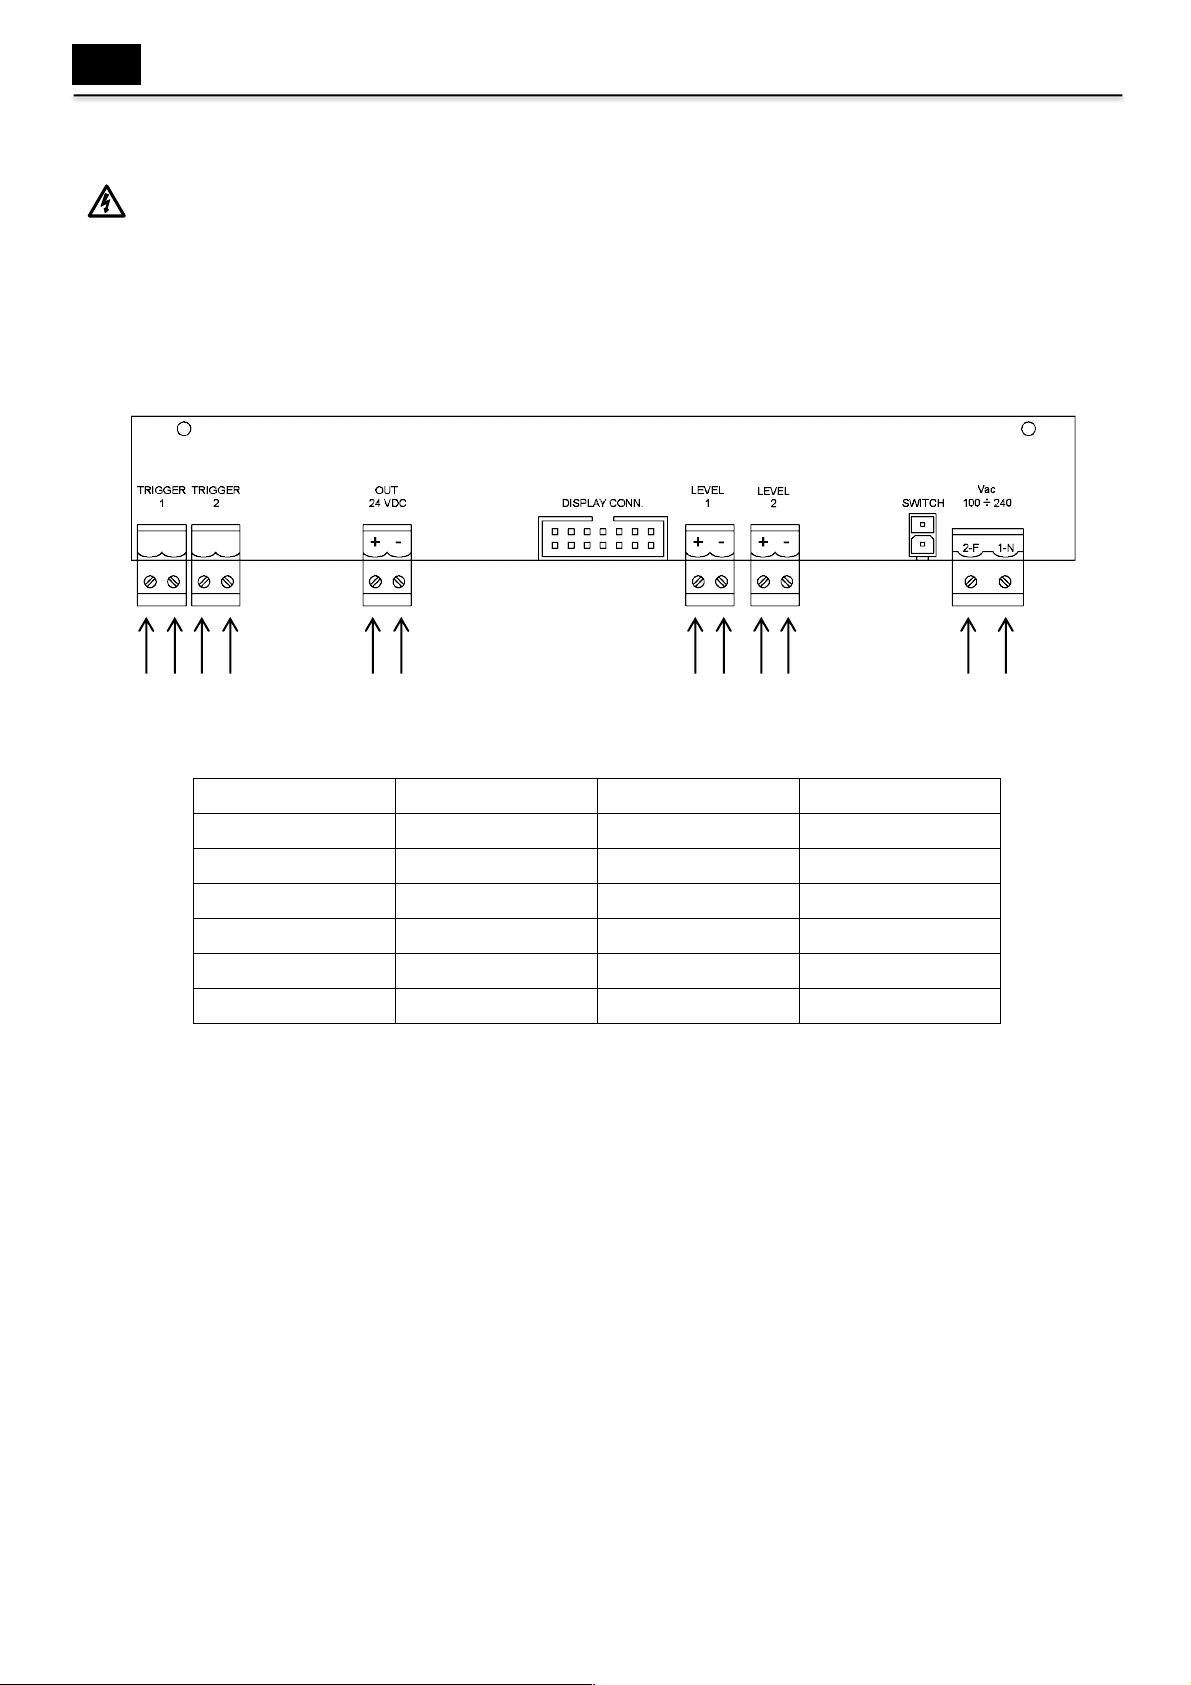
For all connections, please refer to the circuit board schematic contained in this manual.
I
Check the model of the equipment you have purchased for the references about installation, setting
and programming.
CAUTION: The WashBasic has high voltage connected to the transformer. Always disconnect power
when servicing the unit.
CAUTION: During installation and electrical connections remove all power from the laundry machine.
Ü
Failure to follow these instructions may lead to personal injury, damage to the product or poor product
performance.
1.5 MATERIALS REQUIRED DURING INSTALLATION
• Two pole wire: 2x0.75 - H-05 VVF (qty 2; length 2 mt - for trigger signal);
• Two pole wire: 2x1.5 - H-05 VVF (qty 1; length 2 mt - for power supply);
• 4x6 mm copper tubing (qty 1; length 2 mt - for water solenoid valve).
Ü
The lengths indicated above are for typical installations. Your installation may require different lengths.
Ü
An installation kit is available.
2. INSTALLATION
Mount the unit on a nearby wall (using suitable hardware) to the laundry machine. Try to keep the unit within one
meter from the final rinse line to avoid long tubing runs.
Locate the WashBasic as close to the chemical product tanks as possible in order to maximize both your motor and
tube life.
Check all applicable plumbing and electrical codes before proceeding with the installation. This will help to ensure
that the system is installed in safe and suitable manner. A wiring schematic of the laundry machine should be used
as reference for making electrical connections, this is typically provided by the laundry machine manufacturer if one
cannot be located on the machine itself.
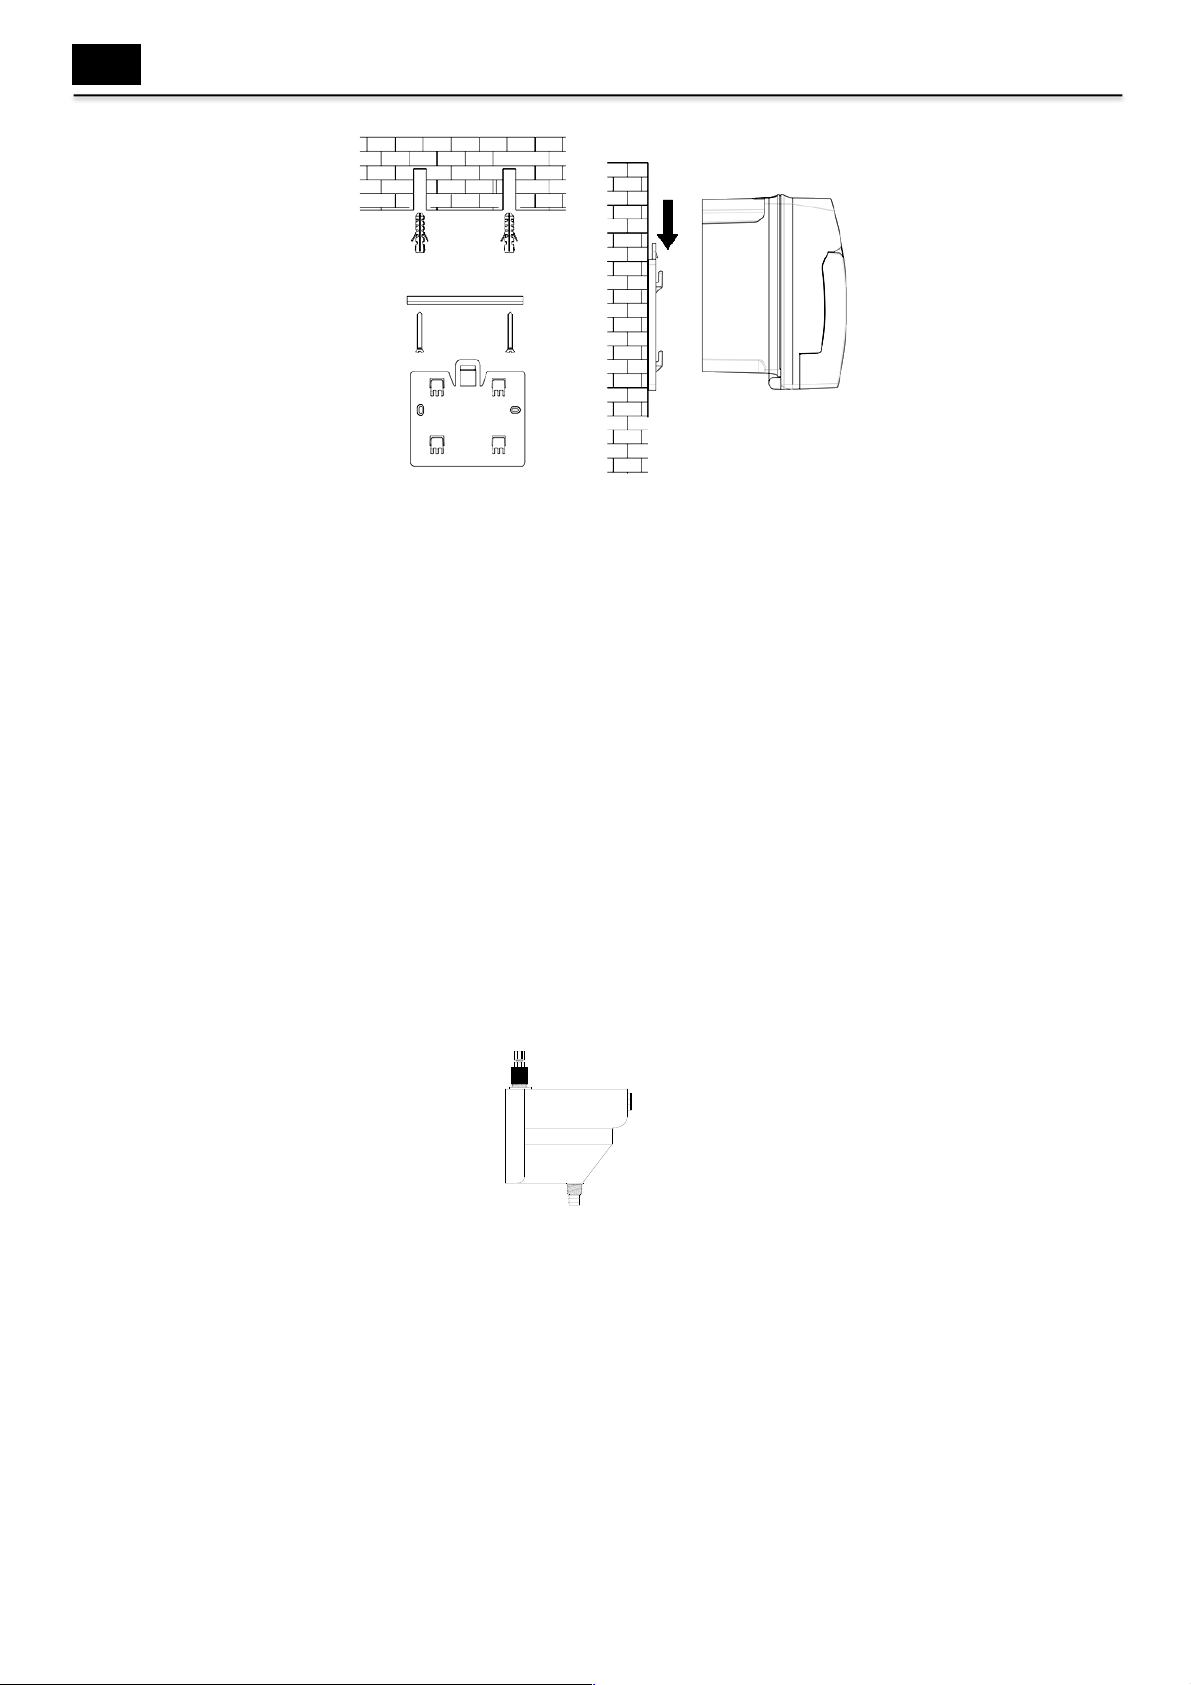
2.1 MOUNTING THE SYSTEM
Apply the panel unit system with the brackets and screws supplied:
• Determine a suitable location for the system;
• Using the bracket as a template, mark and drill holes for bolting the system to the wall;
• Insert the anchors in the holes;
• Bolt the bracket in place with the hardware provided;
• Mount the system with the bracket as the picture below;
• Open the Cabinet Front, unscrewing the upper screws by ¼ of a turn.

0000138874 rev. 1.0 4
WASHBASIC
EN
Picture 1
2.2 PLUMBING
2.2.1 Liquid product plumbing:
Connect 8X12 mm (3/8") PVC tubing from the output (right) side of the pump to the injection point.
Connect 8x12 mm (3/8") PVC tubing from the chemical source to the suction (left) side of the pump.
2.2.2 Solid product plumbing:
A powder or solid type feeder (not provided) should be used for dispensing dry detergent products. Follow the
instructions included with the detergent feeder for installation, and recommended water temperature/pressure. Make
sure that the detergent feeder (bowl) is located in a position on the wall that allows the feeding of the detergent in the
laundry machine through gravity.
• Cut a suitable length of ¼” OD copper tubing (not provided) and connect between the input side of the water
solenoid valve and the water source;
• Cut a suitable length of ¼” OD copper tubing (not provided) and connect between the output of water solenoid
to a powder or solid detergent feeder;
• Cut a suitable length of tubing (not provided) and connect between the output of detergent feeder to the
elbow connector;
Carefully tighten the compression nuts on the water solenoid; over tightening may cause solenoid to leak. Tighten
connections to the water source and detergent feeder as needed.
Picture 2
i The water solenoid valve does not have a set direction for input/output.
i Always use the foot filter and make sure that it reaches the bottom of the container. Periodically check
and clean the filter of buildup or debris.

0000138874 rev. 1.0 5
WASHBASIC
EN
HOSE REPLACEMENT
Open the pump’s lid and release
the hose by pulling the left
connector upward.
Position the roller at 7h15,
turning it in the direction of the
circular arrow.
Completely release the left
connector, holding it taut towards
the outside, and turn the roller in
the direction of the circular arrow
so that the hose is freed up to the
right connector.
Position the roller at 7h05,
turning
it in the direction of the circular
arrow.
Insert the left connector into the
relative housing and pass the
hose under the roller’s guide.
Turn the roller in the direction of
the circular arrow,
simultaneously accompanying
the hose into the pump’s head,
until the right connector is
reached.
Close the pump’s lid and press its
surface hard so that it is properly
locked into place.

0000138874 rev. 1.0 6
WASHBASIC
EN
3. ELECTRICAL CONNECTIONS (Qualified service personnel only)
CAUTION: The WashBasic has high voltage connected to the transformer. Always disconnect power
when servicing the unit.
I
All electrical connections to the WashBasic system should first be verified with a meter. Application of
incorrect voltage will permanently damage the unit and is not covered under warranty. Avoid wiring to any
power source that has large fluctuations in voltage and/or is prone to surges. Refer to the wiring diagram
in this manual for all power and signal connections. All wiring must conform to local electrical codes.
CONNECTOR
SIGNAL
TYPE OF SIGNAL
TYPE
1-2
Power Supply
VAC (100-240)
INPUT
3-4
Level 2
Dry Contact
INPUT
5-6
Level 1
Dry Contact
INPUT
9-10
Alarm Output
OUT 24 VDC
OUTPUT
13-14
Trigger 2
VAC (12-240)
INPUT
15-16
Trigger 1
VAC (12-240)
INPUT
16
15
14
13
6
5
4
3
10
9
2
1

0000138874 rev. 1.0 7
WASHBASIC
EN
4. STARTUP, RUNNING AND PROGRAMMING MODE
4.1 START UP
When power is switched on, the display will briefly show the firmware code and its revision number and go through
a self-test routine. Then it will show the default display:
4.2 RUNNING MODE
Running mode will always show the ongoing phase for each pump on the display:
• When in standby
• As the trigger is present and accepted
• Time decreasing in delay mode
• Time decreasing in dosing mode
• Time decreasing in locked mode
If only one program is set, the system will not show the program parameter.
If multiple programs are set the running mode will be as follows:
• When in standby
By using the buttons in running mode, it is possible to:
• Activate the dosage of the right pump by pressing ;
• Activate the dosage of the left pump by pressing ;
• Change the program from 1 to 9, if multiple programs are set, by pressing once;
• Access the Setup/Setting menu by pressing for more than 3 seconds.
4.3 PROGRAMMING MODE
To access the programming menu, when in standby, press for more than 3 seconds than use and
to select one of the following available options: Prime, Setup, Setting, Escape.
When in programming mode, press for more than 3 seconds to exit and return to the standby mode at any time.
Notes:
• The user will be asked to insert the Password only if password is different than 0000, otherwise the access
to the programming menu will be free.
• Once the password is set and after pressing for 3 seconds to access to programming menu, if buttons
are not used for more than 20 seconds, the system will automatically exit the programming mode.
Ready Ready
Ready Ready
Trig Trig
Del010 Del005
Dos018 Dos011
Lck000 Lck000
Ready P1 Ready

0000138874 rev. 1.0 8
WASHBASIC
EN
5. PROGRAMMING MENU
5.1 PRIMING INSTRUCTIONS
DISPLAY READING
DESCRIPTION
1
From standby, press for more than 3 sec. to access the programming menu.
2
If the password is set, use to insert the password and press to
confirm.
3
Use to select Prime and press to confirm.
4
Press and hold to prime the DETERGENT pump. Press and hold to
prime the RINSE pump. Press to confirm and to return to the previous menu.
5
To exit the programming mode, use to select Escape and press to
confirm.
5.2 SETUP MENU
DISPLAY READING
DESCRIPTION
1
From standby, press for more than 3 sec. to access the programming menu.
2
If the password is set, use to insert the password and press to
confirm.
3
Use to select Setup and press to confirm.
4
If the option Dosage Method in Setting menu is set to Volume:
Use to select Pumps Dosage and press to confirm.
5
Press to start/stop the dosage. Press to decrease/adj. time up to “0”.
Press to confirm and move to the next option.
6
Press to start/stop the dosage. Press to decrease/adj. time up to “0”.
Press to confirm and move to the next option.
7
If the option Dosage Method in Setting menu is set to Time:
Use to select Pumps Time and press to confirm.
8
Press and hold to scroll the value (up to 999s). Press to confirm
and to move to the next option.
9
Press and hold to scroll the value (up to 999s). Press to confirm
and to move to the next option.
10
Use to select Pumps Delay and press to setup the delay.
11
Press and hold to scroll the value (up to 999s). Press to confirm
and to move to the next option.
12
Press and hold to scroll the value (up to 999s). Press to confirm
and to move to the next option.
13
Use to select Pumps Lockout and press to setup the lockout.
14
Press and hold to select the value (up to 999m). Press to confirm
and to move to the next option.
15
Press and hold to select the value (up to 999m). Press to confirm
and to return to the previous menu.
16
To exit the programming mode, use to select Escape and press to
confirm.
Ready Ready
Password 0000
Prime
Prime▼ ▲Prime
Escape
Ready Ready
Password 0000
Setup
Pumps Dosage
000s Dos 000s
000s Dos 000s
Pumps Time
000s Time 000s
000s Time 000s
Pumps Delay
000s Del 000s
000s Del 000s
Pumps Lockout
000m Lck 000m
000m Lck 000m
Escape

0000138874 rev. 1.0 9
WASHBASIC
EN
5.3 SETTING MENU
DISPLAY READING
DESCRIPTION
1
From standby, press for more than 3 sec. to access the programming menu.
2
If the password is set, use to insert the password and press to
confirm.
3
Use to select Setting and press to confirm.
4
Use to select Password Set and press to confirm.
5
Use to set the new password. Press to confirm and to move to the
next option.
6
Use to select Programs Qty and press to confirm.
7
Use and to select from 1 to 9 programs. Use to change
the programs qty. Press to confirm and to move to the next option.
8
Use to select Washer Trigger and press to confirm.
9
Use to select between 12-230V and 80-230V. Press to confirm and
to move to the next option.
10
Use to select Language and press to confirm.
11
Use to select between English, French, Italian, Spanish. Press
to confirm and to move to the next option.
12
Use to select Washer solenoid and press to confirm.
13
Use to select between NO and NC. Press to confirm and to move
to the next option.
14
Use to select Dosage method and press to confirm.
15
Use to select between Volume and Time. Press to confirm and to
move to the next option.
16
Use to select Buttons enable and press to confirm.
17
Use to select Yes or No. Press to confirm and to move to the next
option.
18
Use to select Trigger filter and press to confirm.
19
Use to set a value between 0-99s. Press to confirm and to move to
the next option.
20
To exit the programming mode, use to select Escape and press to
confirm.
5.4 SYSTEM RESET
To reset the system, press for 15 seconds. The system will show:
Use to select Yes and press to confirm.
Ready Ready
Password 0000
Setting
Password Set
Pass. Set 0000
Programs Qty
Prog. N 1
Washer Trigger
Trigger
Language
Lan. English
Washer solenoid
Wash. sole. NC
Dosage method
Dosage Volume
Buttons enable
Butt. Enable Yes
Trigger filter
Trig. Filt. 03s
Escape
Reset Yes

0000138874 rev. 1.0 10
WASHBASIC
EN
6. ALARMS
Alarm Message
Alarm Relay
Buzzer
Pump Block
Restore Condition
Par Err PressEnt
NO
NO
YES
Restore default values by pressing and reprogram
the system according to specific needs.
Pump 1 LEVEL
YES
YES
YES
Refill with product to clear the alarm.
Pump 2 LEVEL
YES
YES
YES
Refill with product to clear the alarm.
M.Block
YES
YES
YES
System restart. Check for hardware malfunction.
7. MAINTENANCE & ACCESSORIES
7.1 MAINTENANCE
Routine maintenance on the WashBasic unit includes replacing worn out pump tubes and keeping the unit clean.
Repairs to the unit involve modular component replacements. This minimizes spare parts inventory requirements
and speeds up the service process in the field.
SQUEEZE TUBE REPLACEMENT
Replace squeeze tubes on regular maintenance intervals. A planned preventive maintenance schedule will insure
replacement before the tube fails. In the event the tube does rupture, clean all product from pump with a damp cloth.
• Disconnect the power supply and open the blue transparent lid of the WashBasic;
• Remove the old tube and insert the new squeezing tube;
• Close the blue transparent lid of the WashBasic and make sure the lid clicks into its seat.
7.2 ACCESSORIES
It is possible to connect a remote control to the system.
8. TROUBLESHOOTING
Problem
Action
1
Power light does not illuminate
• Check fuses on the circuit board.
• Check input terminals on board for correct input voltage. Refer to the
circuit board diagram.
2
Pump(s) or solenoid will not
activate
• Check pump output terminals for loose screws and disconnected wires.
• Check for proper voltage across motor windings (or solenoid contacts).
• Check for obstruction in pump head (or solenoid).
3
Too much or too low chemical
• Check the programmed quantity.

0000138874 rev. 1.0 11
WASHBASIC
EN
9. Console
The function Button Enable have to be enabled in order that the console can work.
10. Technical assistance
For technical assistance please contact:
Seko Spa
Via Salaria Km. 92,200
02015 S.Rufina - Rieti (Italy)
Phone: +39 0746 605801 - Fax: +39 0746 607072
Website: http://www.seko.com
dosing
start
dosing
start
Fixed green: during
the dosage of the
right pump
Flashing Red:
during an alarm of
the right pump
By pressing
activate the
programmed
dosage of the right
pump
Fixed green: during
the dosage of the
left pump
Flashing Red:
during an alarm of
the left pump
By pressing
activate the
programmed
dosage of the left
pump
Table of contents