poly-planar IXM-10 User manual
Poly Planar LLC 520 McCormick Dr.Glen Burnie MD. 21061 410-761-4000
www.polyplanar.com
8
Mounting:
The IXM-10 can be mounted using the included double-stick tape (make sure
to mount to a clean, dry surface), or it can screwed in place using the included
screws and case mounting tabs. The XMD-1000 should be fixed firmly to a
clean, dry surface away from any water or excess humidity.
Make sure any unused connectors have their caps firmly attached.
Trouble shooting:
1. Only receiving channel 1: XM is a subscription service. Make
sure your subscription is up to date and follow the activation
instructions for your XM unit.
2. Display reads “No Antenna”: Make sure the XM antenna is
plugged in.
3. Display reads “No Signal”: Adjust placement of antenna for
maximum signal strength.
4. Display reads “No XM”: Check connection to XMD-1000.
5. Poor reception or drop-outs: Adjust placement of antenna for
maximum signal strength.
6. No Audio: Make sure the RCA cables are routed properly as
shown in the hook-up diagrams on pages 2-5.
7. Will not turn on: Verify cable connections and insure 12V power
and ground are connected.
Specifications:
Operating Voltage …………………..……… 13.8V (10V – 16V) DC
Dimensions (approx. w/h/d) ……………….. 105mm X 40mm X 120mm
4.15 X 1.5 X 4.75 inches
Weight ……………………………………….. 15 oz (.425 Kg)
WARRANTY
Poly-Planar marine audio systems are warranted to be free of defects in materials and
workmanship for a period of two years. Warranty is subject to proper installation and
operation within published specifications. Poly-Planar will repair or replace, at its
discretion, any unit returned prepaid to its factory and determined to be defective. Poly-
Planar Inc. is not liable for consequential damages.
Poly Planar LLC 520 McCormick Dr.Glen Burnie MD. 21061 410-761-4000
www.polyplanar.com 1
IXM-10 XM Radio Interface Module Rev 1.0
Introduction:
The IXM-10 is a custom module designed to bring XM Radio to the Poly-
Planar line of marine audio products. It requires the XMD-1000 XM Direct
Receiver (Sold separately)
Features:
•Easy way to add XM radio to the audio network
•Complete control of XM functions
•Song/Channel/Artist data displayed on RD-44
•Allows mounting of the XM Direct receiver away from wet areas.
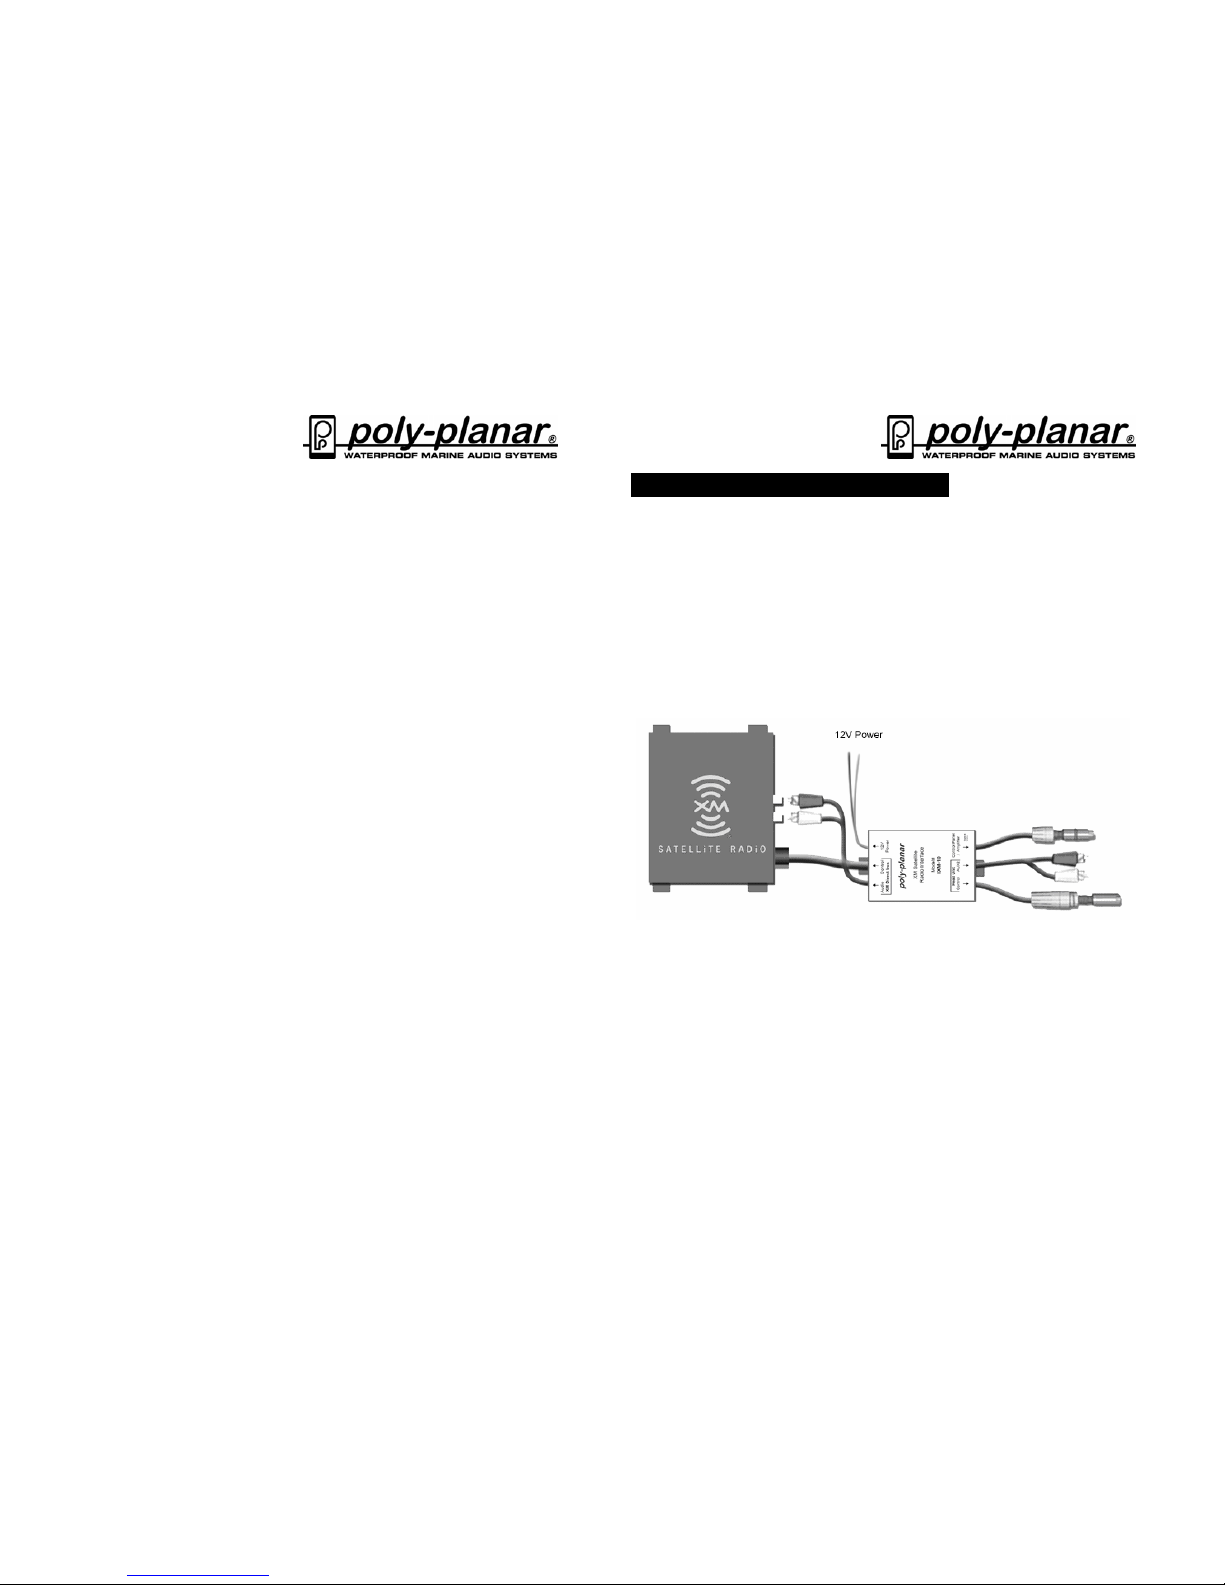
[1] XMD-1000 XM Direct Receiver (Not Included)
[2] Cable to XM Direct Receiver
[3] To XM Audio Output
[4] To 12V battery source
[5] IXM-10 Interface Module
[6] To RD-44, Network Router or Network Amplifier
[7] Audio Output to AUX2 of MRD-70
[8] To MRD-70 Radio
[6]
[3]
[7]
[1]
[2]
[4]
[8]
[5]
Poly Planar LLC 520 McCormick Dr.Glen Burnie MD. 21061 410-761-4000
www.polyplanar.com
2
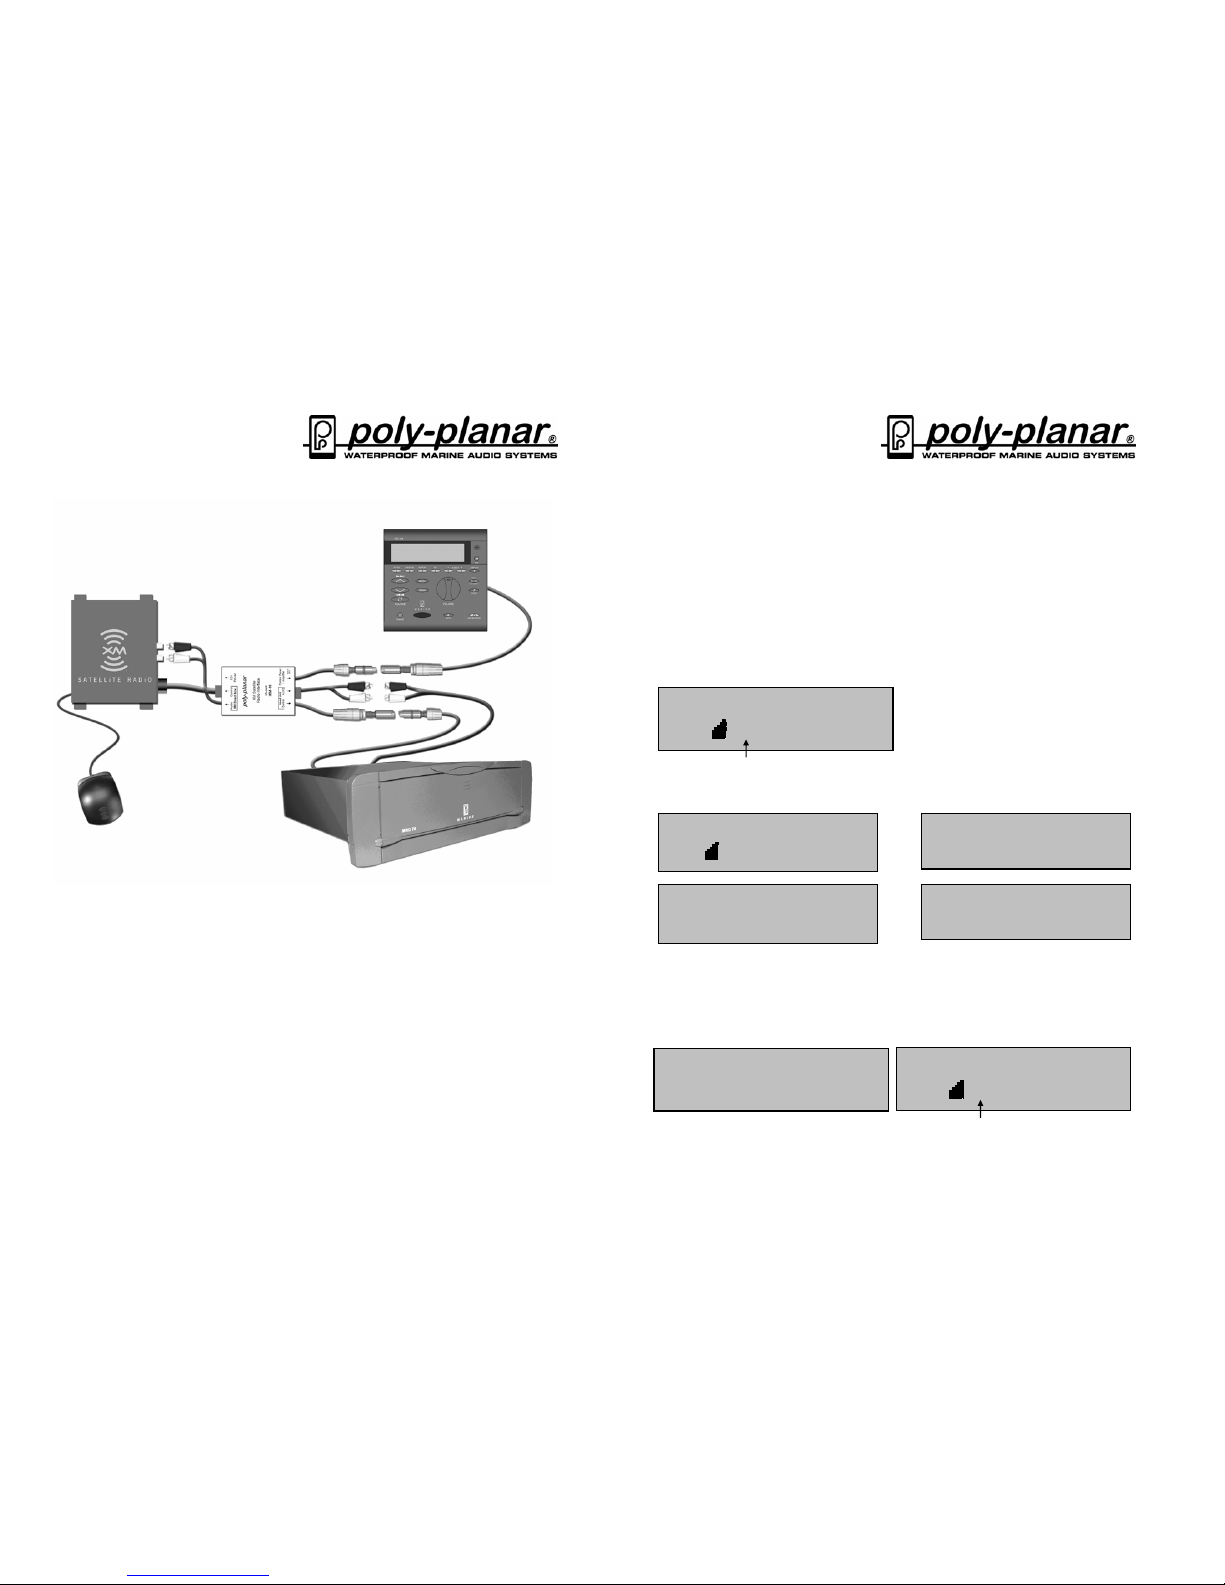
Connection to the MRD-70 CD/MP3 Radio:
[1] Connect the RD-44 Control Panel to the plug on the IXM-10 marked
“Control Panel/Amplifier”.
[2] Connect the AUX2 input of the MRD-70 to the AUX2 RCAs on the
IXM-10 module.
[3] Connect the plug marked “Head Unit Control” to the MRD-70 radio.
[4] Connect the plug marked “XM Direct Box Control” to the input on the
XM Direct Receiver.
[5] Connect the RCA cables marked “XM Direct Box Audio” to the XM
Direct Receiver RCA inputs.
[6] Plug in the XM antenna and route for best signal.
[3]
[2]
[1]
[4]
[5]
[6]
Poly Planar LLC 520 McCormick Dr.Glen Burnie MD. 21061 410-761-4000
www.polyplanar.com 7
1 xm preview
xm1 vol 15
C
A
Scan Mode
Category Mode
Category
JaZZ&Blues
70 real jazz
xm1 vol 15
artist
miles davis
song
so what
category
jazz&blues
[2] Presets. Set favorite channels by holding down one of the Preset
buttons (1-6) for 2 seconds.
[3] Tune Up/Down. Use Tune Up and Down to change channels.
[4] Source. Push “Source” until XM shows as the audio source.
[5] Band. Select preset banks XM1, XM2 and XM3 by pushing the “Band”
button. Store up to 6 presets per “Band”
[6] Scan. Scans up through the channels. Stays for 10 seconds and then
increments to the next channel. Push “Scan” again to exit scan mode.
[7] Display. Push the “Display” button to cycle through “Main, Artist, Song
and Category.
[8] Category. Push the “Category” button to cycle through the XM content
categories. The first time will display the current category. The display will
show “CA” and each press of the “Category” button will move to the next
category. Category mode will time-out after 15 seconds of idle. To tune to
a station within a category, use the UP/DOWN tuning buttons.
1 xm preview
xm1 vol 15
S
C

Poly Planar LLC 520 McCormick Dr.Glen Burnie MD. 21061 410-761-4000
www.polyplanar.com
6
RD-44 Controls Specific to XM Radio
[1] Display [6] Scan Channels
[2] Presets [7] Display Information
[3] Tune Up/Down [8] Category Select
[4] Source
[5] Band selects XM1, XM2 or XM3 preset banks
Operation:
[1] The Display
[2]
xm1 p1 vol 15
1 xm preview
[3]
[4]
[5]
[6]
[7]
[8]
[1]
1 xm preview
xm1 p1 vol 15
Channel # Channel Name
Band Signal Strength Preset #
Poly Planar LLC 520 McCormick Dr.Glen Burnie MD. 21061 410-761-4000
www.polyplanar.com 3
Connecting to a multi-zone audio system with the MRD-70 radio:
1. Connect the plug on the IXM-10 marked “Control Panel/Amplifier”
to the “Network Source” plug on the RT-20 router.
2. Follow steps 2-6 from page 2, “Connection to the MRD-70
CD/MP3 Radio”
3. Connect up to three other zones using MZ series amplifiers.
4. All zones can access the XM tuner by changing “Source” to XM.
IXM-10
RT-20
MRD-70
MZ
Amplifier
[1]
Poly Planar LLC 520 McCormick Dr.Glen Burnie MD. 21061 410-761-4000
www.polyplanar.com
4
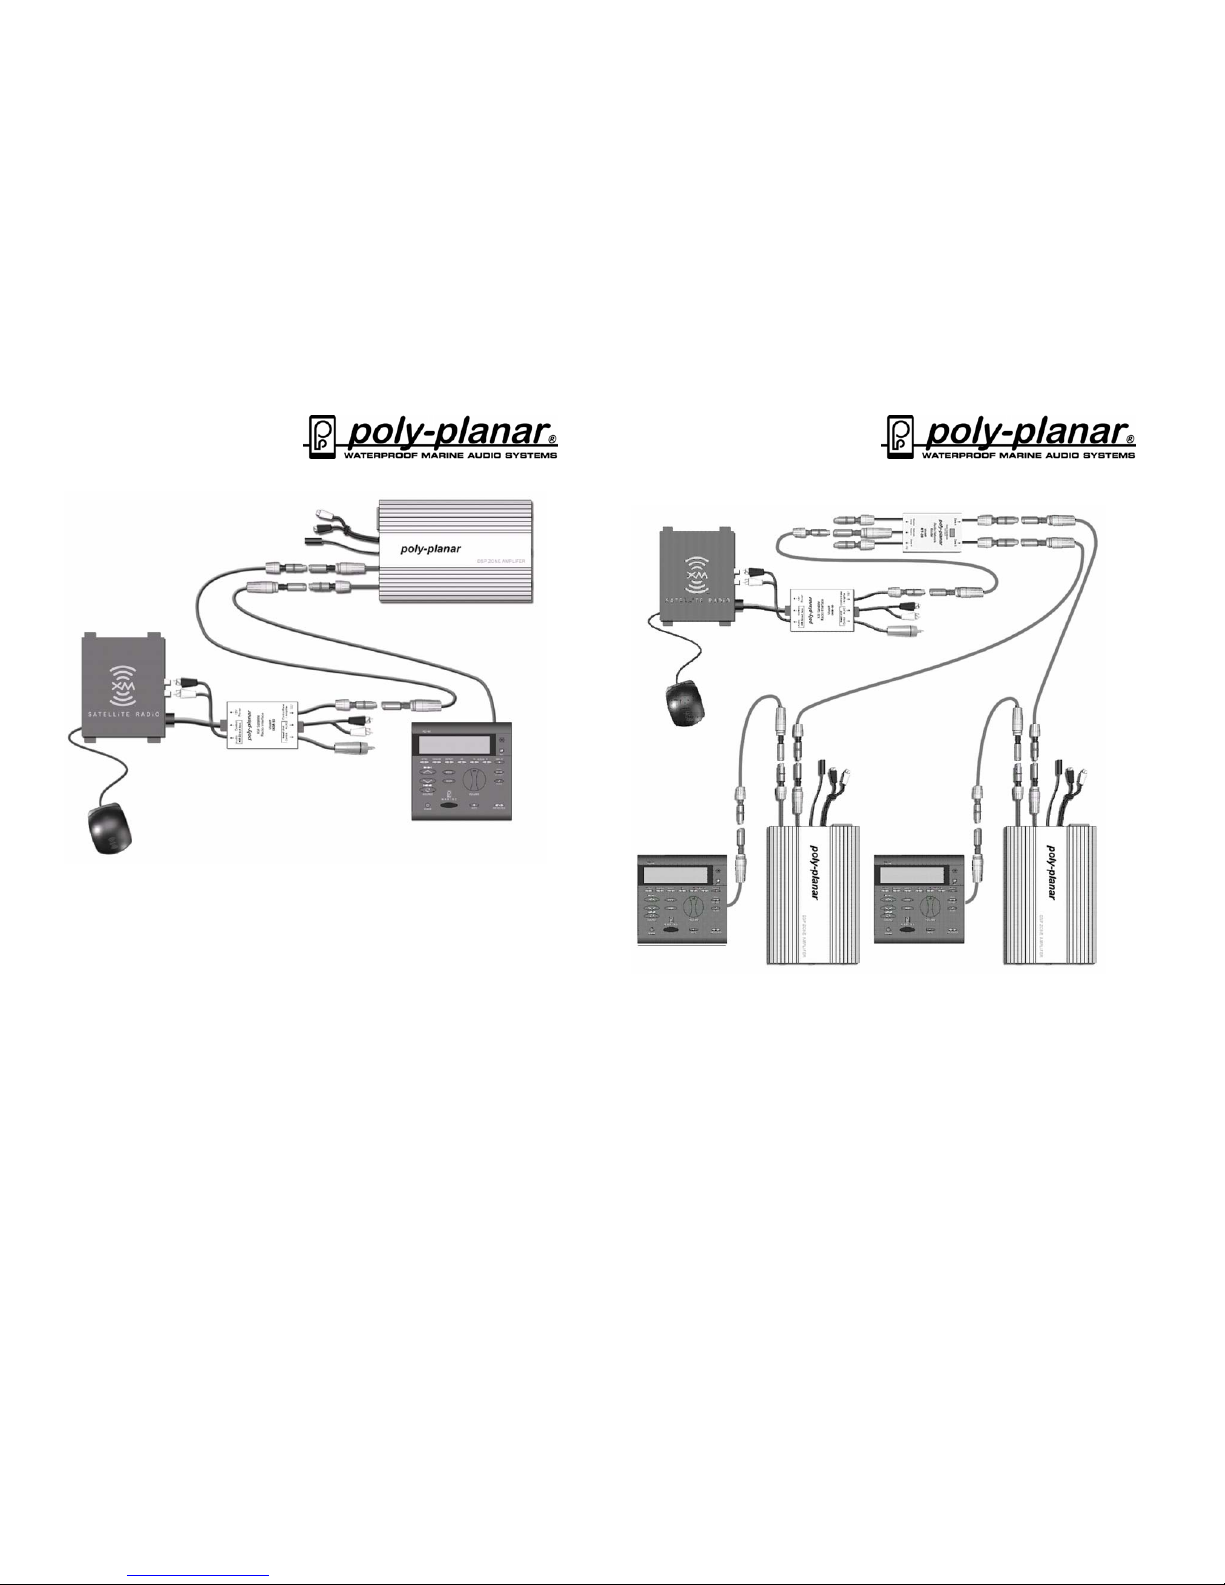
Connection to the MZ Series Amplifier:
1. Using the extension cable, connect the RD-44 Control Panel to
the MZ-100 amplifier Control Panel input.
2. Connect the “Control Panel/Amplifier” plug to the MZ amplifier
“Audio System” plug.
3. Connect the plug marked “XM Direct Box Control” to the input on
the XM Direct Receiver.
4. Connect the RCA cables marked “XM Direct Box Audio” to the
XM Direct Receiver RCA inputs.
5. Plug in the XM antenna and route for best signal.
[1]
[2]
[3]
[4]
[5]
Poly Planar LLC 520 McCormick Dr.Glen Burnie MD. 21061 410-761-4000
www.polyplanar.com 5
Connecting to a multi-zone audio system with MZ Amplifiers:
1. Connect the plug on the IXM-10 marked “Control Panel/Amplifier”
to the “Network Source” plug on the RT-20 router.
2. Connect a Zone plug on the RT-20 to the MZ amplifier “Audio
System” plug.
3. Follow steps 3-5 from page 4, “Connection to the MZ Series
Amplifier”
4. Connect up to three zones using MZ series amplifiers.
RT-20
IXM-10
ZONE 1 ZONE 2


