manuals.online logo
Brands
  1. Home
  2. •
  3. Brands
  4. •
  5. Polyvance
  6. •
  7. Welding System
  8. •
  9. Polyvance 6085-C User manual

Polyvance 6085-C User manual

6085-C Nitro Fuzer Welding Cart - Quick Start Guide
Getting started:
The shutdown procedure is VERY IMPORTANT for maximizing the
life of your heang element. You MUST maintain airow through
the heang element unl it is completely cool. You are in control
of your heang element’s life! Polyvance cannot warrant the
heang elements for this reason.
Page 1Page 4
Welder Shut-down Procedure:
1. Unpack the accessories box. Place
the welding rod boxes onto the large
compartment on the top of the cart
and thread the welding tips into the
appropriate welder.
2. Place the welders into the holster
on the right side of the welder. Be sure
to place the nitrogen welder into the
rectangular top tray and make sure there
is nothing ammable near the holster.
3. Install your shop’s male air tting in
the bottom of the air manifold on the front
of the cart. If desired, you can install a
hose to the front of the manifold to power
air tools.
4. Secure your nitrogen tank to the back
of the cart with the included chains and
adjust the top tank cradle if needed.
Install the nitrogen regulator securely to
the nitrogen bottle.
5. With the welder o󰀨, connect your
CLEAN, DRY, and OIL FREE shop air
supply to the manifold.
Welder will not turn on.
• Check power supply to welder.
• Check wall outlet for 120V.
• Make sure power strip is on.
• Check that all cords going to the welder are plugged in.
• Check circuit breaker on the back of the welder.
Circuit breaker trips.
• Check heating elements for shorts. Remove the hot air element and unplug the airless welder from the control panel. Check the resistance of the
elments using an Ohm meter.
• Hot air welder: 26.0 ± 1.0 Ohm
• Airless welder: 53 ± 3.0 Ohms
• If out of range, or an open circuit is indicated, replace the faulty heating element.
• If elements check OK, turn the unit on with no elements installed. If circuit breaker continues to trip, contact Polyvance. If unit appears to function
normally without the elements installed, plug in the airless welder only and test. If unit continues to operate normally, shut power o󰀨, then reinstall
the hot air element and test. If unit trips circuit duiring either test, its safe to assume the fault lies withing the last element installed.
Nitrogen welder does not heat or is not hot enough.
• Turn the controller power “ON” by pushing the control knob once.
• Check air ow to hot air welder. If the green “safe” light does not illuminate, power will not be sent to the Nitrogen welder. Increase airow until the
green light illuminates. (It should illuminate at approximately 10 LPM. If it does not, contact Polyvance.)
• Check the temperature setting. If the airow is at 12, set the temp to 52.
• If it still does not heat, check resistance of the heating element. (see above)
• If no faults are found, contact Polyvance.
Airless welder does not heat.
• Turn the controller power “ON” by pushing the control knob once.
• Check the temperature setting, set the temp to 100. Low settings will produce very little heat.
• If still no heat, check resistance of the heating element (see above).
• If no faults are found, contact Polyvance.
To shut o󰀨 individual welders:
Airless Welder:
Press the airless welder control knob one
time.
Nitrogen Welder:
Place welder into the top holster and press
the nitrogen welder control knob one time.
“OFF” will show on the display.
System Shut-down:
1. Shut o󰀨 main power
2. Close the valve on the nitrogen bottle,
but leave the compressed air connected
and on.
3. Allow the welder to completely cool
before disconnecting the air supply.
CAUTION: Always use
CLEAN, DRY, and OIL-FREE
air for the nitrogen welder.
Water and/or oil inside
the heating element will
drastically shorten its life
span.
Diagnostics:
Congratulations on purchasing the easiest-to-use nitrogen plastic welder on the market. Prior to powering up
the welder, please read and follow the directions outlined in this booklet on the set-up and use of your plastic
welder. Scan the QR codes on the included sheet using your smart phone to see how to use the welder.
Failure to read and fully understand these instructions or failure to watch the instructional videos will potentially
cause damage to your welder, will increase your risk of injury, and may cause the welder to become a re
hazard. Videos are also accessible on our website at: http://www.polyvance.com/video
1128 Kirk Road, Rainsville, AL 35986
Tech Support: 800-633-3047
email: [email protected]
web: www.polyvance.com
1 2
31
23
4
5
Your hose
Your shop
tting
Install tips
Chain to
cart
Adjustable
tank cradle
Your shop air
Ah, cool
air!
REV: 11-2018
Page 2 Page 3
1. Most bumper repair can be done using the factory pre-set temperature set-
tings with the air/nitrogen ow set at 12 LPM, however the chart above may be
used to ne-tune the nitrogen welder for use on di󰀨erent materials.
Note: Going outside the range on the chart is generally not needed, nor
recommended unless you are welding unusually thin or thick material or if
the material you are welding has an unusually high or low melting point. It’s
important to note that when increasing the temperature without increasing the
airow, the heating element can be over-heated easily, causing a dramatic re-
duction in the life-span of the element. Over-heating is indicated by a glowing
outer steel torch barrel. If this happens, immediately turn down the tempera-
ture and turn up the air and nitrogen ow. If an over-heat condition continues
uncorrected for any length of time, a re hazard will result, the heating ele-
ment will eventually burn out, and the handle of the torch may be destroyed by
the excessive heat.
2. Changing the airow from air to nitrogen is automatic when the torch is
removed from the holster.
3. Once the welder has warmed up, welding is accomplished by directing the
heated nitrogen at the intersection of the area to be repaired on the base ma-
terial and the welding rod. The welding rod should be applied perpendicular to
the base material with the welder aimed at approximately a 45° angle between
the two.
4. The substrate should begin to gloss over in 3 to 5 seconds after applying
the heat. At this point, begin pressing the rod downward onto the surface, roll-
ing it towards the heat. Be sure the surface of the rod and the surface of the
substrate are both melted when pushing the two materials together.
For more information on welding plastic, please watch the instructional videos
found at www.polyvance.com.
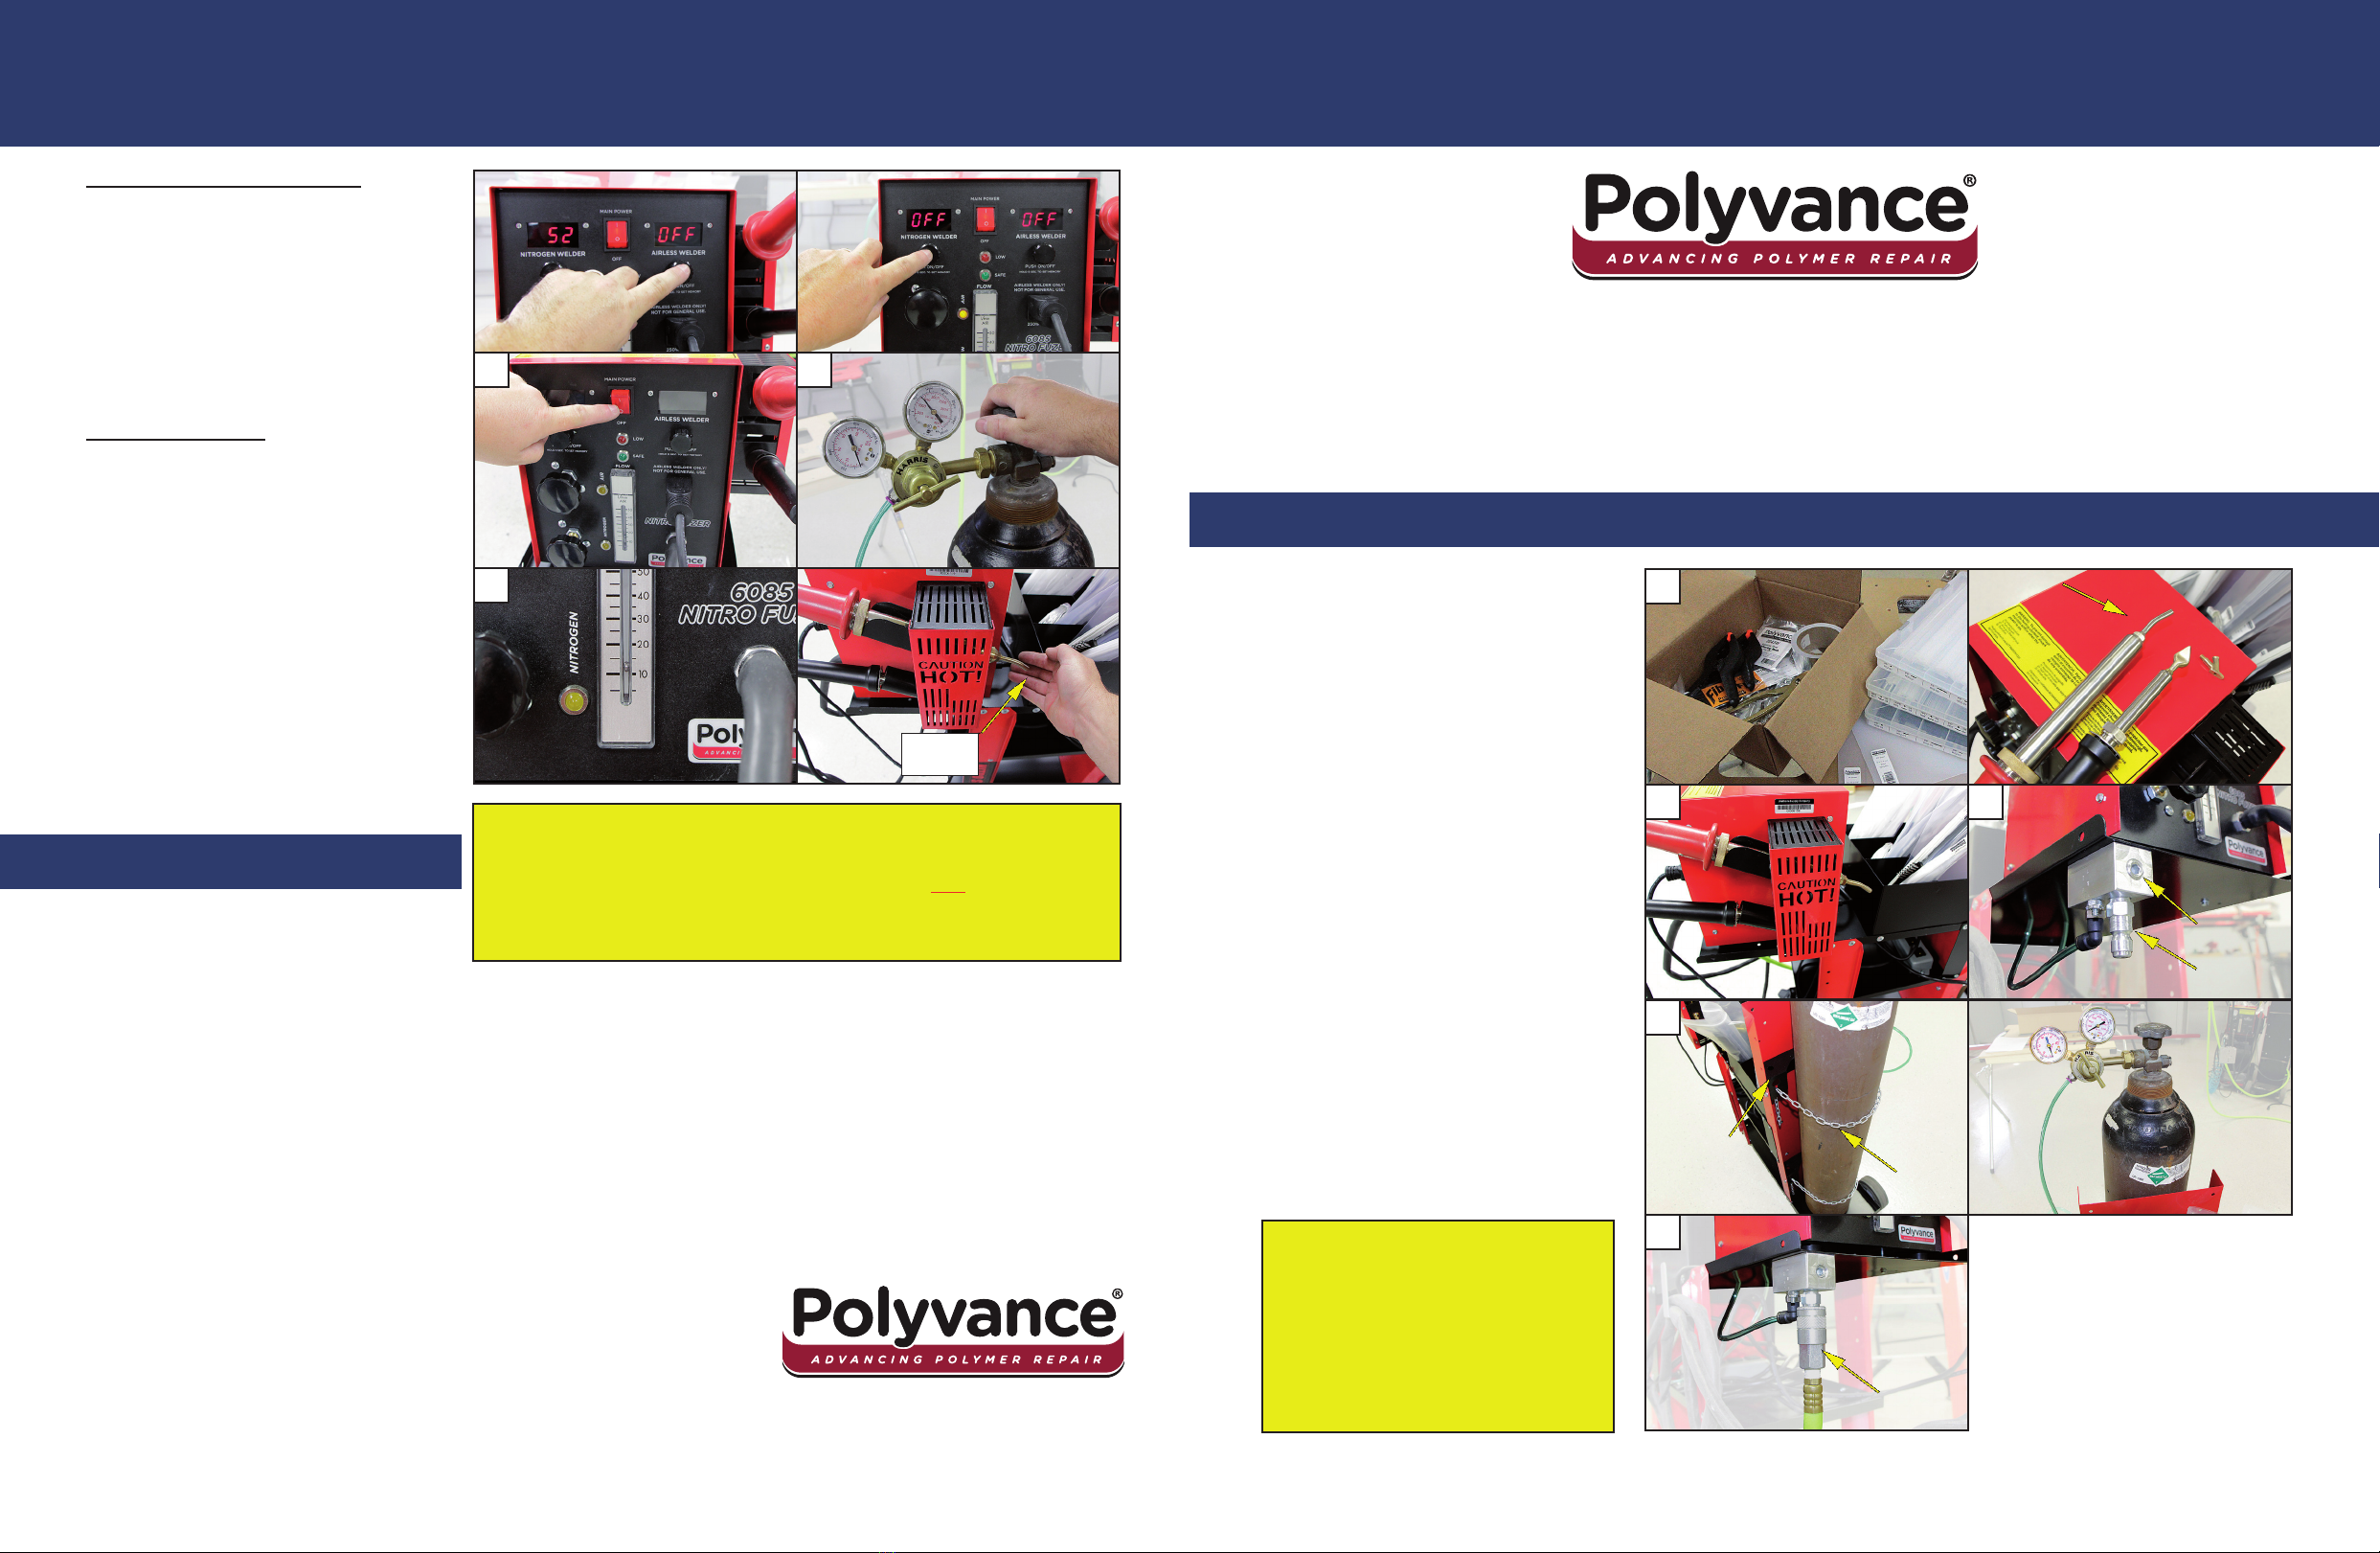
6. Adjust the nitrogen regulator on the
nitrogen bottle to read between 20 - 50 psi.
7. Turn on the main power switch to the
welder. Both welders will show “OFF.” Do
not turn them on until the air/nitrogen ow
is set correctly.
8. Adjust the ow of the AIR using the top
regulator on the front of the welder so the
ow gauge reads 12 LPM. At this setting,
the ball will oat halfway between the
10 and 15 LPM lines. (Note: if the main
power is OFF, compressed air will continue
to ow through the welder.)
9. No power is owing to the heating
elements yet, but the indicator light
showing “AIR” is owing should be on.
To make nitrogen ow, remove the hot
air welder from the holster. The indicator
light will switch to “NITROGEN” and an
electronically controlled valve inside the
welder will switch the ow from “AIR” to
”NITROGEN”. With the “NITROGEN”
light illuminated, use the lower regulator
on the front of the welder to adjust the
nitrogen ow to the same setting as the air
ow (12 LPM), then place the welder back
into the holster. The indicator light will
automatically change back to “AIR.” To see
if both of your ow setting match, toggle
the “AIR” and “NITROGEN” ows by lifting
the welder from the holster and setting it
back in. The oating ball should remain at
12 LPM regardless of which air supply is
indicated.
10. Turn on the nitrogen and airless
welders by pushing their respective control
knob once. The nitrogen welder is preset
to 52 and the airless welder is preset to
100. These temperature settings are
suitable for most polypropylene welding
with the air ow set at 12 LPM.
11. Check to make sure the green “SAFE”
light is on. If it does NOT illuminate
when the airow is over 10 LPM, contact
Polyvance tech support for adjustment
procedure.
12. With the green light on, allow the
welders to warm up completely (5 to 10
minutes) before welding. Note: the airless
welder’s heat is not dependent on the
green “Safe” light.
Type of Plastic Melting Temp. Series of
Welding Rod
Recommended Temperature
Setting on Nitrogen Welder Air Flow
Polyurethane (RIM, PUR) N.A. R01 70-100 (AIRLESS WELDER ONLY) N.A.
Polypropylene (PP) 160-166 °C (320 -331 °F) R02 52-60 12
ABS 105 (221°F) R03 44-52 12
Polyethylene (LDPE) 105-115 °C (221-239 °F) R04 44-52 12
TPO 177°C (350°F) R05 52-60 12
Nylon (PA) 269°C (516°F) R06 60-68 12
Polycarbonate (PC) 155°C (311°F) R07 44-52 12
PVC 177°C (350°F) R09 44-52 12
Polyethylene (HDPE) 190°C (375°F) R12 56-64 12
PET 254°C (490°F) R13 56-64 12
ASA 220°C (428°F) R14 44-52 12
GTX 275-300°C (527-572°F) R15 60-68 12
Temperature Setting Suggestions*
* Most welding operations will be at the recommended settings. Welding outside the
recommended range may be needed if the plastic being welded is very thin or thick or
if a higher or lower airow is used. Extreme care must be taken to avoid overheating
the element.
Welding Basics:
CAUTION: A LWAYS maintain airow through the welder
while it is hot or the power is on. Failure to do so will burn
out your heang element. Polyvance DOES NOT WARRANT
the heang element because its life is completely under
YOUR control.
1
2
3
4
76
8
9
10
11
12 LPM
Set between 20
and 50 psi
12 LPM

Other Polyvance Welding System manuals

Polyvance 6049-C Nitro Fuzer Lite User manual

Polyvance

Polyvance 6049-C Nitro Fuzer Lite User manual

Polyvance Nitro-Fuzer 8002 User manual

Polyvance

Polyvance Nitro-Fuzer 8002 User manual

Polyvance 6180 User manual

Polyvance

Polyvance 6180 User manual

Popular Welding System manuals by other brands

Hobart Welders H100L4-10 owner's manual

Hobart Welders

Hobart Welders H100L4-10 owner's manual

SIAM Neonline CUT-33 manual

SIAM Neonline

SIAM Neonline CUT-33 manual

HURNER HST 300 Junior + 2.0 user manual

HURNER

HURNER HST 300 Junior + 2.0 user manual

Thermal Arc EXCEL-ARC 750 CC owner's manual

Thermal Arc

Thermal Arc EXCEL-ARC 750 CC owner's manual

Miller XMT 450 MPa owner's manual

Miller

Miller XMT 450 MPa owner's manual

FRO­NIUS DeltaSpot Operating instructions/spare parts list

FRO­NIUS

FRO­NIUS DeltaSpot Operating instructions/spare parts list

Fytech FY-91G owner's manual

Fytech

Fytech FY-91G owner's manual

Paton PRO-160 Data sheet and operating manual

Paton

Paton PRO-160 Data sheet and operating manual

Truweld Equipment TWE - SC2402 Operation manual

Truweld Equipment

Truweld Equipment TWE - SC2402 Operation manual

Fytech FY-9G owner's manual

Fytech

Fytech FY-9G owner's manual

DENTAURUM desktopCompact 090-578-50 Instructions for use

DENTAURUM

DENTAURUM desktopCompact 090-578-50 Instructions for use

HOLZMANN MASCHINEN DIPA 40 user manual

HOLZMANN MASCHINEN

HOLZMANN MASCHINEN DIPA 40 user manual

Ironton Arc 200 owner's manual

Ironton

Ironton Arc 200 owner's manual

Blueweld STARMIG 210 instruction manual

Blueweld

Blueweld STARMIG 210 instruction manual

WIA VORTEX AD15VRADl5-0 owner's manual

WIA

WIA VORTEX AD15VRADl5-0 owner's manual

Magmaweld Monotig 160ip user manual

Magmaweld

Magmaweld Monotig 160ip user manual

HOMER tools MG-160 operating manual

HOMER tools

HOMER tools MG-160 operating manual

Air Liquide OERLIKON CITOMIG 300 XP Safety instruction for use and maintenance

Air Liquide

Air Liquide OERLIKON CITOMIG 300 XP Safety instruction for use and maintenance

manuals.online logo
manuals.online logoBrands
  • About & Mission
  • Contact us
  • Privacy Policy
  • Terms and Conditions

Copyright 2025 Manuals.Online. All Rights Reserved.