Pontec PondoAir Set 1800 User manual

DE Gebrauchsanleitung
EN Operating instructions
FR Notice d'emploi
NL Gebruiksaanwijzing
ES Instrucciones de uso
PT Instruções de uso
IT Istruzioni d'uso
DA Brugsanvisning
NO Bruksanvisning
SV Bruksanvisning
FI Käyttöohje
HU Használati útmutató
PL Instrukcja użytkowania
CS Návod k použití
SK Návod na použitie
SL Navodila za uporabo
HR Uputa o upotrebi
RO Instrucţiuni de folosinţă
BG Упътване за употреба
UK Посібник зексплуатації
RU Руководство по эксплуатации
PondoAir Set 1800

- -
2
A
PAR0024
B
C
PAR0027 PAR0028
D
PAR0025

- -
3
E
PAR0026
F G
PAR0029 PAR0030

- -
4
H
PAR0022
I
PAR0031

- -
5
J
PAR0023

- DE -
6
- DE -
Original Gebrauchsanleitung
Hinweise zu dieser Gebrauchsanleitung
Mit dem Kauf des Produkts PondoAir Set 1800 haben Sie eine gute Wahl getroffen.
Lesen Sie vor der ersten Benutzung des Gerätes die Anleitung sorgfältig und machen Sie sich mit dem Gerät vertraut.
Alle Arbeiten an und mit diesem Gerät dürfen nur gemäß der vorliegenden Anleitung durchgeführt werden.
Beachten Sie unbedingt die Sicherheitshinweise für den richtigen und sicheren Gebrauch.
Bewahren Sie diese Anleitung sorgfältig auf. Bei Besitzerwechsel geben Sie bitte die Anleitung weiter.
Symbole in dieser Anleitung
D
Die in dieser Gebrauchsanleitung verwendeten Symbole haben folgende Bedeutung:
Gefahr von Personenschäden durch gefährliche elektrische Spannung
Das Symbol weist auf eine unmittelbar drohende Gefahr hin, die den Tod oder schwere Verletzungen zur
Folge haben kann, wenn die entsprechenden Maßnahmen nicht getroffen werden.
Gefahr von Personenschäden durch eine allgemeine Gefahrenquelle
Das Symbol weist auf eine unmittelbar drohende Gefahr hin, die den Tod oder schwere Verletzungen zur
Folge haben kann, wenn die entsprechenden Maßnahmen nicht getroffen werden.
Wichtiger Hinweis für die störungsfreie Funktion.
A Verweis auf eine oder mehrere Abbildungen. In diesem Beispiel: Verweis auf Abbildung A.
Verweis auf ein anderes Kapitel.
Lieferumfang
A Anzahl Beschreibung
1 1 PondoAir 1800
2 4 Luftschlauch
3 4 Belüfterstein
4 1 Luftverteiler
5 2 Klammer
6 1 Schlauchadapter
7 2 Ersatzmembran
8 1 Gebrauchsanleitung
Bestimmungsgemäße Verwendung
PondoAir Set 1800, im weiteren "Gerät" genannt, darf ausschließlich wie folgt verwendet werden:
Zur Belüftung und Versorgung von Gartenteichen mit Sauerstoff.
Für den Einsatz in Springbrunnenanlagen und Teichen.
Betrieb unter Einhaltung der technischen Daten.
Während der Winterperiode kann das Gerät als Eisfreihalter dienen, um zu verhindern, dass der Teich zufriert. Voraus-
setzung ist, dass der zulässige Kältegrad der Außentemperatur nicht überschritten wird.

- DE -
7
Sicherheitshinweise
Dieses Gerät kann von Kindern ab 8 Jahren und darüber sowie von
Personen mit verringerten physischen, sensorischen oder mentalen
Fähigkeiten oder Mangel an Erfahrung und Wissen benutzt werden,
wenn sie beaufsichtigt oder bezüglich des sicheren Gebrauchs des
Gerätes unterwiesen wurden und die daraus resultierenden Gefah-
ren verstehen. Kinder dürfen nicht mit dem Gerät spielen. Reinigung
und Benutzerwartung dürfen nicht von Kindern ohne Beaufsichtigung
durchgeführt werden.
Gefahren durch die Kombination von Wasser und Elektrizität
Die Kombination von Wasser und Elektrizität kann bei nicht vorschriftsmäßigem Anschluss oder unsachgemäßer
Handhabung zum Tod oder zu schweren Verletzungen durch Stromschlag führen.
Bevor Sie in das Wasser greifen, immer alle im Wasser befindlichen Geräte spannungsfrei schalten.
Vorschriftsmäßige elektrische Installation
Elektrische Installationen müssen den nationalen Errichterbestimmungen entsprechen und dürfen nur von einer
Elektrofachkraft vorgenommen werden.
Eine Person gilt als Elektrofachkraft, wenn sie auf Grund ihrer fachlichen Ausbildung, Kenntnisse und Erfahrungen
befähigt und berechtigt ist, die ihr übertragenen Arbeiten zu beurteilen und durchzuführen. Das Arbeiten als Fach-
kraft umfasst auch das Erkennen möglicher Gefahren und das Beachten einschlägiger regionaler und nationaler
Normen, Vorschriften und Bestimmungen.
Bei Fragen und Problemen wenden Sie sich an eine Elektrofachkraft.
Der Anschluss des Gerätes ist nur erlaubt, wenn die elektrischen Daten von Gerät und Stromversorgung überein-
stimmen. Die Gerätedaten befinden sich auf dem Typenschild am Gerät, auf der Verpackung oder in dieser Anlei-
tung.
Das Gerät muss über eine Fehlerstrom-Schutzeinrichtung mit einem Bemessungsfehlerstrom von maximal 30 mA
abgesichert sein.
Verlängerungsleitungen und Stromverteiler (z. B. Steckdosenleisten) müssen für die Verwendung im Freien geeig-
net sein (spritzwassergeschützt).
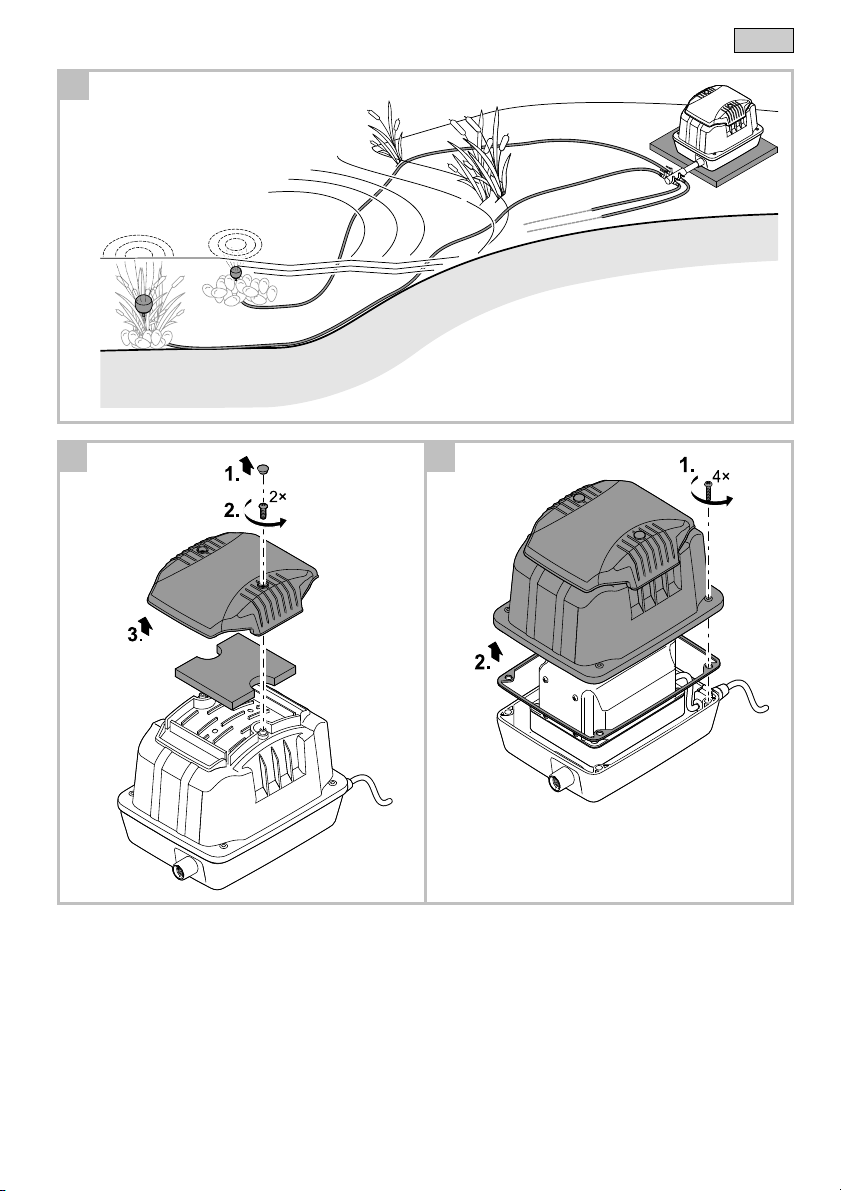
Der Sicherheitsabstand des Gerätes zum Wasser muss mindestens 2 m betragen.
Schützen Sie Steckerverbindungen vor Feuchtigkeit.
Schließen Sie das Gerät nur an einer vorschriftsmäßig installierten Steckdose an.
Sicherer Betrieb
Bei defekten elektrischen Leitungen oder defektem Gehäuse darf das Gerät nicht betrieben werden.
Tragen oder ziehen Sie das Gerät nicht an der elektrischen Leitung.
Verlegen Sie Leitungen geschützt vor Beschädigungen und achten Sie darauf, dass niemand darüber fallen kann.
Öffnen Sie das Gehäuse des Gerätes oder zugehöriger Teile nur, wenn Sie dazu in der Anleitung ausdrücklich auf-
gefordert werden.
Führen Sie nur Arbeiten am Gerät durch, die in dieser Anleitung beschrieben sind. Wenden Sie sich an eine autori-
sierte Kundendienststelle oder im Zweifelsfall an den Hersteller, wenn sich Probleme nicht beheben lassen.
Verwenden Sie nur Original-Ersatzteile und -Zubehör für das Gerät.
Nehmen Sie niemals technische Änderungen am Gerät vor.
Die Anschlussleitungen können nicht ersetzt werden. Bei einer beschädigten Leitung muss das Gerät bzw. die Kom-
ponente entsorgt werden.
Halten Sie die Steckdose und den Netzstecker trocken.

- DE -
8
Aufstellen und Anschließen
B
Beide Klammern über den Schlauchadapter schieben. Den Schlauchadapter auf den Luftverteiler und auf den Luft-
auslass am Gerät stecken. Beide Verbindungen mit den Klammern sichern.
C
Belüftersteine und Luftverteiler mit Luftschläuchen verbinden.
– Für die Aufstellung die Luftschläuche auf die gewünschte Länge kürzen.
– Luftschläuche möglichst kurz halten.
D, E
Gerät waagerecht, stand- und überflutungssicher aufstellen.
– Gerät oberhalb des Wasserniveaus aufstellen, da es sonst durch zurücklaufendes Wasser beschädigt wird.
– Mindestens 2 m Sicherheitsabstand zum Wasser einhalten.
Belüftersteine im Teich platzieren.
– Luftschlauch/Luftschläuche geschützt und knickfrei verlegen, dabei möglichst kurz halten.
Inbetriebnahme
Einschalten: Gerät mit dem Netz verbinden. Das Gerät schaltet sich sofort ein, wenn die Stromverbindung hergestellt
ist.
Ausschalten: Gerät vom Netz trennen.
Störungsbeseitigung
Störung Ursache
A
bhilfe
Gerät läuft nicht Netzspannung fehlt Netzspannung überprüfen
Gerät fördert keine Luft oder die Fördermenge
ist ungenügend
Belüftersteine verschmutzt Belüftersteine reinigen oder ersetzen
Luftfilter verschmutzt Luftfilter reinigen oder ersetzen
Luftschlauch abgeknickt oder porös Luftschlauch knickfrei verlegen oder ersetzen
Membran defekt Beide Membranen ersetzen
Gerät ist ungewöhnlich laut Membran defekt Beide Membranen ersetzen
Reinigung und Wartung
Achtung! Gefährliche elektrische Spannung!
Mögliche Folgen: Tod oder schwere Verletzungen.
Schutzmaßnahmen:
Bevor Sie ins Wasser greifen, Netzspannung aller im Wasser befindlichen Geräte abschalten.
Vor Arbeiten am Gerät Netzspannung abschalten.
Luftfilter ersetzen
So gehen Sie vor:
F
1. Gummistopfen vom Filterdeckel abziehen.
2. Darunterliegende Schrauben lösen und herausnehmen.
3. Filterdeckel abnehmen.
4. Luftfilter entnehmen, reinigen oder gegebenenfalls ersetzen.
5. Teile in umgekehrter Reihenfolge wieder zusammenbauen.

- DE -
9
Membran ersetzen
Wenn die Luftfördermenge nachlässt, müssen die Membranen des Luftmotors ersetzt werden. Dazu muss der Luftmo-
tor ausgebaut werden.
So gehen Sie vor:
Gehäuse öffnen:
G
1. Schrauben am Gehäuse lösen und entfernen.
2. Gehäuseoberteil mitsamt Dichtungsgummi abnehmen.
Luftmotor ausbauen:
H
1. Schrauben am Luftmotorgehäuse lösen und entfernen.
2. Luftmotorgehäuse herausheben.
– Kabelzugentlastung abziehen.
3. Schrauben an beiden Seiten des Luftmotorgehäuses lösen und mit den Unterlegscheiben und Sprengringen entfer-
nen.
4. Luftmotor aus dem Luftmotorgehäuse herausnehmen.
– Luftmotor an den beiden Luftkammern anfassen.
Membran ersetzen:
I
1. Luftkammer von Membranfassung abnehmen.
2. Mutter lösen und mit Unterlegscheibe entfernen.
3. Stützscheibe abziehen.
4. Membran aus der Membranfassung lösen.
– Empfehlung: Leichten Druck auf den Rand der Membran ausüben, um diese aus der Nut zu drücken.
5. Neue Membran einsetzen.
– Die Membran muss in den Aussparungen der Membranfassung liegen und korrekt in der Nut sitzen.
6. Stützscheibe und Unterlegscheibe aufsetzen und mit Mutter festschrauben.
Luftmotor einbauen:
J
1. Luftkammern auf beiden Seiten auf die Membranhalterung setzen.
2. Luftmotor ins Luftmotorgehäuse setzen.
– Darauf achten, dass die Auslassstutzen nach oben zeigen.
– Sicherstellen, dass die O-Ringe richtig auf dem Auslassstutzen sitzen.
3. Schrauben mit den Unterlegscheiben und Sprengringen an beiden Seiten des Luftmotorgehäuses festschrauben.
– Erst die höher liegenden Schrauben eindrehen.
– Schrauben über Kreuz festziehen.
4. Luftmotorgehäuse auf das Gehäuseunterteil setzen und festschrauben.
– Die Netzanschlussleitung muss richtig in der Aussparung im Luftmotorgehäuse liegen.
– Die Zugentlastung der Netzanschlussleitung muss richtig in der Aussparung im Gehäuseunterteil liegen.
5. Gehäuseoberteil aufsetzen und mit dem Gehäuseunterteil verschrauben. (→ Gehäuse öffnen)
– Das Dichtungsgummi muss passgenau zwischen Gehäuseoberteil und Gehäuseunterteil sitzen.

- DE -
10
Lagern/Überwintern
Wenn sich das Gerät im Dauerbetrieb befindet, kann es bei Frost installiert bleiben. Andernfalls das Gerät in einem
trockenen Innenraum (Zimmertemperatur) lagern.
Verschleißteile
Belüftersteine, Luftfilter und Membranen sind Verschleißteile und unterliegen nicht der Gewährleistung.
Entsorgung
Dieses Gerät darf nicht als Hausmüll entsorgt werden! Nutzen Sie bitte das dafür vorgesehene Rücknahme-
system. Machen Sie das Gerät vorher durch Abschneiden der Kabel unbrauchbar.
Garantiebedingungen
PfG gewährt 2 Jahre Garantie ab Verkaufsdatum auf nachweisbare Material- und Fabrikationsfehler. Voraussetzung
für die Garantieleistung ist die Vorlage des Kaufbeleges. Der Garantieanspruch erlischt bei unsachgemäßer Handha-
bung, elektrischer oder mechanischer Beschädigung durch missbräuchliche Anwendung sowie bei unsachgemäßer
Reparatur durch nicht autorisierte Werkstätten. Reparaturen dürfen nur von PfG oder von PfG autorisierten Werkstät-
ten durchgeführt werden. Bei der Anmeldung von Garantieansprüchen senden Sie das beanstandete Gerät oder das
defekte Teil mit Fehlerbeschreibung und Kaufbeleg frei Haus an PfG. PfG behält sich vor Montagekosten in Rechnung
zu stellen. Für Transportschäden haftet PfG nicht. Diese müssen umgehend gegen den Transporteur geltend gemacht
werden. Weitergehende Ansprüche, gleich welcher Art, insbesondere für Folgeschäden, sind ausgeschlossen. Diese
Garantie berührt nicht die Ansprüche des Endkunden gegen den Händler.

- EN -
11
- EN -
Translation of the original Operating Instructions
Information about these operating instructions
You made a good choice with the purchase of this product PondoAir Set 1800.
Prior to commissioning the unit, please read the instructions of use carefully and fully familiarise yourself with the unit.
Ensure that all work on and with this unit is only carried out in accordance with these instructions.
Adhere to the safety information for the correct and safe use of the unit.
Keep these instructions in a safe place! Please also hand over the instructions when passing the unit on to a new
owner.
Symbols used in these instructions
GB
The symbols used in this operating manual have the following meanings:
Risk of injury to persons due to dangerous electrical voltage
This symbol indicates an imminent danger, which can lead to death or severe injuries if the appropriate
measures are not taken.
Risk of personal injury caused by a general source of danger
This symbol indicates an imminent danger, which can lead to death or severe injuries if the appropriate
measures are not taken.
Important information for trouble-free operation.
A Reference to one or more figures. In this example: Reference to Fig. A.
Reference to another section.
Scope of delivery
A Quantity Description
1 1 PondoAir 1800
2 4 Air hose
3 4 Aeration stone
4 1 Air distributor
5 2 Clip
6 1 Hose adapter
7 2 Replacement membrane
8 1 Operating instructions
Intended use
PondoAir Set 1800, referred to in the following as "unit", may only be used as specified in the following:
For aeration and supplying oxygen to garden ponds.
For use in water fountain systems and ponds.
Operation under observance of the technical data.
During the winter months, the unit can be used to keep the surface of the pond free of ice and prevent the pond from
freezing up. Prerequisite for this is that the temperature does not go below the permissible minimum outside tempera-
ture for the unit.

- EN -
12
Safety information
This unit can be used by children from the age of 8 and by persons
with physical, sensory or mental impairments or lack of experience
and knowledge, as long as they are supervised or instructed on how
to use the unit safely and are able to understand the potential haz-
ards. Do not allow children to play with the unit. Do not allow children
to clean or maintain the unit without close supervision.
Hazards encountered by the combination of water and electricity
The combination of water and electricity can lead to death or severe injury from electrocution, if the unit is incorrectly
connected or misused.
Prior to reaching into the water, always switch off the mains voltage to all units used in the water.
Correct electrical installation
Electrical installations must meet the national regulations and may only be carried out by a qualified electrician.
A person is regarded as a qualified electrician if, due to his/her vocational education, knowledge and experience, he
or she is capable of and authorised to judge and carry out the work commissioned to him/her. This also includes the
recognition of possible hazards and the adherence to the pertinent regional and national standards, rules and regu-
lations.
For your own safety, please consult a qualified electrician.
The device may only be connected if the electrical data of the device and the power supply coincide. The device
data is to be found on the device type plate, on the packaging or in this manual.
Ensure that the unit is fused for a rated fault current of max. 30 mA by means of a fault current protection device.
Extension cables and power distributors (e. g. outlet strips) must be suitable for outdoor use.
Minimum safety distance between the unit and the water: 2 m.
Protect the plug connections from moisture.
Only plug the unit into a correctly fitted socket.
Safe operation
Never operate the unit if either the electrical cables or the housing are defective!
Do not carry or pull the unit by its electrical cable.
Route cords/hoses/lines in a way that they are protected against damage, and ensure that they do not present a
tripping obstacle.
Only open the unit housing or its attendant components, when this is explicitly required in the operating instructions.
Only execute work on the unit that is described in this manual. If problems cannot be overcome, please contact an
authorised customer service point or, when in doubt, the manufacturer.
Only use original spare parts and accessories for the unit.
Never carry out technical modifications to the unit.
The power connection cables cannot be replaced. When the cable is damaged, the unit or the component needs to
be disposed of.
Keep the socket and power plug dry.

- EN -
13
Installation and connection
B
Push both clips over the hose adapter. Fit the hose adapter onto the air distributor and onto the air outlet on the unit.
Secure both connections with the clips.
C
Connect the aeration stones and the air distributor with air hoses.
– Shorten the air hoses to the desired length for the installation.
– Keep the air hoses as short as possible.
D, E
Install the unit in a stable, horizontal and flood-protected position.
– Install the unit above the level of the water otherwise it will be damaged by water flowing back.
– Ensure that the unit is installed with a safety distance of at least 2 m from the water.
Position the aeration stones in the pond.
– Lay the air hose/air hoses well protected and without kinks, keeping them as short as possible.
Commissioning/start-up
Switching on: Connect the unit to the mains. The unit switches on as soon as the power connection is established.
Switching off: Disconnect the unit from the mains.
Remedy of faults
Malfunction Cause Remedy
The unit is not operating No mains voltage Check mains voltage
The unit does not deliver any air or the amount
delivered is insufficient
The aeration stones are soiled Clean or replace the aeration stones
The air filter is soiled Clean or replace the air filter
Air hose kinked or porous Lay the air hose without kinks or replace
Membrane is defective Replace both membranes
The unit is unusually loud Membrane is defective Replace both membranes
Maintenance and cleaning
Attention! Dangerous electrical voltage.
Possible consequences: Death or severe injury.
Protective measures:
Prior to reaching into the water, switch off the mains voltage to all units used in the water.
Switch off the mains voltage prior to carrying out work on the unit.
Replace air filter
How to proceed:
F
1. Remove the rubber blind plugs from the filter cover.
2. Undo and remove the screws located underneath.
3. Remove the filter cover.
4. Remove, clean and, if necessary, replace the air filter.
5. Reassemble the parts in the reverse order.

- EN -
14
Replacing the membrane
If the air flow rate decreases, it is necessary to replace the membranes of the aerator motor. To do this, it is necessary
to remove the aerator motor.
How to proceed:
Opening the housing:
G
1. Undo and remove the screws from the housing.
2. Remove the top section of the housing together with the rubber gasket.
Removing the aerator motor:
H
1. Undo and remove the screws from the aerator motor housing.
2. Lift out the aerator motor housing.
– Remove the cable strain relief.
3. Undo the screws on both sides of the aerator motor housing and remove them together with the washers and
circlips.
4. Take the aerator motor out of the aerator motor housing.
– Hold the aerator motor by the two air chambers.
Replacing the membrane:
I
1. Remove the air chambers from the membrane frame.
2. Undo and remove the nut together with the washer.
3. Remove the support disc.
4. Release the membrane from the membrane frame.
– Recommendation: Apply light pressure to the edge of the membrane to push it out of the groove.
5. Insert a new membrane.
– Ensure that the membrane is positioned in the recesses of the membrane frame and is correctly seated in the
groove.
6. Fit the support disc and washer, and screw tight with the nut.
Fitting the aerator motor:
J
1. Place the air chambers onto the membrane holder on both sides.
2. Place the aerator motor into the aerator motor housing.
– Ensure that the outlet sockets are pointing upward.
– Ensure that the O-rings are correctly seated on the outlet sockets.
3. Fit and tighten the screws with the washers and circlips on both sides of the aerator motor housing.
– First turn in the higher screws.
– Tighten the screws crosswise.
4. Place the aerator motor housing onto the bottom section of the housing and screw on.
– Ensure that the power connection cable is correctly located in the recess in the aerator motor housing.
– Ensure that the strain relief of the power connection cable is correctly located in the recess in the bottom section
of the housing.
5. Fit and screw the housing top section onto the housing bottom section. (→ Opening the housing)
– Ensure that the rubber gasket is precisely fitted between the housing top and bottom section.

- EN -
15
Storage/Over-wintering
When the unit is in continuous operation it can remain in place at freezing temperatures.) Otherwise store the unit in-
doors in a dry room (room temperature).
Wear parts
Aerator stones, air filter and membranes are wear parts and are not covered by our warranty.
Disposal
Do not dispose of this unit with domestic waste! For disposal purposes, please use the return system provided.
Disable the unit beforehand by cutting off the cables.
Guarantee conditions
PfG grants a 2 year guarantee from the date of sale on proven material and manufacturing faults. Prerequisite for our
guarantee is the presentation of the purchase receipt. Our guarantee will become null and void if the unit is misused,
electrically or mechanically damaged by inappropriate use and improper repair by non-authorised workshops. Repairs
are reserved for workshops authorised by PfG or by PfG itself. In the case of warranty claims, please return the defec-
tive unit or part freight paid to PfG together with a description of the fault and the purchase receipt. PfG reserves the
right to invoice repair costs. PfG is not liable for transport damage. Any damage must be claimed against the carrier.
Further claims of whatever type, especially consequential damage, are excluded. This guarantee does not affect the
final customer’s claims against the dealer.

- FR -
16
- FR -
Traduction de la notice d'emploi originale
Remarques relatives à cette notice d'emploi
Avec l'acquisition du produit, PondoAir Set 1800 vous avez fait le bon choix.
Avant la première utilisation de l'appareil, lire attentivement cette notice d'emploi et se familiariser avec l'appareil. Tous
les travaux effectués avec et sur cet appareil devront être exécutés conformément aux directives ci-jointes.
Respecter impérativement les consignes de sécurité relatives à une utilisation correcte et en toute sécurité.
Conserver soigneusement cette notice d'emploi. Lors d'un changement de propriétaire, prière de transmettre égale-
ment cette notice d'emploi.
Symboles dans cette notice d'emploi
F
Les symboles utilisés dans cette notice d'emploi ont les significations suivantes :
Risque de dommages aux personnes dû à une tension électrique dangereuse
Le symbole attire l'attention sur un danger directement imminent pouvant entraîner la mort ou des blessures
graves si les mesures correspondantes ne sont pas prises.
Risque de dommages aux personnes dû à une source de danger générale
Le symbole attire l'attention sur un danger directement imminent pouvant entraîner la mort ou des blessures
graves si les mesures correspondantes ne sont pas prises.
Consigne importante pour un fonctionnement exempt de dérangement.
A Renvoi à une ou à plusieurs illustrations. Pour cet exemple : renvoi à l'illustration A.
Renvoi à une autre section.
Pièces faisant partie de la livraison
A Nombre Description
1 1 PondoAir 1800
2 4 Flexible à air
3 4 Diffuseur
4 1 Élément de répartition de l'air
5 2 Attaches
6 1 Adaptateur de flexible
7 2 membrane de rechange
8 1 Notice d'emploi
Utilisation conforme à la finalité
PondoAir Set 1800, appelé par la suite «appareil», doit être utilisé exclusivement comme suit :
Pour l'aération et l'alimentation en oxygène des bassins de jardin.
Pour une utilisation dans des installations à jet d'eau et des étangs/bassins.
Exploitation dans le respect des données techniques.
Pendant l'hiver, l'appareil peut servir de dispositif anti-glaces pour éviter que le bassin/l'étang ne soit complètement
recouvert d'une couche de glace. Veiller à ce que la température extérieure autorisée ne soit pas dépassée.

- FR -
17
Consignes de sécurité
Attention :
Dans le cas où cet appareil serait utilisé par des mineurs de moins
de 8 ans ainsi que par des personnes souffrant d'un handicap mental
ou plus généralement par des personnes manquant d'expérience, un
adulte averti devra être présent, qui renseignera le mineur ou la per-
sonne fragilisée concernée sur le bon emploi de ce matériel. Les en-
fants ne doivent pas jouer avec cet appareil. Ne pas laisser un enfant
sans surveillance pour le nettoyage ou l'entretien.
Dangers dus à la combinaison d'eau et d'électricité
La combinaison d'eau et d'électricité peut entraîner des blessures graves ou la mort par électrocution en présence
de raccordements non conformes ou d'une utilisation inappropriée.
Toujours mettre hors tension tous les appareils se trouvant dans l'eau avant tout contact avec l'eau.
Installation électrique correspondant aux prescriptions
Les installations électriques doivent répondre aux règlements d'installation nationaux et leur exécution est exclusi-
vement réservée à un technicien électricien.
Une personne est considérée comme technicien électricien lorsqu'elle est capable et habilitée à apprécier et réaliser
les travaux qui lui sont confiés en raison de sa formation technique, de ses connaissances et de son expérience.
Travailler en tant que technicien consiste également à identifier d'éventuels dangers et à respecter les normes
régionales et nationales, les règlements et les dispositions en vigueur qui se rapportent aux tâches à exécuter.
En cas de questions et de problèmes, prière de vous adresser à un technicien électricien.
Le raccordement de l'appareil est autorisé uniquement lorsque les caractéristiques électriques de l'appareil et de
l'alimentation électrique correspondent. Les caractéristiques de l'appareil sont indiquées sur la plaque signalétique
de l'appareil, sur l'emballage ou dans cette notice d'emploi.
Veiller à ce que l'appareil soit absolument protégé par fusible par le biais d’une protection différentielle avec un
courant assigné de 30 mA maximum.
Les câbles de rallonge et le distributeur de courant (par ex. blocs multiprises) doivent être conçus pour une utilisa-
tion en extérieur (protégé contre les projections d'eau).
La distance de sécurité entre l'appareil et la pièce d'eau doit être d'au moins 2 m.
Protéger les raccordements à fiche contre l'humidité.
Raccorder l'appareil uniquement à une prise installée conformément à la réglementation.
Exploitation sécurisée
En cas de lignes électriques défectueuses ou de carter défectueux, il est interdit d'exploiter l'appareil.
Ni porter, ni tirer l'appareil par le câble électrique.
Poser les câbles de manière à ce qu'ils soient protégés contre d'éventuels endommagements et veiller à ce que
personne ne puisse trébucher.
Ouvrir le carter de l'appareil ou des éléments s'y rapportant uniquement si cela est expressément sollicité dans la
notice d'emploi.
Exécuter des travaux sur l'appareil uniquement si ces derniers sont décrits dans la notice d'emploi. S'il est impossi-
ble de remédier aux problèmes, contacter le SAV agréé ou en cas de doute le constructeur.
N'utiliser que des pièces de rechange et des accessoires d'origine pour l'appareil.
Ne jamais procéder à des modifications techniques sur l'appareil.
Les câbles de raccordement ne sont pas interchangeables. Au cas où un câble de raccordement serait endom-
magé, l'appareil ou le composant doit être éliminé.
Tenir la prise de courant et la prise de secteur au sec.

- FR -
18
Mis en place et raccordement
B
Pousser les deux attaches sur l'adaptateur de flexible. Insérer l'adaptateur de flexible sur l'élément de répartition de
l'air et sur la sortie d'air de l'appareil. Bloquer les deux raccordement avec les attaches.
C
Raccorder les diffuseurs et l'élément de répartition de l'air avec les flexibles à air.
– Pour le montage raccourcir la conduite souple air à la longueur voulue.
– Garder une longueur la plus courte possible pour les conduites souple air.
D, E
Installer l'appareil bien à l'horizontale, dans une position stable, sans risque d'immersion.
– Placer l'appareil au-dessus du niveau de l'eau, sinon risque de dommage par des retours d'eau.
– Garder une distance d'au moins 2 m par rapport à l'eau.
Placer le ou les aérateurs dans le bassin/l'étang.
– Disposer la ou les conduites souples en évitant les pliures, réduire au maximum les longueurs.
Mise en service
Mise en circuit : Brancher l'appareil sur la tension secteur. L'appareil se met immédiatement en marche dès que la
connexion avec le réseau est établie.
Mise hors circuit : Débrancher l'appareil de la tension secteur.
Élimination des dérangements
Dérangement Cause Remède
L'appareil ne fonctionne pas La tension secteur manque Vérifier la tension secteur
L'appareil ne refoule pas d'air ou la quantité re-
foulée est insuffisante
Les diffuseurs sont encrassés Nettoyer ou remplacer l'aérateur
Le filtre à air est encrassé Nettoyer ou remplacer le filtre à air
conduite souple pliée ou poreuse redisposer la conduite souple sans pliure ou la
remplacer
La membrane est défectueuse Remplacer les deux membranes
L'appareil fait des bruits forts, inhabituels La membrane est défectueuse Remplacer les deux membranes
Nettoyage et entretien
Attention ! Tension électrique dangereuse !
Conséquences éventuelles : mort ou blessures graves.
Mesures de protection :
Toujours couper l'alimentation électrique de tous les appareils se trouvant dans l'eau avant tout contact
avec l’eau.
Avant d'exécuter des travaux sur l'appareil, couper la tension du secteur.
Remplacer le filtre à air
Voici comment procéder :
F
1. Retirer les bouchons en caoutchouc du couvercle de filtre.
2. Desserrer les vis qui se trouvent en -dessous et les enlever.
3. Ôter le couvercle du filtre.
4. Retirer le filtre à air, le nettoyer ou remplacer.
5. Remonter les pièces en suivant l'ordre inverse.

- FR -
19
Remplacement de la membrane
Lorsque le volume d'air refoulé se réduit, remplacer les membranes du moteur pneumatique. Démonter le moteur
pneumatique pour ce remplacement.
Voici comment procéder :
Ouvrir le boîtier :
G
1. Desserrer et enlever les vis sur le boîtier.
2. Retirer la partie supérieure du boîtier avec les joints d'étanchéité en caoutchouc.
Démonter le moteur pneumatique :
H
1. Desserrer et enlever les vis sur le boîtier du moteur pneumatique.
2. Soulever le boîtier du moteur pneumatique.
– Retirer la fixation anti-traction du câble.
3. Desserrer les vis de chaque côté du boîtier du moteur pneumatique et le retirer avec les rondelles et les bagues
d‘arrêt.
4. Sortir le moteur pneumatique du boitier du moteur pneumatique.
– Saisir le moteur pneumatique par les deux chambres d'aération.
Remplacer la membrane :
I
1. Retirer la chambre d'aération du logement de membrane.
2. Desserrer et enlever l'écrou avec la rondelle.
3. Retirer la rondelle support.
4. Enlever la membrane de son logement.
– Conseil : exercer une légère pression sur le bord de la membrane pour la faire sortir de la rainure.
5. Insérer la nouvelle membrane.
– La membrane doit reposer dans l'évidement du logement de membrane, bien en place dans la rainure.
6. Mettre la rondelle-support et la rondelle en place et fixer avec l'écrou.
Monter le moteur pneumatique :
J
1. Placer les chambres d'aération de part et d'autre du support de membrane.
2. Mettre le moteur pneumatique dans le boîtier du moteur pneumatique.
– Vérifier que les conduits de sortie soient bien dirigés vers le haut.
– S'assurer que les joints toriques sont bien en place sur le conduit de sortie.
3. Visser les vis avec les rondelles et les bagues d'arrêt sur les deux côtés du boîtier de moteur pneumatique.
– Visser d'abord les vis du haut.
– Serrer les vis diamétralement opposées en diagonale.
4. Replacer le boîtier du moteur pneumatiques sur la partie inférieure et serrer les vis.
– Le câble d'alimentation électrique doit être correctement placé dans l'évidement du boîtier du moteur pneuma-
tique.
– La fixation anti-traction du câble d'alimentation électrique doit être correctement placée dans l'évidement de la
partie inférieure du boîtier.
5. Replacer la partie supérieure du boîtier et la visser avec la partie inférieure du boîtier. (→ Ouvrir le boîtier)
– Les joints d'étanchéité en caoutchouc doivent être exactement en place entre la partie supérieure du boîtier et la
partie inférieure du boîtier.

- FR -
20
Stockage/entreposage pour l'hiver
Si l'appareil se trouve en exploitation continue, il peut rester installé pendant les périodes de gel. Sinon, entreposer
l'appareil dans un espace intérieur sec (température ambiante).
Pièces d'usure
L'aérateur, le filtre à air et les membranes sont des pièces d'usure et ne sont pas couvertes par la garantie.
Recyclage
L'appareil ne doit pas être jeté avec les ordures ménagères ! Prière d'utiliser le système de reprise prévu à cet
effet. Rendez l'appareil inutilisable en sectionnant le câble auparavant.
Conditions de garantie
PfG assure une garantie de 2 ans à partir de la date de vente pour tout défaut de matériel ou de fabrication. La garan-
tie est valable uniquement sur présentation du bon d’achat. Le recours en garantie s’annule lors d’une manipulation
non conforme à la finalité, lors de dommage électrique ou mécanique entraîné par une utilisation abusive ainsi que lors
de réparation incorrecte effectuée par un atelier de réparation non autorisé. Les réparations ne doivent être effectuées
que par PfG ou par des ateliers de réparation habilités par PfG. Lors de la déclaration de recours en garantie, prière de
faire parvenir à PfG la pièce ou l’appareil défectueux avec une description du défaut ainsi que le bon d’achat franco
domicile. PfG se réserve le droit de facturer des coûts de main d'œuvre. PfG décline toute responsabilité pour des
dommages survenus pendant le transport. Ces derniers devront être immédiatement déclarés auprès du transporteur.
Toutes réclamations ultérieures, de quelque nature que ce soit, en particulier les dommages consécutifs, sont exclues.
Cette garantie n’a aucun effet sur les réclamations du consommateur final vis-à-vis du négociant.
Other manuals for PondoAir Set 1800
1
Table of contents
Languages:
Other Pontec Lawn And Garden Equipment manuals

Pontec
Pontec PondoAir Set 1800 User manual

Pontec
Pontec PondoAir Set 1200 LED User manual

Pontec
Pontec PondoRell 3000 User manual

Pontec
Pontec PondoPolar Air User manual

Pontec
Pontec PondoAir Set 3600 User manual

Pontec
Pontec PondoSolar Air Island User manual

Pontec
Pontec PondoAir Set 200 User manual

Pontec
Pontec PondoSolar Air 150 Plus User manual

Pontec
Pontec PondoAir Set 450 User manual

Pontec
Pontec PondoClear Island 3000 User manual