Lowes.com/portfolio Lowes.com/portfolioLowes.com/portfolio
CAUTION/ATTENTION/PRECAUCIÓN
Never attempt to disassemble or alter the product in any way not instructed in this manual.
/
Ne tentez jamais de démonter ni de modifier le produit contrairement aux indications du
présent manuel./No intente desensamblar o modificar el producto de ninguna manera que
no sea la indicada en este manual.
SAFETY INFORMATION/CONSIGNES DE
SÉCURITÉ/INFORMACIÓN DE SEGURIDAD
Please read and understand this entire manual before attemting to assemble, operate or
install the product.
Assurez-vous de lire et de comprendre l’intégralité du présent manuel avant de tenter
d’assembler, d’utiliser ou d’installer l’article.
Lea y comprenda completamente este manual antes de intentar ensamblar, usar o
instalar el producto.
WARNING/AVERTISSEMENT/ADVERTENCIA
This portable lamp has a polarized plug (one blade is wider than the other) as a safety
feature to reduce the risk of electric shock. Ce
luminaire
portatif
est
muni d’une
fiche
polarisée
(une
lame est plus
large
que l ’
autre)afin de réduire les risques de choc électrique.
Est
alámpar
a portátil tien
e u
n enchuf
epolarizad
o (un
a clavij
a e
s má s
anch
a qu
e l
a otra
como característica de seguridad para reducir el riesgo de descargas eléctricas.
)
This plug will fit in a polarized outlet only one way. If the plug does not fit fully into the
outlet, reverse the plug. If it still does not fit, contact a qualified electrician. Never use with
an extension cord unless plug can be fullyinserted./Cette fiche ne peut être branchée sur
une prise polarisée que dans un . la fiche ne peut être branchée sur la prise, inversez
la fiche. Si elle ne s’insère toujours pas, faites appel à un électricien qualifié. N’utilisez jamais
une rallonge électrique, à moins que la fiche puisse être complètement insérée dans la prise./
Este enchufe se inserta en un tomacorriente polarizado de una sola manera. Si el enchufe
no encaja por completo en el tomacorriente, inviértalo. Si aún no encaja, póngase en
contacto con un electricista calificado. Nunca utilice extensiones eléctricas a menos que el
enchufe pueda insertarse completamente.
Do not alter the plug./Ne modifiez pas la fiche./No modifique el enchufe.
Do not use the product if the plug is damaged in any way./N’utilisez pas ce produit si la
fiche est endommagée de quelque façon que ce soit./No use el producto si el enchufe
presenta algún tipo de daño.
Estimated Assembly Time
: 10 minutes
Temps d’assemblageapproximatif : 10 minutes
Tiempo estimado de ensamblaje
:
10 mimutos
PREPARATION/PRÉPARATION/PREPARACIÓN
Before beginning assembly of product, make sure all parts are present. Compare parts with
package contents list.and diagram above. If any part is missing or damaged, do not
attempt to assemble, install or operate the product.
/
Avant de commencer l’assemblage
de l’article, assurez-vous d’avoir toutes les pièces. Comparez le contenu de l’emballage
avec la liste et le tableau ci-dessus. S’il y a des pièces manquantes ou endommagées, ne
tentez pas d’assembler, d’installer ni d’utiliser
l’article./Antes decomenzar a ensamblar el
producto, asegúrese de tener todas las piezas. Compare las piezas con la lista del
contenido del paquete.y el diagrama anterior. No intente ensamblar, instalar ni
usar el
producto si falta alguna pieza o si están dañadas.
No tools required for assembly.
No se necesitan herramientas para el ensamblaje.
Aucun outil n’est nécessaire pour l’assemblage.
ASSEMBLY INSTRUCTIONS/INSTRUCTIONS POUR
L’ASSEMBLAGE/INSTRUCCIONES DE ENSAMBLAJE
A
B
D
E
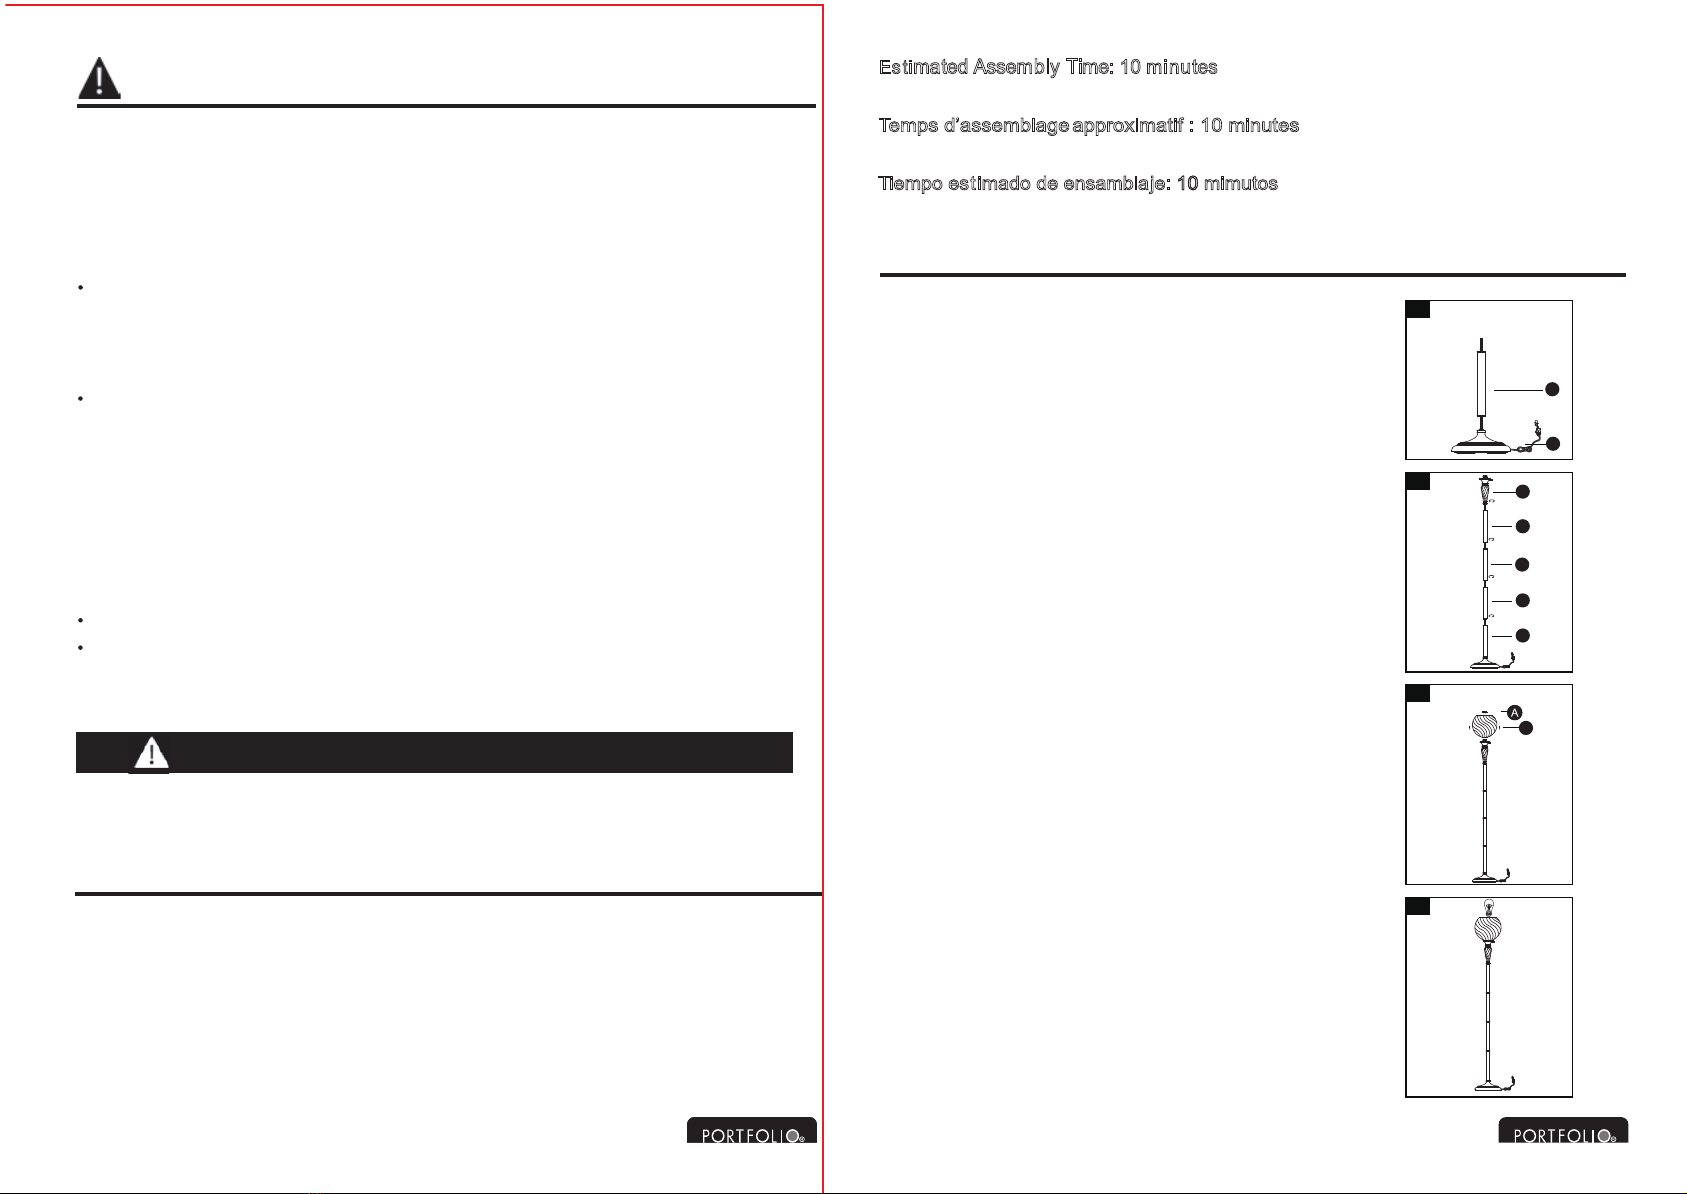
1
3
1. Fasten pole (D) onto base (E).
3. Attach shade (B), securing with socket ring (A).
2. Thread remaining poles (D) together and secure to
C
D
D
D
D
2
4. Insert bulb (not included). Use 3-way 100-watt max.
standard-base incandescent bulb or 26-watt max.
standard-base CFL.
socket assembly (C).
Fixez la tige (D) sur la base (E).
Sujete la varilla (D) en la base (E).
Vissez les tiges restantes (D) ensemble et fixez
à
l'ensemble de douille (C).
Enrosque y una las varillas (D) que quedan y
asegúrelas al ensamble del portalámpara (C).
Fixez l'abat-jour (B) à l'aide de la bague de douille (A).
Fije la pantalla (B) y asegúrela con el anillo de
portalámpara (A).
Insérez une ampoule (non incluse).Utilisez une ampoule
à incandescence à culot standard à trois intensités d'un
maximum de 100 watts ou une ampoule fluocompacte à
culot standard d'un maximum de 26 watts.
Inserte la bombilla (no se incluye).Use una bombilla
incandescente de 3 vías de base estándar de 100 vatios
como máximo o una bombilla CFL de base estándar de
sens Si
26 vatios como máximo.
le tout
//
4


