Powerhorse 157055 User manual

READ & SAVE THESE INSTRUCTIONS
1800 PSI Electric High Pressure Washer
Owner’s Manual
WARNING: Read carefully and understand all ASSEMBLY AND OPERATION
INSTRUCTIONS before operating. Failure to follow the safety rules and other basic safety
precautions may result in serious personal injury.
Item #157055

Page 2 of 27
Thank you very much for choosing a Powerhorse®product!
For future reference, please complete the owner’s record below:
Serial Number/Lot Date Code: ________________________________
Purchase Date: ____________________________________________
Save the receipt, warranty, and this manual. It is important that you read the entire manual to become
familiar with this product before you begin using it.
This pressure washer is designed for certain applications only. Northern Tool and Equipment is not
responsible for issues arising from modification or improper use of this product such as an application
for which it was not designed. We strongly recommend that this product not be modified and/or used
for any application other than that for which it was designed.
For technical questions, please call 1-866-902-9690.

Page 3 of 27
Table of Contents
Intended Use..........................................................................................................................................4
Packaging Contents..............................................................................................................................4
Technical Specifications......................................................................................................................4
Important Safety Information...............................................................................................................4
Specific Operation Warnings...............................................................................................................6
Grounding..............................................................................................................................................7
Main Parts of Product...........................................................................................................................9
Assembly Instructions..........................................................................................................................9
Before Each Use..................................................................................................................................11
Operating Instructions........................................................................................................................12
After Each Use.....................................................................................................................................15
Maintenance ........................................................................................................................................15
Troubleshooting..................................................................................................................................17
Parts Diagram......................................................................................................................................21
Parts List..............................................................................................................................................22
Replacement Parts..............................................................................................................................25
Limited Warranty.................................................................................................................................26

Page 4 of 27
Intended Use
The Powerhorse 1800 PSI Electric Pressure Washer is intended for cleaning the walls of buildings,
facades, terraces, footpaths, garden equipment, machinery, vehicles, tools, etc., with a pressure
water nozzle. If required, you can also use the pressure washer with added household cleaning
agents.
The pressure washer is to be used only for its prescribed purpose, any other use is deemed to be a
case of misuse. The user/operator and not the manufacturer will be liable for any damage or injuries
of any kind caused as a result of this.
Note that our equipment has not been designed for use in commercial, trade, or industrial
applications. Our warranty will be voided if the pressure washer is used in commercial, trade, or
industrial businesses or for equivalent purposes.
Packaging Contents
Ground Fault Circuit
Interrupter (GFCI) (1)
High-pressure Hose (1)
Hand Crank (1)
Detergent Tank (1)
Quick-connect Wand (1)
Trigger Handle (1)
QC Spray Tips (3)
Turbo Nozzle (1)
Water Filter Screen (1)*
Tip Cleaning Needle (1)
Owner’s Manual (1)
*Water filter screen comes pre-attached on the water inlet, located on the front of the pressure washer.
Technical Specifications
Property
Specification
Power Source Requirement
120 Volt AC, 60 Hz
Rated Current
13 Amps
Max. Pressure
1800 psi
Max. Flow Rate
1.5 GPM
Electrical Cord
35 feet
High-Pressure Hose
19 feet
Inlet Water
Cold Tap Water, Max. 104°F / 40°C
Detergent Injection Rate
3~12%
Important Safety Information
⚠WARNING
Read and understand all instructions. Failure to follow all instructions may result in serious injury
or property damage.
The warnings, cautions, and instructions in this manual cannot cover all possible conditions or
situations that could occur. Exercise common sense and caution when using this tool. Always be

Page 5 of 27
aware of the environment and ensure that the tool is used in a safe and responsible manner.
Do not allow persons to operate or assemble the product until they have read this manual and
have developed a thorough understanding of how it works.
Do not modify this product in any way. Unauthorized modification may impair the function and/or
safety and could affect the life of the product. There are specific applications for which the product
was designed.
Use the right tool for the job. DO NOT attempt to force small equipment to do the work of larger
industrial equipment. There are certain applications for which this equipment was designed. This
product will be safer and do a better job at the capacity for which it was intended. DO NOT use
this equipment for a purpose for which it was not intended.
Industrial or commercial applications must follow OSHA requirements.
⚠WARNING
WORK AREA SAFETY
Inspect the work area before each use. Keep work area clean, dry, free of clutter, and well-lit.
Cluttered, wet, or dark work areas can result in injury. Using the product in confined work areas
may put you dangerously close to cutting tools and rotating parts.
Do not use the product where there is a risk of causing a fire or an explosion; e.g., in the presence
of flammable liquids, gases, or dust. The product can create sparks, which may ignite the
flammable liquids, gases, or dust.
Do not allow the product to come into contact with an electrical source. The tool is not insulated
and contact will cause electrical shock.
Keep children and bystanders away from the work area while operating the tool. Do not allow
children to handle the product.
Be aware of all power lines, electrical circuits, water pipes, and other mechanical hazards in your
work area. Some of these hazards may be hidden from your view and may cause personal injury
and/or property damage if contacted.
⚠WARNING
PERSONAL SAFETY
Stay alert, watch what you are doing, and use common sense when operating the tool. Do not use
the tool while you are tired or under the influence of drugs, alcohol, or medication. A moment of
inattention while operating the tool may result in serious personal injury.
Dress properly. Do not wear loose clothing, dangling objects, or jewelry. Keep your hair, clothing
and gloves away from moving parts. Loose clothes, jewelry, or long hair can be caught in moving
parts. Air vents on the tool often cover moving parts and should be avoided.
Wear the proper personal protective equipment when necessary. Use ANSI Z87.1 compliant safety
goggles (not safety glasses) with side shields, or when needed, a face shield. Use a dust mask in
dusty work conditions. Also use non-skid safety shoes, hardhat, gloves, dust collection systems,
and hearing protection when appropriate. This applies to all persons in the work area.

Page 6 of 27
Do not overreach. Keep proper footing and balance at all times.
⚠CAUTION
PRESSURE WASHER USE AND CARE
Do not force the pressure washer. Products are safer and do a better job when used in the
manner for which they are designed. Plan your work, and use the correct product for the job.
Check for damaged parts before each use. Carefully check that the product will operate properly
and perform its intended function. Replace damaged or worn parts immediately. Never operate the
product with a damaged part.
Do not use a pressure washer with a malfunctioning switch. Any power tool that cannot be
controlled with the power switch is dangerous and must be repaired by an authorized service
representative before using.
Disconnect the power/air supply from the product and place the switch in the locked or off position
before making any adjustments, changing accessories, or storing the tool. Such preventive safety
measures reduce the risk of starting the tool accidentally.
Store the product when it is not in use. Store it in a dry, secure place out of the reach of children.
Inspect the tool for good working condition prior to storage and before re-use.
Use only accessories that are recommended by the manufacturer for use with your product.
Accessories that may be suitable for one product may create a risk of injury when used with
another tool. Never use an accessory that has a lower operating speed or operating pressure than
the tool itself.
Keep guards in place and in working order. Never operate the product without the guards in place.
Do not leave the tool running unattended.
Specific Operation Warnings
⚠WARNING
Wear ANSI Z87.1 compliant safety goggles during use.
Before servicing, cleaning, or removing parts, unplug pressure washer from power source and
relieve the pressure.
Risk of Explosion. Do not use pressure washer to spray flammable liquids.
Arching electrical parts. Keep the motor at least 18ft. (6m) from explosive vapors.
High-pressure spray can cause flying debris and possible surface damage.
Cleaning chemical vapors or contact with skin may be hazardous.
Never operate the pressure washer with broken or missing parts. Check the product regularly and
repair or replace worn or damaged parts immediately.
Never spray flammable liquids or use the pressure washer in areas containing combustible dust,
liquids, or vapors. An electric spark could cause an explosion.
Never leave the wand unattended while the product is running or switched on.

Page 7 of 27
Never cover the pressure washer during operation to allow free air cooling.
Always turn water supply on before turning the pressure washer on unless draining for storage.
Running the pump dry causes serious damage.
Not for use by or around children.
INJECTION HAZARD
Spray gun can kick back causing personal injury or loss of control of spray gun, causing injury
other persons. Hold spray gun with two hands while operating.
Equipment can cause serious injury if the spray penetrates the skin. Never point spray gun or
direct spray at people, animals, or pressure washer.
When unit is switched to the OFF position, pressure will still remain in unit. Point the spray gun in
a safe direction and engage trigger to release pressure. Do not direct discharge at persons or
animals.
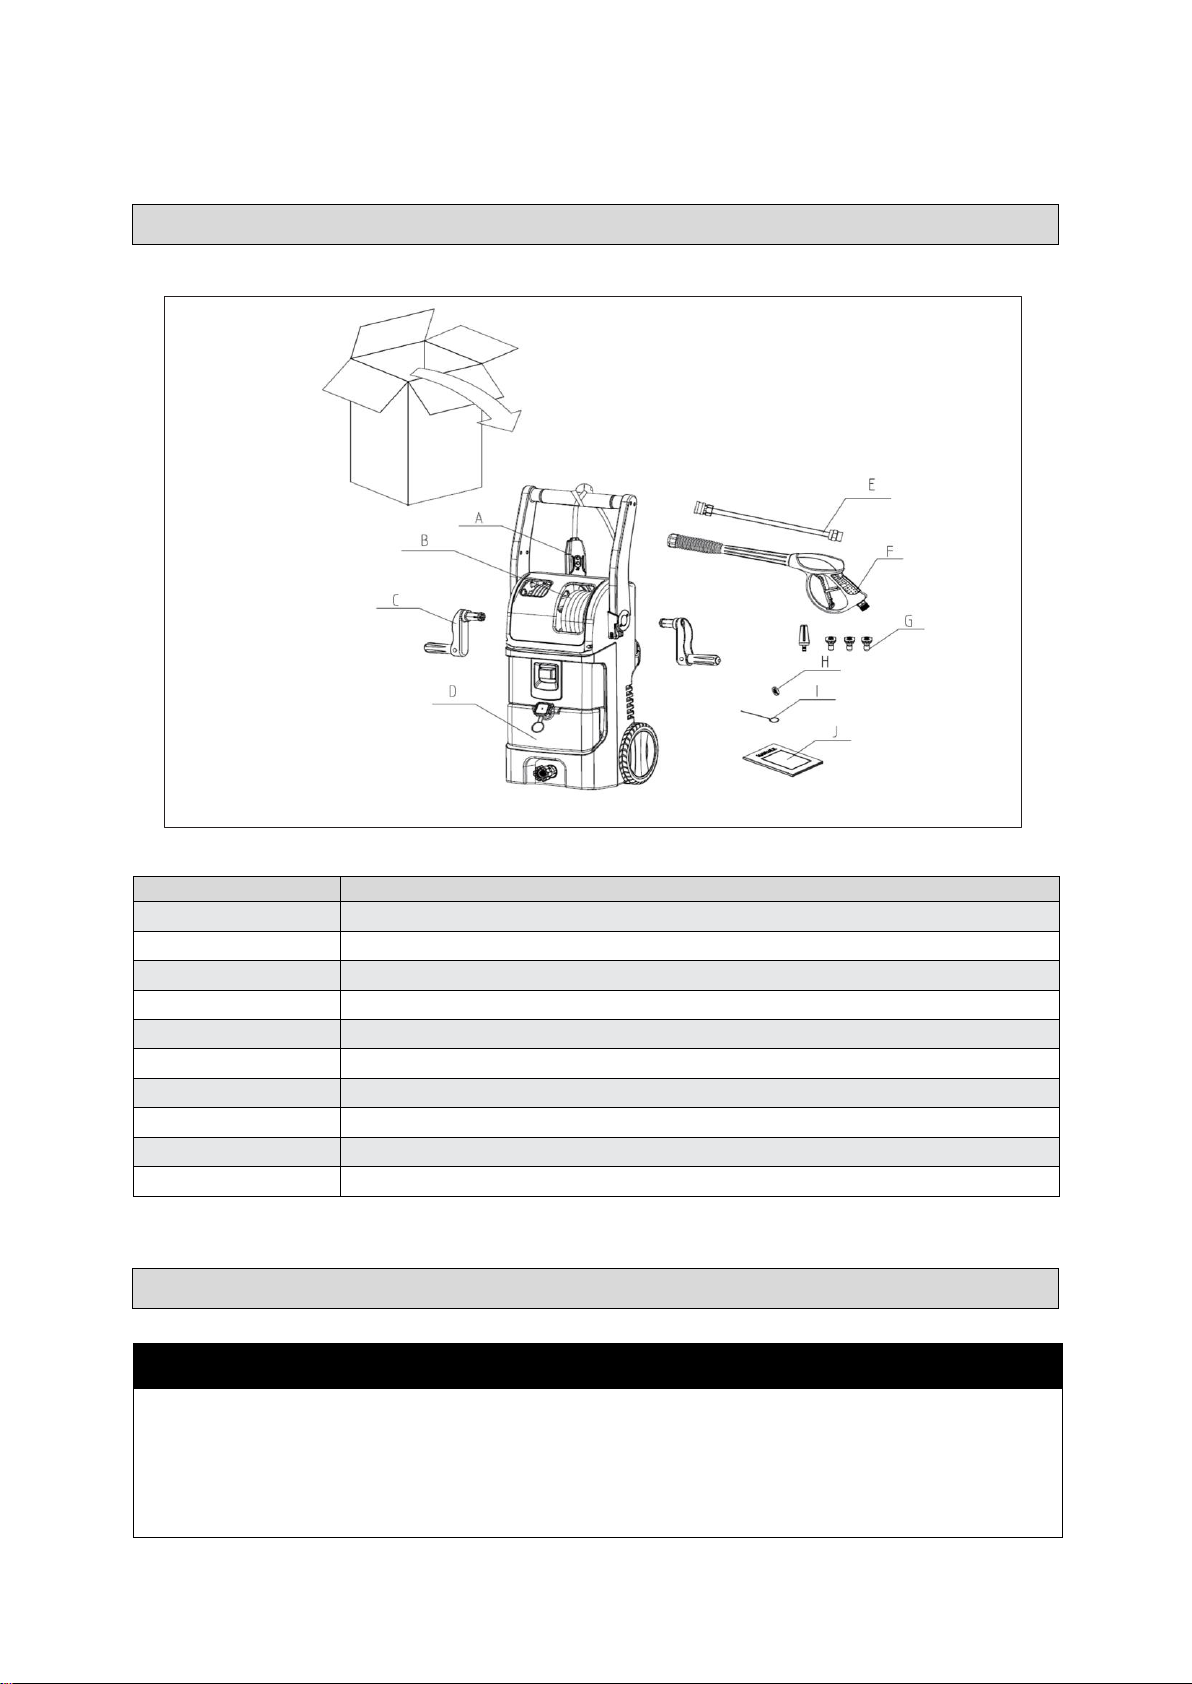
Never operate the pressure washer without all components properly connected to the product
(handle, gun/wand assembly, nozzle, etc.).
Never put hand or fingers over the nozzle or spray tip while operating the pressure washer.
ELECTRIC SHOCK HAZARD
Inspect cord before using. Do not use if cord is damaged, frayed or split.
Keep all connections dry and off of the ground.
Do not plug in power cord when wet or while standing on damp/wet ground.
Always move switch on product to “Off” position before connecting or disconnecting power cord to
electrical outlets.
Do not use an extension cord with this product.
Connect only to a grounded outlet equipped with a ground fault circuit interrupter (GFCI).
Do not attempt to service or open this product while it is connected to an electrical source. Service
should only be completed by a qualified technician.
When servicing, use only original equipment manufacturer (OEM) replacement parts.
This product is provided with a ground fault circuit interrupter (GFCI) built into the power cord plug.
If replacement of the plug or cord is needed, ensure the GFCI is included with the new cord.
Connect to individual branch circuit only.
Grounding
⚠WARNING
This device provides additional protection from the risk of electrical shock. Plug the Ground Fault
Circuit Interrupter (GFCI) into a power outlet. Indicator should turn red. TEST BEFORE EACH
USE. Press the TEST button. Red indicator should disappear. Press RESET button again for use.
Do not use if above test fails.
Should replacement of the plug or cord become necessary, use only manufacturer replacement
parts that include GFCI protection. All services must be done by an Authorized Service Technician.
Unauthorized service will void warranty.
Connect directly to an outlet. Do not use the pressure washer with an extension cord. The use of

Page 8 of 27
an extension cord could override the GFCI built into the plug of the power supply cord resulting in
the risk of electrical shock.
CHECK with a qualified electrician or service person if you do not completely understand the
grounding instructions, or if you are not sure the tool is properly grounded.
Grounded Tools: Tools with 3-Prong Plugs
Tools marked with Grounding Required have a 3-wire cord and 3-prong grounding plug. The plug
must be connected to a properly grounded outlet. If the tool should electrically malfunction or break
down, grounding provides a low resistance path to carry electricity away from the user, reducing the
risk of electric shock. (See Figure A.)
Your tool must be plugged into an appropriate outlet, properly installed and grounded in accordance
with all codes and ordinances. The plug and outlet should look like those in the following illustration.
Double Insulated Tools: Tools with Two-Prong Plugs
Tools marked Double Insulated do not require grounding. They have a special double insulation
system which satisfies OSHA requirements and complies with the applicable standards of
Underwriters Laboratories, Inc., the Canadian Standard Association, and the National Electrical Code.
(See Figure B.)
Double insulated tools may be used in either of the 120 volt outlets shown in the following illustration.

Page 9 of 27
Main Parts of Product
*Water filter comes pre-attached on the water inlet, located on the front of the pressure washer.
Assembly Instructions
Reference
Subassembly
A
Ground Fault Circuit Interrupter (GFCI)
B
High-pressure Hose
C
Hand Crank
D
Detergent Tank
E
Quick-connect Wand
F
Trigger Handle
G
Spray Tips
*H
Water Filter Screen
I
Tip Cleaning Needle
J
Owner’s Manual
⚠WARNING
Remove the power cord from the power source before carrying out any work on the equipment,
and use only original parts.
Before starting any cleaning task, it is important to inspect the area for objects that could create a
hazard.

Page 10 of 27
Raise the handle to an upright position and set the
position to cam - lock.
Attach high-pressure hose from hose reel to the gun wand trigger handle and hand-tighten until
the two parts are locked.
Remove any objects from the work area that could be tripped over, such as toys or outdoor
furniture. Ensure that all doors and windows are closed tightly.
Attach hand-cranks onto the hose reel and cord
reel on both sides. Insert in the holes and snap into
place. No tools required.

Page 11 of 27
Attach the desired color-coded spray tip to the quick - connect wand by pushing to ensure it is
clicked in securely. Insert the wand into the trigger handle and hand-tighten until the two parts are
locked securely.
Attach the garden hose to the water inlet (hand-tighten
only).
Attach the garden hose to a cold water source and turn the water
on full. The water temperature must not exceed 104o F (40oC) and
the supply pressure must be between 40 to 80 psi.
Before Each Use
⚠WARNING
Never use the pressure washer to draw in water contaminated with solvents (e.g., paint thinners,
gasoline, oil, etc.).
Dirt in the water inlet will damage the pressure washer. To avoid this risk, we recommend
inspecting and cleaning the water inlet regularly.
Always prevent debris from being drawn into the washer by using a clean water source and an
additional accessory water filter if required.
To prolong the life of the washer, rest the washer for 5 minutes after every 30 minutes of use.
Surface Preparation
Before starting any cleaning task, it is important to inspect the area for objects that could create a
hazard. Remove any objects from the work area that could be tripped over, such as toys or outdoor
furniture. Ensure that all doors and windows are closed tightly.
Water Supply (Cold Water Only)
Only draw cold water through the washer. For use with a cold water supply only. The water hose must
be at least a 1/2" (13 mm) in diameter. Flow rate of water supply must not fall below 2 GPM (gallons
per minute). Flow rate can be determined by running the water for one minute into an empty 5-gallon
container. Measure the volume of water in the bucket after one minute. The water supply temperature
must not exceed 104°F (40°C).

Page 12 of 27
Operating Instructions
⚠WARNING
Risk of injury, do not direct discharge stream at self or other persons.
Before cleaning any surface, an inconspicuous area should be cleaned to test spray pattern and
distance for maximum cleaning results
The pressure washer must only be used with clean water. Use of unfiltered water or corrosive
chemicals will damage the pressure washer.
This pressure washer is not intended to pump hot water. Never connect it to a hot water supply as
it could cause injury and will significantly reduce the life of the pump.
Damage may occur to painted surfaces if chemical is allowed to dry on the surface. Wash and
rinse a small section at a time. Avoid working on hot surfaces or in direct sunlight.
Never use: Bleach, chlorine products and other corrosive chemicals, liquids containing solvents
(i.e., paint thinners, gasoline, oils), tri-sodium phosphate products, ammonia products, or acid-
based products. These chemicals will harm the pressure washer and will damage the surface
being cleaned.

Page 13 of 27
Depress the trigger until there is a steady stream of water. Before changing the spray tip, switch the
washer off, depress trigger to release pressure and activate trigger handle safety latch. Change the
spray tip as per the recommendation, if necessary.
⚠WARNING
Make sure spray tip and wand is locked. Do not move the spray tip while trigger is depressed.
If painted surfaces are peeling or chipping, use extreme caution as the pressure washer may
remove the loose paint from the surface.
Completely unwind the power cord by pulling
and plug the Ground Fault Circuit Interrupter
(GFCI) into a power outlet. The indicator
should turn red. TEST BEFORE EACH
USE. Press the TEST button. The red
indicator should disappear. Press the
RESET button again for use. Do not use if
this test fails.
Ensure the trigger safety latch is
released by pushing it down and
engage the trigger for a few
seconds to discharge the residual
pressure in the high-pressure hose.
Turn on the pressure washer by turning the switch
to mark “— “. The washer will run for a few
seconds to build up pressure, and then will stop on
the function of total stop system (TSS).
Make sure the on/off switch is in the OFF
position before plugging in the pressure
washer. Turn the switch to the O mark to
ensure it is off.

Page 14 of 27
For most cleaning applications, a 40 spray angle is recommended to avoid damage to the surface
being sprayed.
The pressure of spray on the surface will increase when you move the wand closer to the surface.
Cleaning Detergents Dispenser
Only use cleaning detergents recommended for pressure washers. Always follow detergent
manufacturer’s label recommendations for proper use of detergents or soap. Always protect the
eyes, skin, and
respiratory system from detergent.
Turn off the pressure washer by turning the switch to mark
“O”.
⚠WARNING
Working with detergent ensures a quick soaking of the dirt, and allows the high-pressure water to
penetrate and remove the dirt more effectively.
To apply detergents you must be operating at low-pressure. This provides a gentle application of
detergent, with the pressure equivalent to a garden hose. The high-pressure setting is used for
cleaning; you cannot apply detergents when working at high-pressure. Always test detergent in an
inconspicuous area before use.
Engage the trigger safety lock.
Attach the low-pressure spray tip (black)
for soap or detergent application.
Detergent application will only work with
low-pressure spray tip.
Lift up to remove the cap of detergent
tank, fill tank with detergent or soap,
and replace the cap. Apply detergent
as instructed by the detergent
manufacturer.

Page 15 of 27
Turn ON the pressure washer. Depress the trigger to operate the washer. The liquid detergent will
automatically mix with water and be discharged through the spray tip.
Allow the detergent to remain on the surface for a short time before rinsing. Do not allow
detergent to dry on the surface.
Rinse with clean water under high-pressure. On a vertical surface, rinse from the bottom up, and
then rinse from the top down to avoid streaking. Hold the nozzle 6"-8" (15-20 cm) from the
cleaning surface, at a 45° angle.
When you have finished using the detergent dispensing system, fill the detergent tank with clean
water to rinse the system clean. Depress the trigger for one minute at low-pressure so that all
detergents remaining in the system are thoroughly flushed out.
Remove detergent tank to empty the remaining water, and rinse it until it is thoroughly cleaned.
After Each Use
Shutting Down and Cleaning up
Turn the switch to the OFF (O) position.
Unplug the power cord from the outlet.
Turn off the water supply.
Press the trigger to release any remaining water pressure.
Disconnect the garden hose from the water inlet on the washer.
Engage trigger handle safety lock.
Maintenance
⚠WARNING
Turn off the water supply and squeeze the trigger to depressurize the washer. Failure to do so
could result in personal injury due to discharge of high-pressure water.
Failure to clean properly will cause the detergent injection system to become clogged and
inoperable.
Drain the pressure washer after each use.
For storage: remove water connection, turn on the washer for a few seconds, and press trigger
handle to purge remaining water in the pump. Turn off immediately.
⚠WARNING
Disconnect the pressure washer from the power source before conducting any maintenance.
Turn off water supply and depress trigger to depressurize the washer. Failure to do so could result
in personal injury due to discharge of high-pressure water.
To assure product safety and reliability, repairs should be performed by authorized service
technician or other qualified service personnel, always use manufacturer replacement parts.
Service or repairs made by unauthorized personnel will void the product warranty.

Page 16 of 27
(If you are not using detergent, go directly to next point.) When you have finished using the
detergent dispensing system, fill the detergent tank with clean water to rinse the system clean.
Depress the trigger for one minute at low-pressure so that all detergents remaining in system are
thoroughly flushed out. Remove detergent tank to empty the remaining water, and rinse it until it is
thoroughly cleaned.
Turn off the water supply and disconnect the garden hose from the faucet and the water inlet on
the washer.
Depress the trigger for a few seconds to release any remaining water until water spray stops.
Turn off the washer immediately.
Unplug the Ground Fault Circuit Interrupter (GFCI) from the power outlet and wrap power cord
into the cable reel by rotating the reel with hand-crank.
For storage, disconnect the high-pressure hose from the trigger handle and wrap hose into the
hose reel by rotating the reel with hand crank.
Engage the trigger handle safety latch and disconnect the quick – connect wand from trigger
handle, disconnect and replace the spray tip to tip holder on the washer, insert the wand into the
wand holder.
Store the washer and accessories in a room that does not reach freezing temperatures. Do not
store near furnace or other sources of heat as it may dry out the pump seals.
Optimum Winterizing Procedure
Winterizing your pressure washer will help protect and prolong its life. We strongly recommend you
follow the following steps using the *Pressure Washer Pump Guard. This will keep the internal parts
lubricated, protected from rust, and prevent the pump from freezing.
Connect the Pressure Washer Pump Guard hose onto the water inlet.
Depress the button on top of the Pressure Washer Pump Guard container.
Continue until the fluid exits the pressure hose.
Remove the hose from the pump inlet (water inlet).
*Note: The Pressure Washer Pump Guard is not supplied with
your pressure washer. It can be purchased where you
purchased this pressure washer, at most home center stores,
or call 1-800-556-7885 and request item #1579000.
Water Filter Screen
The pressure washer is equipped with a water filter screen to protect the pump. If the screen is not
kept clean, the flow of water to the pressure washer will be restricted and the pump may be damaged.
1. To clean the inner water screen, remove the inlet adaptor and
remove the filter screen from the pump inlet.
2. Rinse the screen until it is free of debris and blockage.
3. Replace the filter screen and inlet adaptor immediately to

Page 17 of 27
prevent any foreign matter from entering the pump.
Main Body Cleaning
Use only mild soap and a damp cloth to clean the main body.
Connections
Connections on pressure washer hose trigger handles and spray wands should be cleaned regularly
and lubricated with non-water soluble grease. Failure to do so could void the product warranty.
Spray Tips Only
Clogged spray tips can cause the pump pressure to be too high and cleaning is immediately required.
Clean the spray tips by carefully inserting the tip cleaning needle provided, or a thin and sharp
instrument (i.e., sewing needle) into the tip to remove any dirt deposited.
Troubleshooting
Use the table below to troubleshoot problems before contacting service personnel or your local
dealer. If the problem continues after troubleshooting, call your local dealer for assistance.
Fault / Malfunction
Possible Cause
Corrective Action
Motor will not start.
On/Off switch is in the OFF (O)
position.
Turn switch to the ON (-)
position.
GFCI is not plugged in.
Plug in GFCI.
Extension cord is too long.
Extension cord is not the proper
gauge. Extension cord is
damaged.
Replace the extension cord with
either a 25’ (7.6 m) 14/3 gauge
cord or a 50’ (15 m) 14/3 gauge
cord.
Electrical outlet does not supply
adequate power.
Try a different outlet.
Tripped pressure washer
thermal protector.
Allow to cool and restart
washer.
⚠WARNING
Disconnect the pressure washer from the power source before making any repairs.
Drain the trigger handle assembly of any remaining water. Aim the trigger handle downwards and
squeeze trigger.

Page 18 of 27
Fault / Malfunction
Possible Cause
Corrective Action
Washer does not
reach high-
pressure.
Diameter of garden hose is too small.
Replace with a 1"(25 mm) or 5/8"(16
mm) garden hose.
Water supply is restricted.
Check garden hose for kinks,
leaks, and blockage.
Not enough water supply.
Open water source fully.
Water filter screen is clogged.
Remove filter and rinse in warm
water.
Power nozzle is in the low-pressure
position.
Replace with desired high-pressure
tip.
Pump is sucking air.
Check that hoses and fittings are
airtight. Turn off the pressure washer,
and purge the pump by squeezing
the trigger handle until a steady flow
of water emerges through the spray
tip.
Output pressure
varies high and low.
Not enough inlet water supply.
Turn water on fully. Check the
garden hose for kinks, leaks, or
blockage.
Pump is sucking air.
Check that hoses and fittings are
airtight. Turn off the pressure washer,
and purge the pump by squeezing
the trigger handle until a steady flow
of water emerges through the spray
tip.
Water filter screen is clogged.
Remove filter and rinse with
warm water.
Discharge nozzle is obstructed.
Blow out or remove debris with a tip
cleaning needle.
Calcified gun, hose, or power nozzle.
Run distilled vinegar through
detergent tank.
Detergent is not
working.
Detergent container is empty.
Add more detergent.
Detergent bottle or suction tube not
properly connected.
Check connections.
Detergent is too thick.
Dilute detergent.
Detergent is not
working.
Filter on detergent suction tube is
clogged.
Run warm water through filter to
remove build-up.

Page 19 of 27
Fault / Malfunction
Possible Cause
Corrective Action
Damaged or clogged detergent
suction tube.
Remove obstruction or replace
detergent suction tube.
Nozzle is in high-pressure position.
Use low-pressure (black) tip.
Discharge nozzle is obstructed.
Blow out or remove debris with a tip
cleaning needle.
Garden hose
connection
leaks.
Loose fittings.
Tight fittings.
Missing/worn rubber washer.
Insert new washer.
Spray wand,
extension or
nozzle leaks.
Spray nozzle not properly attached.
Ensure quick-connect wand is
attached securely. Ensure spray tip is
clicked in securely.
Pump is sucking air.
Call the toll-free hotline: 1-866-
902-9690.
Pump is noisy.
Pump is sucking air.
Check that hoses and fittings are
airtight. Turn off washer and
purge pump by squeezing trigger
handle until a steady flow of
water emerges through the spray
tip.
Water filter is clogged.
Remove water filter and rinse in
warm water.
Water leaks from
pump (up to 10
drops per minute is
permissible).
Loose fittings.
Check that all fittings are tight.
Water seals are damaged or worn.
Call the toll-free hotline: 1-866-902-
9690.
Oil is dripping.
Oil seals are damaged or worn.
Call the toll-free hotline: 1-866-902-
9690.
Motor buzzes but
fails to run.
Supply voltage below minimum.
Verify that only the pressure washer
is running on this circuit.
System has residual pressure.
Turn washer off, squeeze trigger on
spray wand to release pressure, and
then turn washer on.
Voltage loss due to extension cord.
Unplug any extension cords attached
and plug the washer directly into the
outlet.
Pressure washer not used for long
periods.
Call the toll-free hotline: 1-866-902-
9690.

Page 20 of 27
Fault / Malfunction
Possible Cause
Corrective Action
Residual friction among components.
Washer might hum.
Disconnect water supply and power
on for 2 to 3 seconds, repeat couple
times or until the motor starts.
No water.
Water supply is off.
Turn on water supply.
Kink in the garden hose.
Remove kink in garden hose.
Quick-connect assembly is attached
in reverse.
Verify that inlet adapter (H2) is
attached to the washer’s water inlet
and the quick-connect coupler (H1) is
attached to garden hose.
Table of contents
Other Powerhorse Pressure Washer manuals

Powerhorse
Powerhorse M157711A.4 User manual

Powerhorse
Powerhorse M45811F User manual

Powerhorse
Powerhorse MPHFFKB.1 User manual

Powerhorse
Powerhorse M750143E User manual

Powerhorse
Powerhorse PPW2000 User manual

Powerhorse
Powerhorse M157711C.1 User manual

Powerhorse
Powerhorse 106168 User manual

Powerhorse
Powerhorse 106167 User manual

Powerhorse
Powerhorse PPW2300 User manual

Powerhorse
Powerhorse M1577110E User manual