Powerhorse M1577149A.3 User manual

Owner’s Manual
Pressure Washer: Machine that cleans dirty surfaces with high pressure water
Instructions for Installation/Set-up, Operation, Maintenance, & Storage
This pressure washer produces cold water high pressure spray. Cleaning chemicals may be incorporated into the
spray if desired. The pressure pump for this equipment is powered by a gasoline internal combustion engine.
WARNING: SPECIAL HAZARDS
CO Poisoning: Exhaust from engine contains carbon monoxide, a poisonous gas that can cause carbon monoxide
poisoning and possible death if inhaled.
Injection Injury: High-pressure spray can pierce skin and underlying tissues, leading to serious injury and possible
amputation. Such an injection injury can result in blood poisoning and/or severe tissue damage.
Flying Debris: High-pressure spray can cause flying debris and possible surface damage.
Electric shock: Operating equipment in wet conditions or near water can cause electric shock.
Chemical Exposure: Cleaning chemical vapors or contact with skin may be hazardous.
Fire/Explosion: Engine sparking can ignite fuel or other flammable liquids or vapors in the vicinity. Hot exhaust from engine
can ignite combustible materials.
Burns: Pressure Washer pump and engine are hot surfaces that can cause burn injuries.
Detailed safety information about these hazards appears throughout this manual.
Equipment Protection Quick Facts
Inspect Upon Delivery: FIRST! Inspect for missing or damaged components. See “Initial Set-Up/Installation” section
for where to report missing or damaged parts.
Add Engine Oil: Engine is shipped without oil. See “Engine Manual” section of this manual for instructions on
capacity and viscosity recommendations.
Replace Temporary Pump Oil Plug: Pump is shipped with oil but with temporary shipping plug. Check pump oil
level before starting and replace temporary shipping plug with permanent oil fill plug provided within plastic bag
containing this Owner’s Manual.
Water Flow Requirements: Make sure your supply water flow rate is 20% higher than the pressure washer's flow
rate (see "Operations", section for detail), and that your water is clean and particle free.
Chemical Spraying: Use only approved pressure washer chemicals designed for high-pressure use. Use soap
adjustment knob to regulate cleaning power (on select units).
Storage: Do not allow water to freeze in the pump, hose, or spray gun(s). See “Storage” for more information.
Maintenance Schedule: Engine and pump require periodic inspection and servicing to keep pressure washer
functioning efficiently. See “Maintenance Schedule Summary”for frequency of servicing.
Battery Required: A battery is not included. A battery must be installed before starting the engine or damage to the
engine voltage regulator will result. Purchase a standard 12 VDC, 10 Ah battery. Further detail in “Specifications”
section.
Any Questions, Comments, Problems, or Parts Orders
Call Powerhorse Product Support 1-866-443-2576
ITEM NUMBER: 1577149, 1577249
SERIAL NUMBER: _____________
M1577149A.3

2
Table of Contents
Equipment Protection Quick Facts ........................................................................................................................................ 1
TABLE OF CONTENTS................................................................................................................................................2
ABOUT YOUR PRESSURE WASHER.........................................................................................................................4
SPECIFICATIONS ........................................................................................................................................................5
COMPONENT IDENTIFICATION..................................................................................................................................6
SAFETY ........................................................................................................................................................................7
Hazard Signal Word Definitions ............................................................................................................................................ 7
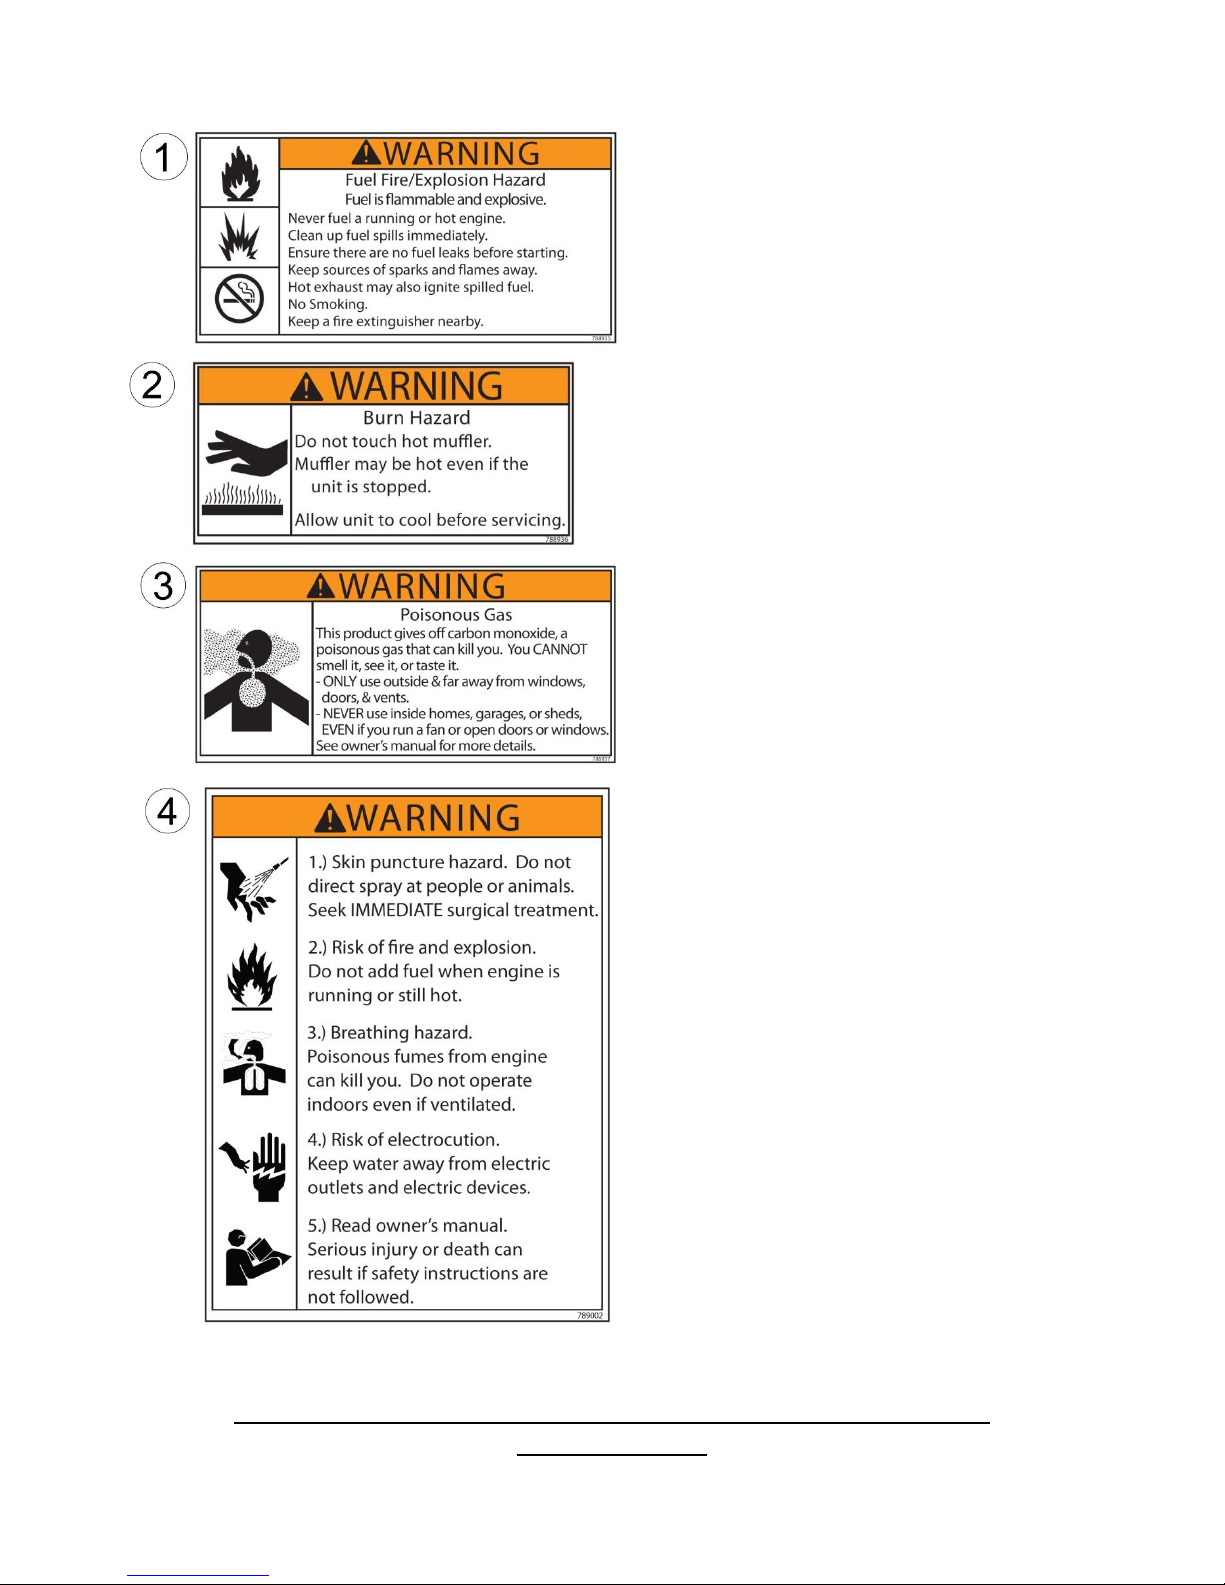
SAFETY LABELING.....................................................................................................................................................8
Safety Decal Locations ......................................................................................................................................................... 8
Safety Decals........................................................................................................................................................................ 9
INITIAL SET-UP..........................................................................................................................................................10
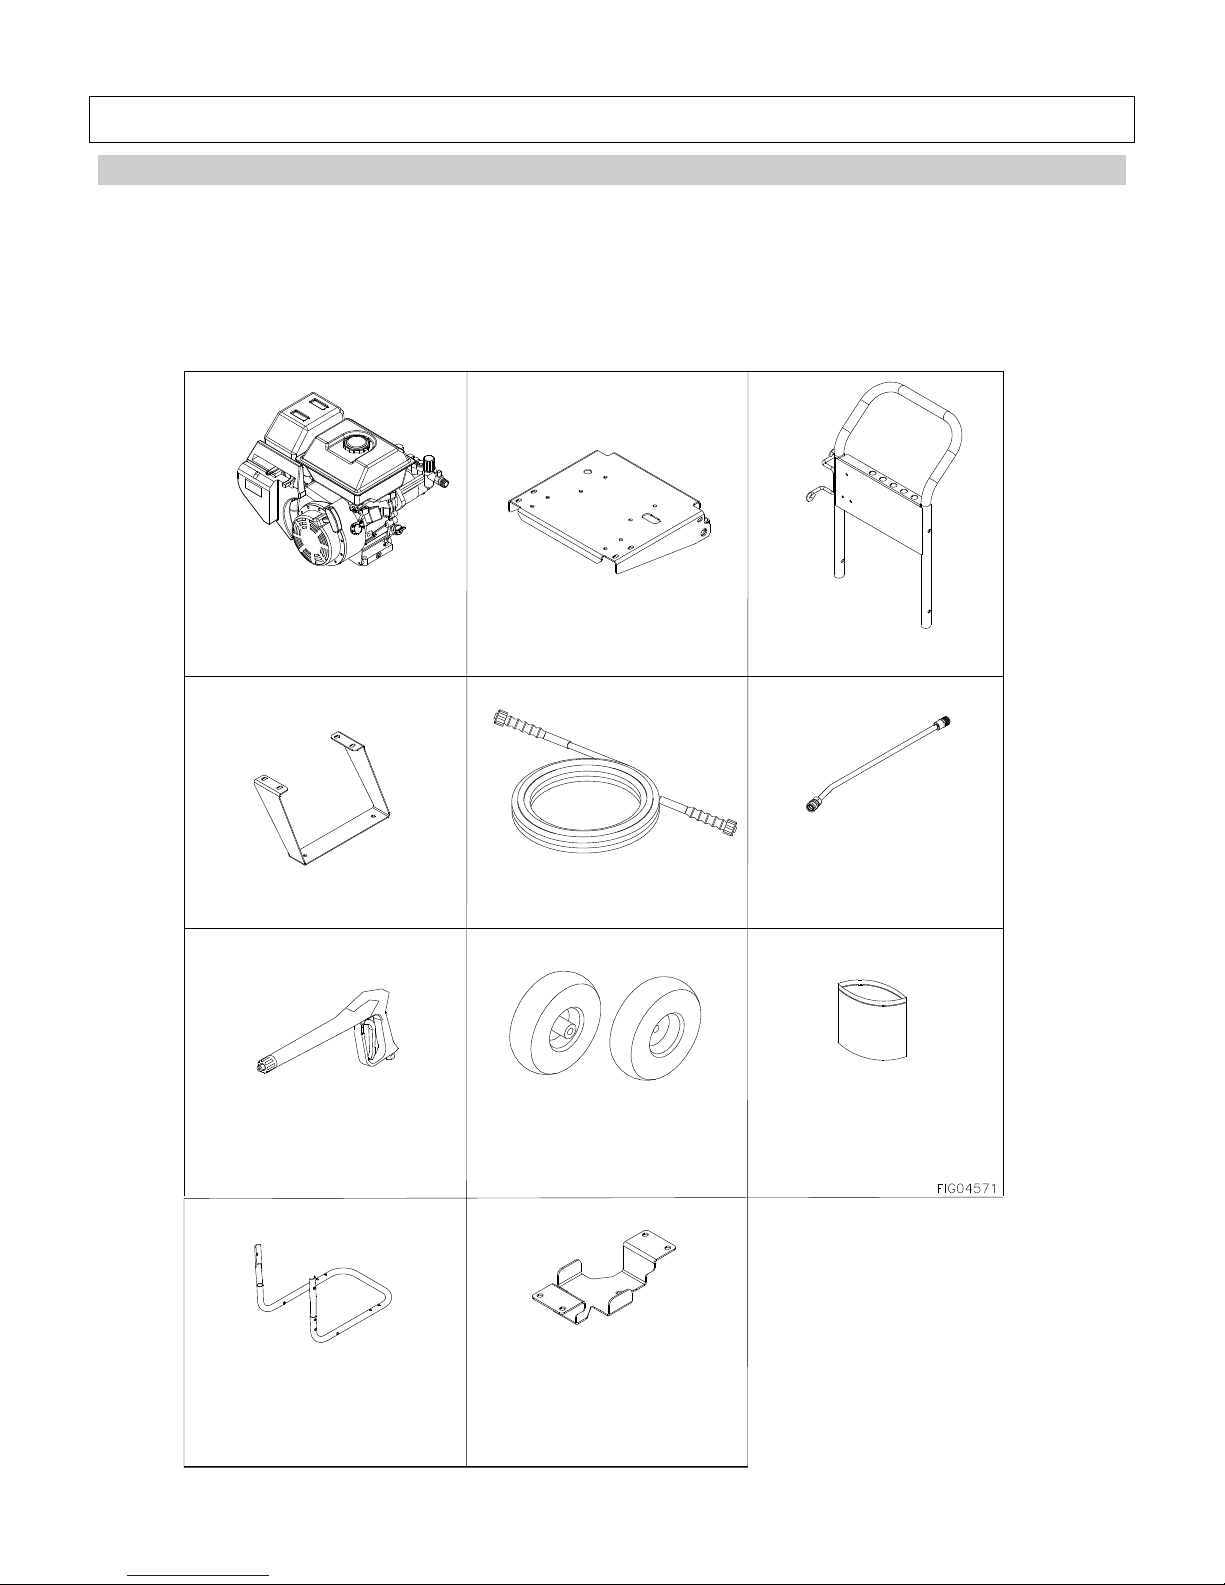
Step 1. Inspect & Unpack...................................................................................................................................................... 10
Step 2. Assembly................................................................................................................................................................... 12
Base Assembly ................................................................................................................................................................... 12
Install Battery (1577249 Only)............................................................................................................................................. 14
Step 3. Select Suitable Location........................................................................................................................................... 15
Moving and Handling .......................................................................................................................................................... 15
Outdoor Use Only ............................................................................................................................................................... 15
Install Spark Arrestor (if Required)...................................................................................................................................... 16
OPERATION ...............................................................................................................................................................17
Follow Safety Rules for Operation ....................................................................................................................................... 17
Preparing for Operation ........................................................................................................................................................ 18
Check/Add Oil to Pump....................................................................................................................................................... 18
Check/Add Engine Oil......................................................................................................................................................... 19
Inspect Fuel System/Check for Leaks................................................................................................................................. 20
Connect Hoses, Water Supply, and Spray Nozzle .............................................................................................................. 20
Prime the Water Supply......................................................................................................................................................... 22
Set Up for Chemical Spray (if desired)................................................................................................................................. 22
Start-Up Procedures.............................................................................................................................................................. 23
Start the Engine to Power the Pump................................................................................................................................... 23
Apply Cleaning Chemical (If Desired) ................................................................................................................................. 23
Begin High Pressure Spray................................................................................................................................................. 24
Shutdown ............................................................................................................................................................................... 25
STORAGE...................................................................................................................................................................26
Between-Use Storage............................................................................................................................................................ 26
Prepare Pressure Washer for Freezing Conditions............................................................................................................ 26
Prepare Engine for Long Term Storage............................................................................................................................... 27
Prepare Pressure Washer for Storage ................................................................................................................................. 27
MAINTENANCE & REPAIR........................................................................................................................................28
MAINTENANCE SCHEDULE SUMMARY..................................................................................................................28
DETAILED INSTRUCTIONS –MAINTENANCE & REPAIR ......................................................................................28
Follow Safety Rules ............................................................................................................................................................ 28
Keep Pressure Washer Clean............................................................................................................................................. 28

3
Inspect Spray System ......................................................................................................................................................... 29
Do not start pressure washer until all needed repairs have been completed...................................................................... 29
Check Tire Pressure ........................................................................................................................................................... 29
Change Pump Oil................................................................................................................................................................ 30
TROUBLESHOOTING................................................................................................................................................31
PARTS EXPLOSION- MODELS 1577149, 1577249- REV A.3 ..................................................................................32
PARTS LIST-MODELS 1577149, 1577249- REV A.3 ................................................................................................33
PUMP EXPLODED VIEW- REV A.3 ...........................................................................................................................34
PUMP PARTS LIST- REV A.3 ....................................................................................................................................35
PUMP KIT PARTS LIST-REV A.3 ..............................................................................................................................36
ENGINE EXPLODED VIEW (1577149)- REV A.3.......................................................................................................37
ENGINE PARTS LIST (1577149)-REV A.3.................................................................................................................38
ENGINE KIT PARTS LIST (1577149)-REV A.3..........................................................................................................39
ENGINE EXPLODED VIEW (1577249)-REV A.3........................................................................................................40
ENGINE PARTS LIST (1577249)-REV A.3.................................................................................................................41
ENGINE KITS PARTS LISTS (1577249)-REV A.3.....................................................................................................42
ENGINE MANUAL ......................................................................................................................................................43
LIMITED WARRANTY ................................................................................................................................................51

4
About Your Pressure Washer
Thank you for purchasing a Powerhorse Pressure
Washer! It is designed for long life, dependability, and
top performance.
Intended Use. Produce a high-pressure water spray.
Incorporate cleaning chemicals into a low-pressure
water spray.
Note: Do not use for other purposes, as unforeseen
hazards or equipment damage may result.
Power Source. The pressure washer is powered by a
gasoline engine.
Supplies Required. Normal operation will require you
to supply:
Pressure Washer pump oil
Gasoline
Engine oil
Personal Protection Equipment
See “Specifications”section of this manual for more
detail.
Site Location. Intended for outdoor use only.
Personal Protection. Wear safety apparel during
operation, including safety glasses with side and top
protection. Ear protection is also recommended if
working near any operating engine. Other safety apparel
includes waterproof insulated gloves, and non-slip
protective footwear. Cleaning chemicals may require the
use of respiration mask; refer to chemical label for
further instruction.
Adult control only. Only trained adults should set up
and operate the pressure washer. Do not let children
operate.
Under The Influence. Never operate, or let anyone else
operate, the pressure washer while fatigued or under
the influence of alcohol, drugs, or medication.
Keep this manual for reference and review.
ATTENTION: Rental Companies and Private
Owners who loan this equipment to others!
All persons to whom you rent/loan this pressure washer
to must have access to and read this manual. Keep this
owner’s manual with the pressure washer at all times
and advise all persons who will operate the machine to
read it. You must also provide personal instruction on
how to safely set-up and operate the pressure washer
and remain available to answer any questions a
renter/borrower might have. Owner’s Manuals are
available from Powerhorse at 1-866-443-2576

5
Specifications
MODEL
Model #
1577149
1577249
FLOW OUTPUT
PSI (bar)
3000 (207)
3000 (207)
GPM (l/min)
2.5 (9.4)
2.5 (9.4)
Max Water Temp
140F (60C)
140F (60C)
ENGINE
Engine
Powerhorse
Powerhorse w/ Electric Start
Horsepower
208CC
208CC
DIMENSIONS / COMPONENTS
Length
27.5”
27.5”
Width
23”
23”
Height
38.5”
38.5”
Weight
75lbs
80lbs
Pump Oil Capacity
4 oz.
4 oz.
SUPPLIES REQUIRED (not included)
Engine Oil
Refer to the “Engine Manual”
section
Refer to the “Engine Manual”
section
Pump Oil
(shipped with oil, but refills
required)
SAE 30 non-detergent pump oil
(#35605)
SAE 30 non-detergent pump oil
(#35605)
Battery
N/A
12 Volt
10 Ah
Max Dimensions:
6-1/8” x 3-1/2 x 4-7/16”

6
Component Identification
1. Pressure Washer Pump: Inspect for
loose/broken parts prior to each use.
2. Pump Oil Fill: Add pump oil here. Replace
shipping plug with vented dipstick.
3. Pump Oil Drain: Drain pump oil from here.
4. Pump (Water) Inlet: Attach garden hose here.
5. Pump (Water) Outlet. Connect high pressure
hose here.
6. Pressure Adjustment (Unloader): Valve that
regulates pressure and directs flow into bypass
when trigger is closed.
7. Chemical Injector: Push chemical hose onto
injector to route chemical from chemical bucket
into pump.
8. Thermal Protector: Valve that regulates water
temp in the pump
9. Engine: The air-cooled engine powers the pump.
10. Gun Holder: Store gun here.
11. Nozzles: Change nozzles for different spray
patterns.
12. Handle: Designed for easy cart movement.
13. Hose: Attach couplers to gun and water outlet.
14. Spray Gun: Source of pressurized water, use two
hands for safe operation.
15. Trigger: Pull to allow pressurized water to flow
out of spray gun.
16. Chemical Hose: Submerge in cleaning solution.
See “Parts Explosion” for more details
16
14 13
11
12
15
10
7
98
6
5
43
2
1

7
Safety
Hazard Signal Word Definitions
DANGER
WARNING
CAUTION
CAUTION
NOTICE
This is the safety alert symbol. It is used to alert you to
potential personal injury hazards. Obey all safety
messages that follow this symbol to avoid possible injury
or death.
DANGER (red) indicates a hazardous situation, which if
not avoided, will result in death or serious injury.
WARNING (orange) indicates a hazardous situation,
which if not avoided, could result in death or serious
injury.
CAUTION (yellow), used with the safety alert symbol,
indicates a hazardous situation, which if not avoided,
could result in minor or moderate injury.
CAUTION (yellow), without the safety alert symbol, is
used to address practices not related to personal injury.
NOTICE is used to address practices not related to
personal injury.

8
Fig04684
1
3
2
4
Safety Labeling
Safety Decal Locations
WARNING:
ALWAYS make sure safety labels are in place and in good condition. If a safety label is missing or not legible, order new labels
from Powerhorse Product Support at 1-866-443-2576
On-Product Warning Labels
Location
Part numbers
Description
1
788935
Fuel Fire Explosion
2
788936
Burn Hazard
3
788937
Poisonous Gas
4
789002
Warnings

9
Safety Decals
To order replacement safety labels, call Powerhorse Product Support
at 1-866-443-2576

10
Initial Set-Up
Step 1. Inspect & Unpack
Upon receiving your item check for missing or damaged parts.
See “Component Identification” section of this manual for a diagram of the pressure washer and its components.
For missing or damaged components, contact Product Support at 1-800-270-0810.
If complete, fill out product serial number information. See “Limited Warranty” section of this manual.
Engine/Pump
Base
Handle
Leg
Pressure Hose
Lance
Spray Gun
Wheel
Hardware Bag
Base Tube
Battery Bracket
*Only on Model# 1577249

11
Hook
Qty-1
Part# 38509
3/4” Thin Nut
Qty-2
Part# 82476
5/16” Wing Nut
(1577249) Qty-4
5/16 x 1 1/2" Bolt
Qty-10
Part# 82017
5/16 x 2" Bolt
(1577249) Qty-4
Part# 82018
5/16" Nut
Qty-18
Part# 82019
5/16" x 3/4" Bolt
(1577149) Qty-6
(1577249) Qty-2
Part# 82015
5/16" x 2" Carriage Bolt
Qty-2
Part# 82233
Grommet
(1577149) Qty-5
(1577249) Qty-6
Part# 35198
Nozzles
Qty-2
Part# 781025
T-Handle Knobs
Qty-2
Part# 38578
Rubber Foot
Qty-2
Part# 2215
Breather Plug Tube with Dipstick
Qty-1
Part# 785819
Suction Hose w/ Strainer
Qty-1
3/4” x 4” Bolt
Qty-2
Part# 82230
3/4” Lock Washer
Qty-2
Part# 82041
3/4” Thick Nut
Qty-2
Part# 82040
Hardware Bag

12
FIG04686
FIG04685
FIG04687
FIG04688
Step 2. Assembly
Note: Remove contents from pallet and assembly can
occur at this time
Base Assembly
1. Bolt pressure washer frame to the engine base
using:
(6) 5/16-18 x 1-1/2”HHSF Flange Bolts (82017)
(6) 5/16-18 Flange Nut (82019)
2. Attach the leg to the pressure washer base
using:
For Model# 1577149
(4) 5/16-18 x 3/4” HHSF Flange Bolts (82015)
(4) 5/16-18 Flange Nut (82019)
For Model # 1577249
(4) 5/16-18 x 2” HHSF Flange Bolts (82018)
(4) 5/16-18 Flange Nut (82019)
3. Bolt the rubber bumpers (feet) to the leg of the
pressure washer cart using:
(2) 5/16-18 x ¾” HHSF Flange Bolts (82015)
(2) 5/16-18 Flange Nut (82019)
Wheel to Base Assembly
4. Install wheels on the pressure washer base
using:
(2) 3/4 x 4”Bolts (82230)
(2) 3/4-10 Thin Nut
(2) 3/4” Thick Nut (82040)
(2) 3/4” Lock Washers (82041)
Repeat the process as pictured to install the wheel
on opposite side.
Check that wheels turn freely.
After completing this step the pressure washer cart
assembly may now be placed right side up, ensuring
that the wheels and leg are on a flat surface.
Flange
Bolt
Flange
Nut
Flange
Nut
Flange
Bolt
Bumper
Bolt
Thick Nut
Lock
Washer
Thin Nut
Base
Wheel
Flange
Bolt
Flange
Nut
Base
Frame

13
FIG04693
Fig04690
Flange Bolt
Flange Nut
Engine
Handle to Base Assembly
5. Bolt the pressure washer handle on to cart
assembly using:
(2) 5/16-18 x 2” Carriage Bolt (82233)
(2) T-Handle Knobs (38578)
6. Install the hose hook and nozzle grommets
using:
(1) Threaded Hose Hook (38509)
(2) 5/16-18 Flange Nut (82019)
For Model# 1577149
(5) 7/16 Grommet (35198)
For Model # 1577249
(6) 7/16 Grommet (35198)
Mounting Engine to Base
7. Mount engine to cart assembly using:
(1) Engine & Pump
(4) /16-18 Flange Nut (82019)
(4) 5/16-18 X 1 1/2” Flange Bolts (82017)
Insert flange bolt from underneath base of the
cart. Tighten flange nuts to the bolts fastening
engine to cart.
Replace Shipping Plug with Dipstick
8. Remove shipping plug from the pump and
replace with the supplied dipstick.
9. Attach chemical hose to Pump by pushing onto
chemical injector barb.
Note: Discard Shipping Plug and O-ring.
FIG04689
Bolt
T-Handle
Hose
Hook
Flange Nut
*Grommet
Nozzle
Grommet
Nozzle (x2)

14
Fig04721
Install Battery (1577249 Only)
10. Route battery cables as shown. Note: Ignition
switch and starter removed for clarity.
A.) Install a 12-volt standard lawn and garden
battery with a minimum of 10 amp hour rating
and max dimensions of 6-1/8” x 3-1/2 x 4-7/16”.
The engine will NOT run unless a battery is
installed.
The battery is to be supplied by the
customer.
B.) Following the steps below for connecting and
disconnecting the battery:
WARNING: Battery Hazards
Batteries are hazardous because they contain
caustic acid, can emit explosive gases, and can
cause electric shock. Caution must be exercised
when making connections to a battery to avoid
shock and contact with the acid, and to prevent
any sparking that could lead to an explosion.
ALWAYS follow the general battery safety rules
and instructions.
General Battery Safety Rules
ALWAYS use eye protection and protective
clothing when handling batteries.
NEVER smoke or work near sparks or other
sources of ignition.
NEVER touch both battery terminals at the same
time with your hand or any non-insulated tools.
If battery acid contacts skin or clothing, flush
immediately with water and neutralize with baking
soda.
11. Connecting the Battery
Always connect the cables in the following
sequence to avoid possible shock:
a. Connect the red cable to the positive (+)
terminal of the battery.
b. Then connect the black cable to the
negative (-) terminal of the battery.
Disconnecting the Battery
Always disconnect cables in the following sequence
to avoid possible shock.
a. Remove the battery from the battery bracket.
b. First, disconnect the black cable from the
negative (-) terminal of the battery.
c. Next, disconnect the red cable from the
positive (+) terminal of the battery.
d. Reinstall the battery strap.
Fig04719
POSITIVE CABLE
NEGATIVE CABLE
Red
Black
Bolt (x2)
Nut (x2)
*Nuts and bolts
not supplied.

15
12. Install battery and battery bracket using:
(1) Battery, Customer to Purchase Separately
(1) Battery Bracket (788911)
(4) 5/16-18 Wing Nuts (777450)
WARNING: High Pressure Fluid Injection
Hazard
High-pressure fluid discharge from leaks (even pin-sized) or
ruptured components can pierce skin and inject fluid into the
body. Injection injury can result in blood poisoning and/or
severe tissue damage leading to infection, gangrene, and
possibly amputation.
Never use a finger or skin to check for leaks.
Never operate machine with damaged or
missing hoses/parts.
Never attempt to repair a high-pressure hose or
component –Always replace it with a part that
is rated at or above the pressure rating of this
machine.
Step 3. Select Suitable Location
Moving and Handling
Moving your pressure washer around
Use the handles to manually move the pressure
washer.
Push the pressure washer in front of you has you
walk.
To turn, push down slightly on the handles and
pivot the pressure washer on its wheels.
Elevating or lowering your pressure washer
To reduce risk of injury, it is recommended that
two adults lift the pressure washer.
Only lift the pressure washer by the bumper and
handle. Do not use the pump or engine as a lifting
point.
WARNING: Lifting hazard
The pressures washer is heavy. It can crush and cause
serious injury if it rolls out of control or tips over. Follow
the instructions below for safely moving the pressure
washer.
Outdoor Use Only
1. Never run the pressure washer in an enclosed
or partially enclosed location such as a building,
garage, barn, shed, or house. These spaces
can trap poisonous gases. Running a fan or
opening windows will not provide adequate
ventilation to prevent dangerous CO build-up.
2. Only use the pressure washer outdoors and far
away from open windows, doors, and building or
vehicle vents.
3. Place the pressure washer so that the exhaust
fumes will not be directed towards people or
building air intakes.
4. Do not locate and use the pressure washer in
the presence of flammable vapors, dust, gases,
or other potentially combustible materials.
5. Ensure that working, battery-operated or battery
back-up carbon monoxide alarms are used in
any dwelling/structure that is in close proximity
to the running pressure washer.
6. Note that this pressure washer is NOT designed
or approved for use in vehicles or marine
applications. Never run the pressure washer
inside RVs or other vehicles, on boats, or on
pick-up truck beds.
Fig04722
Wing Nut
Battery
Bracket
Battery

16
Positioning:
1. The pressure washer should be positioned
on a firm, level (less than 3 degree slope),
heat-resistant surface with good drainage
and a nearby water supply.
2. The pressure washer should be placed
within garden hose distance of a continuous
water supply. Ensure that the pressure
washer sits level and will not slide or shift
during operation. If applicable, block the
pressure washer's wheels to prevent
movement.
3. Situate so there is adequate pulling room for
starting the engine using the recoil starter.
Attempting to pull at an odd angle could rip
off grip cord and/or cause muscular injuries
to the operator.
Airflow:
1. Situate so there is adequate clearance
around pressure washer to allow for airflow –
at least 7 feet from any non-combustible wall
or obstruction.
2. Do not operate with a tarp, blanket, or cover
surrounding the machine.
3. Do not place any objects against or on top of
the unit.
4. The pressure washer needs adequate,
unobstructed flow of air to allow for proper
combustion and adequate cooling. Proper
combustion can only be obtained when there
is a sufficient supply of oxygen available for
the amount of fuel being burned. Cooling
ventilation is required to prevent overheating
of the pressure washer and possible fire.
Exhaust:
WARNING: Exhaust Modification hazard
Never attempt to attach ductwork to the muffler
system to allow for installation inside an enclosure.
This could cause heat build-up and increased exhaust
back-pressure, resulting in possible exhaust leakage
or damage to the pressure washer.
1. The exhaust gas from your pressure washer
is extremely hot and can cause combustible
materials to catch on fire.
2. Make sure the engine is at least 7 feet from
all combustible materials and
buildings/structures during operation.
3. Keep a fire extinguisher rated "ABC" nearby.
Keep it properly charged and be familiar with
its use.
4. Place the unit so that the exhaust fumes will
not be directed towards people or building air
intakes.
DANGER: Carbon monoxide hazard
Exhaust fumes from the engine contain carbon
monoxide (CO), a poisonous gas you cannot see,
smell, or taste. The CO generated by the engine can
rapidly accumulate, even in areas that appear to be well
ventilated, resulting in dangerous and fatal
concentrations within minutes. NEVER run pressure
washer inside any enclosed or semi-enclosed spaces,
including homes, garages, basements, sheds, boxes,
pick-up truck beds, RVs, or boats. These spaces can
trap poisonous gases, EVEN if you run a fan or open
windows. If you start to feel sick, dizzy, or weak while
using the pressure washer, shut off the engine and get
to fresh air RIGHT AWAY. See a doctor. You may have
carbon monoxide poisoning.
Install Spark Arrestor (if Required)
Equip engine with spark arrestor if machine will be
used near any ignitable forest, brush, or grassy
land. Make sure you comply with applicable local,
state, and federal codes.

17
Operation
Follow Safety Rules for Operation
After you have checked and fueled the equipment
and positioned it in a suitable worksite, it is time to
start your pressure washer. The following are the
procedures necessary for safe, successful operation
of your pressure washer.
WARNING
Failure to follow safety rules may result in serious injury
or death to the operator or bystanders.
Instruct operators. Owner must instruct all operators in
safe set-up and operation. Do not allow anyone to
operate the pressure washer who has not read the
Owner’s Manual and been instructed on safe use
practices.
Safety equipment/controls. Always operate with all
safety covers, guards, and barriers in place and in good
working order, and all controls properly adjusted for safe
operation.
Moving parts. Keep hands, feet, hair and apparel away
from moving parts. Air vents may cover moving parts
and should be avoided as well. Never remove any
guards while the unit is operating.
Ear Protection. Hearing can be damaged from
prolonged, close-range exposure to the type of noise
produced by this pressure washer. The use of ear plugs
or other hearing protection device is recommended for
persons working within 15-20 feet of the running
pressure washer for an extended period of time.
Eye Protection. Wear ANSI/OSHA required “Z87.1”
safety glasses when operating or servicing the pressure
washer. Pressurized spray from this unit can cause
severe injury to the eyes. Small objects can become
airborne as the spray contacts them.
NOTE!
Before starting the pressure washer, review the
following general safety rules for operation:
Conditions for Use
Know how to stop. Be thoroughly familiar with proper
use of the equipment and all controls and connections.
Know how to stop the pressure washer and
depressurize system quickly if needed.
Instruct all operators. The pressure washer's owner
must instruct all operators and potential renters in safe
set-up and operation. Do not allow anyone to operate
the pressure washer who has not read the Owner's
Manual and been instructed on its safe use.
Adult control only. Only trained adults should set up
and operate the pressure washer. Do not let children
operate. Pressure washers can generate forces greater
than children can control and require judgment beyond
what can be expected of children.
Under the influence. Never operate, or let anyone else
operate, the pressure washer while fatigued or under
the influence of alcohol, drugs, or medication.
Safety equipment / controls in place. Do not operate
the pressure washer unless all safety covers, guards,
and barriers are in place and in good working order, and
all controls are properly adjusted for safe operation.
Damaged. Do not operate the pressure washer with
damaged, missing, or broken parts. Never attempt to
repair a high pressure hose or component. Always
replace it with a part that is rated at or above the
pressure rating of the machine.
Modifications. Do not modify the pressure washer in
any way or deactivate any safety device. Do not change
or add to fuel tank, fuel lines, or exhaust system.
Modifications can result in hazards related to carbon
monoxide poisoning, fuel leaks, fire, explosion or other
serious safety hazards, and will also void the warranty.
During Use
Stay alert. Watch what you are doing at all times.
Clear work area. Clear the work area of all bystanders.
Keep children and pets away.
Keep spray away from electrical wiring. Spray
contact with electrical wiring will likely result in severe
electrical shock or electrocution.
Hot exhaust/parts. Stay clear of engine exhaust.
Never touch hot engine muffler, or other hot surfaces.
All are very hot and will burn you.
Never pull by hose. Do not move this machine by
pulling on the hose. Hose or connections could fail and

18
result in catastrophic high pressure release of fluid as
well as hose whipping.
Avoid sharp objects. Keep hose away from sharp
objects. Bursting hoses may cause injury.
No load bearing. Do not use the pump to support other
items of equipment that impose unacceptable loads on
the pump. Do not attempt to use this machine as a prop.
Lock trigger safety latch when not spraying. Spray
gun is equipped with a built-in trigger safety latch to
guard against accidental trigger release. Rotate safety
latch to the locked position when not spraying.
Leaving unattended. Always turn off the pressure
washer and relieve system pressure before leaving the
sprayer unattended.
Prompt Emergency Response
Seek medical aid for suspected injection injury. If
injured by high-pressure fluid, no matter how small the
wound is, see a doctor at once. A typical injection injury
may be a small puncture wound that does not look
serious. However, severe infection or reaction can
result if proper medical treatment is not administered
immediately by a doctor who is familiar with injection
injuries.
Seek medical aid for suspected carbon monoxide
poisoning. The running engine gives off carbon
monoxide, a poisonous gas that can kill you. If you start
to feel sick, dizzy, or weak while using the pressure
washer, shut off the engine and get to fresh air RIGHT
AWAY. See a doctor. You may have carbon monoxide
poisoning.
Put on Personal Protective Gear
WARNING: Personal Protective Gear
Use personal protective gear to prevent:
-Eye and skin injection injury from high pressure spray
-Eye injury from flying debris
1. Wear waterproof gloves, safety glasses with side and
top protection, face protection, and protective
clothing when operating the machine. If spraying
pressure washer specific chemicals, wear a
respirator mask to avoid inhalation of vapors if
directed on the chemical label.
2. Wear non-slip, protective footwear. Use of pressure
washer can create puddles and slippery surfaces.
Wear footwear capable of maintaining a good grip on
wet surfaces.
Preparing for Operation
Make sure that any regular maintenance has been
performed as prescribed in “Maintenance & Repair”
section.
Check/Add Oil to Pump
CAUTION
Never run the pump without sufficient lubrication!
1. Turn off engine, allow it to cool and disconnect
the spark plug wire.
2. Twist dipstick cap until the arrow on the cap
lines up with the arrow on the breather plug
tube. Remove the dipstick from the breather
plug tube. Then remove the breather plug tube
from the pump.
3. Wipe the dipstick off with a clean dry cloth.
Insert the dipstick cap into the pump housing
and remove it. The oil level should be at least to
the lower “L” notch on the dipstick, but not
above the upper “H” notch. Add above
recommended oil as needed.

19
4. Thread the pump breather plug tube back into
the pump housing.
5. Align the arrow on the dipstick cap with the
arrow on the breather plug tube, insert it, and
twist it to secure. Reconnect the spark plug.
6. If oil level is low, use the following:
Model
Oil Type
1577149
1577249
SAE 30 non-detergent pump
oil (#35605)
1. Replace fill cap.
Check/Add Engine Oil
Use the recommended oil type for your engine and
expected ambient conditions. (See engine “Engine
Manual” section for oil type and capacity, and more
detailed oil check/fill instructions.)
WARNING: Burn Hazard
Never open oil port while engine is running. Hot oil can
spray over face and body.
Notes:
Engine is shipped without oil. You must add oil
before first use.
Add Fuel
WARNING: Fuel Fire/Explosion Hazard
Gasoline is highly flammable and explosive. Heat,
sparks, and flames can ignite fuel vapors, which can
become widespread during fueling. A flash fire
and/or explosion could result and cause serious
injury or death. Always use extreme care when
handling fuels. Carefully follow all instructions to
avoid the following conditions which could result in
fuel ignition:
gas vapor collection inside enclosures
static electric sparks
sparks from electric wiring, batteries, or running
engines
sources of heat (such as a hot engine exhaust)
open flames, including pilot lights
Always follow these general safety rules when
fueling:
1) Turn pressure washer off and allow to cool for at
least two minutes before removing any fuel cap.
Note: A running or still-hot engine is hot enough to
ignite fuel.
2) Fill fuel tank OUTDOORS –never indoors. Fuel
vapors can ignite if they collect inside and
enclosure and explosion can result.
3) Stay away from all sources of heat, sparks, and
flames. Do not smoke.
4) Never pump fuel directly into the gas tank at a
gas station –it could cause a static electric
spark. Follow these steps to avoid static electric
sparking during fueling:
Use an approved portable container to
transfer fuel to the pressure washer's tank. (A
portable container made of metal or
conductive plastic is preferred because it
dissipates charge to ground more readily.)
Always place container on the ground to be
filled. Never fill the portable gas container
while it is sitting inside a vehicle, trailer, trunk,
or pick-up truck bed.
Dissipate static charge from your body before
beginning the fueling process by touching a
grounded metal object at a safe distance from
fuel sources.
Keep nozzle in contact with container while
filling. Do not use a nozzle lock-open device.
5) Clean up fuel spills/splashes immediately.
If possible, move the pressure washer away
from spilled fuel on the ground.
Wipe up spilled fuel and wait 5 minutes for
excess fuel to evaporate before starting
engine.
Fuel soaked rags are flammable and should
be disposed of properly.
If fuel is spilled on your skin or clothes,
change clothes and wash skin immediately.
.
Fill Engine Fuel Tank
Check the gasoline tank level. If needed, fill
tank with fresh unleaded gasoline from a portable
container:
1) Remove engine gas cap.
2) Add gasoline through the fill opening:
Use only a UL-approved portable gasoline
container to transfer the gasoline to engine's
tank.
Do NOT overfill the gasoline tank. Allow at
least 1/2" of empty space below the fill neck to
allow for fuel expansion.
3) Replace gas cap securely before starting
engine.

20
4) Store extra gasoline in a cool, dry place in a UL
approved tightly sealed container.
Inspect Fuel System/Check for Leaks
Inspect the engine fuel system and check for leaks
before each use.
Do not start pressure washer until all needed repairs
have been completed.
WARNING: Fuel Leak Hazard
Gasoline fuel is highly explosive and fuel leaks
can result in fire or explosions. You can be
burned and seriously injured if the fuel system is
not properly hooked up or there is a fuel leak
when you start the engine.
Inspect the entire fuel system. Look for:
signs of leaks or deterioration
chafed or spongy fuel hose
loose connections
loose or missing fuel hose clamps
damaged fuel tank or
defective gasoline shut-off valve
Inspect Spray System
Always inspect spray system for damage and leaks
before each use. Do not start pressure washer until all
needed repairs have been completed.
WARNING: High Pressure Fluid
Injection Hazard
High-pressure fluid discharge from leaks (even pin-
sized) or ruptured components can pierce skin and
inject fluid into the body. Injection injury can result in
blood poisoning and/or severe tissue damage leading
to infection, gangrene, and possibly amputation.
Never use a finger or skin to check for leaks.
Never operate machine with damaged or missing
hoses/parts.
Never attempt to repair a high-pressure hose or
component –Always replace it with a part that is
rated at or above the pressure rating of this
machine.
Perform Scheduled Maintenance, As needed
Make sure that any other regular maintenance has been
performed as prescribed in this manual in the
"Maintenance Schedule Summary" section.
Refer to the “Engine Manual” section for engine
maintenance instructions.
Connect Hoses, Water Supply, and Spray
Nozzle
Position pressure washer for use
For detailed instruction on positioning your pressure
washer for use, turn to the “Initial Set-Up” section of
this manual and reference “Step 3: Select Suitable
Location”.
Where no flammable vapors, dusts, and gases are
present.
Where there is adequate, unobstructed ventilation
airflow.
With adequate clearance from combustible
materials.
On a firm, level, heat-resistant surface with good
drainage and nearby access to a continuous water
supply.
Attach Garden Hose to Water Inlet
1.) Make sure the water supply is clean. Debris can
cause excess pump wear and reduce performance.
2.) An insufficient water supply will damage your
pump. Make sure the water supply is steady and is
20% over the rated flow of your pump. Use a
stopwatch to time how long it takes to fill a 5-gallon
bucket with your garden hose. The bucket must fill
faster than the times listed in the table below.
Model
Time to fill 5 gallon bucket
1577149
100 seconds
1577249
100 seconds
3.) The water supply garden hose must have an inside
diameter of at least 5/8”. If the hose is more than
100 ft. long, the diameter must be at least 3/4”.
4.) Never use a reservoir tank as a water source.
Drawing water out of a tank may cause pump
cavitation and damage to your pump. This
pressure washer is designed for a pressurized
water source such as a city water faucet. However,
the water source pressure must not exceed 115 psi
(8 bar).
5.) Always use a flexible rubber hose for your water
supply. Do not use rigid piping.
This manual suits for next models
2
Table of contents
Other Powerhorse Pressure Washer manuals

Powerhorse
Powerhorse PPW2000 User manual

Powerhorse
Powerhorse 157055 User manual

Powerhorse
Powerhorse M750143E User manual

Powerhorse
Powerhorse M1577110E User manual

Powerhorse
Powerhorse PPW2300 User manual

Powerhorse
Powerhorse M157711C.1 User manual

Powerhorse
Powerhorse 106167 User manual

Powerhorse
Powerhorse M157711A.4 User manual

Powerhorse
Powerhorse M45811F User manual

Powerhorse
Powerhorse 89897 User manual