Powersmart PS22 User manual

INSTRUCTION MANUAL
1300 PSI Electric Pressure Washer
Model # PS22
Have product questions or need technical support? Please feel free to contact us!
Website: www.Amerisuninc.com
Toll free: 1-800-791-9458 M-F 8-4 CST

2

3
CONTENTS
Technical data…...………………………………………………………... 3
General safety rules…….………………………………………………... 4
Specific safety rules for pressure washer...………………………………. 5
Electrical information…………………………………………………... 6
Knowing your pressure washer...………………………………………… 7
Assembly and adjustments……………………………………………… 8
Operation………………………………………………………………... 9
Storage…………………………………………………………………… 12
Maintenance……………………………………………………………... 13
Exploded view & parts list……………………………………………… 14
Warranty………………………………………………………………… 17
TECHNICAL DATA
Pressure Washer Model # PS22
Motor: 120V, 60 Hz, 11A
Power cable length: 35 feet with GFCI
Motor speed: 1,7000 RPM
Max. pressure: 1300 PSI
Rated pressure: 1000 PSI
Max. water flow: 1.2 GPM
Detergent bottle capacity: 0.13 Gallon
High pressure hose length: 20 Feet
Inlet water pressure: 40-60 PSI
Weight: 18.6 lb.
Warning! We strongly recommend that this item not be modified and/or used for any application
other than that for which it was designed. If you have any questions relative to its application, do not
use the equipment until you have consulted us and we have advised you.
Contact Power Smart at (800)791-9458 M-F 8am-4pm CST
Thank you for purchasing Power Smart products. Please register online at
www. Amerisuninc.com.
The information will allow us to track your warranty and update on your unit.
Important: Our company does not provide email or personal information to any third party for any
reason. For any questions check our website or call customer service at (800)791 9458.

4
GENERAL SAFETY RULES
Safety is a combination of common sense, staying alert, and knowing how your pressure washer works.
SAVE THESE SAFETY INSTRUCTIONS.
WARNING: To avoid mistakes that could cause serious injury, do not plug in pressure
washer until the following steps have been read and understood.
WARNING: This appliance is not intended for use by children or by unassisted,
unsupervised persons whose physical, sensory or mental capabilities prevent them from
using it safely. Children should be supervised to ensure that they do not play with the
appliance.
Before starting up your machine, please check it carefully for any defects. If you find any, do not start up
your machine. Please call Power Smart customer service at 1-800-791-9458 M-F 8-4 CST.
WARNING: When using the pressure washer, basic safety precautions should always be
followed to reduce the risk of fire, electric shock, and personal injury. These include:
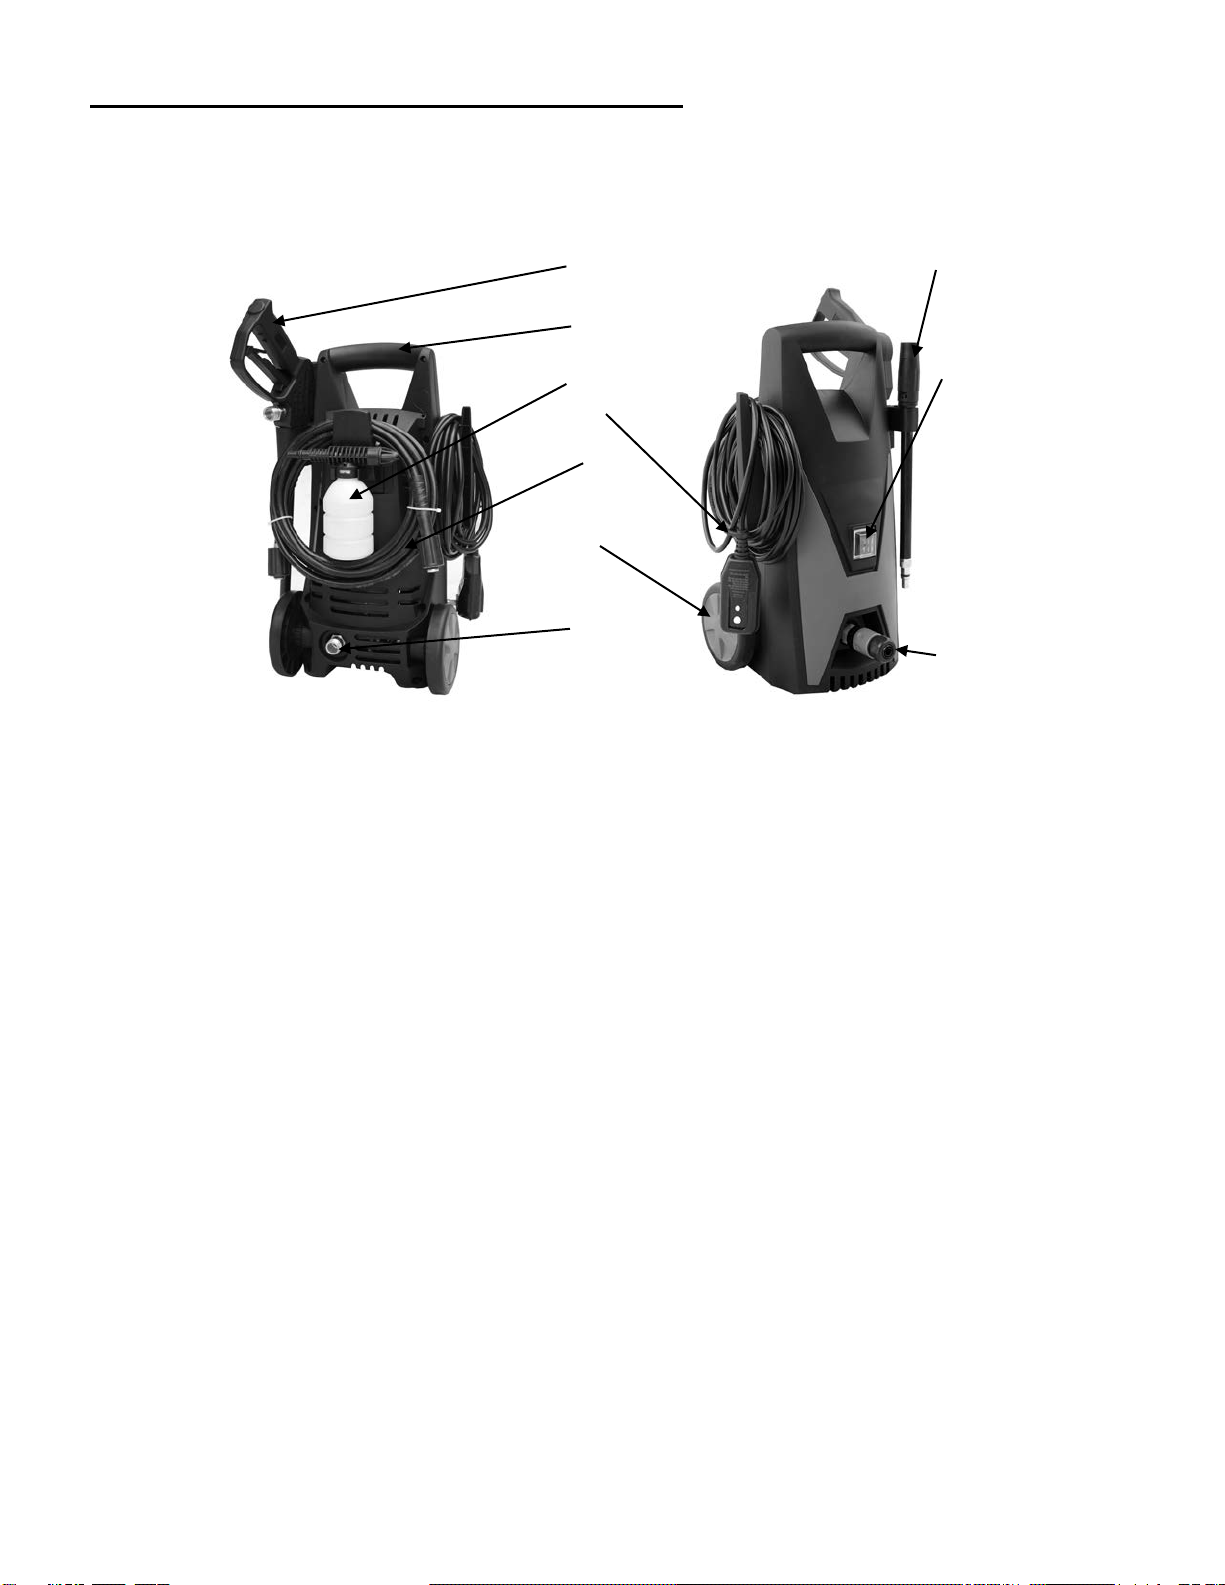
•Know your product – Know how to stop the machine and bleed pressure quickly. Thoroughly
familiarize yourself with the controls.
•Keep bystanders away – All visitors and pets should be kept a safe distance away from the work
area.
•Use the right product – Do not use this machine for any job except that for which it is intended.
•Dress properly – Do not wear loose clothing or jewelry. They can get caught in moving parts.
Protective rubber gloves and non-slip footwear are recommended when working outdoors.
CAUTION! – Exercise caution to avoid slipping or falling. Wear protective footwear that will protect
your feet and improve your footing on slippery surfaces.
•Stay alert – Watch what you are doing. Use common sense. Do not operate the pressure washer
when you are tired, or under the influence of alcohol or drugs.
•Do not overreach – Keep proper footing and balance at all times.
•Avoid unintentional starting – Do not carry a plugged in machine with your finger on the
trigger. Make sure the switch is off before plugging in the machine.
•Do not abuse the cord – Never carry the machine by the cord or yank the cord to disconnect it
from the receptacle. Keep the cord away from heat, oil, and sharp edges.
•Use safety glasses – Also use safety footwear, snug-fitting clothing, protective gloves, hearing
and head protection.
•Check the water temperature – This pressure washer is not meant to pump hot water. NEVER
connect it to a hot water supply as it will significantly reduce the life of the pump.
•Store indoors – NEVER store the pressure washer outdoors or where it could freeze. The pump
could be seriously damaged.
WARNING: High-pressure jets can be dangerous if subject to misuse. The jet must not be directed at
persons, pets, live electrical equipment, or the appliance itself.
•Do not direct the jet at yourself or others in order to clean clothes or footwear.
•Risk of explosion – Do not spray flammable liquids.

5
SPECIFIC SAFETY RULES FOR PRSSURE WASHER
WARNING: Do not operate your pressure washer until it is completely assembled and
installed according to the instructions.
It is very important to bleed the gun before using the pressure washer. Squeeze the trigger to allow any air
that is trapped inside of the unit and hose to escape. Continue to squeeze trigger until a steady stream of
water comes from the nozzle.
Keep operating area clear off all persons.
Before each use pressure must be released! Trigger on wand then start the washer.
Do not overreach or stand on unstable support. Keep good footing and balance at all times.
Follow the maintenance instructions specified in the manual.
To reduce the risk of electrocution, don’t start and run the machine in the rain or storm. Keep all
connections dry and off the ground. Do not touch plug with wet hands. It is strictly prohibited to let water
leak into the machine.
When the machine is turned on, the interior pumps start and continue to run even if the pressure wand
trigger has not been depressed. Running the machine for more than 3 minutes without depressing the
pressure wand trigger could cause heat damage to the motor and pumps, please do not leave the machine
running unattended or unused for more than 3 minutes.
When the machine is running, please maintain a constant water supply. Without water circulation will
damage the sealing rings of the machine.
It is necessary to turn on the spray lance within one or two minutes after the machine has been started.
Otherwise, the temperature of the circulating water within the machine will soon rise to a critical point,
which will cause damage to the sealing rings inside the machine.
Don’t start and run the machine in a place excessively cold so as to prevent the machine from freezing.
This appliance has been designed for only using cleaning water, do not use corrosive chemicals.
Do not use the appliance within the range of people
Do not direct the jet against yourself or others in order to clean clothes or footwear.
Disconnect from the electrical power supply before carrying out user maintenance.
To ensure the appliance safety to please use only original spare parts from the manufacturer or approved
by the manufacturer. Do not use the machine before you change them if they are damaged.
WARNING: Do not expose to rain or use in damp locations.

6
ELECTRICAL INFORMATION (CONTINUED)
Guidelines for using extension cords
Make sure your extension cord is in good condition. When using an extension cord, be sure to use one
heavy enough to carry the current your product will draw. An undersized cord will cause a drop in line
voltage resulting in loss of power and overheating. The table below shows the correct size to be used
according to cord length and nameplate ampere rating. If in doubt, use the next heavier gauge. The
smaller the gauge number, the heavier the cord.
Minimum Gauge for Extension Cords (AWG)
(When using 120 V only)
Ampere Rating
Total Length of Cord in feet
More Than
Not More Than
25
50
100
150
0
6
18
16
16
14
6
10
18
16
14
12
10
12
16
16
14
12
12
16
14
12
Not Recommended
Make sure your extension cord is properly wired and in good condition. Always replace a damaged
extension cord or have it repaired by a qualified person before using it.
Protect your extension cords from sharp objects, excessive heat and damp or wet areas.
Use a separate electrical circuit for your tools. This circuit must not be less than a #12 wire and should be
protected with a 15 A time-delayed fuse. Before connecting the motor to the power line, make sure the
switch is in the OFF position and the electric current is rated the same as the current stamped on the motor
nameplate. Running at a lower voltage will damage the motor.
WARNING: This tool must be grounded while in use to protect the operator from electric
shock.

7
KNOWING YOUR PRESSURE WASHER
1
Gun
6
Wheel
2
Carrying handle
7
Water outlet
3
Detergent kit
8
Adjustable spray wand
4
Power cord
9
ON/OFF switch
5
Water hose
10
Water inlet
1
2
3
4
5
6
7
8
9
10

8
ASSEMBLY AND ADJUSTMENTS
Unpacking
Unpack the pressure washer and all its parts, and compare against the list below. Do not discard the
carton or any packaging until the pressure washer is completely assembled.
1
Gun
2
Adjustable wand
3
Inlet quick connector
4
Detergent kit (not shown)
Connect high pressure hose
1. Connect the 35 feet high pressure hose to the water outlet (1) on
the pressure washer.
2. Connect another end of high pressure hose to the gun.
1
2
3
1

9
ASSEMBLY AND ADJUSTMENTS (CONTINUED)
Connect the garden hose to pressure washer
Connect the garden hose adaptor (female coupler) to the water inlet of the
pressure washer, then thread your garden hose (male end) into the garden hose
adaptor. You may need take the male connector of from the quick connector.
The garden hose must have an internal diameter of at least 13 mm (1/2 in.) and
must be reinforced. The water supply must be at least equal to the washer
delivery capacity.
Setup water gun
The pressure washer is equipped with an adjustable Spray wand.
Fit the wand into the gun and rotate it until the two parts are completely locked.
OPERATION
Automatic ON/OFF
The motor on this pressure washer does not run continuously. It only runs when the trigger of the spray
gun is squeezed.
Bleeding the gun
It is very important to bleed the gun before using the pressure washer. Squeeze the trigger to allow any air
that is trapped inside of the unit and hose to escape. Continue to squeeze trigger until a steady stream of
water comes from the nozzle. (This process may take up to 2 minutes).
Using the spray gun
Flip the lock tab behind the trigger up or down until it clicks to apply or remove the safety. Pull back on
the trigger to begin operating pressure washer. To stop water flow, release trigger.
NOTE: The motor only runs when the trigger is operated and shuts off when the trigger is released.

10
OPERATION (CONTINUED)
Using the adjustable wand
WARNING! High-pressure jets can be dangerous
if subject to misuse. The jet must not be directed at
persons, pets, live electrical equipment, or the
appliance itself.
1. The washer is equipped with an adjustable nozzle.
2. The water pressure can be adjusted from low pressure
(–) to high pressure (+) by turning the pressure
adjustment knob. The nozzle tip can be adjusted from
pencil spray (wide open tip) to fan spray (narrow tip)
by turning the nozzle tip adjustment knob.
WARNING! Do not adjust the nozzle while the trigger is squeezed. Failure to do so could
result in damage.
Working with detergent kit
When cleaning with the pressure washer, some cleaning tasks can be solved with water alone, but for
most tasks cleaning with detergent allows for more effective dirt removal.
WARNING! Use only detergents specifically designed for use with pressure washers. DO
NOT USE household detergents, acids, alkaline solutions, bleaches, solvents, flammable
material, or industrial grade solutions. These could damage the pressure washer.
CAUTION! Always test the detergent in an inconspicuous area before use.
1. Unscrew the top of detergent kit and fill the bottle with detergent.
2. Replace top on detergent kit.
3. Remove the wand from gun.
4. Attach detergent kit to gun.
5. Apply detergent so it thoroughly covers cleaning surface. Apply from bottom to top to prevent
detergent from sliding down and streaking.
6. Allow detergent to remain on the surface for a few minutes. This is a good time to use a brush to
lightly scrub heavily soiled areas. Never allow detergent to dry on the cleaning surface.
7. Remove detergent kit from gun and replace with the wand.
8. Rinse detergent from surface.
NOTE: Flush detergent kit with clear water following each use.
CAUTION! Damage may occur to painted surfaces if the detergent is allowed to dry on the
surface. Wash and rinse a small section at a time. Avoid working on hot surfaces or in direct
sunlight.

11
OPERATION (CONTINUED)
1. Rinse with clean water under high pressure. When working on a vertical surface, rinse from the
bottom up, then rinse from the top down to avoid streaking. Hold the nozzle 6-8 inches away from
the work surface at a 45° angle.
2. When you have finished using the detergent injection system, refill it into fresh water. Siphon
water at low pressure for one minute so that all the detergent is flushed through the system.
CAUTION! Failure to follow these cleaning instructions will cause the injection system to
become clogged and inoperable.
Shutting down
1. Turn the switch to the OFF position and unplug the power cord from the outlet.
2. Turn off the water source.
3. Hold the trigger to release water pressure.
4. Disconnect the garden hose from the water inlet on the unit.
5. Disconnect the high-pressure hose connection on the trigger gun handle.
6. Release the trigger and engage the gun safety lock.
WARNING! Turn off the water supplyand squeeze the trigger to depressurize the unit. Failure
to do so could result in personal injury due to discharge of high-pressure water.

12
Storage
CAUTION! Always store your pressure washer in a location where the temperature will not
fall below 32ºF (0ºC). The pump in this machine is susceptible to permanent damage
if it freezes. FREEZE DAMAGE IS NOT COVERED BY THE WARRANTY.
Store the pressure washer indoors in a dry, covered area where it is not subject to adverse weather
conditions.
It is important to store this product in a frost-free area.
Always empty water from all hoses, the pump, and the detergent tank before storing.
CAUTION! The use of a pump protector is recommended to prevent cold weather damage
during storage over the winter months.
Winterizing and long-term storage
If you must store your pressure washer in a location where the temperature falls below 32ºF, you can
minimize the chance of damage to your machine by utilizing the following procedure:
1. Disconnect all water connections.
2. Turn on the machine for a few seconds until the remaining water in the pump exits. Turn off
immediately.
3. Do not allow the high-pressure hose to become kinked.
4. Store the machine and accessories in a room that does not reach freezing temperatures.
5. Do not store near a furnace or other sources of heat that may dry out the pump seals.
6. Operate the pressure washer with non-corrosive/non-toxic anti-freeze, a pump saver, or a pump
protector before storing for the winter.
WARNING! Before reusing, completely flush the unit with clear water. Anti-freeze products
can damage paintwork, so you must ensure there is no anti-freeze left in the system before
using it again.

13
MAINTENANCE
WARNING! Before working on the pressure washer, disconnect the plug from the power
supply socket.
1. To ensure good performance, check and clean the water inlet
filter. Remove the filter and rinse with warm water to prevent
any foreign matter from clogging the pump.
2. Clean the nozzle with the tip cleaner provided. Remove the
spray wand from the gun; remove any dirt from the nozzle hole
and rinse.

14
EXPLODED VIEW & PARTS LIST

15
Item
Stock #
Description
Qty
Item
Stock #
Description
Qty
1
PS22-101
Water Outlet Joint
1
32
PS22-132
Screw M6x25
4
2
PS22-102
Spring
1
33
PS22-133
Spring Washer 6
4
3
PS22-103
O-Ring 22x2.4
1
34
PS22-134
Pump Body
1
4
PS22-104
Blocking
1
35
PS22-135
O-Ring 58x2.65
1
5
PS22-105
O-Ring 5x1.8
1
36
PS22-136
O-Ring 10x1.5
6
6
PS22-106
Valve Core
1
37
PS22-137
Inlet & Outlet Valve Seat
6
7
PS22-107
Valve Core Spring
1
38
PS22-138
Inlet & Outlet Valve Core
6
8
PS22-108
Jacket
1
39
PS22-139
Inlet & Outlet Valve
6
9
PS22-109
O-Ring 4.5x1.8
1
40
PS22-140
Inlet & Outlet Valve Spring
6
10
PS22-110
O-Ring 16x2.4
1
41
PS22-141
O-Ring 12x1.9
6
11
PS22-111
Piston
1
42
PS22-142
Inlet & Outlet Valve Cap
6
12
PS22-112
Piston Spring
1
43
PS22-143
Y-Ring 12x20x5
3
13
PS22-113
Piston Seat
1
44
PS22-144
O-Ring 24x1.9
3
14
PS22-114
O-Ring 5.6x1.8
1
45
PS22-145
Middle Set
3
15
PS22-115
O-Ring 12x1.8
1
46
PS22-146
O-Ring 16x1.9
3
16
PS22-116
Valve Seat
1
47
PS22-147
In The Interval Set
3
17
PS22-117
Pump Head
1
48
PS22-148
Skeleton Seal 12x20x4
3
18
PS22-118
Screw M6x25
2
49
PS22-149
Plunger Spring
3
19
PS22-119
Spring Washer 6
3
50
PS22-150
Plunger
3
20
PS22-120
Screw M6x35
1
51
PS22-151
Plunger Clip
3
21
PS22-121
O-Ring 18x2.4
1
52
PS22-152
Bearing 51107B
1
22
PS22-122
Water Inlet Joint
1
53
PS22-153
Screw M8x20
1
23
PS22-123
Filter
1
54
PS22-154
Bearings Seat
1
24
PS22-124
Push Rod
1
55
PS22-155
Bearing 6302
1
25
PS22-125
Spring
1
56
PS22-156
Reinforced Seal
1
26
PS22-126
Washer
1
57
PS22-157
Connecting Seat
1
27
PS22-127
Y-Ring 4x11x2.5
1
58
PS22-158
Gear Shaft
1
28
PS22-128
O-RING 22x1.9
1
59
PS22-159
Gear
1
29
PS22-129
Connecting Nut
1
60
PS22-160
Bearing 629
1
30
PS22-130
Switch Cover
1
61
PS22-161
O-Ring
1
31
PS22-131
Micro Switch
1
62
PS22-162
Motor
1

16
EXPLODED VIEW & PARTS LIST (CONTINUED)
Item
Stock #
Description
QTY
1
PS22-201
Wheel cover
2
2
PS22-202
Wheel
2
3
PS22-203
Wheel supporter
2
4
PS22-204
Bottom cover
1
5
PS22-205
Hose supporter
1
6
PS22-206
Soap bottle
1
7
PS22-207
Hose
1
8
PS22-208
Gun supporter
1
9
PS22-209
Bottom heat insulation plate
1
10
PS22-210
Left motor cover
1
11
PS22-211
Switch
1
12
PS22-212
Switch jacket
1
13
PS22-213
Cable & GFCI Plug
1
14
PS22-214
Top heat insulation plate
1
15
PS22-215
Decoration plate
1
16
PS22-216
Top cover
1
17
PS22-217
Right motor cover
1
18
PS22-218
Waterproof cap
1
19
PS22-219
Spray gun
1
20
PS22-220
Quick connector
1
21
PS22-221
Cleaning pin
1

17
ONE (1) YEARS LIMITED WARRANTY
PowerSmart®is committed to building tools that are dependable for years. Our warranties are consistent with our
commitment and dedication to quality.
ONE (1) YEAR LIMITED WARRANTY OF POWER SMART PRODUCTS FOR HOME USE.
Power Smart (“Seller") warrants to the original purchaser only, that all Power Smart consumer power tools will be
free from defects in material or workmanship for a period of one (1) year from date of purchase. Ninety (90) days
for all Power Smart Products, if the tool is used for professional or commercial use.
SELLER’S SOLE OBLIGATION AND YOUR EXCLUSIVE REMEDY under this One (1) Year Limited
Warranty and, to the extent permitted by law, any warranty or condition implied by law, shall be the repair or
replacement of parts, without charge, which are defective in material or workmanship and which have not been
misused, carelessly handled, or misrepaired by persons other than Seller or Authorized Service Center. To make a
claim under this Limited Warranty, you must return the entire power tool product; transportation prepaid, to Power
Smart Include a legible copyof the originalreceipt, which lists the date of purchase (month and year) and the name
of the company purchased from.
THIS LIMITED WARRANTY DOES NOT APPLY TO ANY ACCESSORY ITEMS INCLUDED WITH THE
TOOL SUCH AS CIRCULAR SAW BLADES OTHER RELATED ITEMS OR TO ANY REPLACEMENT
PARTS LISTED UNDER MAINTENANCE.
ANY IMPLIED WARRANTIES SHALL BE LIMITED IN DURATION TO ONE (1) YEAR FROM DATE OF
PURCHASE. SOME STATES IN THE U.S. AND SOME CANADIAN PROVINCES DO NOT ALLOW
LIMITATIONS ON HOW LONG AN IMPLIED WARRANTY LASTS, SO THE ABOVE LIMITATION MAY
NOT APPLY TO YOU.
IN NO EVENT SHALL SELLER BE LIABLE FOR ANY INCIDENTAL OR CONSEQUENTIAL DAMAGES
(INCLUDING BUT NOT LIMITED TO LIABILITY FOR LOSS OF PROFITS) ARISING FROM THE SALE
OR USE OF THIS PRODUCT. SOME STATES IN THE U.S. AND SOME CANADIAN PROVINCES DO NOT
ALLOW THE EXCLUSION OR LIMITATION OF INCIDENTAL OR CONSEQUENTIAL DAMAGES, SO
THE ABOVE LIMITATION OR EXCLUSION MAY NOT APPLY TO YOU.
THIS LIMITED WARRANTY GIVES YOU SPECIFIC LEGAL RIGHTS, AND YOU MAY ALSO HAVE
OTHER RIGHTS WHICH VARY FROM STATE TO STATE IN THE U.S., PROVINCE TO PROVINCE IN
CANADA AND FROM COUNTRY TO COUNTRY.
For questions / comments, technical assistance or repair parts –
Please call toll free at: 1-800-791-9458 (M-F 8am – 4pm CST)
Email: support@amerisuninc.com
SAVE YOUR RECEIPTS. THIS WARRANTY IS VOID WITHOUT THEM.
Table of contents
Other Powersmart Pressure Washer manuals