PRECILUM TRILOBIT 600 RGB/RGBW/RGBA User manual

TRILOBIT
Lenght = 600/900/1200
INSTRUCTIONS MANUAL
RGB/RGBW/RGBA
DMX/RDM elect onic on boa d
TABLE OF CONTENTS
WWW.PRECILUM.COMTRILOBIT RGB / RGBW / RGBA INSTRUCTIONS
MANUAL v1.1
1
1. INTRODUCTION
2. SAFETY AND OPERATION
3. INSTALLATION
4. CONNECTION DIAGRAMS
5. CARE AND MAINTENANCE
6. TECHNICAL SPECIFICATION
7. WARRANTY STATEMENT
2
6
7
12
13
14
15
FOR YOUR OWN SAFETY PLEASE READ THIS INSTRUCTION
MANUAL CAREFULLY BEFORE BEGINNING SETUP AND
INSTALLATION.
LED
Elect ostatic Sensitive Device
(EDS)

1. INTRODUCTION
WWW.PRECILUM.COMTRILOBIT RGB / RGBW / RGBA INSTRUCTIONS
MANUAL v1.1
2
The modules generate colored light by means of the high power LEDs.
The products were designed for exterior use and they are ideal for
locations where effect lighting with long lifetime is required. The
TRILO IT range combines LED technology with a balanced design
profile to create truly specific lighting systems. Using precision
manufacturing techniques the TRILO ITE provides professional
solutions for your lighting requirements. Also, it has a passive cooling
for optimum thermal management.
It made using highest quality materials and construction methods,
bringing the flexibility to outdoor application. This powerful lighting
fixture is ideally suited to use in landscape and building illumination
and IP66 ensures safe operation in even the most demanding areas.
1.1 About the p oduct
1. INTRODUCTION
WWW.PRECILUM.COMTRILOBIT RGB / RGBW / RGBA INSTRUCTIONS
MANUAL v1.1
3
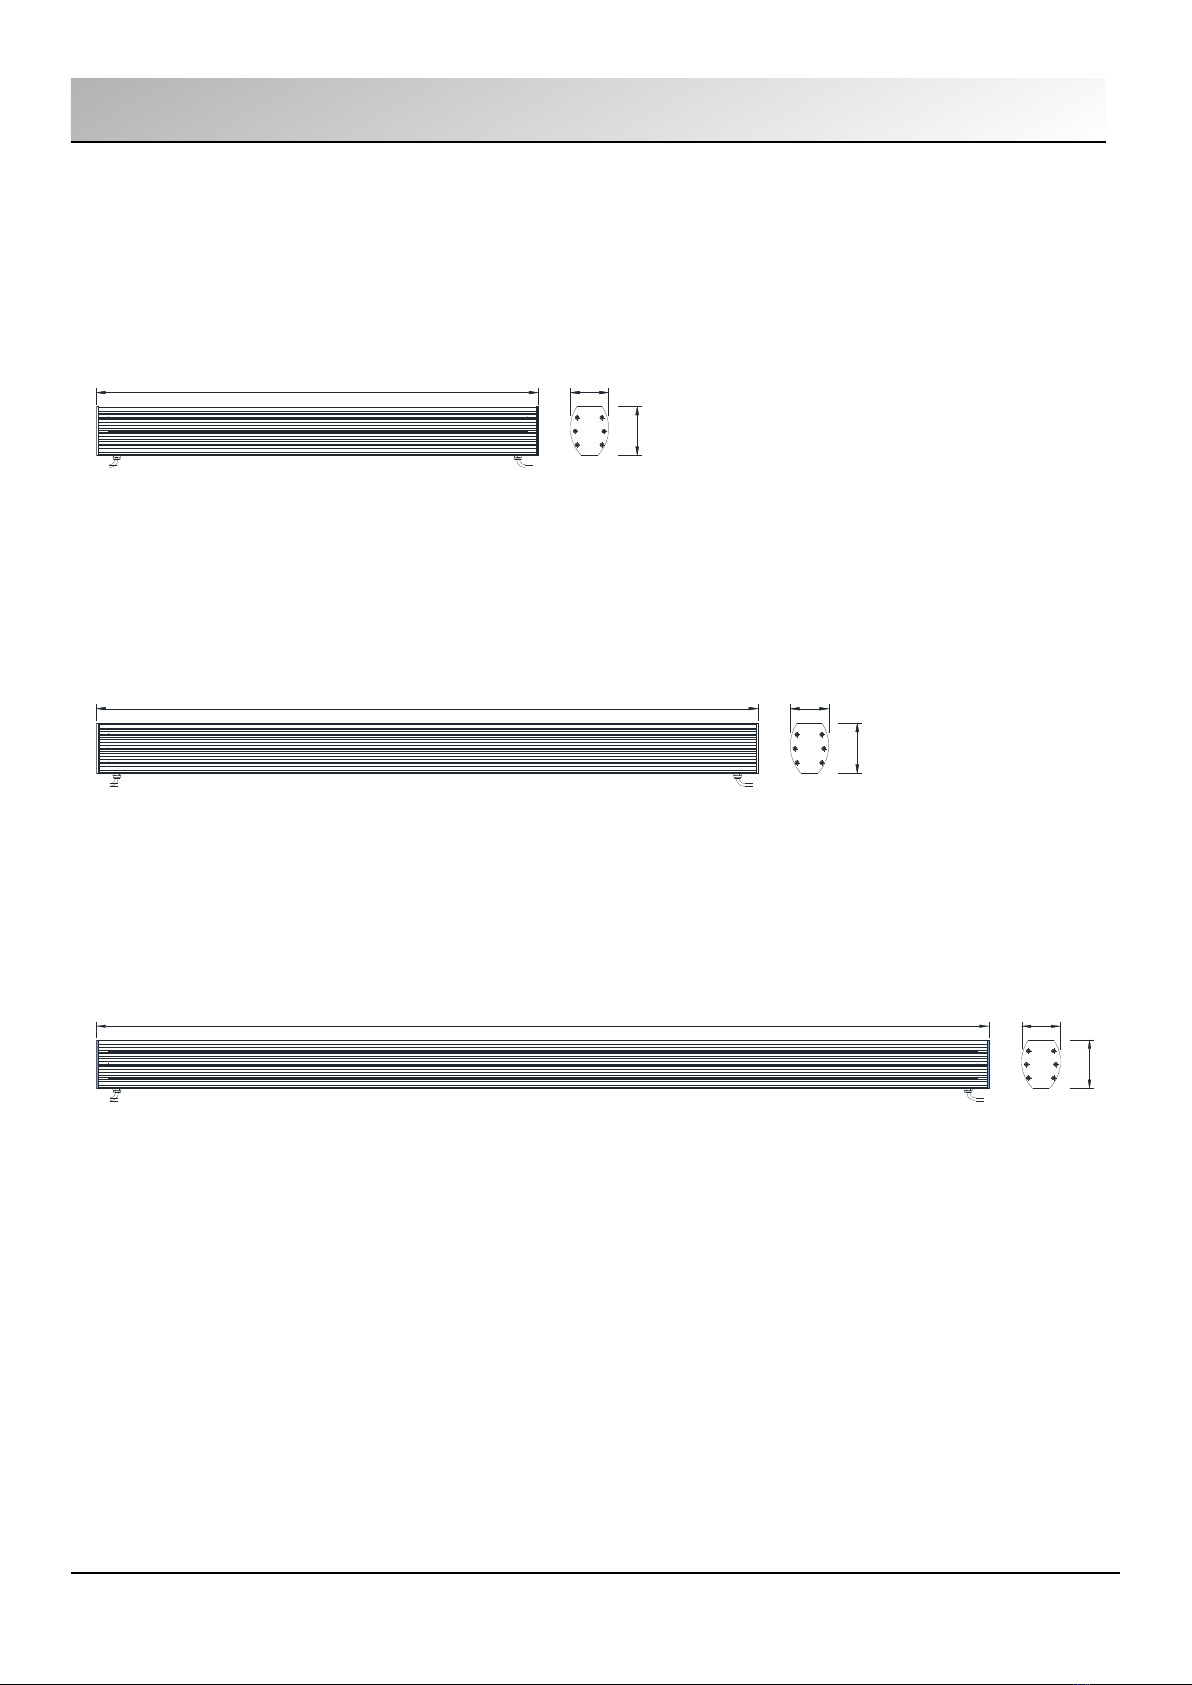
1.2 Dimensions of fixtu e
Lenght = 900 mm
Lenght = 1200 mm
Lenght = 600 mm
70
5112001200
600 51
70
900 51
70

200 - 300
min. 285
max. 385
110
25
1. INTRODUCTION
WWW.PRECILUM.COMTRILOBIT RGB / RGBW / RGBA INSTRUCTIONS
MANUAL v1.1
4
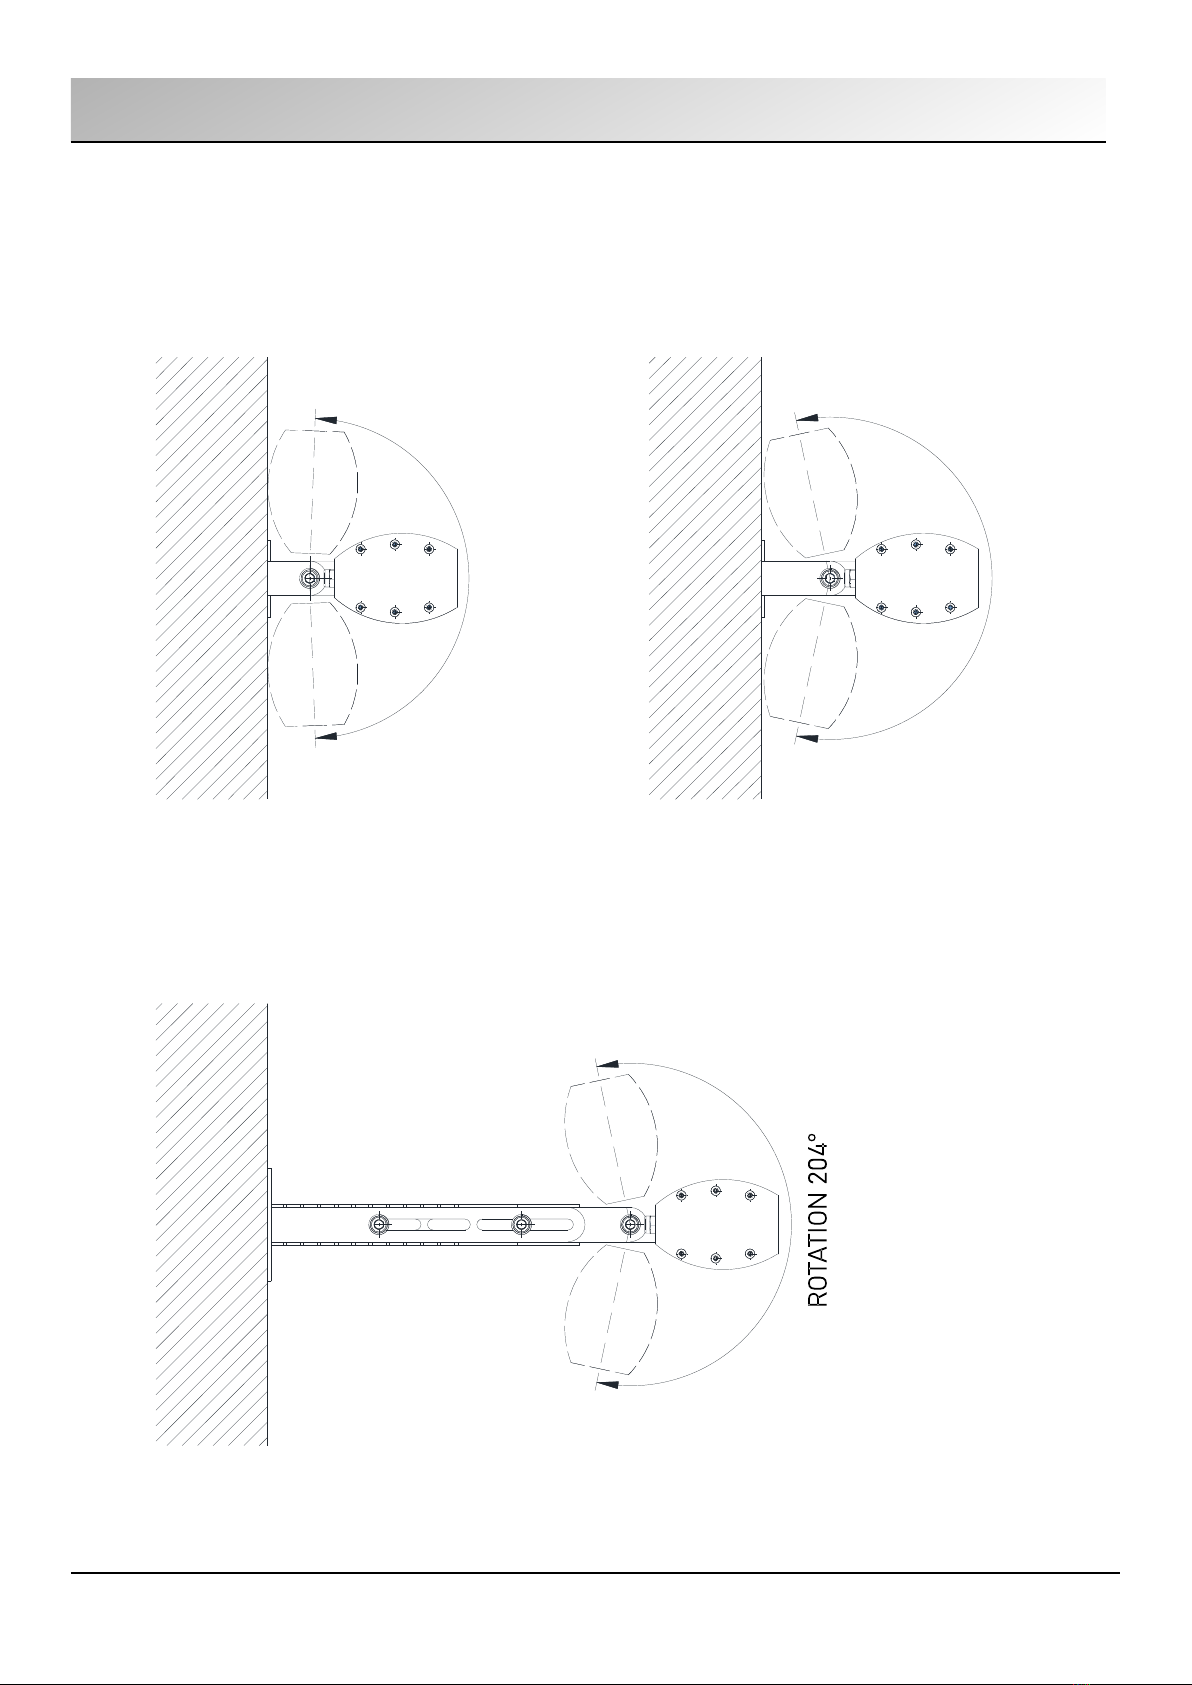
1.3 Dimensions of hanging b acket
4,8 4,888
113,5
31,8
45
R2,6
1.3.1 Fixed b acket (Standa d zinced o on equest stainless steel)
1.3.2 Adjustable b acket
125
40
racket 25 mm: racket 40 mm:
racket 200 - 300 mm:
4,5
66 66 4,54,5
160
51,5
66
R2,75
1. INTRODUCTION
WWW.PRECILUM.COMTRILOBIT RGB / RGBW / RGBA INSTRUCTIONS
MANUAL v1.1
5
1.3.3 Fixation methodes
ROTATION 176°
ROTATION 204°
racket 40 mm:racket 25 mm:
racket 200 - 300 mm:

●Consider the respective national norms during the installation!
●Do not install the fixture near high inflammable liquids or materials.
●Do not looking directly into the LED light beam at close range.
●Turn off the power prior to light fixture installation!
●The light fixture may be installed only by a qualified person!
●The light fixture must be wired according to respective electrical
standards.
●The manufacturer shall not be liable for any modifications of the
product of incorrect installation of the product.
●Never install the luminaire on rain, fog or high humidity.
2. SAFETY AND OPERATION
WWW.PRECILUM.COMTRILOBIT RGB / RGBW / RGBA INSTRUCTIONS
MANUAL v1.1
6
CAUTION - DANGEROUS OLTAGE CONSTITUTING A RISK OF
ELECTRIC SHOCK IS PRESENT WITHIN THIS UNIT!
CAUTION - THE POWER SUPPLY MUST BE UNPLUG FROM THE
MAINS POWER BEFORE CONNECTING ANY CABLES TO A OID
DAMAGING THE PRODUCT!
CAUTION – FOR YOUR OWN SAFETY A OID LOOKING DIRECTLY
INTO THE LED LIGHT SOURCE!
ANY PERSONS WHO INSTALLING THIS PRODUCT MUST BE
QUALIFIED FOR THE HANDLING OF ELECTRICAL
EQUIPMENT AND INSTALLATION MUST BE PERFORMED WITH
LOCAL STANDARTS AND REGULATIONS!

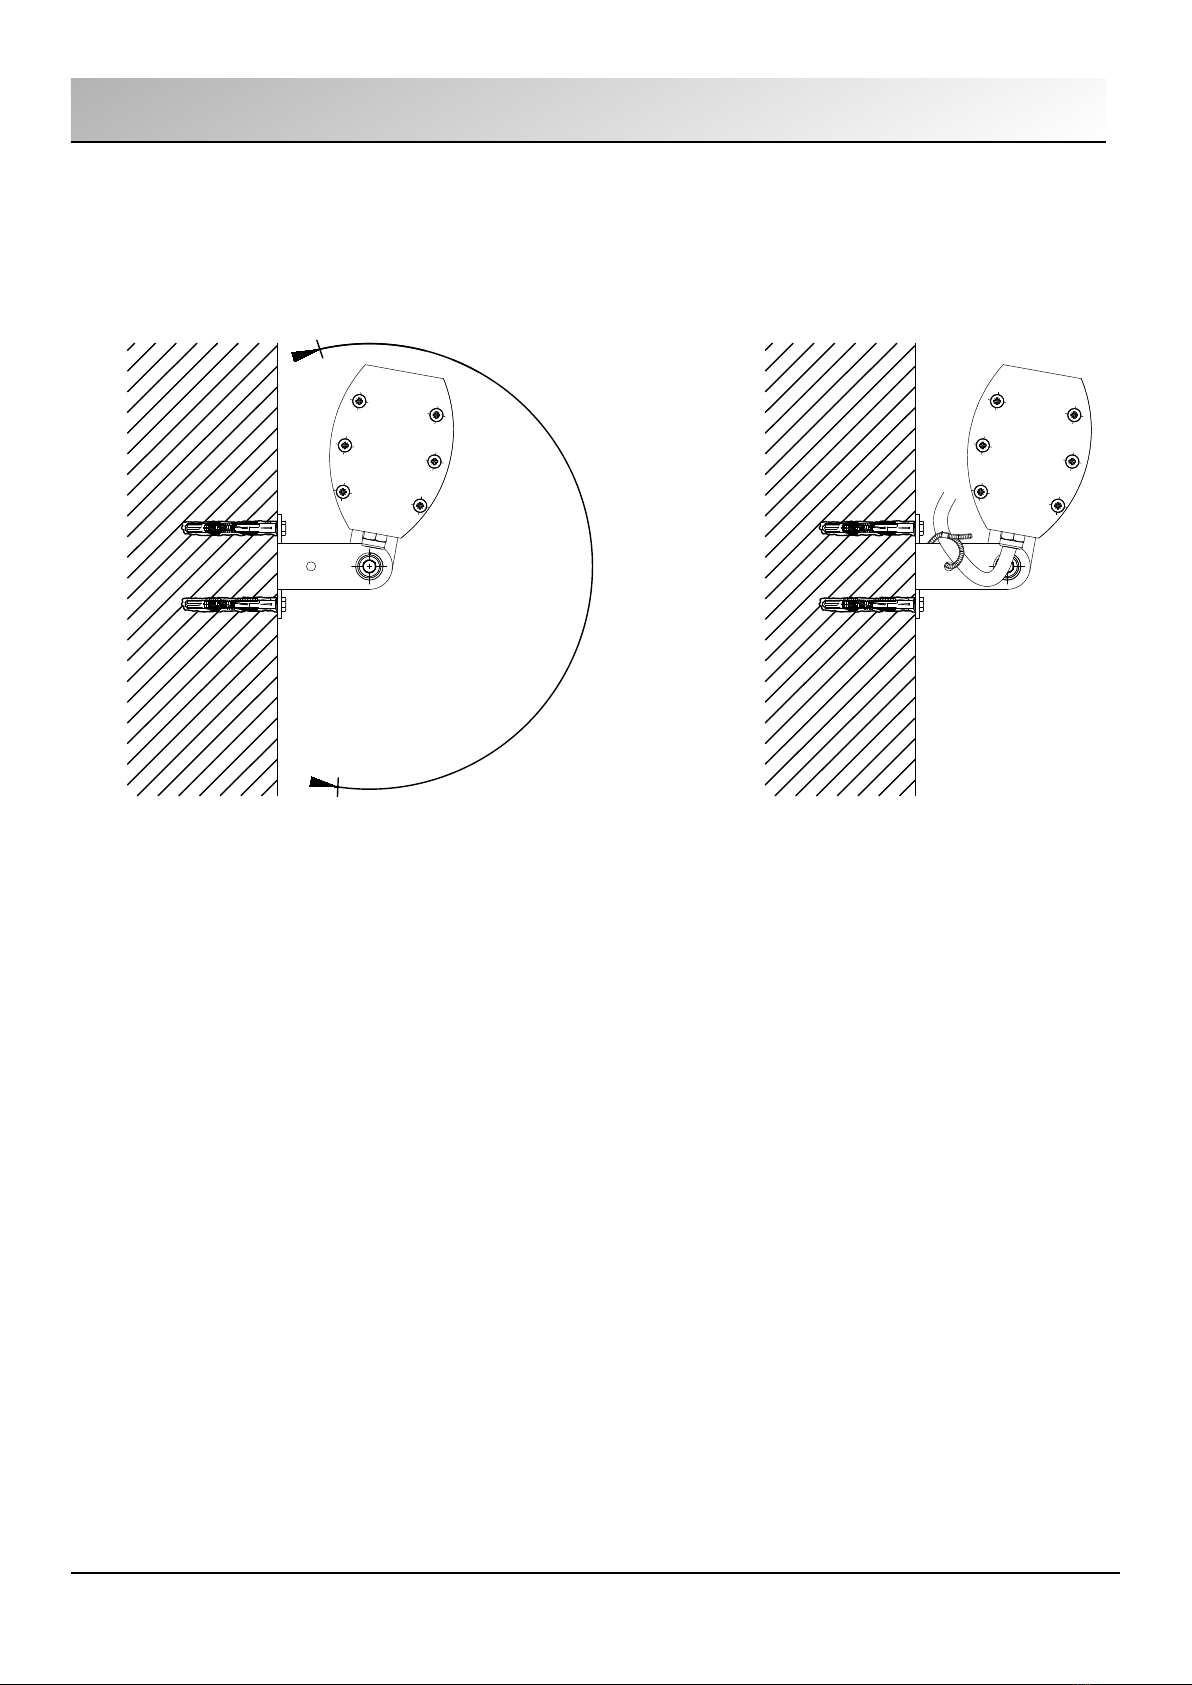
●Drill the holes in the wall according to the holes in the hanging
bracket.
●Mount the hanging bracket with dowels and screws. (Fig. 1)
●First attach the top of the bracket, then turn the luminaire and attach
the other side. (Fig. 2)
●Make sure it is mounted firmly.
3. INSTALLATION
WWW.PRECILUM.COMTRILOBIT RGB / RGBW / RGBA INSTRUCTIONS
MANUAL v1.1
7
3.1 Installation of fixtu e
Fig. 1 Fig. 2
●Adjust the angle of the luminaire. (Fig. 3)
●Stabilize the angle by tightening the screws. (Fig. 3)
●Attach the cable from the luminaire to the bracket using cable zip
ties in such a way that it does not touch the wall. (Fig. 4)
3. INSTALLATION
WWW.PRECILUM.COMTRILOBIT RGB / RGBW / RGBA INSTRUCTIONS
MANUAL v1.1
8
Fig. 3 Fig. 4
3. INSTALLATION
WWW.PRECILUM.COMTRILOBIT RGB / RGBW / RGBA INSTRUCTIONS
MANUAL v1.1
9
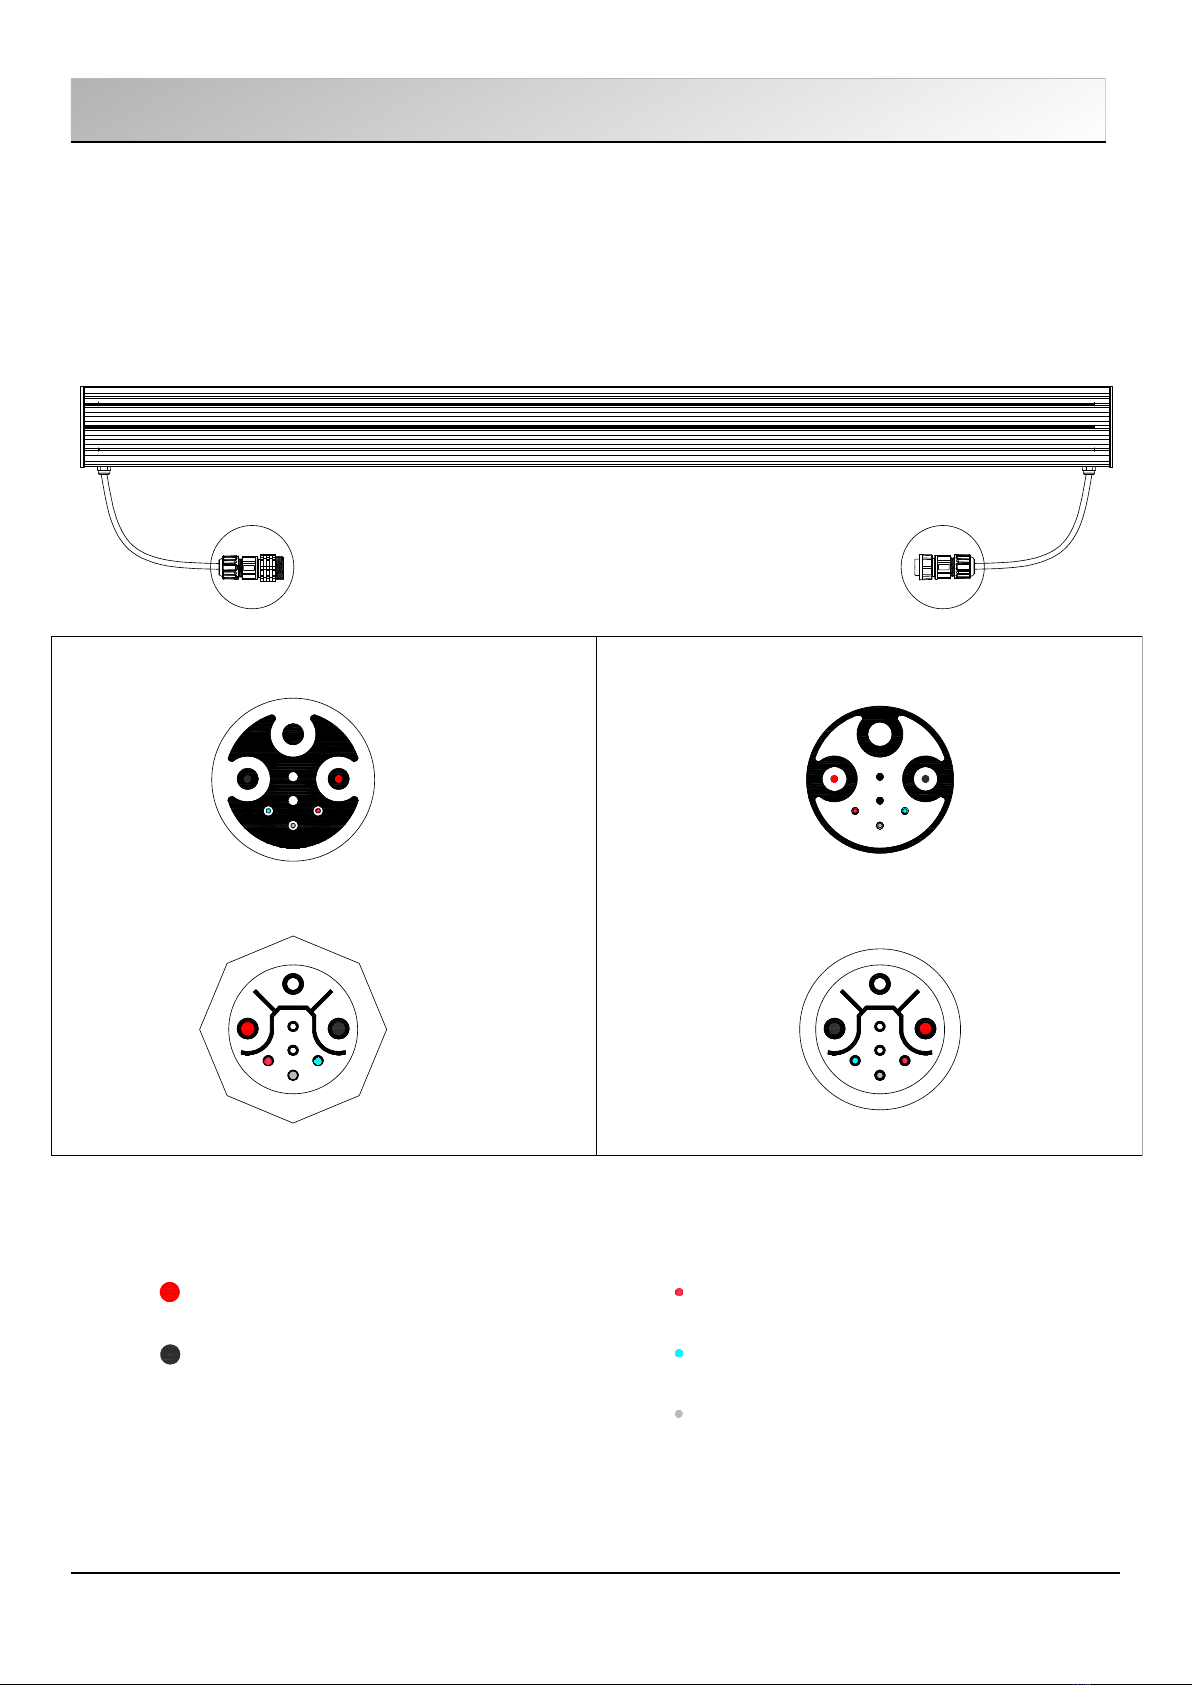
3.2.1 Wi ing – Combi cable (48V DC + DMX)
3.2 Connection
3 + 5 PIN
CONNECTOR
MALE (IN)
3 + 5 PIN
CONNECTOR
FEMALE (OUT)
MALE (IN) – Front view FEMALE (OUT) – Front view
+ 48V (red)
FEMALE (OUT) – Rear view (soldering)
- 48V (black)
POWER DMX
+ (red)
- (blue)
GND (grey)
MALE (IN) – Rear view (soldering)
- 48V + 48V
- 48V + 48V
- 48V+ 48V
- 48V+ 48V
+
-+
GND
-+
GND
-
GND
+
-
GND
3. INSTALLATION
WWW.PRECILUM.COMTRILOBIT RGB / RGBW / RGBA INSTRUCTIONS
MANUAL v1.1
10
3.2 Connection
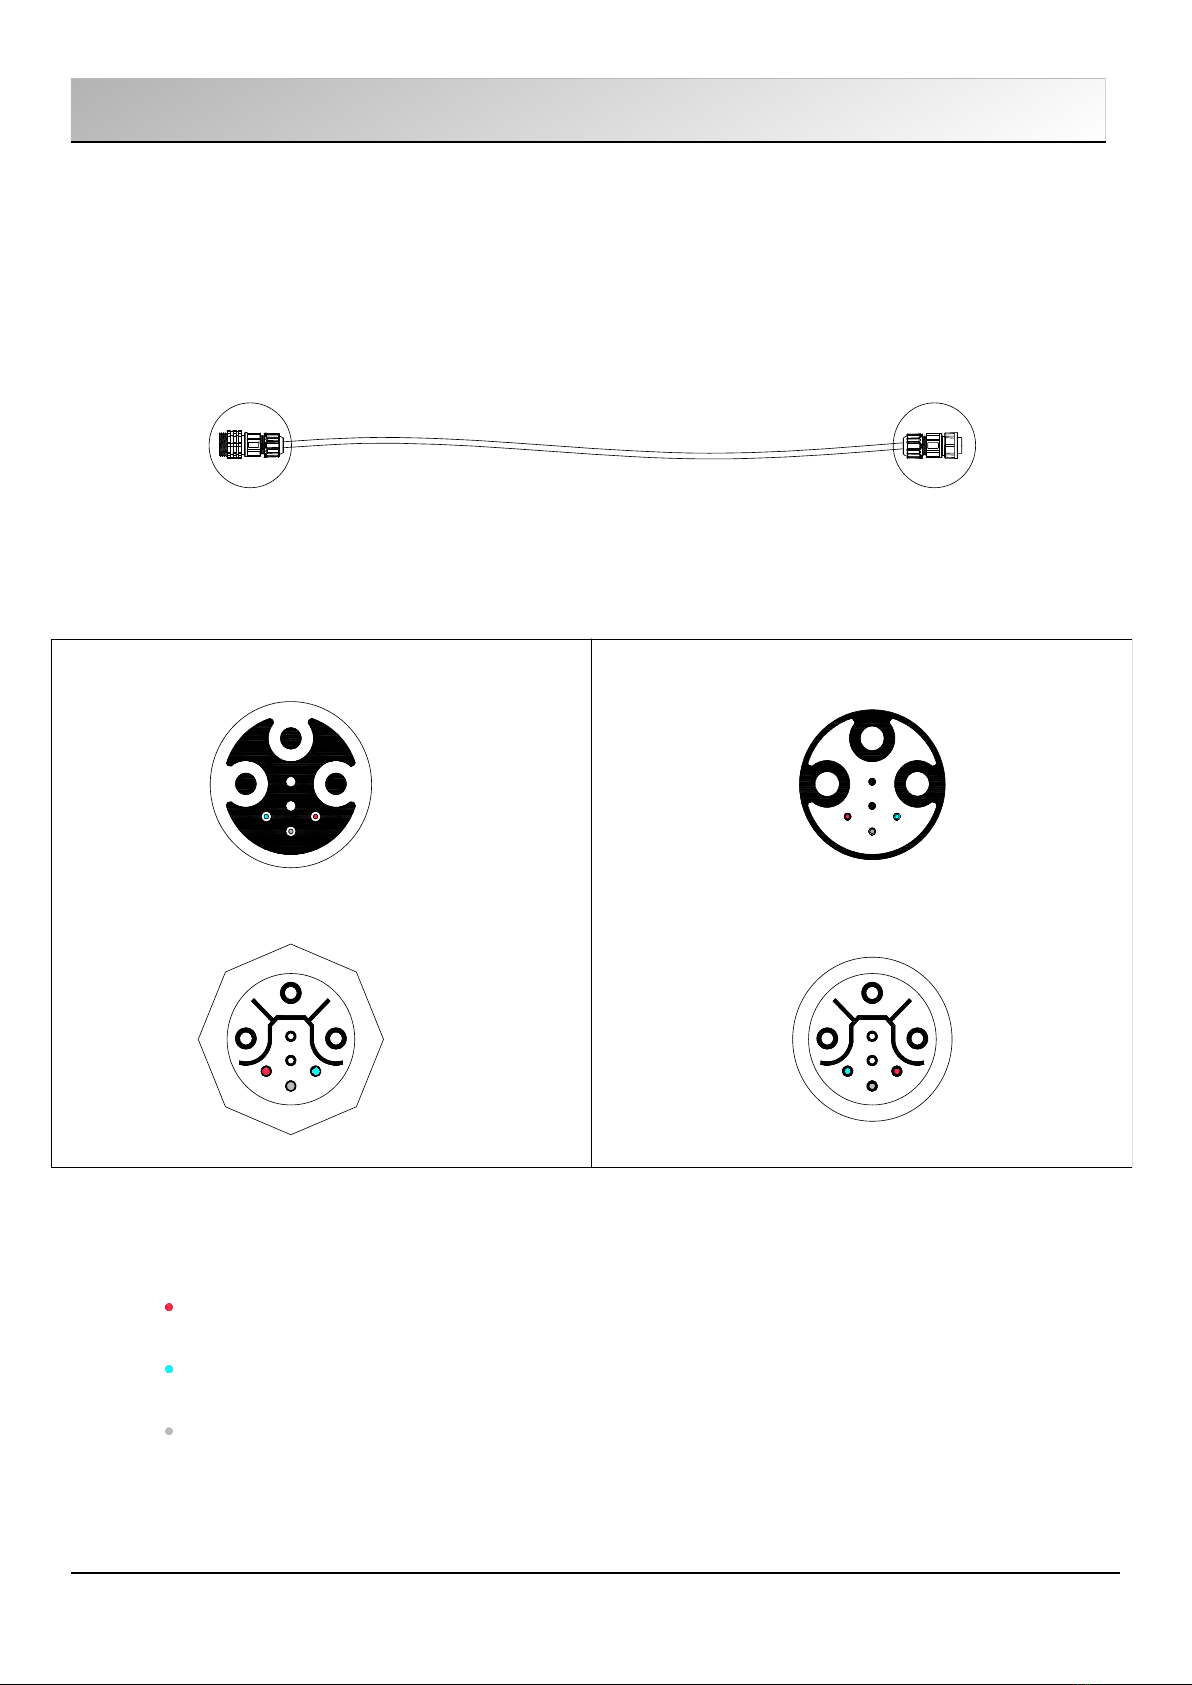
3.2.2 Wi ing – DMX inte cable (only fo DMX t ansmission)
+ (red)
- (blue)
GND (grey)
DMX
3 + 5 PIN
CONNECTOR
MALE
3 + 5 PIN
CONNECTOR
FEMALE
MALE (IN) – Front view FEMALE (OUT) – Front view
MALE (IN) – Rear view (soldering) FEMALE (OUT) – Rear view (soldering)
+
-
+
GND
GND
-
GND
+
-
GND
-
+
3. INSTALLATION
WWW.PRECILUM.COMTRILOBIT RGB / RGBW / RGBA INSTRUCTIONS
MANUAL v1.1
11
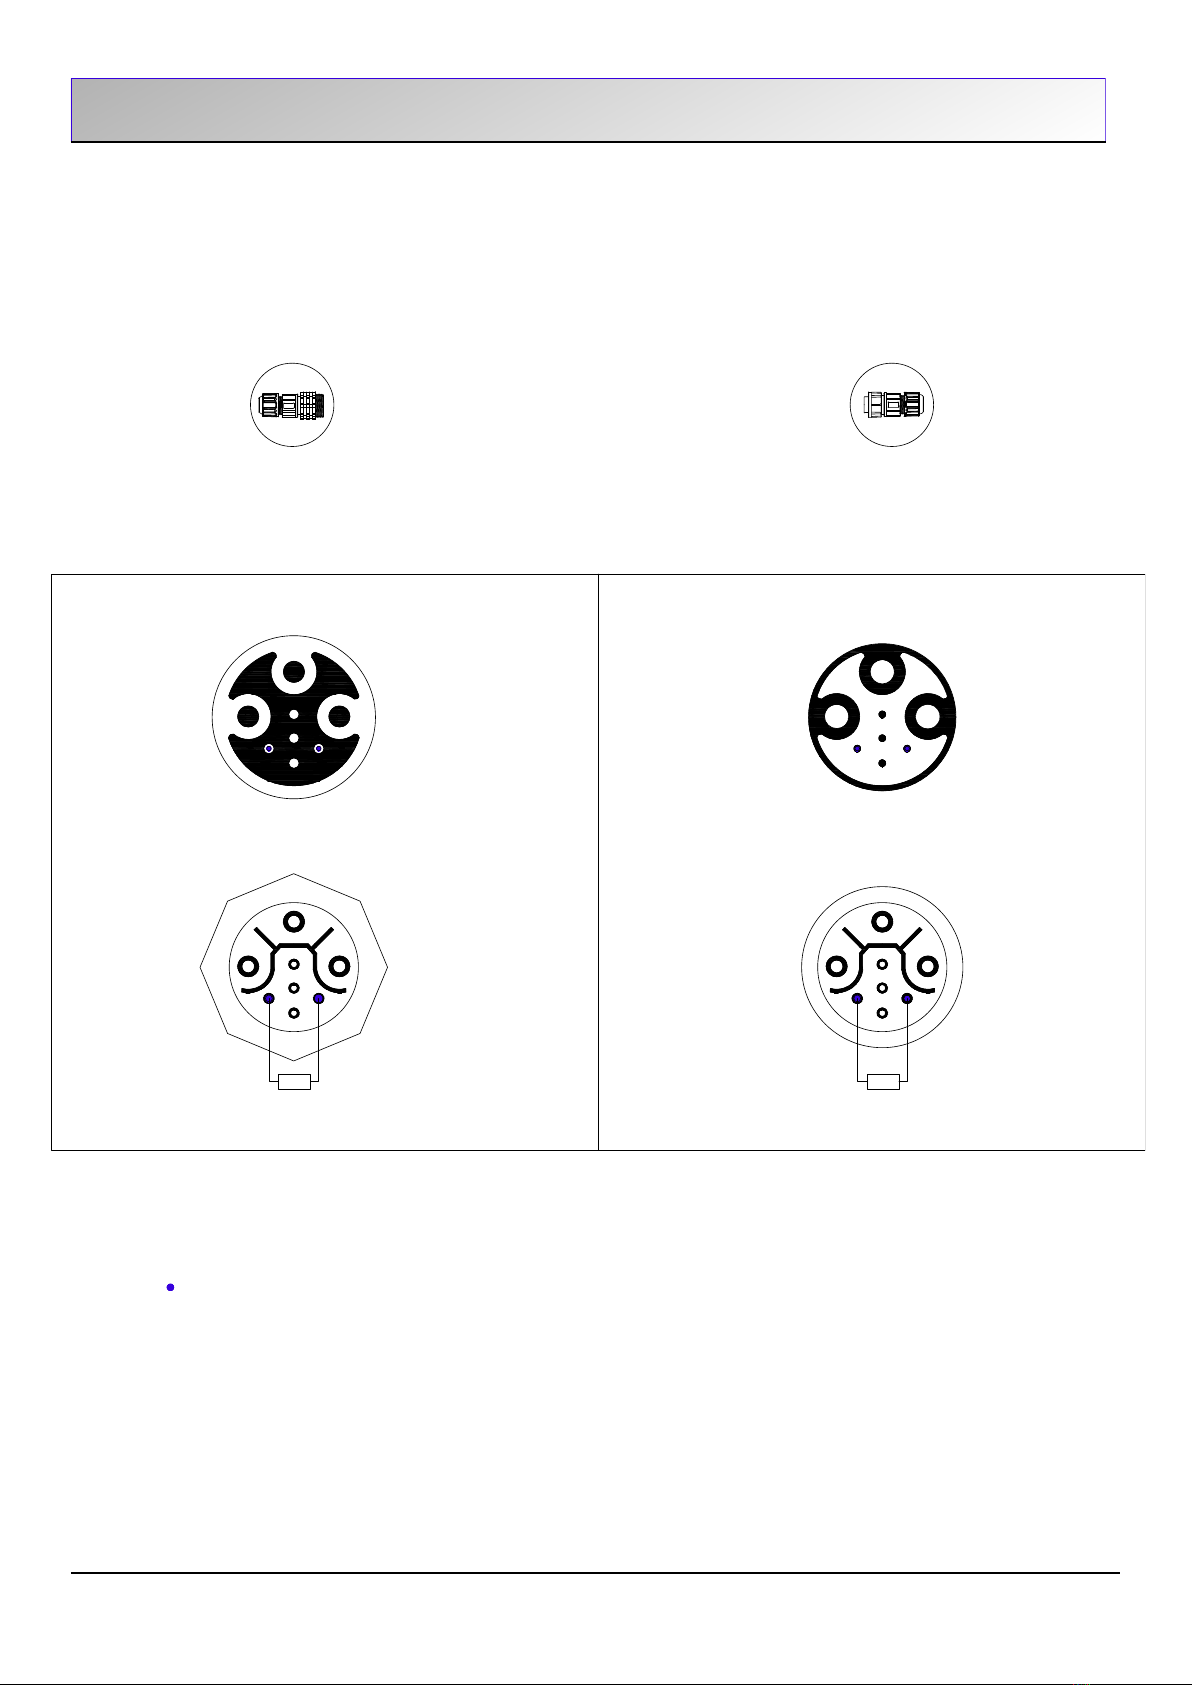
3.2.3 Te minato connecto (fo last luminai e)
3.2 Connection
TERMINATOR
CONNECTOR
MALE
TERMINATOR
CONNECTOR
FEMALE
MALE (IN) – Front view FEMALE (OUT) – Front view
MALE (IN) – Rear view (soldering) FEMALE (OUT) – Rear view (soldering)
Resistor 120 OHM
120 OHM 120 OHM
4. CONNECTION DIAGRAMS
WWW.PRECILUM.COMTRILOBIT RGB / RGBW / RGBA INSTRUCTIONS
MANUAL v1.1
12
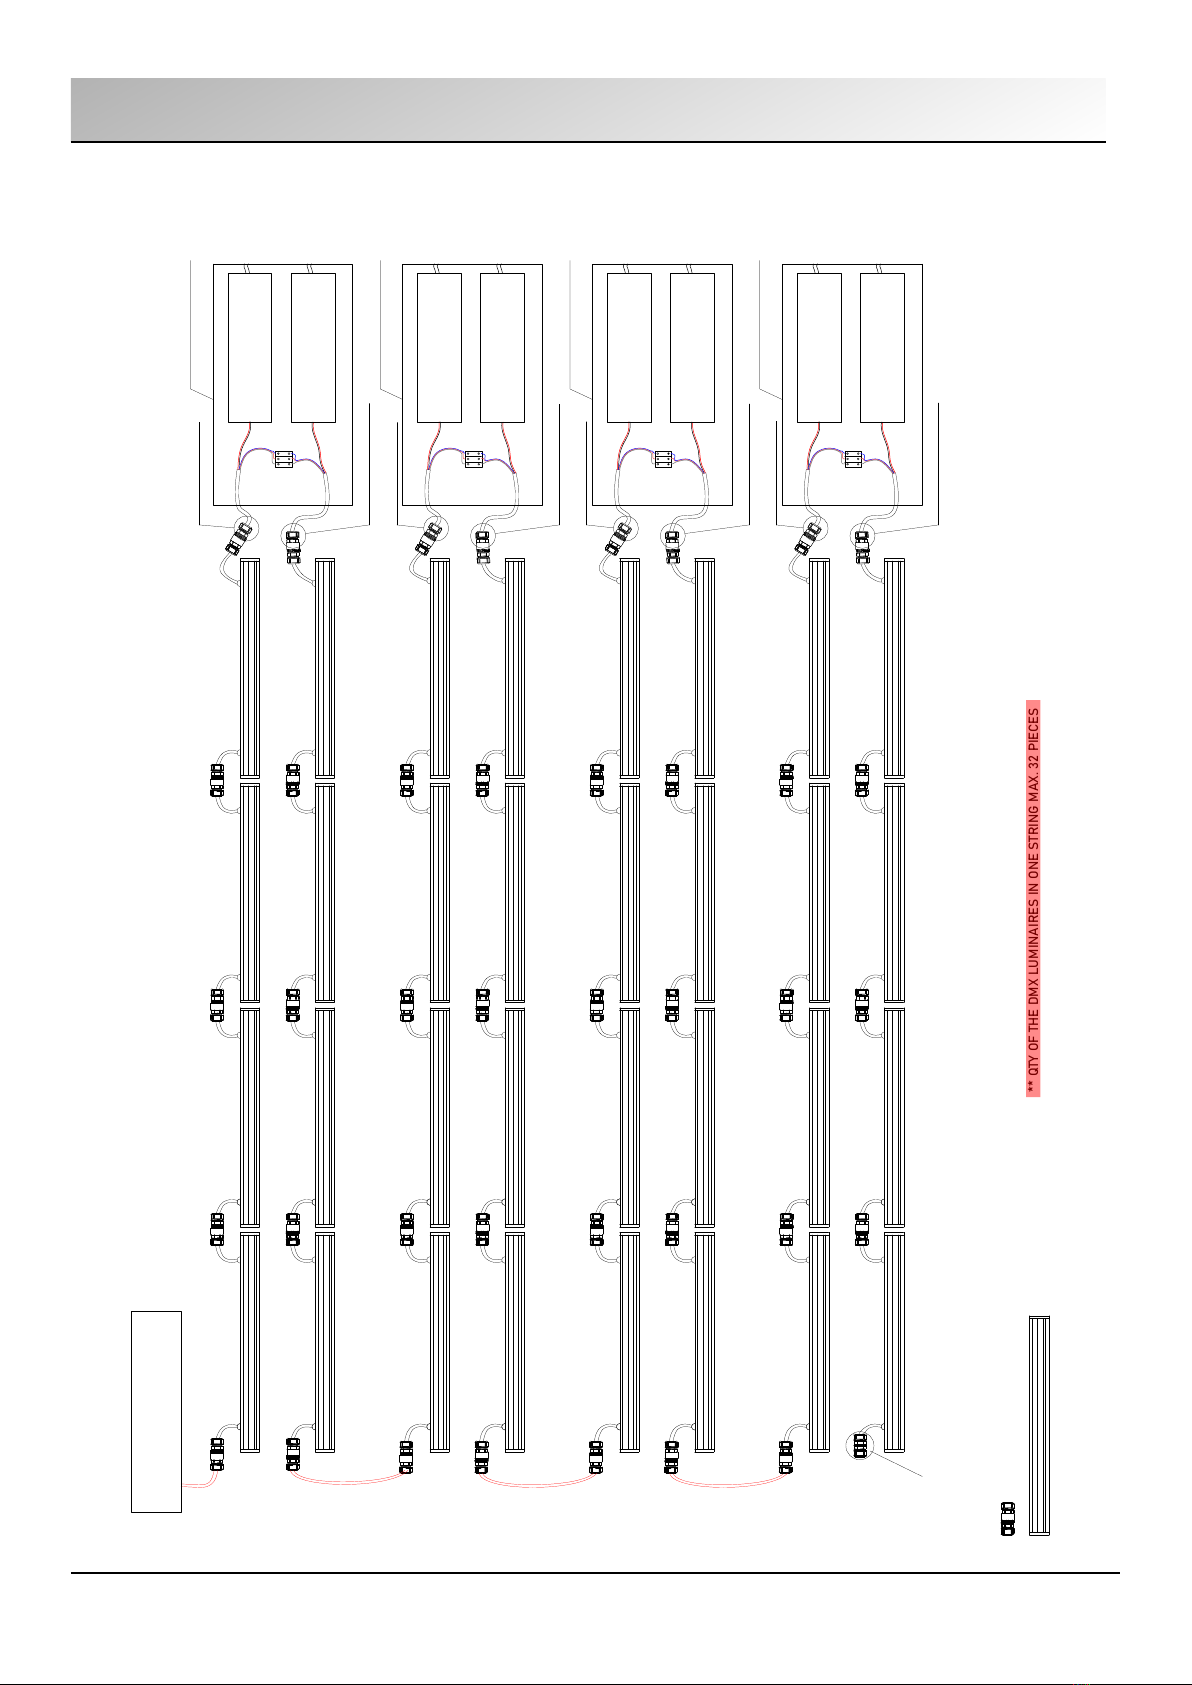
4.1 RGB, RGBW, RGBA option
4321
5678
1211109
DMX INTER CABLE
13
DMX CONTROLLER
141516
20191817
21222324
DMX INTER CABLE
28272625
29303132
DMX INTER CABLE
TERMINATOR CONNECTOR:
SPECIAL CONNECTOR WITH RESISTANCE OF 120 o ms
FEMALE/MALE
MALE/FEMALE
POWER SUPPLY
Input 230V AC 50Hz
Output 48 V DC
POWER SUPPLY
Input 230V AC 50Hz
Output 48 V DC
DMX
48V DC
48V DC
POWER SUPPLY
Input 230V AC 50Hz
Output 48 V DC
POWER SUPPLY
Input 230V AC 50Hz
Output 48 V DC
DMX
48V DC
48V DC
POWER SUPPLY
Input 230V AC 50Hz
Output 48 V DC
POWER SUPPLY
Input 230V AC 50Hz
Output 48 V DC
DMX
48V DC
48V DC
POWER SUPPLY
Input 230V AC 50Hz
Output 48 V DC
POWER SUPPLY
Input 230V AC 50Hz
Output 48 V DC
DMX
48V DC
48V DC
FEMALE/MALE
MALE/FEMALE
FEMALE/MALE
MALE/FEMALE
FEMALE/MALE
MALE/FEMALE
FEMALE/MALE
MALE/FEMALE
FEMALE/MALE
MALE/FEMALE
FEMALE/MALE
MALE/FEMALE
FEMALE/MALE
MALE/FEMALE
FEMALE/MALE
MALE/FEMALE
FEMALE/MALE
MALE/FEMALE
FEMALE/MALE
MALE/FEMALE
FEMALE/MALE
MALE/FEMALE
FEMALE/MALE
MALE/FEMALE
FEMALE/MALE
MALE/FEMALE
FEMALE/MALE
MALE/FEMALE
FEMALE/MALE
TERMINATOR MALE/FEMALE
CONNECTOR MALE
CONNECTOR FEMALE
CONNECTOR MALE
CONNECTOR FEMALE
CONNECTOR MALE
CONNECTOR FEMALE
CONNECTOR MALE
CONNECTOR FEMALE
(See accessories) POWER SUPPLY
DRIVER BOX
POWER SUPPLY
DRIVER BOX
POWER SUPPLY
DRIVER BOX
POWER SUPPLY
DRIVER BOX
DESCRIPTION
CONNECTORS (MALE/FEMALE)
LUMINAIRE
* QTY OF LUMINAIRES IN DAISY CHAIN MAX. 8 PIECES (ACCORDING ELEC. DESIGNER CALCULATION)
** QTY OF THE DMX LUMINAIRES IN ONE STRING MAX. 32 PIECES

Clean the front transparent cover at least every 6 months. Use a moist,
lint-free cloth. Never use alcohol or solvents.
A scheduled maintenance programme must be carried out on the
installation and the fittings regardless of their IP rating or application –
these must include the following operations:
●Clean the fittings from dirt that may be deposited in the heads of the
screws by following the installation instructions attached to each
fitting.
●Check that the screws are not loose on the various components of
the luminaire (glass frame, cable entry , ...).
●Check each cable gland, and cable for damage and that the cable
gland has not come loose.
●For each Isolation Class 1 fitting check that the earth cable has not
come loose. The clip must not show signs of oxidation,damage or
become loose.
●For class 2 fittings check any eventual plastic / isolating covering in
order to verify any damage.
●Check that all the seals are in good condition and that they are not
damaged or split.
The internal components such as the ballasts, transformers, washers
and screws must not show clear signs of oxidation or rust.
Clear traces of rust and oxidation will indicate the presence of water
inside the luminaire.
In case of damage the components must be replaced by original
components and spare parts before using the fitting.
We also recommend to check the fitting at least once a year or within
the prescribed maintenance schedule period depending on the type of
installation.
5. CARE AND MAINTENANCE
WWW.PRECILUM.COMTRILOBIT RGB / RGBW / RGBA INSTRUCTIONS
MANUAL v1.1
13
PRECILUM™ PRODUCTS ARE OF SUPERIOR DESIGN AND
QUALITY AND SHOULD BE TREATED WITH CARE. THE
RECOMMENDATIONS BELOW WILL HELP FULFILL GAIN GOOD
USE AND LONGE ITY FROM THE PRODUCTS.

6. TECHNICAL SPECIFICATION
WWW.PRECILUM.COMTRILOBIT RGB / RGBW / RGBA INSTRUCTIONS
MANUAL v1.1
14
Mounting:
Optical system:
LED device:
LED variants:
Lumen output:
Input voltage:
Control:
Max. power conpusion:
Service lifetime:
Operation ambient temp:
Materials:
Dimensions:
Enviroment:
Weight:
Accesories:
See 1.3 Dimensions of hanging bracket
Spot, Narrow, Medium, Wide, Flood, Oval, Assym.
High power OSRAM LEDs
RG , RG W, RG A and other according req.
See datasheet
48V DC
DMX/RDM electronic on board
TRILO IT 600
RG 27W (current 500mA)
RG W/RG A 36W (current 500mA)
TRILO IT 900
RG 41W (current 500mA)
RG W/RG A 54W (current 500mA)
TRILO IT 1200
RG 54W (current 500mA)
RG W/RG A 72W (current 500mA)
100 000 hrs./L70 @25°C
-30°C/+45°C
Housing: extruded aluminium
Cover: clear tempered glass
See dimensional drawing
IP66
TRILO IT 600: 1,9 kg
TRILO IT 900: 3,0 kg
TRILO IT 1200: 3,9 kg
See website


This manual suits for next models
2
Table of contents
Other PRECILUM Outdoor Light manuals


