Precision Biosystems BlotCycler User manual

1
USER MANUAL
BlotCycler™automated western blot processor.
Revision 10.0.2., 02-2014 software ver 3.1

2
Table of Contents
Specifications and Safety…………………………………………………………………3
Unpacking and Testing..............................................................................................5
Overview .....................................................................................................................7
Programming ..............................................................................................................8
Instrument Set up and Operation…………..............................................................11
Appendix....................................................................................................................16
Troubleshooting ......................................................................17
Fuse replacement........................................... ..........................18
Packing Instruction............................................. .....................19
Accessory Products............................................. ......................21
Technical Support.....................................................................23

3
Specifications and Safety.
Please read this manual thoroughly before operating the BlotCycler.
We suggest that you keep this manual, as you may need to refer to it.
The BlotCycler complies with the European Community Safety requirements. Operation of the
BlotCycler is subject to the conditions described in this manual. The protection provided may be
impaired, if the equipment is used in a manner not specified by Precision Biosystems.
NOTE:
Notes will be used throughout the manual to inform on important points and provide useful hints.
CAUTION:
Cautions will be used to inform the reader of action that may have the potential to either harm the
instrumentation or affect the quality of the data.
WARNING:
Warnings are used to provide special notice of actions that have the potential to cause harm to the operator.
For technical assistance, call, write, fax, or email.
Call: 888-490-4443 x 2
Fax: 617-812-2672
Email: customersupport@precisionbiosystems.com
Write : Customer Support
Precision Biosystems
241 Francis Avenue
Mansfield, MA 02048
Specifications:
Input voltage: 110VAC
Voltage variation : +/-10%
Phase: Single phase
Power frequency: 50Hz or 60Hz (check unit label)
Rated Input current: 5.0A max
Overvoltage category: Transient overvoltage category II
Rated pollution applied: Pollution Degree 2
The device must be connected to a mains socket outlet with protective earthing connections.
- Japan
Use the cable that comes with the product.
- North America
Use the cable that comes with the product.
- Other countries
AC power cable is not attached to the product. Use a power cable that conforms to the regulations in the country where
the product is to be used.
Blot Processing Polyurethane Trays and Tank.
Mini 8–25 ml per chamber, 9 x 7.5 cm
Midi 12–40 ml per chamber, 9.5 x 15 cm
Dimensions (h × w × d) 35 × 34 × 42 cm (with Mini tray)
Weight 12.0 kg

4
Safety certifications: CE directive 2006/95/EC and 2004/108/EC, standard used EN61010-1, IEC61010-1, EN 61326-
1:2006, IEC 61326-1:2005
Installation location conditions
Operation site: Indoors
Maximum operating altitude: 2500 m or lower
Operating temperature 3ºC to 42ºC
WARNING:
(1) Do not operate the instrument under voltage fluctuations exceeding 10% of the recommended line voltage. Large
fluctuations may cause the instrument to fail. Use a three-pronged electrical outlet with a ground.
(2) Instrument can be used in the temperature range 3°C - 42°C, avoid freezing. Do not install the equipment at a place
where the temperature changed frequently.
Instrument can be used under a humidity range of 30 - 80% (RH). Relative humidity less than 80% from 3ºC to 30ºC,
decreasing linearly to 50% from 31ºC to 42 ºC
(3) Do not install the equipment near a heating element.
(4) Do not install the equipment at a place where it may be exposed to corrosive gas.
(5) Do not install the instrument in a location where it may be exposed to dust, especially in locations exposed to outside
air or ventilation outlets that discharge dust particles.
(6) Do not install the equipment at a place constantly or excessively exposed to oscillations or impacts.
(7) Do not install the instrument in a location where it may be exposed to direct sunlight.
(8) Avoid strong magnetic fields and sources of high-frequency waves. The instrument may not function properly near
strong magnetic fields or high frequency wave sources.
The WEEE (Waste Electrical and Electronic Equipment) symbol indicates that this product should not be
disposed of in unsorted municipal waste. Follow local municipal waste ordinances for proper disposal
provisions to reduce the environmental impact of WEEE.

5
Unpacking the BlotCycler.
When you receive the BlotCycler, carefully inspect the shipping box for any damages, which may have
occurred in shipping. Any damage to the container may indicate damage to its contents.
Open the box and take out the enclosed flat box with tray and tank covers and tray plugs. Remove all solutions
and accessories parts from the box.
Using the upper part of the green Styrofoam as a handle, pull BlotCycler out of the box and put it on a flat
surface. Gently remove front and back of the protective Styrofoam; it is a good idea that you have a lab
colleague help with the system removal from the box. Remove the bag. Put the instrument on a solid and
leveled surface, and inspect for any damage.
Examine the unit carefully for any damage incurred during transit. If you suspect damage to the contents may
have occurred, immediately file a claim with the carrier in accordance with their instruction before contacting
Precision Biosystems. The warranty does not cover in-transit damage. Notify Precision Biosystems
([email protected]) of any claim filed.
Remove the protection styrofoam insert between the black pumps inside tank. Put all parts back into the box
and save them in case you need to send instrument back for service.
Packing List:
BlotCycler with six trays
Waste tubing attached to unit
Power cord
Tray lids, 2
Tank lid, 1
Tray plugs, 4
Transformer 220-240 V /110V (optional)
Installation.
Take the power cord from the box, connect it to the back of instrument and plug into 110 V output of the
transformer. Choose the correct input voltage for transformer (use transformer instruction) and plug the
transformer into the correct outlet. Use plug adapter if required.
Place the waste tubing on the back of the instrument into a waste container (not provided) or directly into the
sink.
Make sure the longer tubing under the trays (see picture) is inserted into the
small holes in the waste collectors on the left and right sides of the
instrument.
Remove protective paper from the covers of the trays and tank.
Warning: For personal safety the BlotCycler must be properly grounded. The user should have the wall receptacle and circuit checked by a qualified
electrician to be assured that the receptacle is properly grounded. Where a two-prong receptacle is encountered, it is the responsibility of the user to
replace it with a properly grounded three-prong wall receptacle. Do not under any circumstances, cut or remove the third ground prong from the power
cord. Do not use a two-prong adapter plug.
Warning: Do not operate around flammable liquids or gases.

6
Test run
Turn on the instrument using the switch on the back of the unit. The display should light up and you should see
the first screen with information about different functions:
Check that the silicone plug is inserted in the tank between the black pumps. Make sure that the waste tubing is
going down and is not bent (Remember there is no pump in BlotCycler the solution moves under gravity). It is
important for solution removal that the waste tubing is not bent allowing the solutions to drain properly,
also the outlet of the tubing should not be immersed in the waste solution.
Left side cleaning:
Fill water 3-4 cm above minimal level (about 2 L); make sure water is not leaking.
Press button and then press button, select left side. Now you started the cleaning cycle
on the left side. Make sure that solution is going into the trays and out of the trays. You may stop the cleaning
cycle at any time as soon you verified that everything on the left side is working.
Right Side cleaning:
Repeat the same procedure for the right side, adding more solution if needed. Press button and
select right side. The cleaning of the right side should start. The solution should be coming out from all three
tubes in each tray.
Now the instrument is ready for use. Read the following instructions to program and start using the BlotCycler.
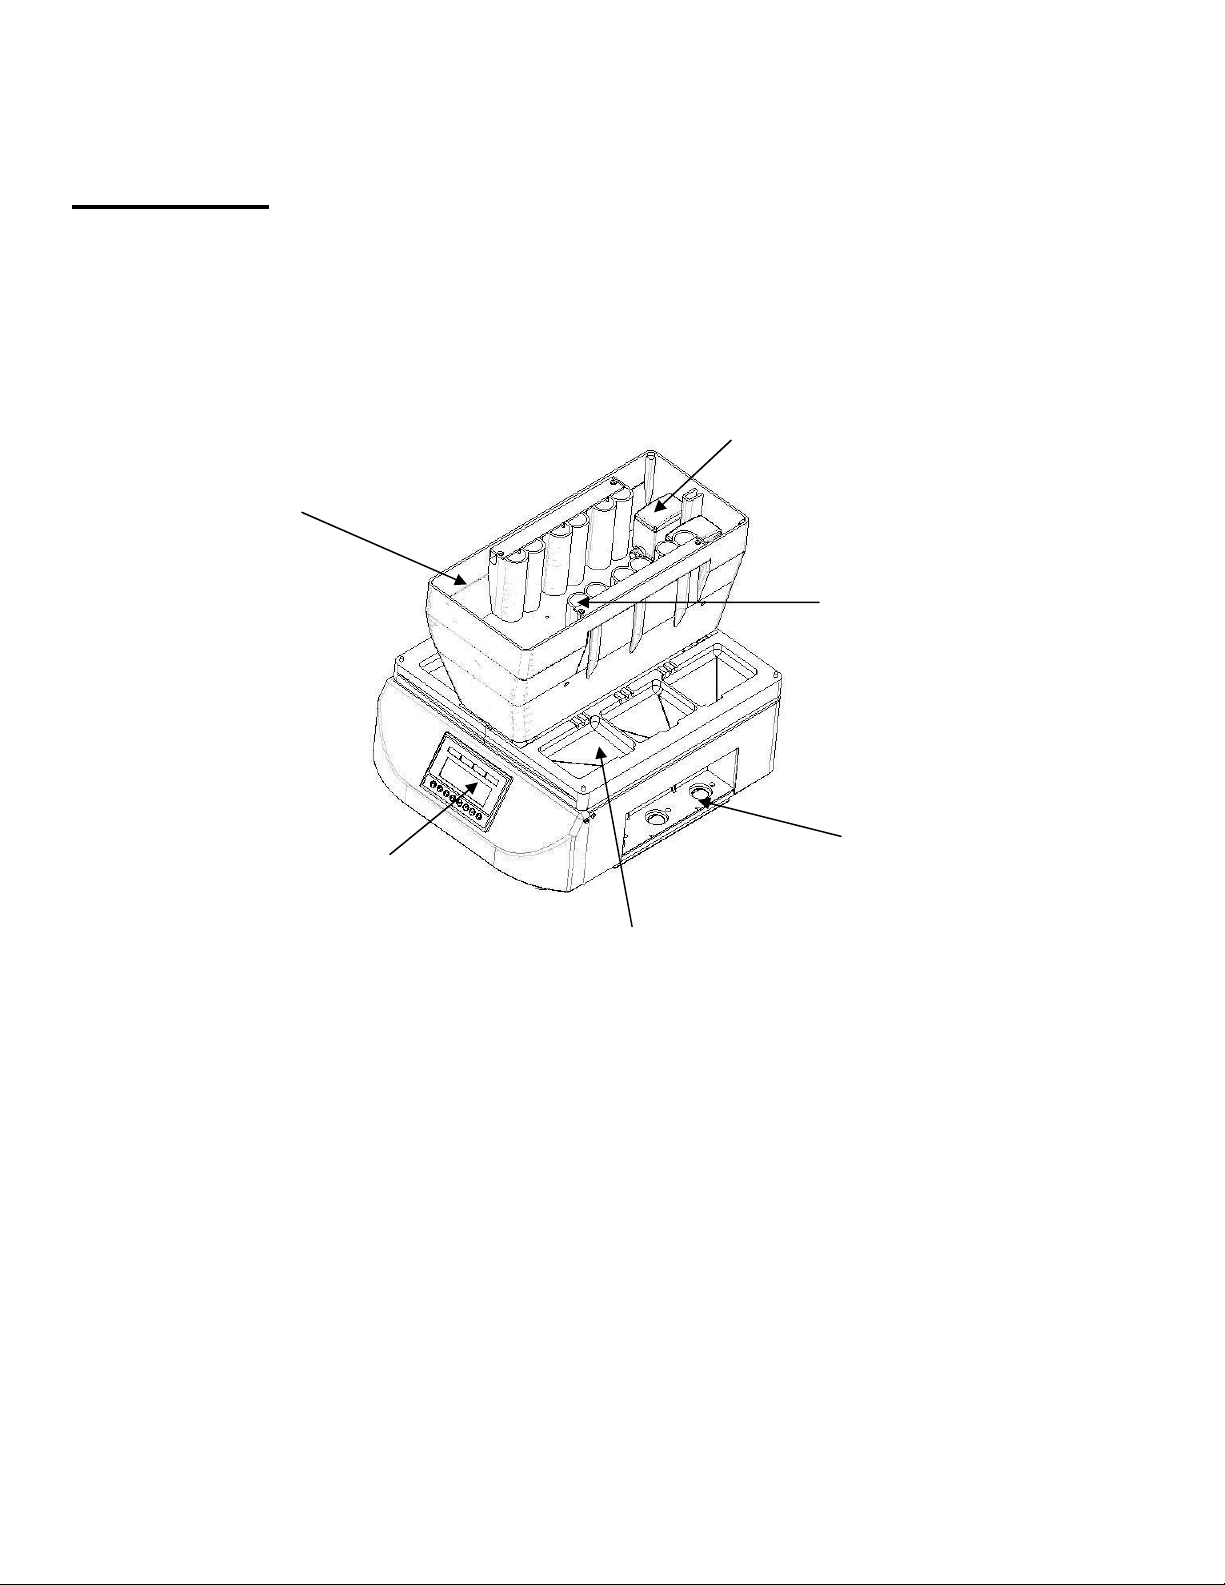
7
Tank
Programming
dis
p
la
y
Trays
Place for antibody
collection vials
Pump
Antibody container.
Overview
BlotCycler™ consists of programming display, four to six trays for blots (trays #1-3 on the left side and trays
#4-6 on the right side), tank with container for primary (P) and secondary (S) antibodies and pumps for
cleaning.

8
A. Programming the BlotCycler
Before starting actual western blot processing get familiar with programming interface
A1. User Interface overview
User interface contains 4 buttons:
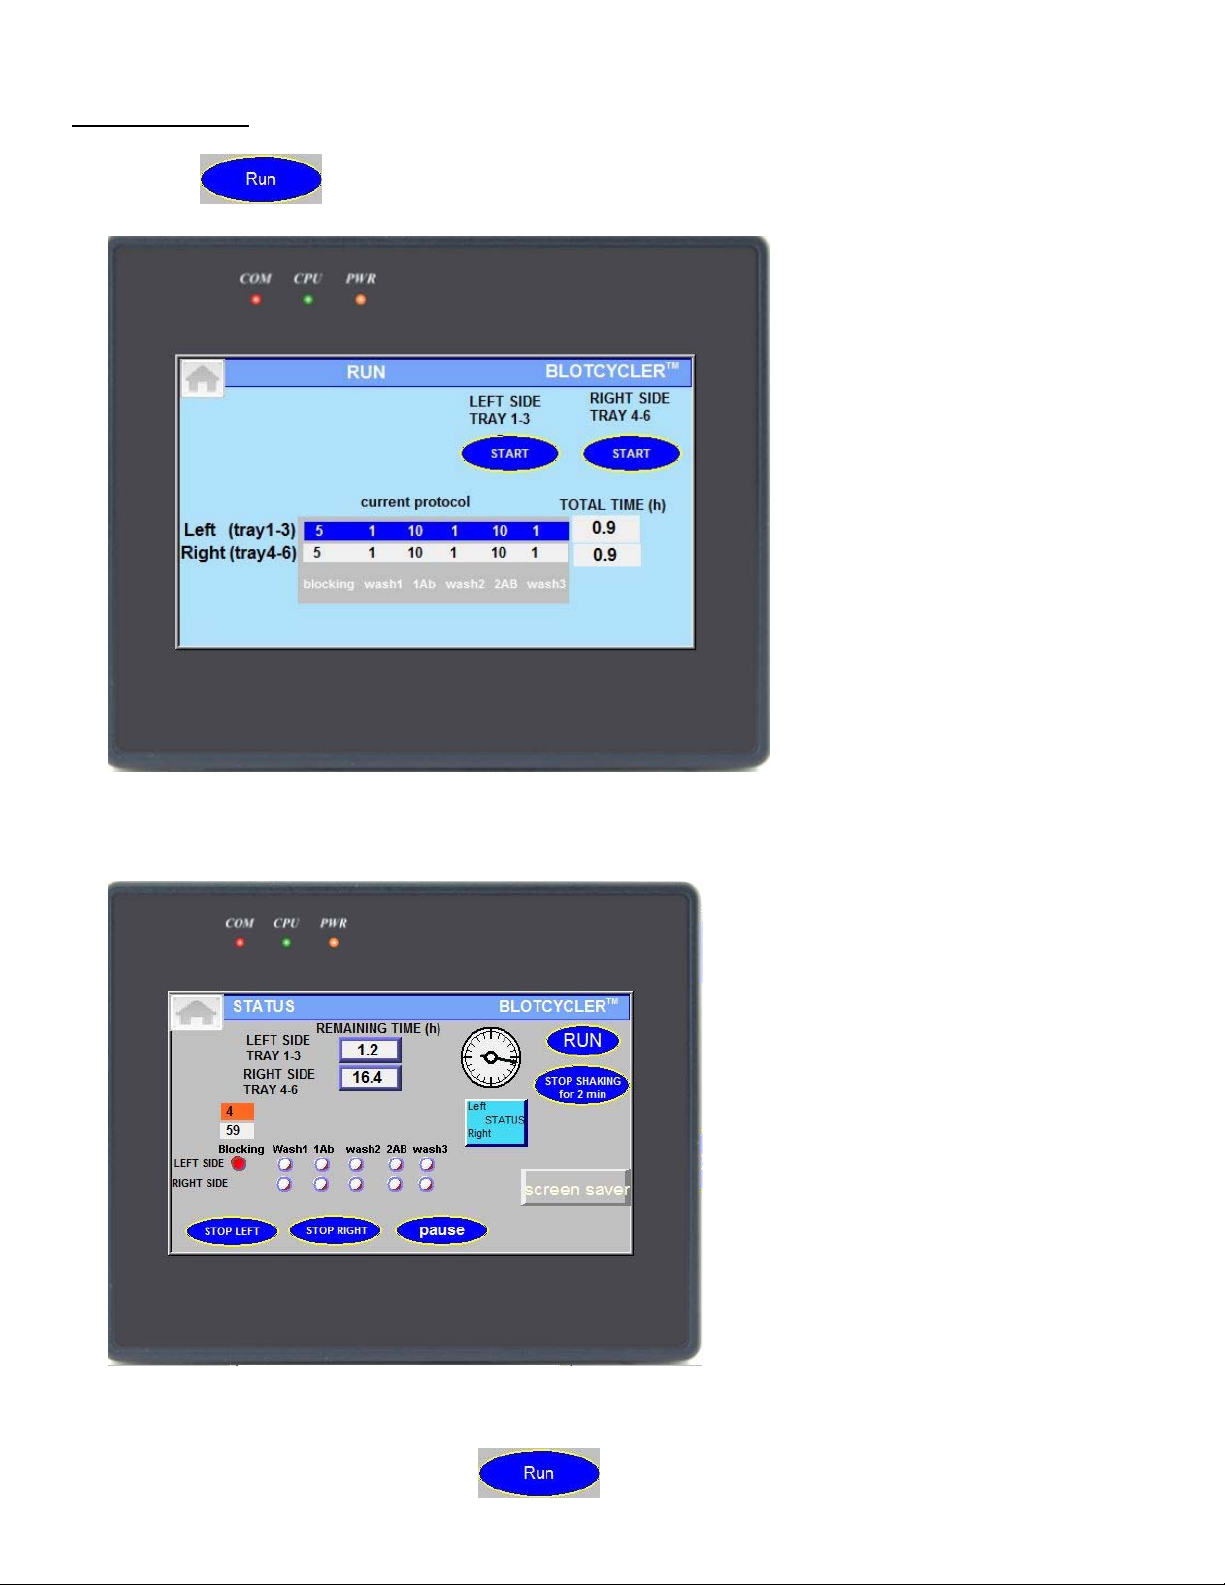
press this button to select existing or set up a new protocol.
press this button to start a protocol
press this button to check the status of the currently running protocol and time to completion
press this button to start cleaning and perform other functions (see below)
9
A2. Protocol overview.
BlotCycler is set up to run standard protocol for western blot starting with blocking, washing after blocking, and
then primary antibody incubation, washing after primary antibodies, secondary antibodies incubation and
washing after secondary antibody incubation. Each step can be programmed independently. At the end of all
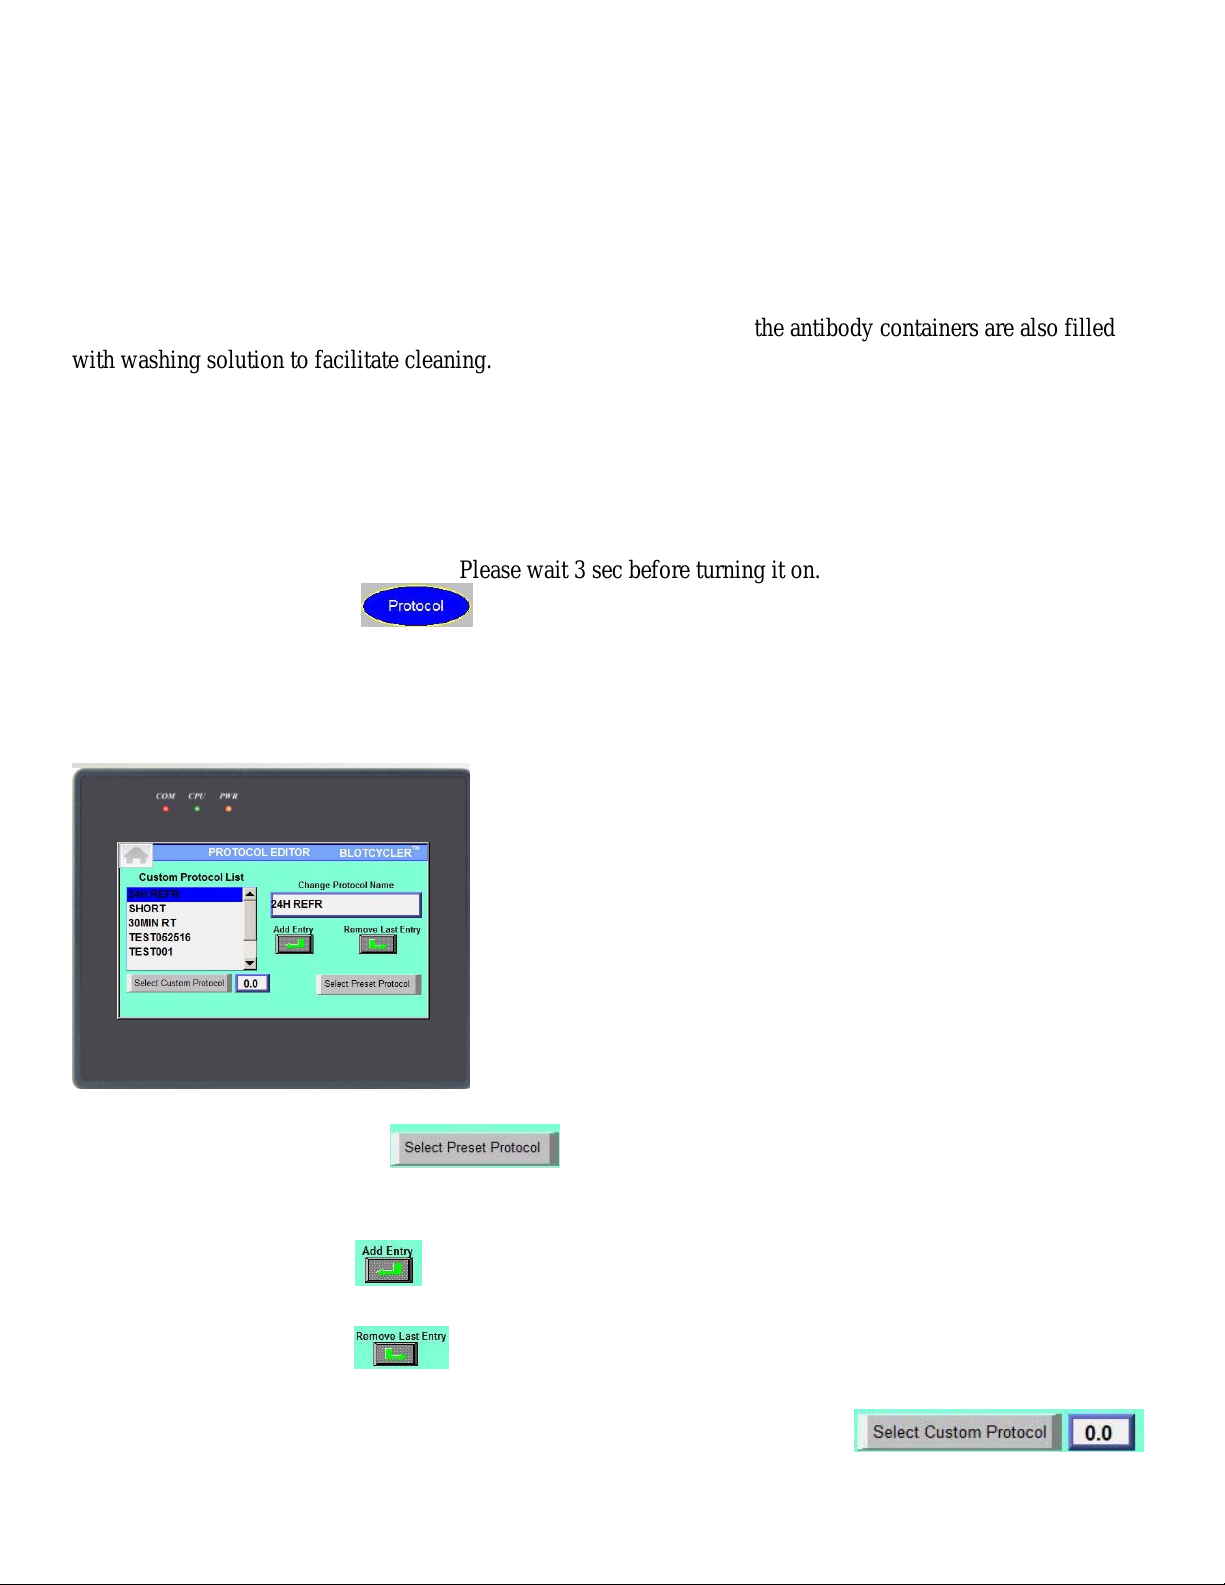
steps the trays are filled with washing solution and shaking is stopped; the antibody containers are also filled
with washing solution to facilitate cleaning.
Note:In order to skip blocking and primary antibody incubation set the Primary antibody incubation time to
zero. Protocol will start at second washing step.
A3. Programming BlotCycler (protocol set up).
To start programming the operator needs to initialize the system by turning the system OFF and ON using the
ON/OFF switch on the back of the unit. Please wait 3 sec before turning it on.
To start protocol set up press .
On the new screen you can select existing protocols, modify existing protocol or set up a new protocol. You can
set up and save up to 20 protocols and there are 4 preset protocols that cannot be changed:
To select a preset protocol touch you will see a choice of four preset protocols, select one, and
choose on which side(right or left) to run your protocol, a new screen to start run will appear (see below)
To add a new protocol press and then touch white area under “Change Protocol Name”. Using keypad
enter new protocol name.
To delete last protocol press .
To select or modify existing protocol, highlight protocol by touching it and press .
10
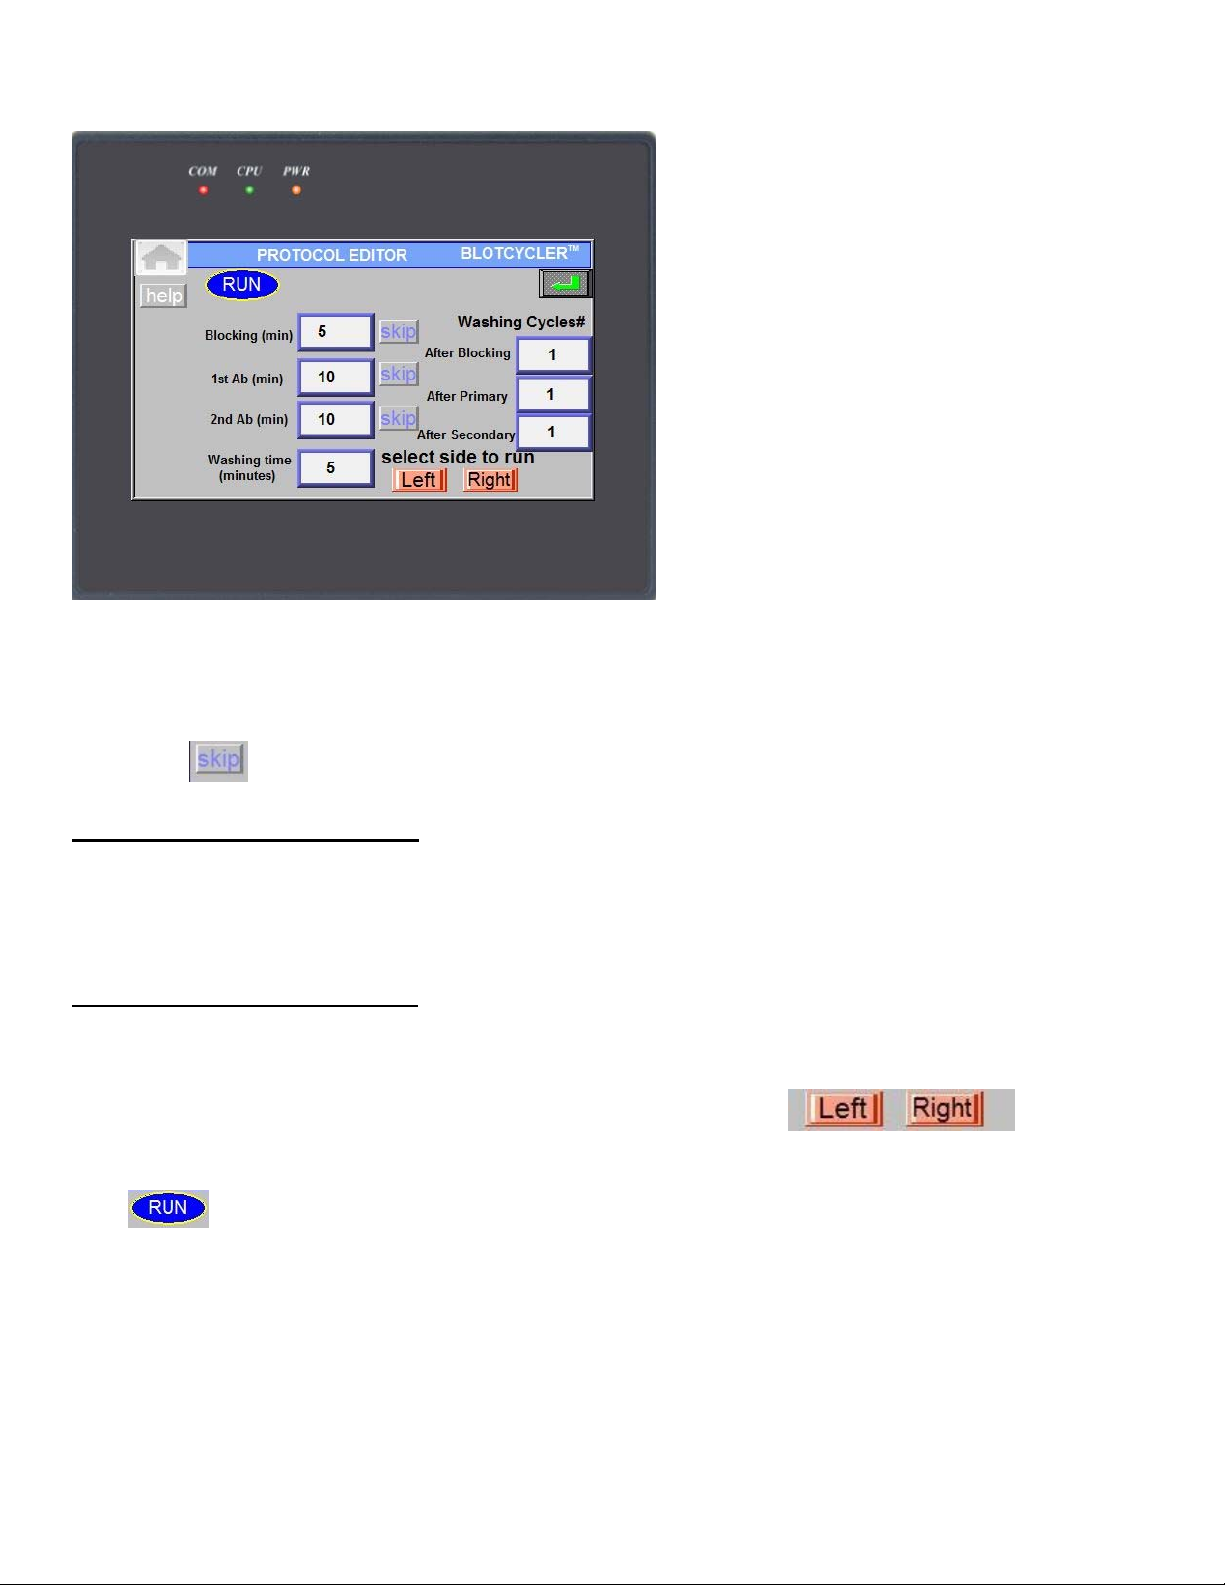
On the following screen you can change any protocol parameters:
Set the incubation time for blocking, primary (PA) and secondary (SA) incubation by touching adjacent white
area.
Note: The minimum time for blocking is 5 minutes, the minimum time for PA and SA incubation is 10
minutes.
Note: press to skip the step, zero time for blocking, PA or SA will appear.
Set the number of washing cycles:
By touching the white area on left side of the screen set the number of washing cycles after blocking,
PA(primary Ab) incubation time and SA(secondary Ab) incubation time.
Note: you can skip washing after blocking by selecting zero, but you cannot skip washing after primary and
secondary antibodies incubation.
Set the duration of washing cycle:
By touching the white area on left of “washing time” you select the duration of each washing cycle. It
can be set between 3 and 20 min.
After finishing the protocol modification select side you would like to run: .
Please note if the button is dimmed, this side is running and cannot be selected
Press button on the top of the screen and use the following screen to verify protocol selection and to
start protocol (see below).
11
B. Set up and Operation
B1. Before starting, you will need to run electrophoresis, transfer protein to membrane and prepare the
following solutions:
Blocking solution for each blot: 12-18 ml mini tray and 18-30 ml for midi tray
Primary Antibody (PA) for each mini blot 10-15 ml , for midi blot 18-25 ml
Secondary Antibody (SA) for each mini blot 12-18 ml for midi blot 18-30ml
Washing buffer up to 3.5 L (depending on the number of blots)
Note: Use 0.1% Tween 20 in the washing, blocking and antibody buffers. This will reduce the surface tension
of solutions and ensure even distribution of the antibody over the blot during incubation.
B2. Loading of the Blot Cycler
Note: If the BlotCycler has not been used for several days, run a cleaning cycle first.
Remove tray covers, place membranes in the trays
Add blocking buffers to each tray containing a membrane.
Close the trays by replacing the covers
Note: tray cover has a cut that should be on the upper side to ensure trays are covered completely.
Remove tank cover
Add Primary Antibodies (P1 – P6). Insert collection vial for primary antibody collection and re-use
Note: Make sure that primary antibody (P) and trays are matched.
(For midi size trays you can use only 1 and 3 on the left side and 4 and 6 on right side)
Add Secondary Antibodies (S1 – S6).
Note: Make sure that secondary antibody (S) and trays are matched.
(For midi size trays you can use only 1 and 3 on the left side and 4 and 6 on right side)
Fill the reservoir with washer to the appropriate level, replace the top cover.
Place a waste container, making sure it is below the instrument level and the waste tube does not touch
the waste solution.
Note: If you do not use all trays you can plug washing tubing with yellow plugs provided.
12
B3. Start Cycling
Note: you do not need to change any settings, if you are using the same protocol as before.
Press button to open a following screen:
Press corresponding start button to start cycling for left (Tray 1-3) or right side (Tray 4-6).
A new screen will appear that show the status of current protocol:
Red blinking dot indicates the current step, the number above it indicate the time to completion of the
current step.
In order to return to previous screen press button.

13
B4. Pause Cycling
you can pause protocol by pressing button. Shaking will not stop
To continue protocol press button for left or right side.
Note: protocol will start from next step if it was close to the end of the previous step.
Use to stop shaking while loading blot into trays. Protocol on other side will not stop, shaking
will resume in two minutes.
To completely stop protocol use or buttons
14
B5. Cleaning
Note: you can do a cleaning only after both sides have finished cycling.
Remove all membranes and containers for primary antibodies.
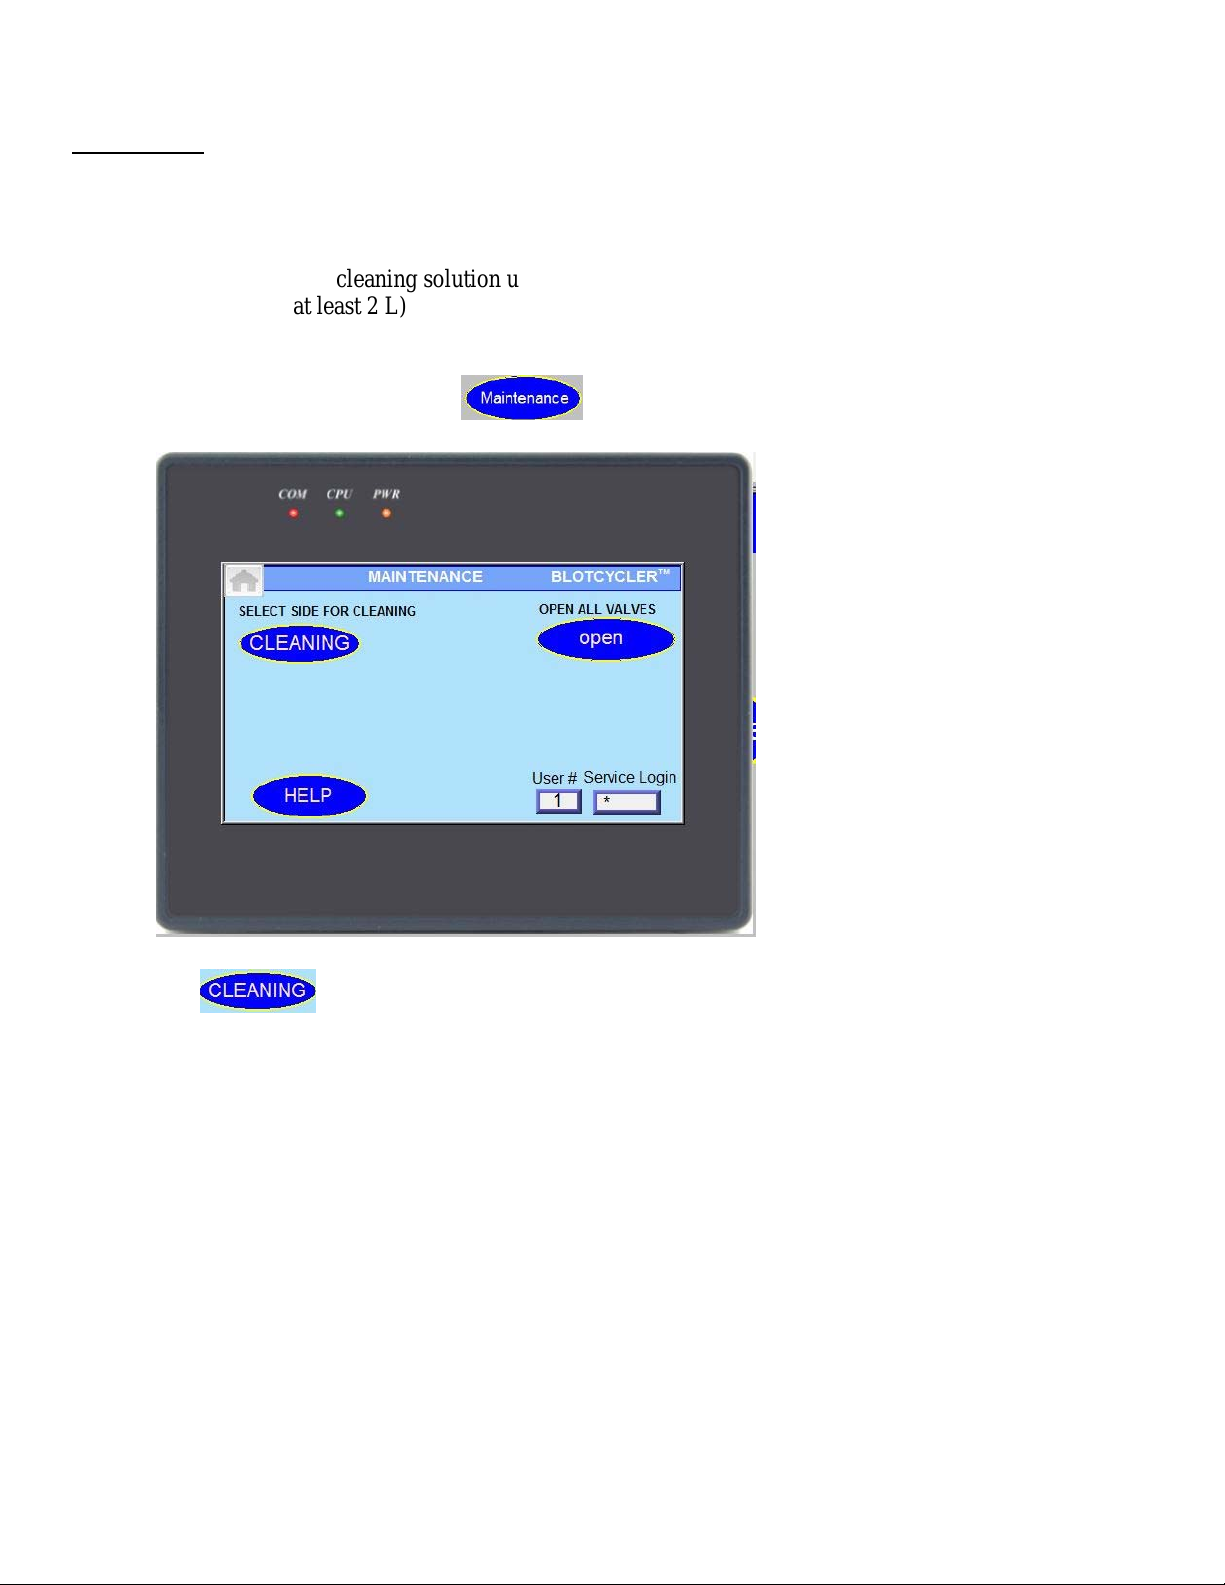
Fill the device with cleaning solution up to Max Level (if you want a shorter cleaning cycle you can add
less buffer, but at least 2 L).
Note: Make sure there is enough cleaning solution otherwise the pumps can be damaged.
Go to the home screen and press button, a new screen will appear:
.
Press and select left or right side on pop-up window.
Note: you can start another side only after cleaning on the other side is completed.
Note: to remove the excess of cleaning solution from the tank you can repeat the cleaning cycler or just
remove the plug located between the pumps.
Note: you can stop cleaning at any time but need to restart BlotCycler before starting a new protocol.

15
B6. BlotCycler Maintenance:
Run cleaning cycle every time you finished western blot processing. You can use deionized or distilled water
for cleaning. At least once in a week perform intensive cleaning with cleaning solution (cat #CL500).
If the BlotCycler is not intended to be used within next 24h, run cleaning cycle with cleaning solution and
then with deionized or distilled water and open all valves. It is a good idea to keep all valves open all the
time while BlotCycler is not in operation.
Go to home screen and press button and then button.
When all valves are open, the beep sound and the message will appear. Now you can turn BlotCycler
off.
Note: before opening valves check that there is no solution in the tank or the level close to minimal level.
Now turn BlotCycler off.
Note: after opening valve you need to restart BlotCycler using switch on the back before using it
again.
Warning: If there is a risk that a large volume of spilled liquid has penetrated the casing of
the instruments and come into contact with the electrical components, immediately switch off
the system, wipe out all spilled solution and do not operate until completely dry.

16
Appendix
Troubleshooting
Problem Possible Cause Solution
No power (the digital
display remains black
when the power is
turned on)
AC power cord is not connected.
Fuse has blown.
Check AC power cord connections at both ends.
Use the correct cords. Replace the fuse
If the problem still persists after verifying that
correct power cord is used and the fuse is
replaced, contact Technical support.
Buffers leak from the
trays and tank
immediately
Valves remain open. Turn instrument off, wait at least 5 sec and
turned instrument on. After initialization valves
will be closed.
Weak or no signal from
the blot Detection step missed or
detection reagents not working. After the blot processing is complete, perform
the detection step using your standard detection
reagents and protocol manually. Make sure the
detection reagents are functional.
Insufficient incubation with
detection reagent Remove blot from detection reagent when
signal-to-noise ratio is acceptable.
Poor or incomplete transfer Make sure transfer apparatus and membrane
sandwiches are assembled correctly. Use
appropriate transfer times. After blotting, stain
membrane to measure transfer efficiency.
Protein of interest ran off the gel Use positive control and/or molecular weight
marker to match gel separation range to size of
protein being blotted. After blotting, stain
membrane to measure transfer efficiency.
Incorrect reagents added or
incorrect containers are filled Make sure that primary and secondary antibody
are added to correct containers and number on
antibody container in the tank and tray match
each other.
Sample too dilute Load the larger amount of protein onto the gel
or increase concentration of proteins.
Poor retention of proteins or
protein weakly bound to
membrane
Use membranes with appropriate binding
capacity. Dry PVDF membrane after protein
transfer to ensure strong binding of the proteins.
Inactive or overly dilute primary
or secondary antibody Determine antibody activity by performing a
serial dilution using six trays or dot blot.
Increase antibody concentration as necessary.
High background on the
blot Film overexposed or became wet
during exposure Decrease exposure time or allow signal to
further decay. Prevent leakage of solutions by
encasing membrane in transparency film and
blotting excess substrate from edges before
exposure.

17
Short blocking time or washing
intensity Increase blocking time and the number of
washes
High concentration of primary
and/or secondary antibody Determine optimal antibody concentration by
performing dilution series using all six trays.
Decrease antibody concentration as necessary.
Protein is overloaded Reduce load or dilute concentration of sample.
Membrane, solutions, trays, or
antibody containers are
contaminated
Use clean glassware and purified water to
prepare solutions. Wear clean gloves at all
times. Use forceps when handling membranes.
Run cleaning protocol with cleaning buffer,
increase the concentration of cleaning buffer
two times
Protein is overloaded Reduce load or dilute concentration of sample.
Non-specific
binding too high Insufficient removal of SDS or
weakly bound proteins from
membrane after blotting
Follow proper protocol for membrane
preparation before immunodetection.
Short blocking time Increase blocking time.
Affinity of the primary antibody
for the protein standards Check with protein standard manufacturer for
homologies with primary antibody.

18
Replacing the Fuse
Follow the instructions below to replace the 250V, 5A rated fuse for the power socket.
1. Turn off BlotCycler using switch on the back of the instrument and detach the power cord from the rear of
the instrument.
2. Open the fuse compartment located on the power entry block using a small flat blade screwdriver or
fingernail to gently open the fuse compartment.
3. Pull the fuse holder out of the compartment and inspect the fuse. If the fuse is burned or there is a break in the
fuse element, replace the 250 V, 5 A with the identical type fuse.
4. Place the fuse holder back into the compartment and snap the cover closed.
For additional fuses, contact Customer Support.

19
Repackaging the Instrument
Find an original box; take out an insert a flat box (originally contained tray and tank covers and dummy vials).
Find a small T-bar and place between pumps into the tank.
(If you cannot find T-bar, use any appropriate material to secure pump inside tank)
There are two green Styrofoam covers: front and back (they are slightly different):
Back Front
Remove tray and cover and place them in a flat box (see below). Put on front and back sterofoam covers on the
instrument. Make someone help you to make sure that instrument is not flip over.
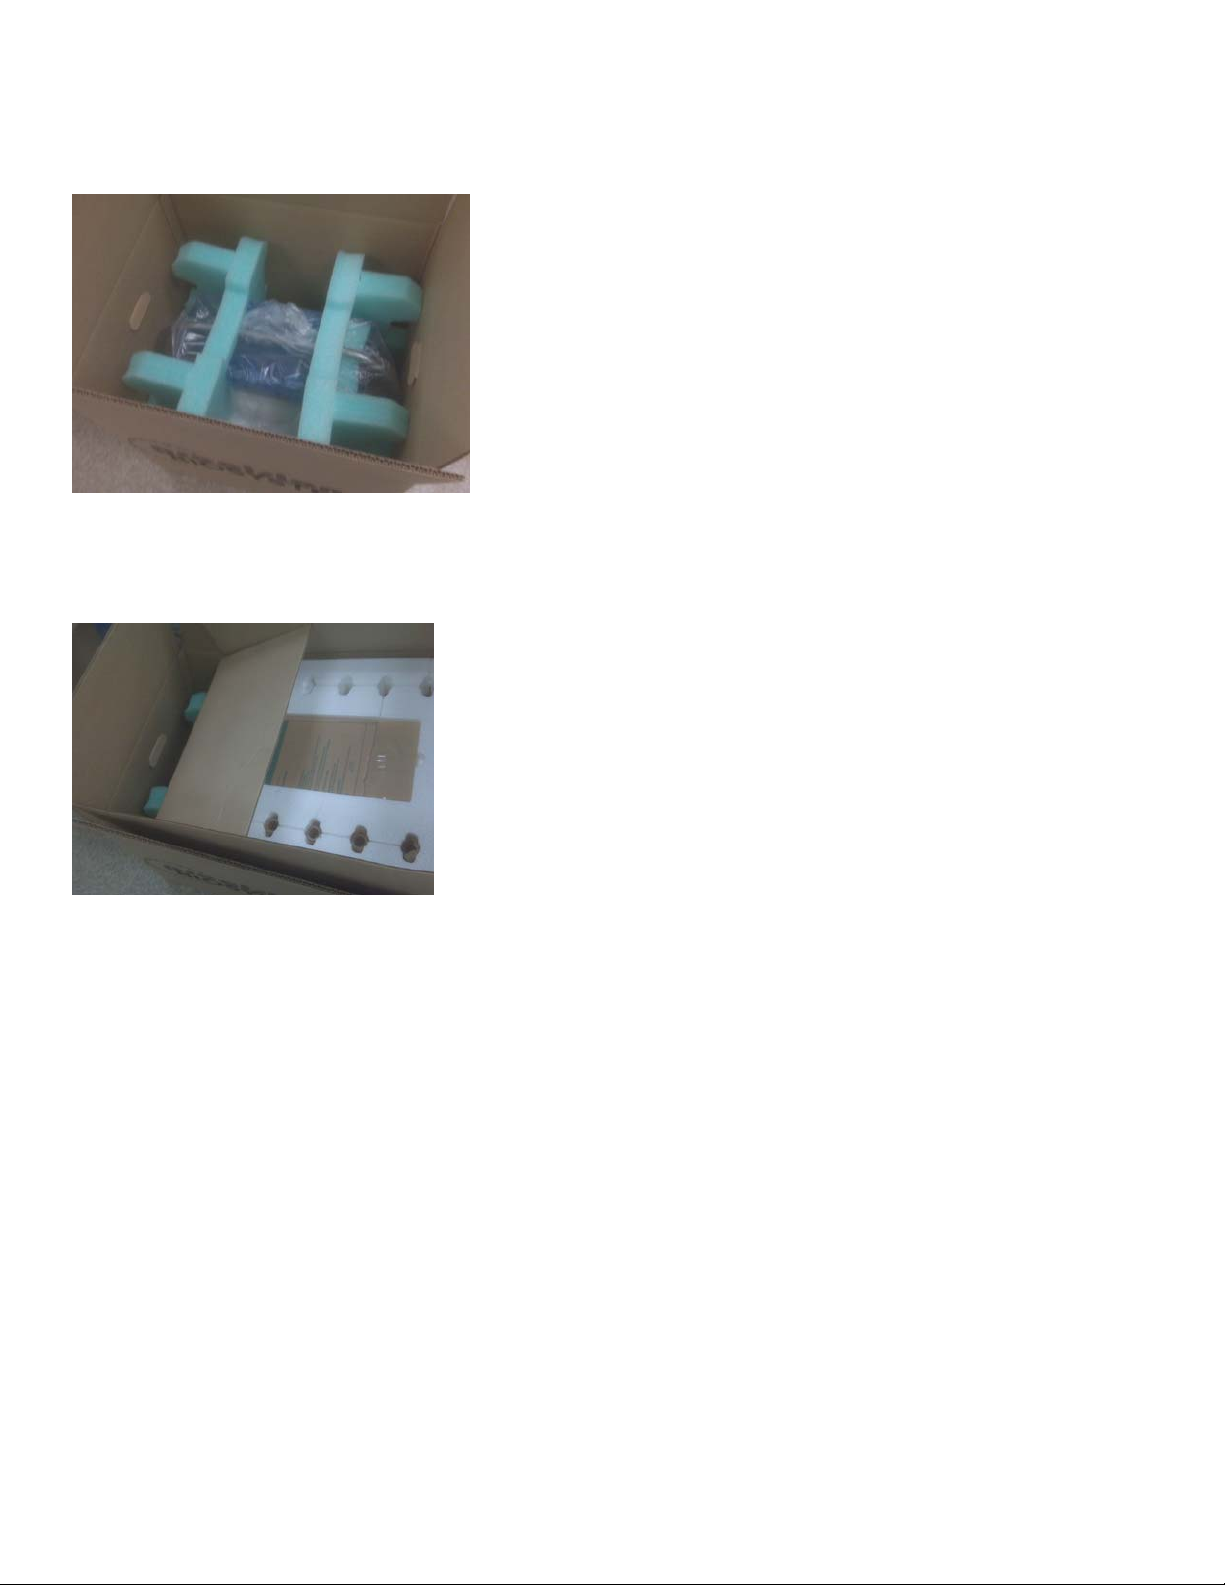
20
Using upper part of green Styrofoam as handles put BlotCycler in the box:
Place insert flat box over instrument (if you cannot find flat box use any soft material to fill the gap between
instrument and box top surface):
Close and tape the box.
Ship to:
Precision Biosystems
ATTN: Production Team
241 Francis Ave
Mansfield, MA 02048, U.S.A.
Table of contents
Popular Laboratory Equipment manuals by other brands

Esco
Esco Swift MiniPro SWT-MIP-0.5 Series Service manual

Parker Balston
Parker Balston NitroFlow60 Installation, operation and maintenance manual

Microm
Microm HM 355 S instruction manual

Meler
Meler Micron 5 instruction manual

Barnstead Thermolyne Corporation
Barnstead Thermolyne Corporation 494 Series Operation manual and parts list

Hanil
Hanil T04 quick guide

Ocean Optics
Ocean Optics USB-ISS-UV/VIS quick start guide

Ultravation
Ultravation UVPhotoMAX GI PTXGI-1224 Installation and owner's manual

Metrohm
Metrohm Combustion-IC-System Manual - Short Instructions

FujiFilm
FujiFilm BL-7000 Operation manual

Brooks
Brooks FluidX XSD-1 user manual

BlackHawk Labs
BlackHawk Labs USB560v2 installation guide


