Precision matthews PM-1127VFI-LB Installation guide

Spartan Robotics
Lathe Safety & Training
Manual

General Safety Information
1. Read your manual thoroughly before operating. Don’t try to do
more than you or your machine can handle. Understand the hazards
of operating a machine tool. In particular, remember never to change
speeds or setups until the machine is completely stopped and never
operate it without first rolling up your sleeves.
2. Wear proper clothing. Avoid loose-fitting clothes, gloves, neckties,
or jewelry that could get caught in moving parts. If you have long
hair, tie it up or otherwise keep it from getting into the machine.
Always wear non-slip footwear.
3. Protect yourself. Use ANSI approved safety glasses, goggles, or a
face shield at all times. Use safety glasses designed for machinery
operation; regular glasses will not do.
4. Have extras available for visitors. Know when to wear a face
mask or earplugs as well.
5. Keep your work area clean and organized. Cluttered work areas
and benches invite accidents. Have a place for everything and put
everything in its place.
6. Never operate your machine under the influence of drugs and
alcohol.
7. Keep track of tools. Remove adjusting keys and wrenches from the
machine before operating. A chuck key or misplacedAllen wrench
can be a safety hazard.
8. Avoid accidental starts. Turn the switch to the OFF position before
plugging in the machine. Turn the speed dial to zero before starting
your machine.
9. Ground your machine. The machine has a three-conductor cord
and three-prong, grounding-type plug. Never connect the power
supply without proper grounding
10. Keep your mind on your work. By paying attention to what you are
doing and avoiding distractions you will spend many safe, enjoyable
hours in your workshop.
11. Never leave your machine running unattended.

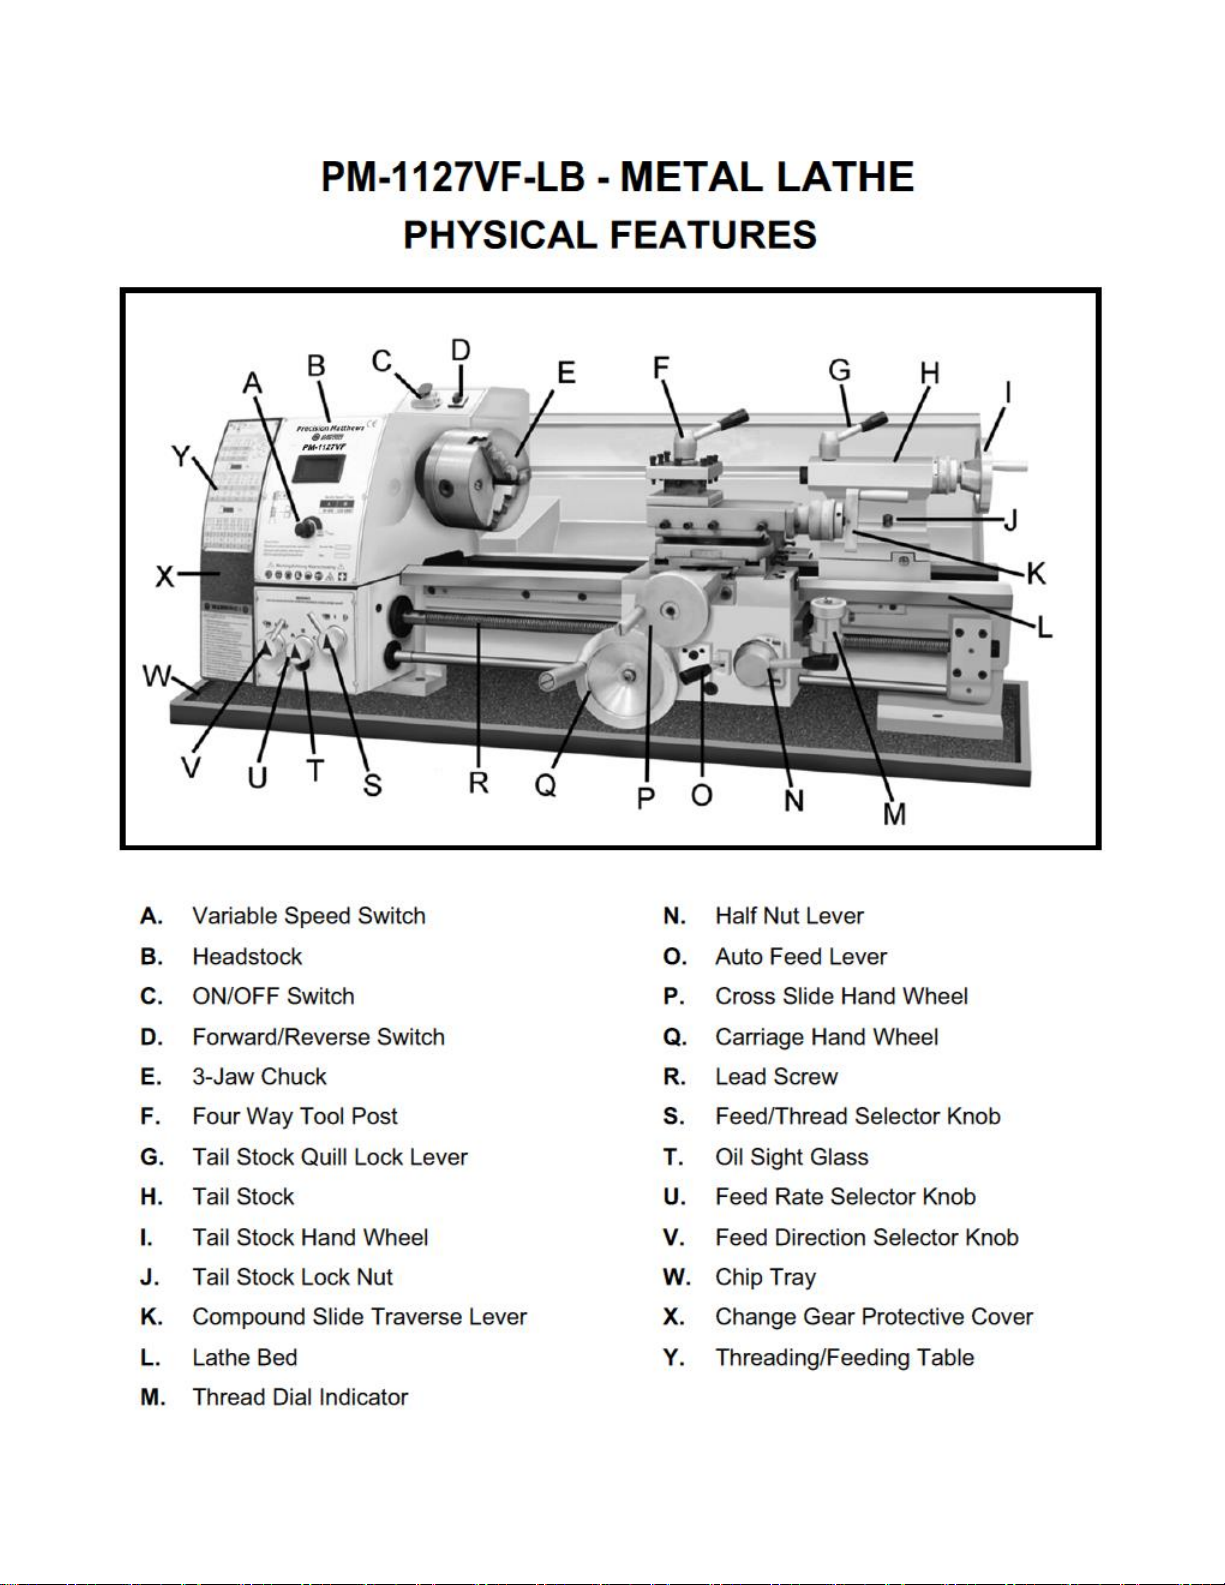
Machine Safety Rules
1. Stop the machine before servicing. Stop the machine before
making changes, removing debris, or measuring your work.
2. Don’t over reach. Don’t reach over the machine when it’s operating.
Keep your hands out of the way.
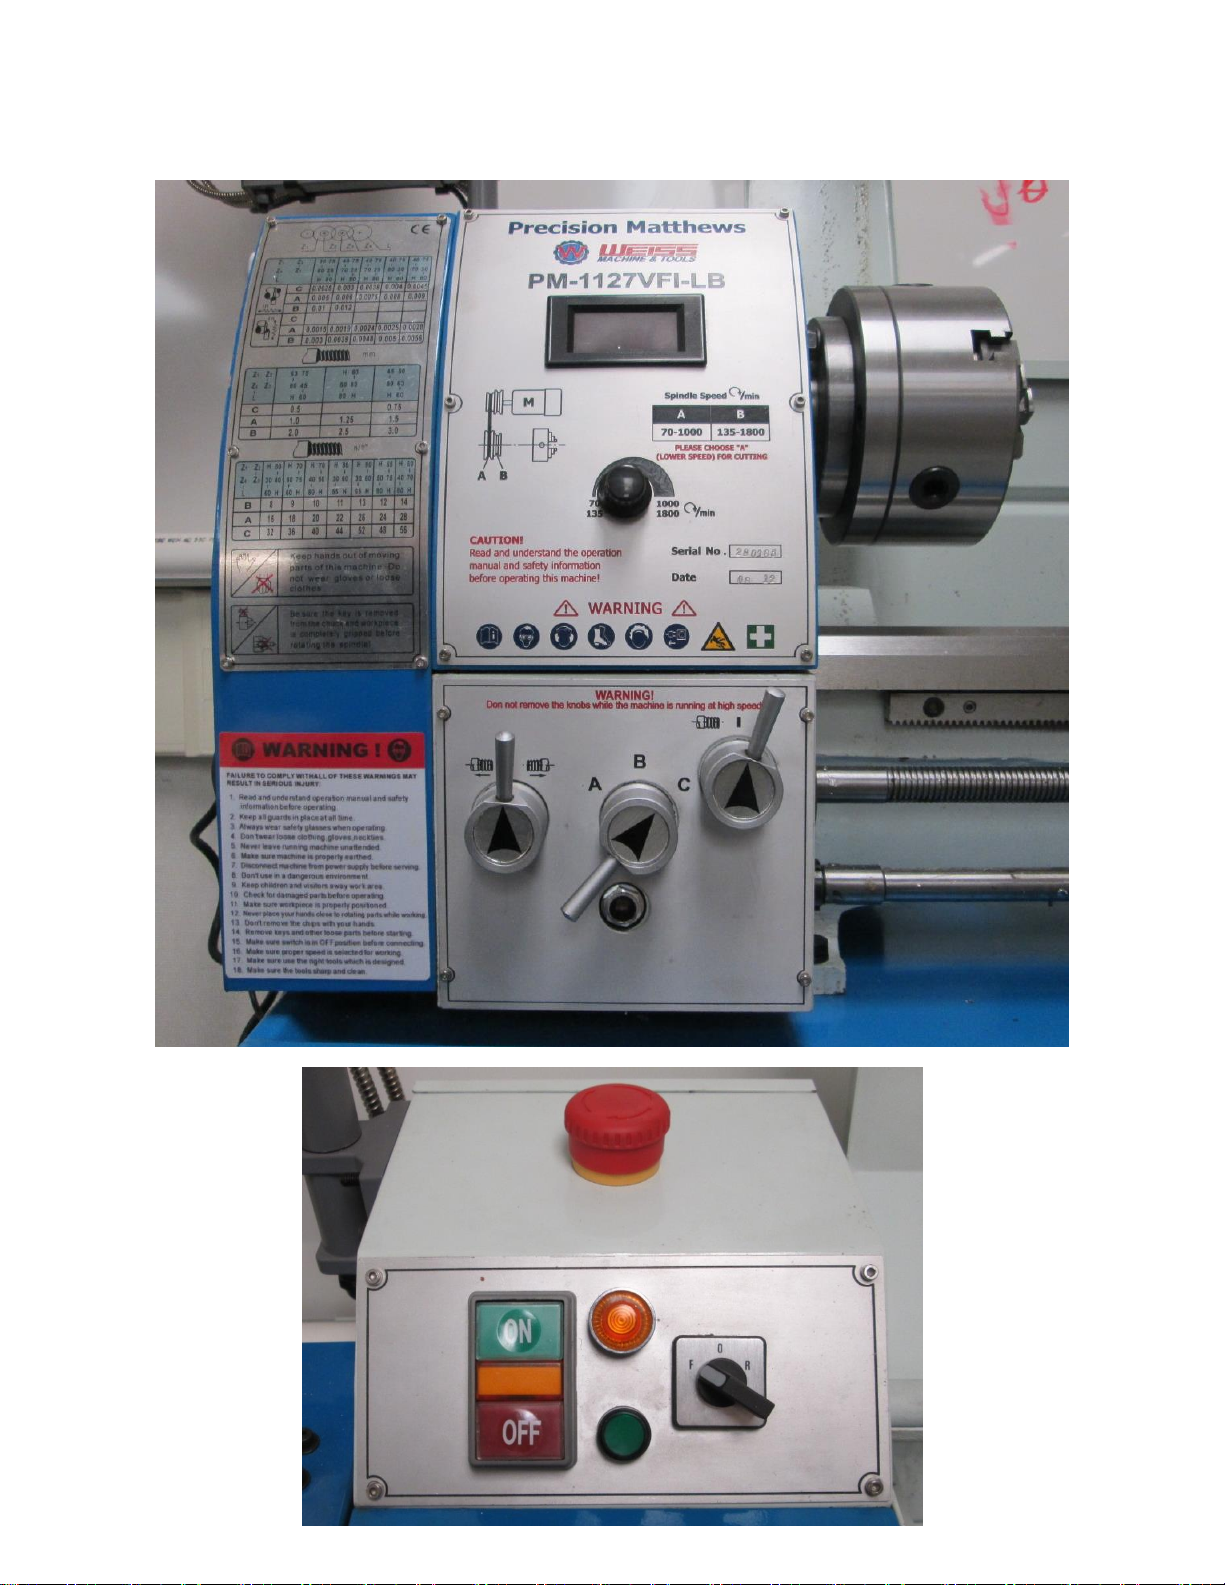
3. Turn the switch OFF. Turn the switch to off before plugging in the
machine. Turn the speed dial to zero before starting your machine.
4. Use proper tooling. Use only recommended accessories and
understand how they should be used before trying them out. Don’t
try to make a tool into something it isn’t or attempt to use a tool in
inappropriate ways. Remember to always use the proper tooling for
the material you are cutting.
5. Secure your work. Before starting your machine, be certain that
your work piece is properly and securely mounted. Flying metal is
dangerous!
6. Do not run the machine beyond its limits of travel. Before
starting your project, ensure that your work area does not go beyond
the limits of travel on your machine. Going beyond the limits of travel
will cause serious damage to your machine.
7. Run your machine at recommended spindle speeds and feed
rates. Always cut at the recommended speed and feed rates for the
type of metal that you are cutting for optimum performance. Do not
begin your cut until the machine has reached the full and proper
speed.
8. Do not change the direction of the spindle rotation Do not
change rotation while your machine is running. Changing the
rotation direction of the spindle while your machine is running could
cause serious damage to your machine.
9. Do not stop the spindle by hand. Always use your on/off switch to
stop the spindle from rotating.
10. Do not clear chips by hand. Metal chips are very sharp and can
easily cut your hand. Use a brush to clear chips.
11. Protect bed ways. When removing or installing tooling from your
lathe spindle, place a piece of wood or other material across the bed
to protect the ways from being damaged if the tooling is dropped.
12. Keep your machine maintained.

Introduction
Description
The lathe is a machine tool used principally for shaping pieces
of metal (and sometimes wood or other materials) by causing
the workpiece to be held and rotated by the lathe while a tool bit
is advanced into the work causing the cutting action.
The basic lathe that was designed to cut cylindrical metal stock
has been developed further to produce screw threads, tapered
work, drilled holes, knurled surfaces, and crankshafts.
Modern lathes offer a variety of rotating speeds and a means to
manually and automatically move the cutting tool into the
workpiece.


Headstock
The headstock is located on the operator's left end of the lathe
bed. It contains the main spindle, the part of the lathe that
rotates, an oil reservoir and the mechanism for obtaining various
spindle speeds and for transmitting power to the feeding and
threading mechanism.
The headstock mechanism is driven by an electric motor
connected to a belt pulley and gear system.
The main spindle is mounted on bearings in the headstock and is
hardened and specially ground to fit different lathe holding
devices. The spindle has a hole through its entire length to
accommodate long workpieces. The hole in the nose of the
spindle has a standard #5 Morse taper (MT5).
Centers, collets, drill chucks, tapered shank drills and reamers
may be inserted into the spindle. Chucks, drive plates, and
faceplates may be mounted onto the spindle nose.
Spindle speed is controlled by the variable speed switch and
Hi/Low belt position.

Headstock Controls

Carriage
The carriage includes the apron, saddle, compound rest, cross
slide, tool post, and the cutting tool. It sits across the lathe
ways and in front of the lathe bed.
The function of the carriage is to carry and move the cutting
tool. It can be moved by hand or by power and can be
clamped into position with a locking nut.
The saddle carries the cross slide and the compound rest. The
cross slide is mounted on dovetail ways on the top of the
saddle and is moved back and forth at 90°to the axis of the
lathe by the cross slide lead screw. The lead screw can be
hand or power activated.
A feed reversing lever, located on the headstock, can be used
to cause the carriage and the cross slide to reverse the
direction of travel when power activated.
The compound rest is mounted on the cross slide and can be
swiveled and clamped at any angle in a horizontal plane. The
compound rest is used in cutting steep tapers, angles for lathe
centers and threading.
The cutting tool and tool holder are secured in the tool post
which is mounted directly to the compound rest.
The apron contains the gears and feed clutches which transmit
motion from the feed rod or lead screw to the carriage and
cross slide.

Carriage Controls

Tailstock
The tailstock is located on the opposite end of the lathe from the
headstock.
It supports one end of the work when machining between
centers, supports long pieces held in the chuck, and holds
various forms of cutting tools, such as drills, reamers, and taps.
The tailstock is mounted on the ways and is designed to be
clamped at any point along the ways.
It has a sliding spindle that is operated by a hand wheel and
clamped in position by means of a spindle clamp.
The tailstock may be adjusted laterally (toward or away from the
operator) by adjusting screws. This is primarily used for cutting
long shallow tapers.

Tool Holding
Drill Chuck
The drill chuck is a small universal chuck which can be used in
either the headstock spindle or the tailstock for holding straight-
shank drills, reamers, taps, or small diameter workpieces.
The drill chuck has three or four hardened steel jaws which are
moved together or apart by adjusting a tapered sleeve within
which they are contained.
The drill chuck is capable of centering tools and small-diameter
workpieces to within 0.002 or 0.003 inch when firmly tightened.
Quick Change Tool Post
The quick-change tool system consists of a quick-change
dovetail tool post with a complete set of matching dovetailed tool
holders that can be quickly changed as different lathe
operations become necessary.
This system has a quick-release knob on the top of the tool post
that allows tool changes in less than 5 seconds.
It includes tool holders for turning tools, boring bars, cut-off tools
and knurling wheels.

Tooling
Turning / Facing
HSS (High Speed Steel) –tool blanks, which can be pre-
ground or are ground by hand to the desired shape for the
application.
Cemented Carbide –Pre-ground carbide brazed to a steel
shank.
Indexable Inserts –Pre-formed ceramic, carbide or HSS.
Attaches to a tool shank with clamp or screw fastener and has
two or more cutting edges. Come in a wide variety of shapes,
material and coatings. Must be selected for the specific
material and use.
Parting / Grooving
Carbide Insert - attaches to a tool shank with clamp or screw
fastener and has one or two cutting edges. Come in a variety
of widths and shapes, materials and coatings.
HSS Blade –Typically used with a clamp style blade holder.
Boring / Drilling
Come in a variety of shapes, lengths, sizes and materials.
Includes twist drills, counter bores, counter sinks, reamers,
solid boring bars and insert style boring bars.

Tooling Examples

Using Tooling
Installing a Turning Tool
Lathe cutting tools are held by tool holders.
To install a tool, first clean the holder, install the tool, then tighten
the screw clamps.
The quick change tool post is secured to the compound with a
bolt. Loosen and tighten this bolt to position the tool post.
The tool holder is secured to the tool post using a quick release
lever. The height of the tool is adjusted with a thumb screw and
lock nut on the tool holder.
The height of a turning, boring or parting tool should be at the
center of axis or slightly above.

Positioning the Turning Tool
In order to move the cutting tool, the lathe saddle (Z-axis) and
cross slide (X-axis) can be moved by hand. There are also
power feeds for these axes.
A third axis of motion is provided by the compound. The angle
of the compound can be adjusted to allow tapers to be cut at
any desired angle. First, loosen the bolts securing the
compound to the saddle. Then rotate the compound to the
desired angle referencing the dial graduations at the base of
the compound. Retighten the bolts. Now the tool can be hand
fed along the desired angle. No power feed is available for the
compound. If a fine finish is required, use both hands to
achieve a smoother feed rate.
The cross slide (X-axis) and saddle (Z-axis) have a digital read
out (DRO) to allow accurate positioning, but the compound
doesn't. To position the compound accurately, use the
micrometer dial or a dial indicator mounted to the cross slide.

Feed, Speed, and Depth of Cut
Cutting speed is defined as the speed at which the work moves
with respect to the tool (usually measured in feet per minute).
Feed rate is defined as the distance the tool travels during one
revolution of the part.
Cutting speed and feed determines the surface finish, power
requirements, and material removal rate.
The primary factor in choosing feed and speed is the material to
be cut. However, one should also consider material of the tool,
rigidity of the workpiece, size and condition of the lathe, and
depth of cut.
Softer materials such as plastics, aluminum and brass can be
cut at higher speeds than harder materials such as steel.
For most Aluminum alloys, on a roughing cut (.010 to .020
inches depth of cut) run at 600 fpm. On a finishing cut (.002 to
.010 depth of cut) run at 1000 fpm.
To calculate the proper spindle speed, divide the desired cutting
speed by the circumference of the work. Experiment with feed
rates to achieve the desired finish.
In considering depth of cut, it's important to remember that for
each thousandth depth of cut, the work diameter is reduced
by two thousandths.
When in doubt always start at a slower speed and feed rate.

Turning
The lathe can be used to reduce the diameter of a part to a
desired dimension.
First, clamp the workpiece securely in the lathe chuck. The part
should not extend more that three times its diameter.
Then install a turning tool (whichever is appropriate for the
material).
If you're feeding the saddle toward the headstock, use a right-
hand turning tool. Move the tool off the part by backing the
carriage up with the carriage hand wheel, then use the cross
feed to set the desired depth of cut.

Facing
A lathe can be used to create a smooth, flat, face very
accurately perpendicular to the axis of a cylindrical part.
First, clamp the workpiece securely in the lathe chuck. Then,
install a facing tool. Bring the tool approximately into position,
but slightly off of the part. Always turn the spindle by
hand before turning it on. This ensures that no parts interfere
with the rotation of the spindle.
Move the tool outside the part and adjust the saddle to take the
desired depth of cut. Then, feed the tool across the face with
the cross slide. If a finer finish is required, take just a few
thousandths on the final cut and use the power feed.
Be careful clearing the ribbon-like chips; They are very sharp.
Do not clear the chips while the spindle is turning. After facing,
there is a very sharp edge on the part. Break the edge with a
file.

Parting and Grooving
A parting tool is deeper and narrower than a turning tool. It is
designed for making narrow grooves and for cutting off parts.
When a parting tool is installed, ensure that it hangs over the
tool holder enough that the holder will clear the workpiece (but
no more than that). Ensure that the parting tool is perpendicular
to the axis of rotation and that the tip is the same height as the
center of the part. A good way to do this is to hold the tool
against the face of the part.
Set the height of the tool, use a tool setting gauge or dead
center mounted in the tailstock.
When the cut is deep, the side of the part can rub against sides
of the parting tool, so it's especially important to apply cutting
fluid. Parting and grooving are generally done at lower speed
and feed rates.

Drilling
A lathe can also be used to drill holes accurately concentric with
the centerline of a cylindrical part.
First, install a drill chuck into the tail stock. Make certain that the
tang on the back of the drill chuck seats properly in the tail
stock.
Move the saddle forward to make room for the tailstock. Move
the tailstock into position, and lock it in place (otherwise it will
slide backward as you try to drill).
Before starting the machine, turn the spindle by hand. You've
just moved the saddle forward, so it could interfere with the
rotation of the lathe chuck.
Always use a centerdrill to start the hole. You should use cutting
fluid with the centerdrill. It has shallow flutes (for added
stiffness) and doesn't cut as easily as a drill bit. Always drill past
the beginning of the taper to create a funnel to guide the bit in.
Take at most one or two drill diameters of material before
backing off, clearing the chips, and applying cutting fluid. If the
drill bit squeaks, apply cutting fluid more often.
The drill chuck can be removed from the tail stock by drawing
back the drill chuck as far as it will easily go, then about a
quarter turn more. A pin will press the chuck out of the ram.
Table of contents
Other Precision matthews Lathe manuals

Precision matthews
Precision matthews PM-1440-2SM User manual

Precision matthews
Precision matthews PM-1440GS User manual

Precision matthews
Precision matthews PM-1127VF-LB User manual

Precision matthews
Precision matthews PM-1440E-LB Installation guide

Precision matthews
Precision matthews PM-1236 User manual

Precision matthews
Precision matthews PM-1440BV User manual

Precision matthews
Precision matthews PM-1236T User manual

Precision matthews
Precision matthews PM-1022V User manual

Precision matthews
Precision matthews PM-1228VF-LB User manual

Precision matthews
Precision matthews PM-1440GT User manual