Precisionary RF-800 User manual

PRECISIONARY INSTRUMENTS
ROTARY MICROTOME RF-800
For Research & Clinical Studies
User Manual

2
Table of Contents
!"#$%&'(&)'*+%*+,&---------------------------------------------------------------------------------------------------------------------------------&.!
!"#$%&'()*&+++++++++++++++++++++++++++++++++++++++++++++++++++++++++++++++++++++++++++++++++++++++++++++++++++++++++++++++++++++++++++++++++++++++++++++++++++++++++&,!
-#./01&++++++++++++++++++++++++++++++++++++++++++++++++++++++++++++++++++++++++++++++++++++++++++++++++++++++++++++++++++++++++++++++++++++++++++++++++++++++++++++++++++++&,!
Instrument)Type)&)Use)..................................................................................................................................................)4!
Intended)Use)of)the)Instrument).................................................................................................................................)4!
Safety)Devices)....................................................................................................................................................................)4!
/'0%$&1%,2345+4'*&-------------------------------------------------------------------------------------------------------------------------------&6!
234566&2(0#71&89:7(0(;/&</$/7#=&>$.(7;#09($&+++++++++++++++++++++++++++++++++++++++++++++++++++++++++++++++++++++++++++++++++++&?!
Technical)Specifications)................................................................................................................................................)5!
234566&2(0#71&89:7(0(;/&@(;A($/$0B&+++++++++++++++++++++++++++++++++++++++++++++++++++++++++++++++++++++++++++++++++++++++++++++++++++&C!
RF-800)Rotary)Microtome)Anatomy)........................................................................................................................)7!
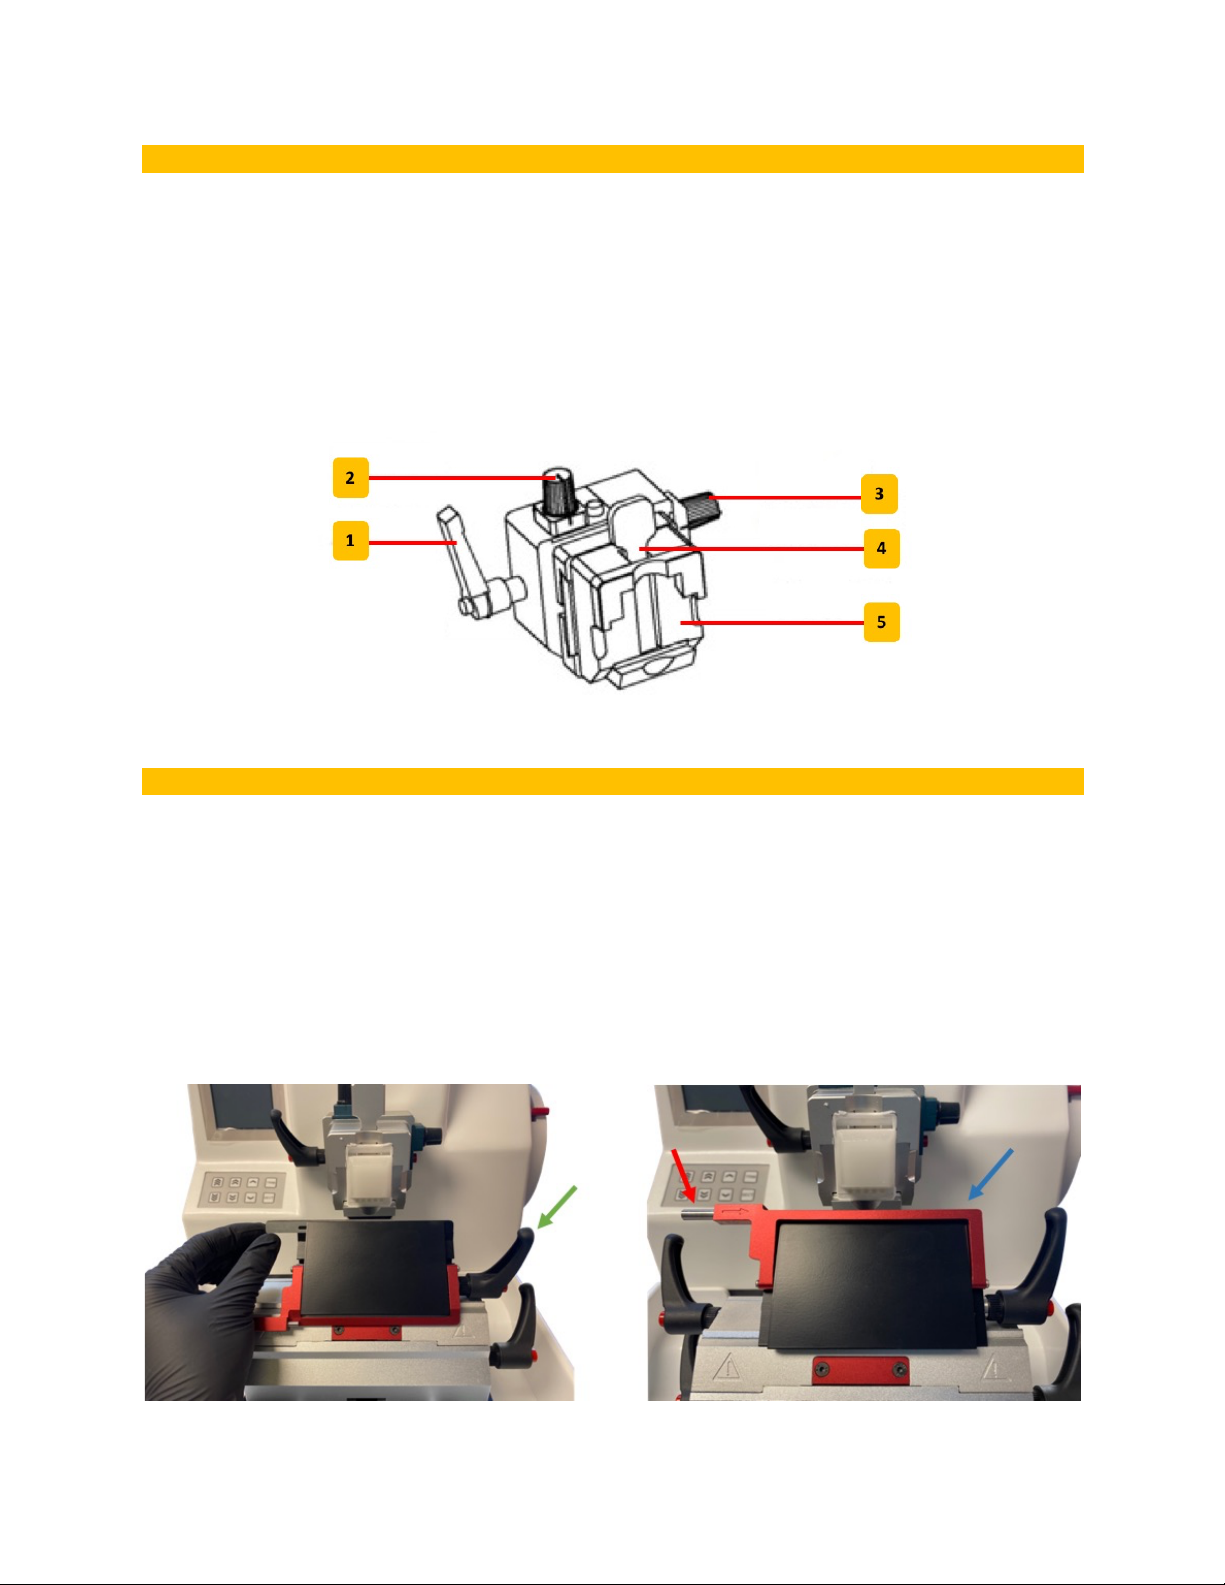
RF-800)Specimen)Head)Clamp)Anatomy)...............................................................................................................)8!
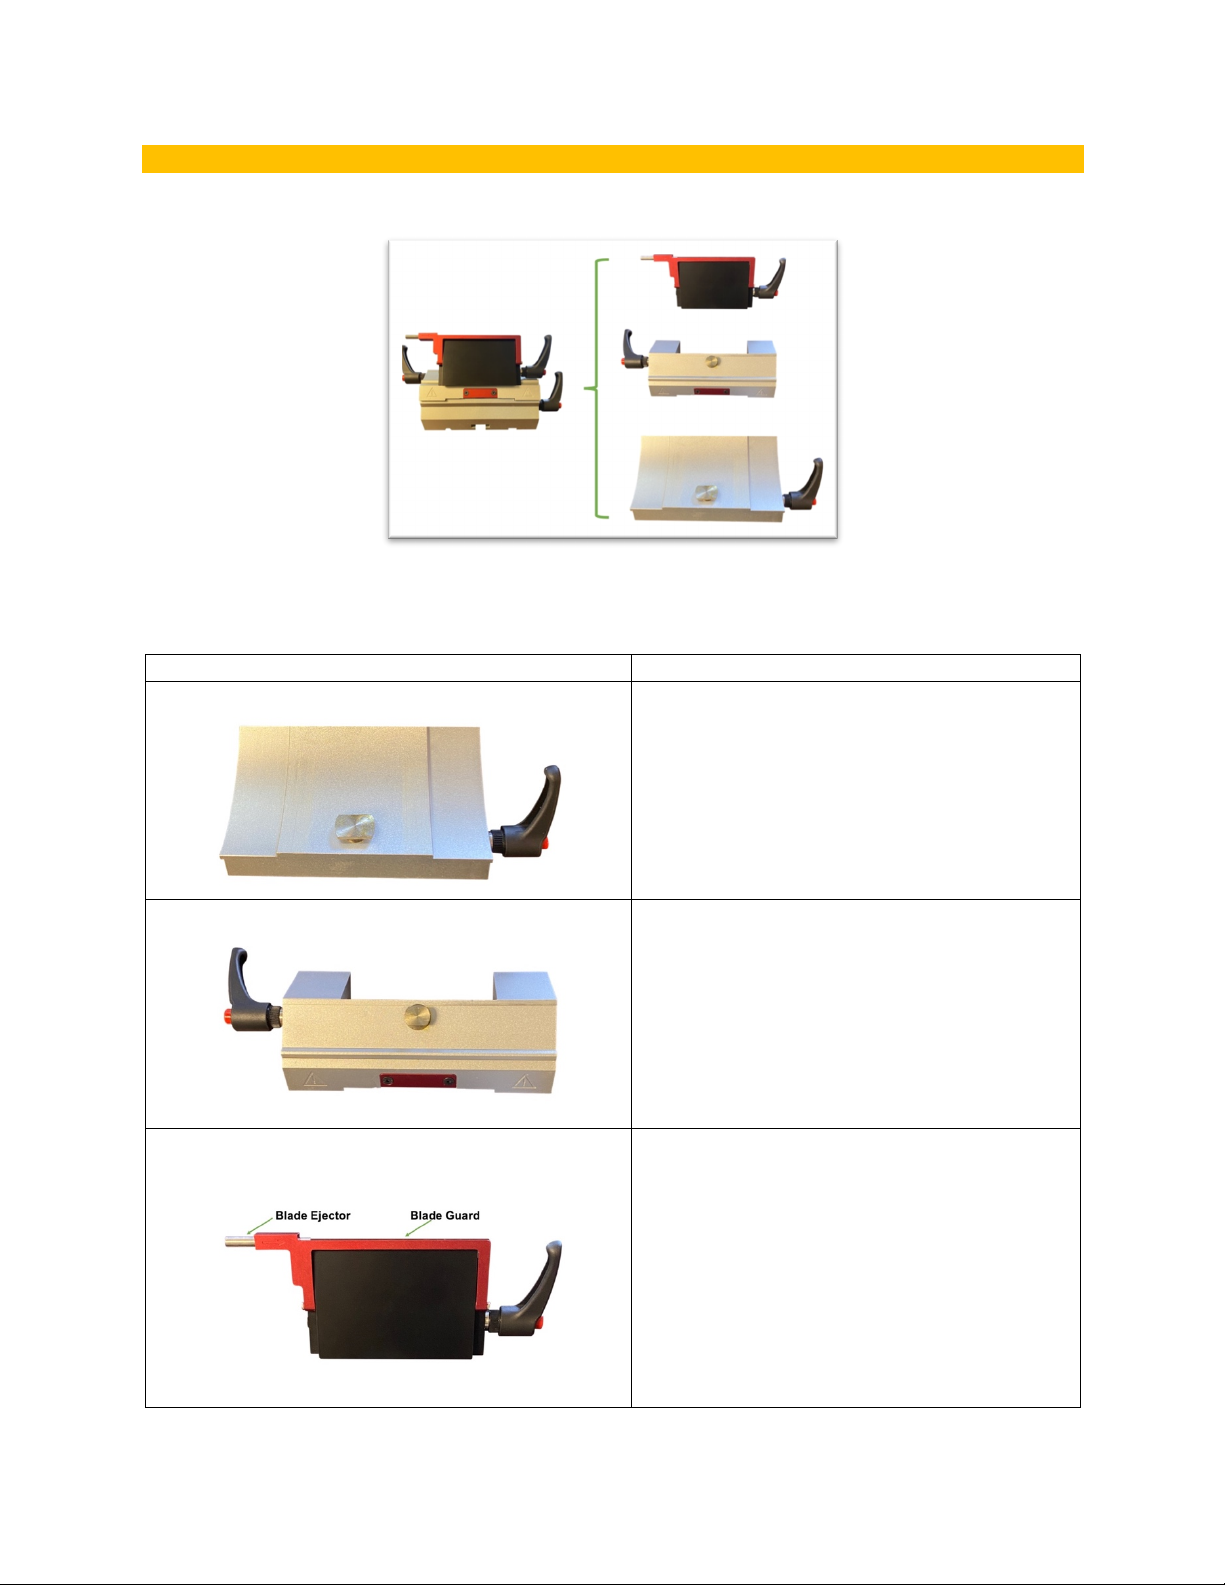
RF-800)Knife)Holder)Base)Anatomy)........................................................................................................................)8!
7*,+"$$"+4'*&---------------------------------------------------------------------------------------------------------------------------------------------&8!
>$B0#==#09($&</$/7#=&>$.(7;#09($&+++++++++++++++++++++++++++++++++++++++++++++++++++++++++++++++++++++++++++++++++++++++++++++++++++++++++++++++&D!
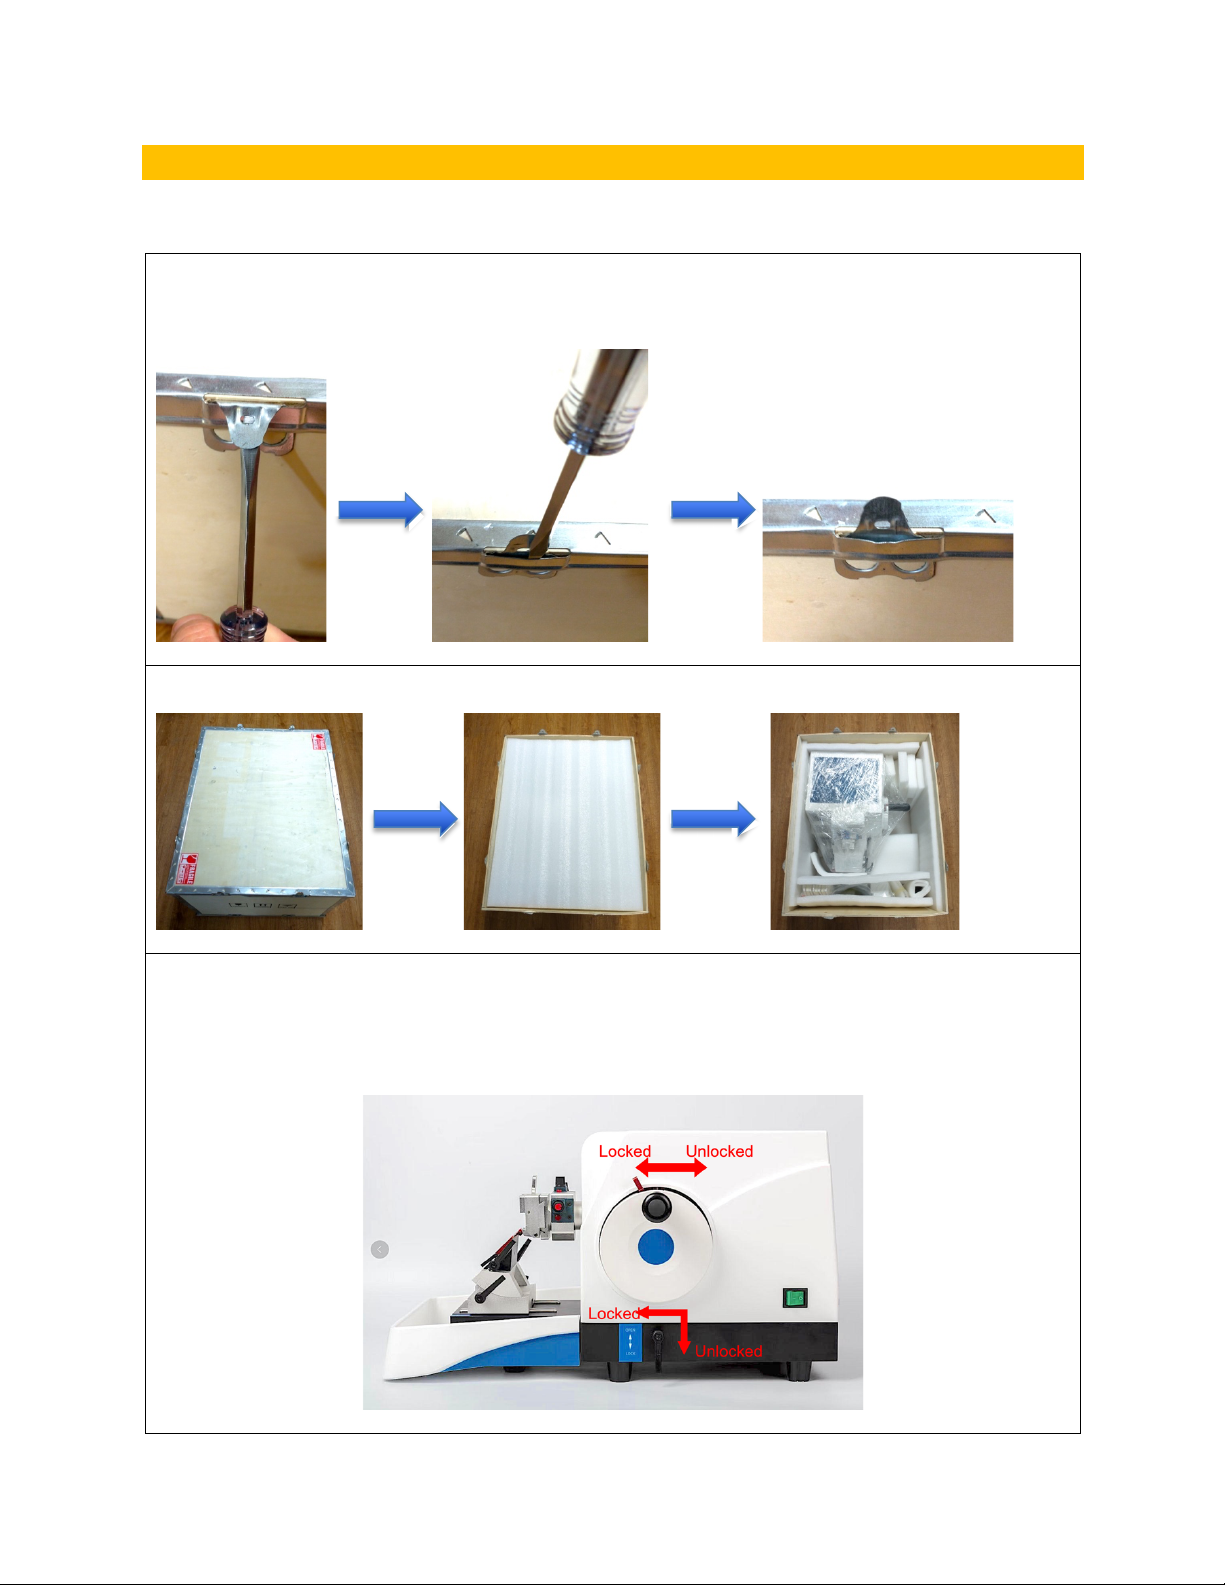
E/=9F/71&(.&0"/&2(0#71&89:7(0(;/&234566&++++++++++++++++++++++++++++++++++++++++++++++++++++++++++++++++++++++++++++++++++++++++++++++&D!
!"#$%&'"()*)+",-$..'"()-/0)12-$34)5'%32-260)1789::);;;;;;;;;;;;;;;;;;;;;;;;;;;;;;;;;;;;;;;;;;;;;;;;;;;;;;;;;;;;;;;;;;;;;;;;;;;;;;;;;;;;;;;;;;;;;;;)<:!
95%3"+4'*&----------------------------------------------------------------------------------------------------------------------------------------------&::!
-G90:"9$H&($&0"/&2(0#71&89:7(0(;/&+++++++++++++++++++++++++++++++++++++++++++++++++++++++++++++++++++++++++++++++++++++++++++++++++++++++&II!
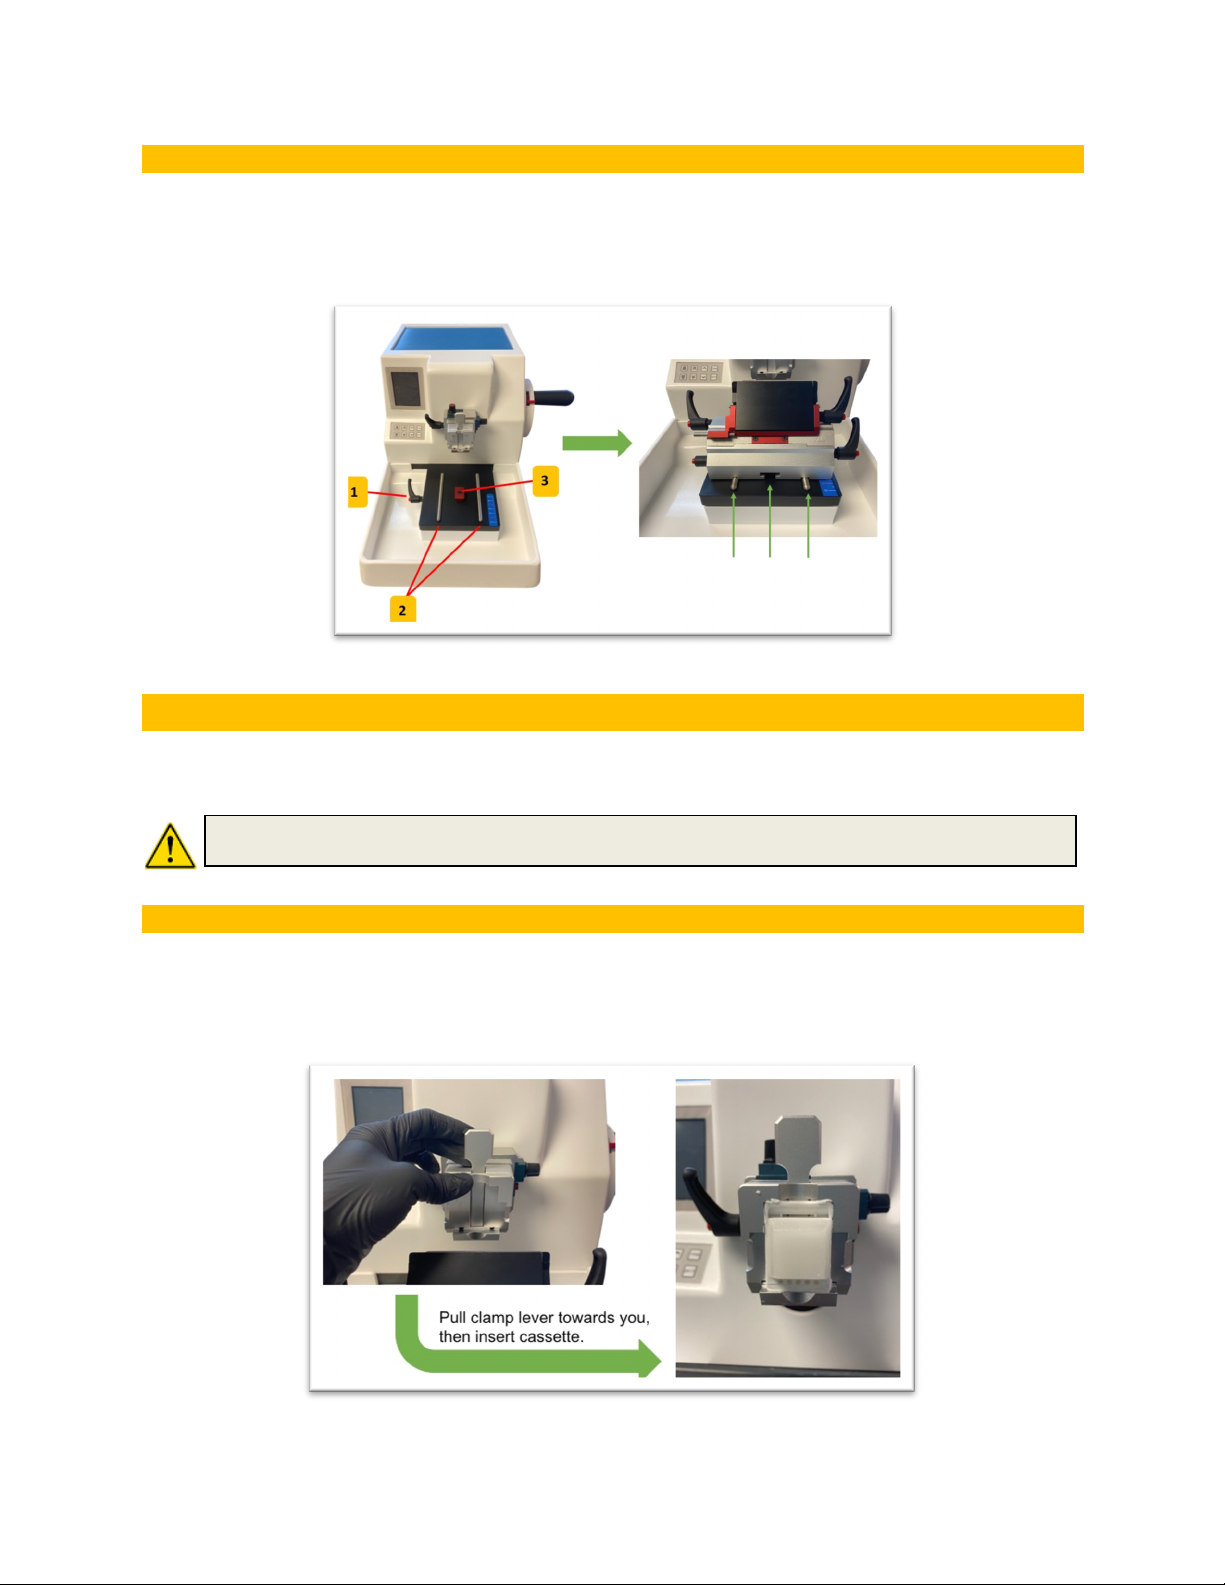
>$B0#==9$H&2(0#71&89:7(0(;/&J::/BB(79/B&+++++++++++++++++++++++++++++++++++++++++++++++++++++++++++++++++++++++++++++++++++++++++++++&II!
=-0#)<;)+",-$..)-/0)3062>0$?.0)@$,-0)-3$4);;;;;;;;;;;;;;;;;;;;;;;;;;;;;;;;;;;;;;;;;;;;;;;;;;;;;;;;;;;;;;;;;;;;;;;;;;;;;;;;;;;;;;;;;;;;;;;;;;;;;;;;;;;;;;;;;;;;;;;;;)<<!
=-0#)A;)B0$3")-/0)C'DD030"-)%26#2"0"-,)2D)-/0)&"'D0)/2.C03)?$,0);;;;;;;;;;;;;;;;;;;;;;;;;;;;;;;;;;;;;;;;;;;;;;;;;;;;;;;;;;;;;;;;;;;;;;;;;;)<A!
=-0#)E;)+",-$..)-/0)&"'D0)/2.C03)?$,0)2"-2)-/0)6'%32-260)?$,0)F"'-);;;;;;;;;;;;;;;;;;;;;;;;;;;;;;;;;;;;;;;;;;;;;;;;;;;;;;;;;;;;;;;;;;;;;;)<E!
@)009$H&-/:09($B&G90"&0"/&2(0#71&89:7(0(;/&+++++++++++++++++++++++++++++++++++++++++++++++++++++++++++++++++++++++++++++++++++++++&I,!
=-0#)<;)+",03-)$)%$,,0--0)23)-',,F0)?.2%&)'"-2)-/0),#0%'60")/0$C)%.$6#);;;;;;;;;;;;;;;;;;;;;;;;;;;;;;;;;;;;;;;;;;;;;;;;;;;;;;;;;;;;;;)<E!
=-0#)A;)GCHF,-)-/0)23'0"-$-'2")$"(.0,)2D)-/0),#0%'60")/0$C);;;;;;;;;;;;;;;;;;;;;;;;;;;;;;;;;;;;;;;;;;;;;;;;;;;;;;;;;;;;;;;;;;;;;;;;;;;;;;;;;;;;;)<I!
=-0#)E;)+",03-)$)32-$34)6'%32-260)%F--'"()?.$C0);;;;;;;;;;;;;;;;;;;;;;;;;;;;;;;;;;;;;;;;;;;;;;;;;;;;;;;;;;;;;;;;;;;;;;;;;;;;;;;;;;;;;;;;;;;;;;;;;;;;;;;;;;;;)<I!
KB9$H&0"/&LA/7#09($&M#$/=&+++++++++++++++++++++++++++++++++++++++++++++++++++++++++++++++++++++++++++++++++++++++++++++++++++++++++++++++++++++++++&I?!
KB9$H&0"/&N@E&!():"B:7//$&M#$/=&+++++++++++++++++++++++++++++++++++++++++++++++++++++++++++++++++++++++++++++++++++++++++++++++++++++++++++&IC!
)$%"*4*;&<&/"4*+%*"*2%&------------------------------------------------------------------------------------------------------------------&:8!
@=/#$9$H&O&E9B9$./:09$H&+++++++++++++++++++++++++++++++++++++++++++++++++++++++++++++++++++++++++++++++++++++++++++++++++++++++++++++++++++++++++++++++&ID!
!3'=#$%,>''+4*;&---------------------------------------------------------------------------------------------------------------------------------&.?!
@"33"*+A&<&B%3C42%,&-------------------------------------------------------------------------------------------------------------------------&.:!
P#77#$01&+++++++++++++++++++++++++++++++++++++++++++++++++++++++++++++++++++++++++++++++++++++++++++++++++++++++++++++++++++++++++++++++++++++++++++++++++++++++++&QI!
-/7F9:/&>$.(7;#09($&+++++++++++++++++++++++++++++++++++++++++++++++++++++++++++++++++++++++++++++++++++++++++++++++++++++++++++++++++++++++++++++++++++++&QI!
@($0#:0&>$.(7;#09($&+++++++++++++++++++++++++++++++++++++++++++++++++++++++++++++++++++++++++++++++++++++++++++++++++++++++++++++++++++++++++++++++++++++&QI!

3
Thank You!
Thank you for choosing the Precisionary Rotary Microtome RF-800!
At Precisionary Instruments, we are thrilled to help you get started with your new rotary
microtome, and we take great pride in quality customer service. Please read the following manual
to help you get started with the Precisionary Rotary Microtome RF-800.
Safety
This user manual is a key part of the Precisionary Rotary Microtome RF-800, therefore make
sure to keep it on hand and as close as possible to the instrument itself for future reference.
Specifically, this user manual contains crucial instructions and guidance regarding the safety
and service of the rotary microtome. As a responsible user, it is important to carefully read all of
the materials in the manual before attempting to use the rotary microtome.
The Precisionary Rotary Microtome RF-800 is in line with the safety requirements for electrical
equipment regarding measurement, control, and laboratory use. Follow all of the instructions
and warnings in this user manual. This helps to ensure your safety as the user and helps
prolong the condition of the rotary microtome.
Note
The information, numerical data, notes and value judgements contained in this manual
represent the current state of scientific knowledge and state-of-the-art technology. We aim to
update the present manual regularly according to the latest technical developments. Please
contact us or visit our website to find the latest versions of this user manual.
Contact [email protected] or call 617-682-0586 for updated information.
Website: http://www.precisionary.com
Dangers, warnings, and cautions appear in a box and are marked by the warning
triangle.
Important information for the user, such as disclaimers, appear in a box and are
marked by the information symbol.
Caution! Follow the accompanying documentation.

4
Instrument Type & Use
The information (technical specifications, instructions, and handling of this rotary microtome)
provided in this user manual applies only to the Precisionary Rotary Microtome RF-800 model.
Please only refer to this user manual when handling the Precisionary RF-800 rotary microtome.
The Precisionary RF-800 is meant to be used by trained laboratory personnel only, and is
intended only for professional use. Please read this manual thoroughly and understand all
instructions BEFORE operating this instrument. For your safety and for obtaining the best
possible tissue slicing results, please familiarize yourself with the technical details explained in
this user manual.
Intended Use of the Instrument
We advise that the safety regulations found in this user manual are maintained in good practice
to prevent accidents and/or personal injuries from occurring. Any other use of this instrument,
not in a laboratory nor research setting, is considered improper use.
Safety Devices
Before you begin working with your instrument, it is important that you become familiar with all
devices that provide safety with your machine. Your instrument is equipped with the following
safety devices: a hand wheel lock system, safety guard on the blade and knife holder, and a
blade ejector.
The RF-800 can be easily cleaned with chemical disinfectant (i.e., isopropyl alcohol,
ethanol, etc.). This instrument can be safely cleaned under a UV lamp. Be sure to
wear safety goggles, gloves, a laboratory coat and mask to protect yourself from
contaminants and UV light when cleaning
• Please do not adjust or remove the accessories or protective devices located on
or inside the rotary microtome. It should only be opened and repaired by
Precisionary Instrument engineers.
• Only original accessories and spare parts authorized by Precisionary Instruments
can be used with the RF-800.
• Only Precisionary Instruments-approved power cords should be used, please do
not attempt to replace with any other type. Make sure to contact customer service
if the power plug does not fit.

5
Model Description
RF-800 Rotary Microtome General Information
The Precisionary RF-800 rotary microtome is a semi-automatic model that is ideal for routine
histology tissue sectioning. This microtome provides high precision cutting and stability, which
gives you reproducible, high-quality wax-embedded and fixed tissue sections.
Key Features:
• LCD touchscreen panel shows all cutting metrics.
• Touchscreen control panel provides easy and friendly controls.
• Specimen clamp is compatible with multiple cassette sizes.
• Cutting stage has blade ejector and blade guard for increased safety. Can be used
with high- or low-profile cutting blades.
• Large volume waste tray is removable for each cleaning.
• Top of rotary microtome can be used as storage for consumables during cutting.
• Smooth turning hand wheel can be locked anywhere in the 360° turn, allowing for
improved ergonomics.
Technical Specifications
Basic Information
Dimensions
22 ¾ in (L) x 16 in (W) x 12 9/16 in (H)
Weight
67 lb
Cutting Specifications
Section Thickness Range
0µm – 1000µm (in 0.1µm increments)
Minimum Section Thickness
0.1µm
Specimen Vertical Stroke
57 mm
Specimen Horizontal Stroke
28 mm
Specimen Retraction
0-100µm (can be turned off)
Sample Orientation
4° along the X-Y axis
Power Supply
100-120V, 60Hz

6
RF-800 Rotary Microtome Components
The Precisionary RF-800 is delivered with everything you need to get started right away to use
your new rotary microtome for cutting experiments. The following items are included with your
RF-800 rotary microtome:
Item Name
Quantity
Part Number (Catalog Number)
RF-800 Rotary Microtome (with Specimen
Head Cassette Clamp)
1
RF-800
Power Cord
1
RF-800-POWER-CORD
Removable Waste Tray
1
RF-800-WASTE-TRAY
Microtome Knife Block Set
1
RF-800-KNIFE-BLOCK
Tissue Brushes
1
RF-TISSUE-BRUSH
Tissue Forceps
1
RF-TISSUE-FORCEPS
Specimen Metal Molds
4
RF-METAL-MOLDS
Rotary Microtome Low-Profile Cutting Blades
3
RF-BLADES
RF-800 User Manual
1
RF-800-MANUAL
*Please compare the delivered components with this part list and your order. Should you
have any questions about your RF-800 delivery, please contact us at
[email protected] or by phone at (617) 682-0586. We are here to help!

7
RF-800 Rotary Microtome Anatomy
#
Name
Function
1
Operation Panel
Allows for adjusting cutting parameters and cutting
modes displayed on the touchscreen.
2
Microtome Storage Surface
Flat surface with rubber pad for easy storage of
accessories and consumables while cutting.
3
LCD Touchscreen Panel
Displays cutting parameters, numbers, and controls.
4
Specimen Head Rotation
Locking Handle
Allows for X-axis and Y-axis rotation of specimen head.
5
Specimen Head Clamp
Allows for specimen samples to be clamped and held
tightly in place for tissue cutting.
6
Handwheel Handle
Allows for handwheel turning.
7
Knife Holder Set
Cutting stage and knife holder set for cutting tissue, can
be adjusted horizontally and at different angles.
8
Microtome Base Rails
Allows for the knife holder set to slide on, move front-to-
back, and be firmly held in place.
9
Removable Waste Tray
For collecting tissue and sample debris.
10
Locking Lever for Knife
Holder Set
Allows for knife holder set to be firmly held in place.
11
Lock for Handwheel
Allows for handwheel to be locked at 12 o’clock position.
12
On/Off Switch
Turns rotary microtome on and off.
13
Locking Handle for
Handwheel
Allows for handwheel to be locked anywhere in 360° turn.

8
RF-800 Specimen Head Clamp Anatomy
#
Name
Function
1
Specimen Head Rotation
Locking Handle
When loosened, allows for X- and Y- axis rotation
adjustments of the specimen head.
2
Specimen Head Y-Axis
Adjustment Knob
Allows for changing the specimen head angle in the Y-axis.
3
Specimen Head X-Axis
Adjustment Knob
Allows for changing the specimen head angle in the X-axis.
4
Sample Clamp
Allows cassettes to be inserted and tightly clamped for
slicing.
5
Sample Insertion Area
Front holder of the specimen head for cassettes.
RF-800 Knife Holder Base Anatomy
#
Name
Function
1
Insertion Groove onto Rotary
Microtome Base
Allows for stable insertion onto the rotary microtome
unit base.
2
Clamping Knob for Cutting Stage
(Horizontal Movement)
Allows for knife holder to be adjusted horizontally.
3
Blade Guard
Safety feature to cover the cutting blade.
4
Blade Ejector
Safety feature to help easily eject cutting blades for
safe removal.
5
Cutting Stage
Area for collection of cut tissue slices.
6
Clamping Knob for Cutting Blade
Loosens/tightens the cutting stage slot to allow for
inserting and removing the cutting blade.
7
Clamping Knob for Cutting Stage
(Rotation Movement)
Allows for knife holder to be adjusted at different
angles for cutting.

9
Installation
Installation General Information
The following restrictions apply:
• The instrument is for indoor use only.
• Make sure that the power plug/circuit breaker is easily accessible.
• Do not use an extension cable with this instrument.
• Keep the machine in a location with a vibration-free floor that has sufficient load capacity
and rigidity for the weight of the instrument (40 kg).
• The instrument must be connected to a grounded power socket. Only use the power
cord provided.
• Chemicals used with the instrument may be flammable and hazardous. Keep the
installation location well ventilated without sources of ignitions of any kind.
• Keep the installation location protected against electrostatic charge.
•
Delivery of the Rotary Microtome RF-800
The Precisionary Rotary Microtome RF-800 is delivered with all safety precautions using freight
shipment. Your rotary microtome will be delivered in a secure wooden crate that will require
disassembly before installation of the instrument. Upon receipt of your rotary microtome
delivery, please complete the following steps:
• Transport the instrument to the desired location. The instrument can be transported with
a forklift or pallet jack.
• The wooden crate containing the rotary microtome must be transported in an upright or
slightly inclined position.
At the final installation location of the uncrated rotary microtome, remove all adhesive tape,
plastic dust wrappers, and accessories.
Do not operate the instrument in rooms with an explosion hazard.
For optimal use of the instrument, make sure that a minimum distance of 12 inches
from walls and furniture is obtained as to avoid heat dissipating appliances within the
vicinity of the instrument.
To ensure safe transport with a forklift, we recommend that 3 people are required: one
operating the forklift, and the other 2 holding the instrument on either side to prevent it
from sliding down.
• When tilting the instrument, ensure that there is at a minimum of 2 people
assisting from the front side to prevent damage to the instrument and injury to
transport personnel.

10
Unpacking & Installing the Rotary Microtome RF-800
We’re here to help provide instructions on how to unpack your new RF-800 carefully and safely!
<; J0('")?4)F"#$%&'"()-/0)@22C0")%3$-0)%2"-$'"'"()-/0)32-$34)6'%32-260;))
• K/030)@'..)?0)60-$.)L-$?,M)$32F"C)-/0)0C(0,)2D)-/0)@22C0")%3$-0;))
• !,0)$),%30@C3'>03)-2)/0.#)#F..)0$%/)-$?)F#;)
)
)))))))))))))))))))))))))))))))))))))))))))))))))) )
)
A; GD-03)$..)-$?,)$30)#F..0C)F#N)3062>0)-/0)-2#)%2>03)2D)-/0)@22C0")%3$-0;))
)
))))))))))))))))))))))) ))))))))))))))))))))))))) )
)
E; O/0")42F)30%0'>0)-/0)32-$34)6'%32-260N)-/0)/$"C@/00.)@'..)$.30$C4)?0)'",-$..0C)D23)42FP)
• K/030)$30)-@2)@$4,)-2).2%&)-/0)/$"C@/00.Q)
<R K/0).0>03)$-)-/0)-2#)2D)-/0)/$"C@/00.)$..2@,)42F)-2).2%&)$"C)F".2%&)-/0)@/00.S,)
62>060"-;)
AR K/0).0>0.)?0.2@)-/0)/$"C@/00.)$.,2)$..2@,)42F)-2).2%&)$"C)F".2%&)-/0)@/00.S,)
62>060"-;)
)
)

11
Operation
Switching on the Rotary Microtome
1. Begin by plugging in the rotary
microtome power cord (with any
appropriate surge protectors)
directly into the wall.
2. Turn the rotary microtome ON by
flipping the on/off switch on the right
side of the rotary microtome.
Flipping the switch in the opposite
direction will turn the microtome
OFF.
= OFF
= ON
Installing Rotary Microtome Accessories
Step 1. Install the removeable waste tray
After unpacking the removable waste tray, slide it onto the base of the RF-800 rotary microtome from the
front. The grooves in the removable waste tray will fit perfectly into the underside of the microtome base.
Make sure that the waste tray is secure after installation.

12
Step 2. Learn the different components of the knife holder base
The knife holder base is composed of three (3) separate components that interlock together:
Starting from the bottom-most piece, here is what each component does:
Knife Holder Base Component
Movement & Function
Base Component
The base component has a groove opening
on the bottom that allows it to slide onto the
microtome unit.
The handle on the right side of the base
component allows the angle of the knife
holder base to be adjusted for cutting.
Middle Component
The middle component allows for horizontal
(or lateral) movement of the cutting stage.
This is advantageous because it allows
users to be able to access the entire length
of the microtome cutting blade during
slicing.
The handle on the left side allows the
cutting stage to be moved horizontally.
Top Component (Cutting Stage & Blade
Holder)
The top component functions as a cutting
stage for collecting sectioned tissue slices.
It also contains the knife blade holder.
We include two cutting blade safety
features on the top component:
1. Blade guard: This guard covers the
entire length of the cutting blade, to
protect users.
2. Blade ejector: This piece helps eject
the cutting blade for easy removal.

13
Step 3. Install the knife holder base onto the microtome base unit
Match the grooves on the microtome base (2 and 3 in the image below) to the openings on the
knife holder base (green arrows). Once the knife holder base is installed, lock it securely in
place by turning the handle (1).
Cutting Sections with the Rotary Microtome
This section covers the operational procedures of the Precisionary Rotary Microtome RF-800.
Step 1. Insert a cassette or tissue block into the specimen head clamp
Begin by pushing the specimen clamp lever towards you, then insert the cassette block. Once
your cassette is inserted, let go of the specimen clamp lever. The cassette will be securely and
firmly held in place, ready for cutting.
Always remember to wear safety gloves while operating the instrument.

14
Step 2. Adjust the orientation angles of the specimen head
To adjust the angle of the specimen head holding your specimen:
• Vertical angle adjustment (north-south axis or Y-axis): Loosen the Specimen Head
Rotation Locking Lever (1), and adjust the orientation using the top knob (2) to your
desired angle.
• Horizontal angle adjustment (left-right axis or X-axis): Loosen the Specimen Head
Rotation Locking Lever (1), and adjust the orientation using the side knob (3) to your
desired angle.
Step 3. Insert a rotary microtome cutting blade
First, loosen the clamping knob (green arrow) for the top component of the knife block set to
insert a microtome cutting blade. Then tighten the clamping knob. You can choose to use either
low-profile or high-profile cutting blades with the RF-800 rotary microtome.
We include two cutting blade safety features on the top component:
1. Blade guard (blue arrow): This guard covers the entire length of the cutting blade, to
protect users.
2. Blade ejector (red arrow): This piece helps eject the cutting blade for easy removal.

15
Please note the safety guards located on the knife holder.
Microtome knives
• Take extreme caution when handling microtome knives/disposable blades as
mishandling sharp objects may cause serious injury.
• Remember to always keep knives/disposable blades accounted for in secured areas.
• Never place a knife/disposable blade on a surface with its cutting edge facing upward.
• Do not attempt to catch a falling knife/disposable blade.
• Always remember to lock the handwheel and ensure that the knife/disposable blade is
covered by the safety guard before handling or changing the specimen.
Always remember to wear safety gloves while operating the instrument.
Using the Operation Panel
The Precisionary Rotary Microtome RF-800 has an operation panel that looks like this:
Here are the specific functions of the Operation Panel buttons:
Specific Operation Panel Button
Function
Fast Forward & Fast Retraction Buttons
Moves the specimen head (tissue sample) forward
and backward rapidly.
The knives are very sharp! Handle with care! Never attempt to catch a falling knife!
Always lock the hand wheel and cover the cutting edge with a safety guard before
making any changes to the knife and specimen or when taking a break.

16
Slow Forward & Slow Retraction
Buttons
Moves the specimen head (tissue sample) forward
and backward slowly.
Single Click Forward & Single Click
Retraction Buttons
Advances and retracts the specimen head (tissue
sample) one click each time.
Modes for Trimming & Sectioning
Ability to switch between two modes: Trimming and
Sectioning.
Using the LCD Touchscreen Panel
The Precisionary Rotary Microtome RF-800 is unique in that it has a state-of-the-art LCD
touchscreen control panel for all functionalities. To help explain the functions of each panel in
the Main Control Panel, here are the specific buttons and selections:
Main Control Screen
Date & Time
To change the date and/or time, touch this section on the screen
and enter the date and/or time you desire.
Select either “Section” or “Trimming”
• Use “Trimming” when you are working to cut excess tissue
and paraffin to get to your specimen’s region of interest.
• Use “Section” when you arrive close to your region of
interest and would like to section slices for retrieval.

17
To change the slice thickness for trimming or sectioning, touch
“Trim Thickness” or “Sect Thickness” and enter your desired
thickness.
This section tracks the cumulative slice count as you cut through
your sample.
To clear the cumulative count, touch the “Clean Section” button.
Touching the “Back Limit” button will cause the specimen head to
fast retract to its starting position.
Touch the “Setting Data” button to see additional Settings Control
screens.
Settings Control Screens
This parameter sets the retraction distance for each return upstroke
of the specimen head.
“Fast speed” sets the speed of the Fast Forward & Fast Retraction
Buttons.
“Slow speed” sets the speed of the Slow Forward & Slow Retraction
Buttons.
“Click distance” sets the distance for Single Click Forward & Single
Click Retraction Buttons

18
“Click interval” sets the speed of each click for Single Click Forward
& Single Click Retraction Buttons
Pressing this button will change all parameters and settings back to
factory settings. Typically, users will not need to activate this feature.
Users will not need this feature, which is used during quality control
and testing during rotary microtome production.
Use these buttons to navigate between control screens.

19
Cleaning & Maintenance
Cleaning & Disinfecting
The RF-800 has been designed to facilitate easy cleaning. Upkeeping the proper maintenance
and cleaning of your instrument is essential in reducing machine degradation.
The section waste can easily be removed by taking out the debris collection tray and disposing
the section waste into a biohazard bin.
We recommend cleaning the RF-800 with isopropyl alcohol (70%).
• Do NOT use xylene, scouring powders or solvents containing acetone or xylene.
• Do NOT use bleach.
• These chemicals will damage the finished surfaces of the RF-800 rotary microtome.
Allow the RF-800 rotary microtome to completely dry before using it again.
To remove paraffin residue, you may use removers such as PARAGardTM Paraffin Repellant.
Remove paraffin residues with a dry cloth or paper towel.
Personal protective wear such as gloves and mask should be worn throughout this
process. Safety precautions for all disinfecting solutions are provided by the
manufacturer and should be followed.
It is important that all sectioning waste is removed BEFORE proceeding to section a
new sample. All waste MUST be removed after each specimen is sectioned.

20
Troubleshooting
Are you the proud owner of a Precisionary Instruments Rotary Microtome RF-800, but are
having problems? This is our “Troubleshooting Guide,” which we wrote to help you troubleshoot
the most commonly encountered issues. Jump right in!
Problem
Solution
Thick & thin alternating tissue
sections
Make sure that the blade holder is clamping the cutting knife
tightly.
Make sure that the specimen in the cassette is clamped to the
specimen head clamp tightly.
If clamping the cassette is difficult, remove the specimen clamp
holder and clean any paraffin residue.
Tissue sections are compressed or
folded
Change to a new knife blade. Typically, this occurs when the
blade is dull.
Also try slowing down the sectioning speed. A cutting speed that
is too fast can cause compressed or folded sections.
Tissue sections have “stripes” or
smears
This results from an accumulation of paraffin debris. Using a
tissue, wipe and clean the cutting blade. Or, change to a new
cutting blade.
You can also try adjusting the clearance angle.
The specimen head cannot move
forward
You have likely reached the front-end position of the travel
distance of the specimen head. Use the coarse feed wheel to fast
reverse the specimen head to its original back position.
Cut tissues sections are curling
and not forming a “ribbon”
Your section thickness may be too thick because you are still
trimming. Try decreasing the section thickness.
The angle of knife clearance may be too small. Increase the
clearance angle to 3-8 degrees.
Your knife may be too dull, so change to a new cutting blade.
After turning on the rotary
microtome, the LCD screen is off
This results from a damaged power cord or fuse. Contact
Precisionary Instruments for ordering a replacement power cord
and/or instructions on replacing the fuse.
If you cannot find the solution below, or if you are still having problems, contact us at:
Precisionary)Instruments,)LLC)
207)Union)Street,)2nd)floor)
Natick,)MA)01760)
)
We welcome your comments, questions, and suggestions!
Table of contents
Other Precisionary Laboratory Equipment manuals

Precisionary
Precisionary Compresstome VF-210-0Z User manual

Precisionary
Precisionary RF-1000 User manual

Precisionary
Precisionary RF-600 User manual

Precisionary
Precisionary Compresstome VF-510-0Z User manual

Precisionary
Precisionary Compresstome VF-310-0Z User manual

Precisionary
Precisionary Compresstome VF-310-0Z User manual

Precisionary
Precisionary CRYOSTAT CF-6100 User manual
Popular Laboratory Equipment manuals by other brands

WDT
WDT DUFTDOS-0-T operating instructions

Showa Denko
Showa Denko Shodex SUGAR SP0810 8C Operation manual

Johnson & Johnson
Johnson & Johnson Sterrad 100NX Service guide

Dynisco
Dynisco LMI5000 operating manual

CellaVision
CellaVision DM96 quick guide

NuAire
NuAire LabGard NU-543-300E Operation and maintenance manual