precisionplus L20 User manual

1. Indication for Use
●This low speed contra angle handpiece is intended for the purposes of dental
treatments and prophylaxis.
●To be used only by trained dental professionals.
2. Precautions for Handling and Operation
●All precautions should be read and understood before use.
●Devices are only to be used for its specified intended use.
●Instructions are provided in order to prevent the risk of personal injury or
damage to the dental handpiece.
3. Contraindications
Should be used with caution on infants, pregnant women, hemophiliacs and
patients with heart problems.
4. Adverse Reactions
●Patients may feel tense, uncomfortable or experience pain during use of the device.
●Patients hearing may be affected during use of the device.
P. 1
P. 2
P. 3
WARNING: Indicates a hazard that may result in serious injury/device
damage if instructions are not correctly followed.
WARNING
CAUTION: Indicates a hazard that may result in mild to moderate
injury/device damage if instructions are not correctly followed.
● Immediately after each and every treatment, the handpiece should be inspected,
cleaned, lubricated and sterilized. Failure to correctly maintain the handpiece
may lead to overheating, injury to user/patient or damage to handpiece.
● Debris inside the gear mechanism can lead to overheating and burn injuries.
Do not allow foreign materials into the gear mechanism or chuck.
CAUTION
● Users are required to protect themselves.
●Users are responsible for correct and intended using, regular maintenance and
continual inspection of the handpiece.
● Avoid impact or contamination of handpiece.
● Do not disassemble or alter the handpiece except as recommended in our user
instructions.
● Correct eye, face and personal protection must be used by operator, assisting staff
and patient whilst handpiece is being used.
● If the handpiece ceases operating abnormally, immediately stop use and contact
your authorized Precision Plus dealer.
●Handpiece is supplied in a non-sterile state and must be autoclaved before use.
●Handpiece should be carefully tested for vibration, noise or overheating prior to use,
if it has not been used for a long time.
USER MANUAL
DENTAL LOW SPEED HANDPIECE
For your safety and the safety of your patients please read this user manual
carefully before use and file for future reference.
This manual is published by Precision Plus.
Precision Plus does not guarantee its contents and reserves the right to amend
without prior notice. Amendments will be published in new editions of this manual.
L20 Contra Angle Handpiece
L20 Rev. V2.3© Precision Plus
L20-1L

6. Connection & Disconnection of Handpieces to Motor
7. Inserting & Removing the Bur
1. Connect handpiece to motor until
it locks into place. (Fig.1)
1. Hold motor and handpiece separately and pull the handpiece off in an axial
direction using a slight rotation (Fig.1).
2. Pull on handpiece to make sure it is
securely attached to motor.
6.1 Connection
7.1 Inserting the Bur
1. Turn the Locking lever to open the chuck. (Fig. 2)
2. Insert the bur into the chuck until the bur fully
engages. Turn the locking lever back into a closed
position.(Fig. 3)
3. Check bur is correctly engaged by gently pulling
on the bur.
7.2 Removing of Bur
1. Turn the locking lever to open chuck (Fig. 2) and carefully pull the bur out.
6.2 Disconnection
P. 4
P. 6
P. 5
P. 7
WARNING: Remove the bur only after the handpiece has completely stopped
rotating.
CAUTION:
● Always inspect bur to confirm it is free of debris before inserting into handpiece.
Debris inside chuck may cause rotation slip or allow the bur to become
disengaged during use.
● Do not exceed the maximum length or speed of bur for the handpiece as
recommend by Precision Plus. See “5. Specifications” of this manual for
information on correct bur choice.
● Do not apply excess pressure to the bur during use, this can lead to bur bending
or breaking causing injury to user/patient or the handpiece.
● Do not use burs that are bent, rusted, worn, cracked, deformed or have non ISO
standard conforming shanks, Burs with these issues may disengage or break
during use.
● Always engage bur correctly into handpiece head. Failure to correctly insert burs
may cause damage to bearings leading to injury or premature failure of handpiece.
● Always follow bur manufacturer instructions.
● Before use always inspect handpiece for excessive vibration, noise or overheating.
If there are abnormalities, stop using and contact authorized Precision Plus dealer.
Fig. 1
Fig. 2
Fig. 3
● Motor must have completely stopped rotating before connecting/disconnecting.
● Connect only to E type motors (ISO 3964 (EN ISO 3964)).
● Do not exceed the Max Rotational Speed as shown in “5.specifications”.
5. Specifications
Model
Chuck Type
Gear Ratio
Max. Speed (r.p.m.)
Motion Type
Bur Type
Max. Working
Part Diameter
Max. Bur Length
Type of Connector
L20-1L
Latch
ISO1797 Type I2.35 mm
ISO 3964
Ø 4 mm
22.6 mm
360°
24,000
1:1

9. Post-use Maintenance
8. Test prior to Use
Follow the check procedure below before use. If any abnormalities are found, see
Troubleshooting chart or contact your authorized Precision Plus dealer.
9.1 Preparation
1.Use correct eye, face and personal protection to avoid possible infection.
2.Remove the bur.
3.Disconnect handpiece from the motor.
P.10
P. 11
P. 8
P. 9
WARNING: To avoid injury, keep your hands away from the bur during rotation.
Fig. 4
CAUTION: Do not use the following fluids to wipe, immerse or clean the
handpiece: strong/highly acidic water, strong acid/alkaline
chemicals, chlorine containing solutions or solvents such as benzine
or thinner. Do not use ultrasonic bath during the cleaning process.
1. Insert the bur. (Refer to “6. Inserting & Removing of Bur”)
2. Rotate the handpiece for about 20 seconds at the
Max. Rotation speed of the attached motor. During
rotation, check for abnormalities such as abnormal
rotation, vibration, noise.
3. After the handpiece rotation has completely stopped,
touch the handpiece head to confirm the head is not
heating abnormally(Fig.4).
Do a manual pre-cleaning, until the handpiece is visually clean. Submerge the
handpiece in a cleaning solution and flush the lumens with a water jet pistol with
cold tap water for at least 10 seconds. Clean the surfaces with a soft bristle brush.
9.2.2 Pre-cleaning
Use a washer-disinfector meeting the requirements of the ISO 15883 series.
Put the instrument into the machine on a tray. Connect the instrument with the WD
by using suitable adapter and start the program:
• 4 min pre-washing with cold water (<40°C);
• emptying
• 5 min washing with a mild alkaline cleaner at 55°C
• emptying
• 3 min neutralising with warm water (>40°C);
• emptying
• 5 min intermediate rinsing with warm water (>40°C)
• Emptying
The automated cleaning processes have been validated by using 0.5% neodisher
MediClean forte (Dr. Weigert).
Note: Acc. to EN ISO 17664 no manual reprocessing methods are required for these
devices. If a manual reprocessing method has to be used, please validate it prior to use.
9.2.3 Automated Cleaning:
Automated Thermal Disinfection in washer/disinfector under consideration of national
requirements in regards to A0 value (see EN 15883). A disinfection cycle of 5 min
disinfection at 93°C has been validated for this device to achieve an A0 value of 3000.
9.2.4 Disinfection:
Drying of outside of instrument through drying cycle of washer/disinfector. If needed,
additional manual drying can be performed through lint free towel. Insufflate cavities
of instruments by using sterile compressed air.
9.2.5 Drying:
CAUTION: Visual inspection for cleanliness of the handpiece. If necessary,
perform reprocessing process again until the handpiece is visibly clean.
Before packaging and autoclaving, make sure that the handpiece has been
maintained acc. to this instruction.
P.12
P.13
P.14
P.15
Points to check
Rotation
Process
Head cap is loose Tighten firmly using the correct head cap wrench
Connect to motor and start, checking for abnormal rotation,
noise, overheating and vibration.
10. Regular Maintenance Checks
Regular maintenance should be performed every 3 months as per the chart below.
If any abnormalities are found, immediately contact your authorized Precision Plus dealer.
* See trouble shooting chart if problems are discovered.
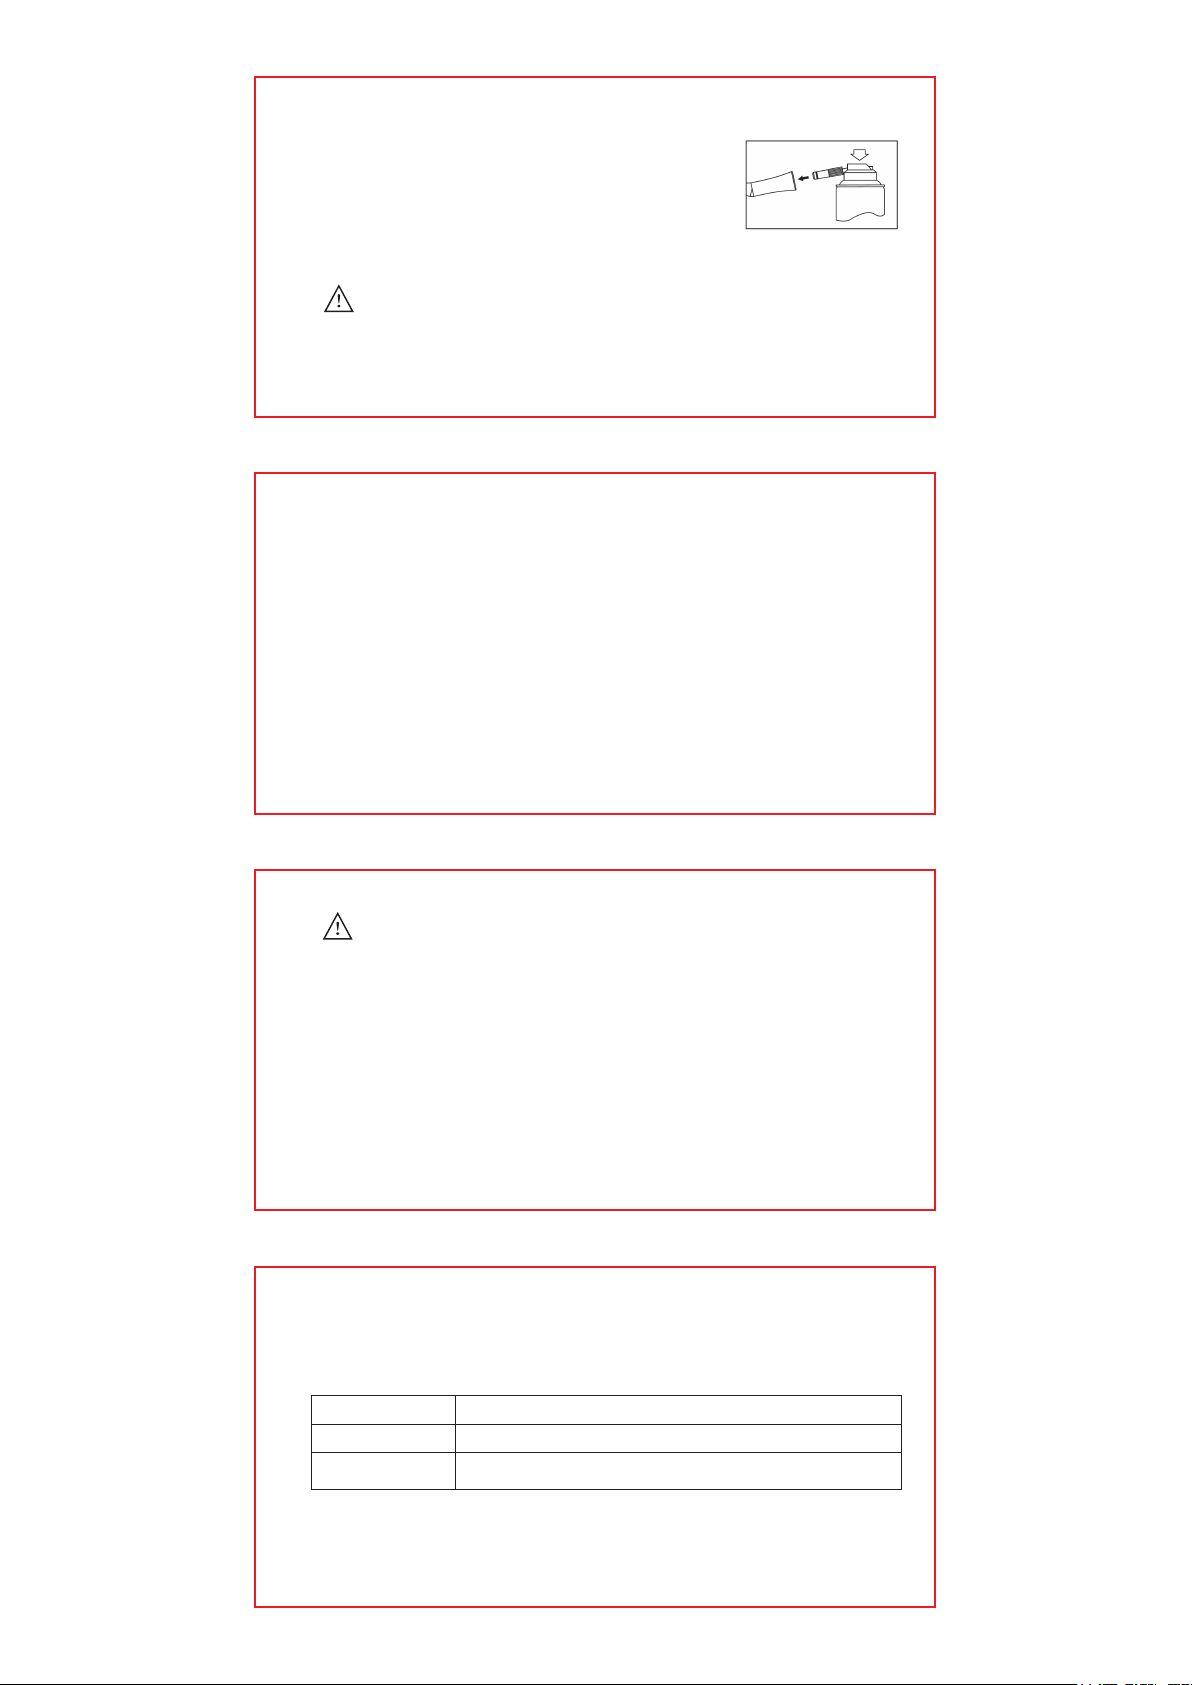
1. Attach the Spray Nozzle onto the Spray Port of the can.
(not included with this device)
2. Insert the Spray Nozzle into the rear of the handpiece.
Hold the handpiece firmly and spray lubricant for
2-3 seconds. Apply lubricant until it has been expelled
from handpiece head for 2 seconds (Fig. 5).
Lubricant must be applied after use and before autoclaving.
9.3 Lubricating
CAUTION
Fig. 5
●Always follow lubricant manufacturers instructions.
●Always hold lubricant can in an upright position.
●Hold handpiece firmly to avoid it being dislodged due to lubricant spray pressure.
CAUTION
●Handpiece must be cleaned and lubricated before sterilization.
●Any remaining blood on outer surface may become clotted and cause operational
failure.
●Do not overheat or cool handpiece too quickly. Rapid change in temperature may
cause damage to the product.
●Do not use autoclaves exceeding 137°C during sterilization.
●Sterilize according to EN 13060/EN 285. Always follow autoclave manufacturer’s
instructions for use.
●Reprocessed products should be stored, protected from dust in a dry, dark and
cool place with minimum exposure to germs.
●Autoclave sterilization is the only agreed method to correctly sterilize this
handpiece. The validity of other sterilization methods is not confirmed or guaranteed.
●Resistance to reprocessing: 250 cycles (reprocessing cycles include cleaning and
sterilization
Handpiece should be sterilized after each and every treatment.
1. Handpiece should be lubricated as per user manual.
2. Insert the handpiece into an autoclave pouch and seal pouch correctly. The
autoclave pouch should comply with the requirements of EN ISO 11607.
3. Sterilize at 134 °C for 5 mins. Sterilization of instruments by applying a fractionated
pre-vacuum steam sterilization process (according to EN 285/EN 13060/EN ISO
17665) under consideration of the respective country requirements. Flash
sterilization is not allowed on lumen instruments!
4. Handpiece should be stored in a sealed pouch in a dry, clean and dust free place
out of direct sunlight until required for use.
9.4 Sterilization
P.18
P.16
P.17
If the handpiece will not work correctly after following above troubleshooting solutions,
please contact Precision Plus or an authorized maintenance centre.
Reduction in speed Motor problem Check motor speed
Handpiece will not engage
bur or hold bur in chuck Damaged chuck Send device to Precision Plus
authorized repairer
Abnormal bur rotation or
failure to cut Bearing damage Replace damaged components
12. Troubleshooting
13. Warranty
Precision Plus products are warranted against manufacturing and material defects.
Precision Plus reserves the right to analyze and determine the cause of any problem.
The warranty is voided should the product not be used in accordance to the user
manual, not for its intended purpose, has not been repaired by Precision Plus or an
authorized Precision Plus repairer, or has non genuine Precision Plus parts installed.
Replacement parts will be made available for seven years after the date of
discontinuation of the model.
14. Disposal of Product
In order to avoid the health risks to operators handling the disposal of medical
equipment, as well as the risks of environment contamination caused thereof,
a surgeon or a dentist is required to confirm the equipment is sterile. Ask specialist
firms who are licensed to dispose of specially controlled industrial wastes, to dispose
of the product for you. Always follow your country specific laws, directives, standards
and guidelines for disposal of medical devices.
made in China
Precision Plus China Limited
Flat 103, No. 122, Tianqiao Road,
Tutang, Changping, Dongguan,
Guangdong, China.
Tel: +86-769-82306233
Fax: +86-769-82301566
L20-1L 12-2021
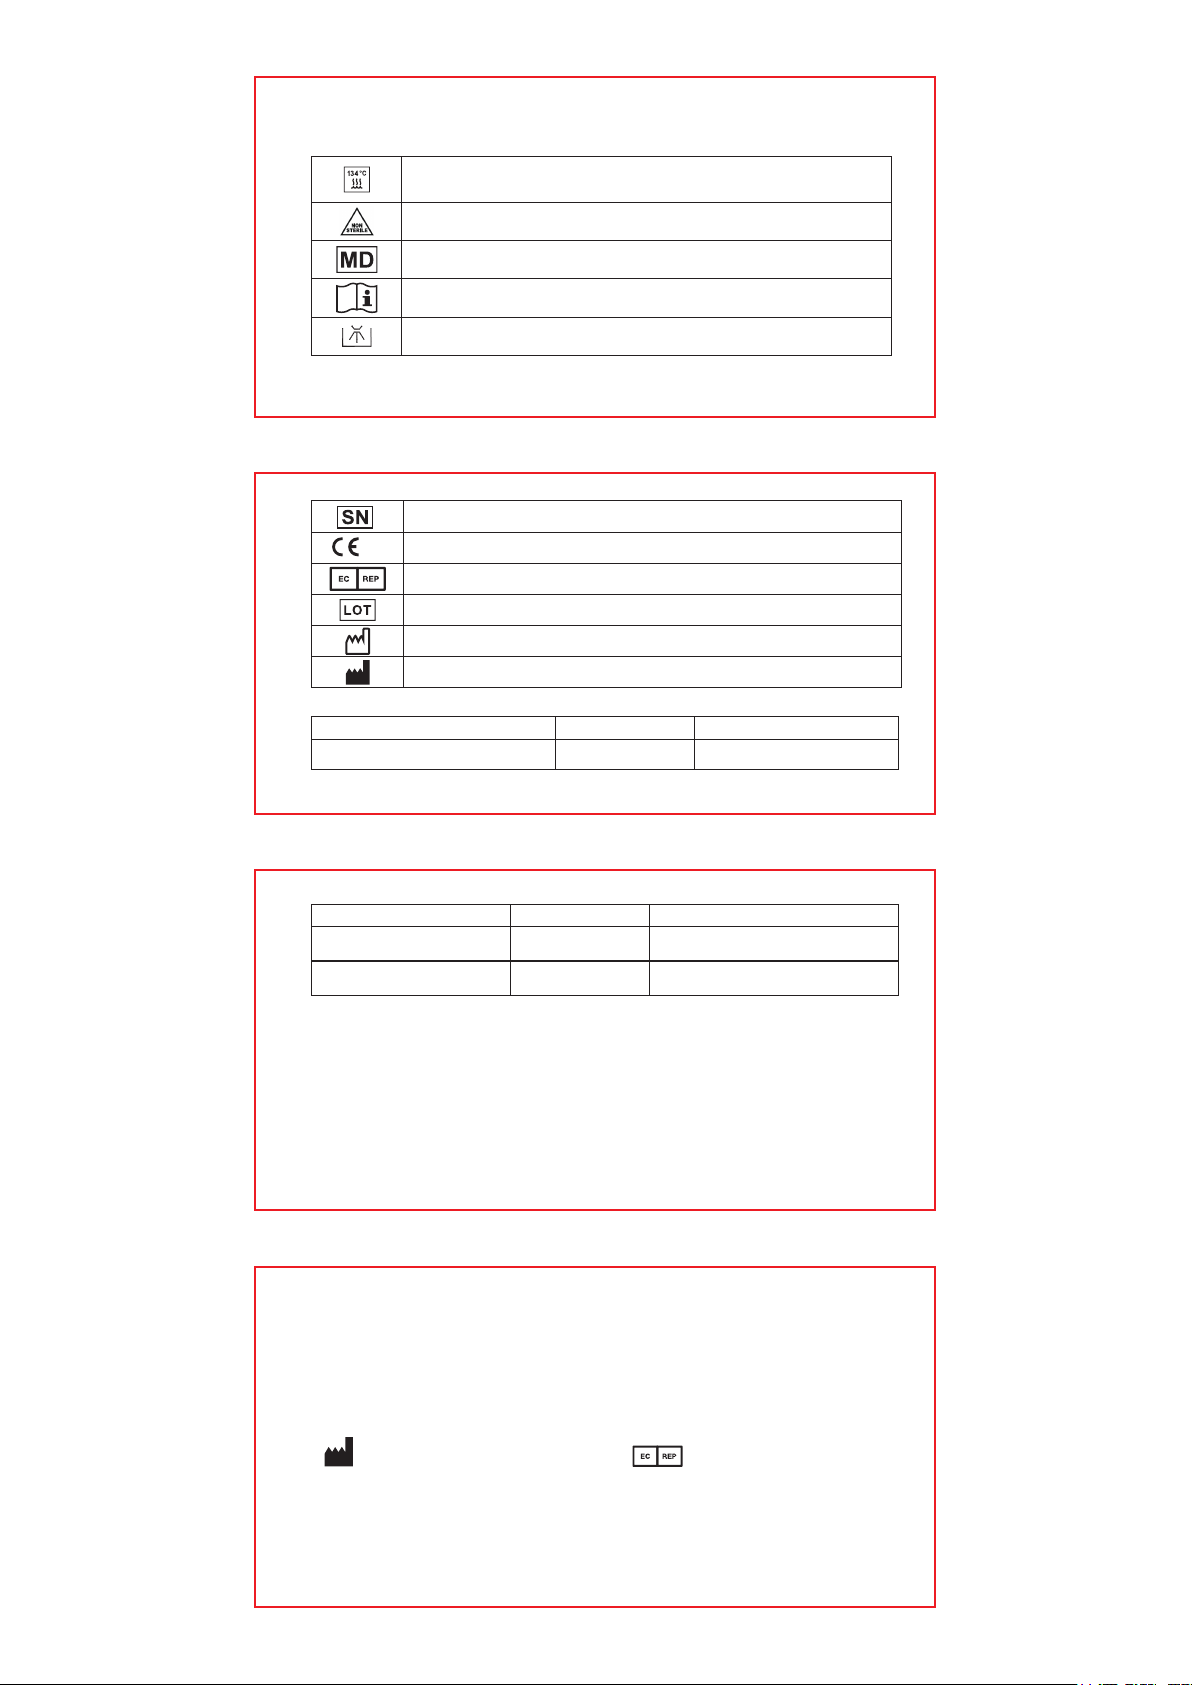
Serial number
Conforms to CE European Directive of “Medical device directive 93/42/EEC”
Authorized representative in the European Community.
Batch code
Date of manufacture
Manufacturer
0197
11. Symbol
Sterilizable in a steam sterilizer (autoclave) at the temperature 134°C(273°F)
The device has not been subjected to a sterilization process
Medical Device
Consult instructions for use
Washer-disinfector for thermal disinfection
Malfunction Cause Solution
High pitched or unusual noise, reduced
cutting power or failure to rotate Debris in handpiece
or gear mechanism Clean and lubricate handpiece
Premium Plus Poland sp. z o.o.
ul. Bukowska 27
62-081 Wysogotowo
Poland
Tel: 48-61-880-10-94
Email: [email protected]
imported and distributed by:manufactured by:
This manual suits for next models
1
Table of contents
Other precisionplus Dental Equipment manuals


Popular Dental Equipment manuals by other brands


Satelec Acteon
Satelec Acteon Mini LED III Supercharged user manual

NSK
NSK Primado2 Operation manual

BEYES
BEYES APEXPILOT ALL-IN-ONE Instructions for use

Bien Air
Bien Air Chiropro Plus 3rd Gen Instructions for use

DENTAURUM
DENTAURUM desktop Compact Instructions for use

Ritter
Ritter RIvisio-cam user manual


