Pregis AirSpeed Ascent User manual

AirSpeed®Ascent
Air Cushion Machine
Operator Manual
Safety and Operation
Revision 4

AirSpeed®Ascent Operator Manual Tech Service Hotline: 886-904-6979 Original Instructions
November 2020
Copyright Pregis Corporation ii
All Rights Reserved
CONTENTS
1SPECIFICATIONS...............................................................................................................................1
1.1 Sound Test Declaration.................................................................................................................1
2OPERATING SAFETY........................................................................................................................2
2.1 Safety ............................................................................................................................................2
2.2 Warning Labels.............................................................................................................................3
3SCOPE AND LIMITS..........................................................................................................................4
3.1 Introduction...................................................................................................................................4
3.2 Inputs and Outputs........................................................................................................................5
3.2.1 Compatible Accessories........................................................................................................5
3.3 Dismantling...................................................................................................................................5
4GENERAL OPERATION ....................................................................................................................6
4.1 Setting up the Machine .................................................................................................................6
4.1.1 Mounting Options.................................................................................................................6
4.1.2 Installing Feet and Mounting Hardware ...............................................................................6
4.1.3 Installing Air Pump...............................................................................................................7
4.1.4 Power On ..............................................................................................................................7
4.2 Changing Film ..............................................................................................................................8
4.2.1 Loading Film.........................................................................................................................8
4.2.2 Removing Film .....................................................................................................................9
4.3 Starting the Machine.....................................................................................................................9
4.3.1 Initial Startup ........................................................................................................................9
4.3.2 Running Film ........................................................................................................................9

AirSpeed®Ascent Operator Manual Tech Service Hotline: 886-904-6979 Original Instructions
November 2020
Copyright Pregis Corporation iii
All Rights Reserved
5ADVANCED OPERATION...............................................................................................................10
5.1 Home Screen...............................................................................................................................10
5.1.1 RFID Recipe Overview.......................................................................................................10
5.2 Table of Symbols........................................................................................................................11
5.3 Fill Mode Adjustments ...............................................................................................................13
5.4 Air Level and Temperature Adjustments....................................................................................13
6TROUBLESHOOTING......................................................................................................................14
6.1 Error Codes.................................................................................................................................14
6.1.1 Resolving Errors .................................................................................................................14
6.2 Clearing Jams..............................................................................................................................15
6.3 Other Items..................................................................................................................................15
6.3.1 Wrinkled Seal......................................................................................................................15
6.3.2 Jamming at Startup..............................................................................................................15
6.3.3 Popping Seal Section ..........................................................................................................15
6.3.4 Pillow Pops Off Air Tube ...................................................................................................15
6.3.5 Flat Pillows .........................................................................................................................16
6.3.6 Tearing at Seal ....................................................................................................................16
6.3.7 Perforation Failure ..............................................................................................................16

AirSpeed®Ascent Operator Manual Tech Service Hotline: 886-904-6979 Original Instructions
November 2020
Copyright Pregis Corporation iv
All Rights Reserved
Property of the Pregis Corporation
1650 Lake Cook Road
Suite 400
Deerfield, IL 60015
United States of America
Authorized CE Representative
ACC –Services Contact
1877 Kirby Lane
Kyle, Texas 78640
United States of America
AirSpeed®Ascent
120/230 VAC, 6.6/3.3 A, 60/50 Hz
Weight (without air pump): 31 lbs / 14.1 kg

AirSpeed®Ascent Operator Manual Tech Service Hotline: 886-904-6979 Original Instructions
November 2020
Copyright Pregis Corporation v
All Rights Reserved

AirSpeed®Ascent Operator Manual Tech Service Hotline: 886-904-6979 Original Instructions
November 2020
Copyright Pregis Corporation vi
All Rights Reserved
LANGUAGES OF OPERATION DISCLAIMER
It is illegal to operate this machine in an EU member state if this (or any other related) manual is not
written in that State’s language. If a translated version is needed, contact Pregis to order the manual.
The original version of this manual is in English and denoted “Original Instructions” in the top right
corner. All translated versions are denoted “Translation of Original Instructions” in the same
location.
AirSpeed®Ascent Operator Manual Tech Service Hotline: 886-904-6979 Original Instructions
November 2020
Copyright Pregis Corporation 1
All Rights Reserved
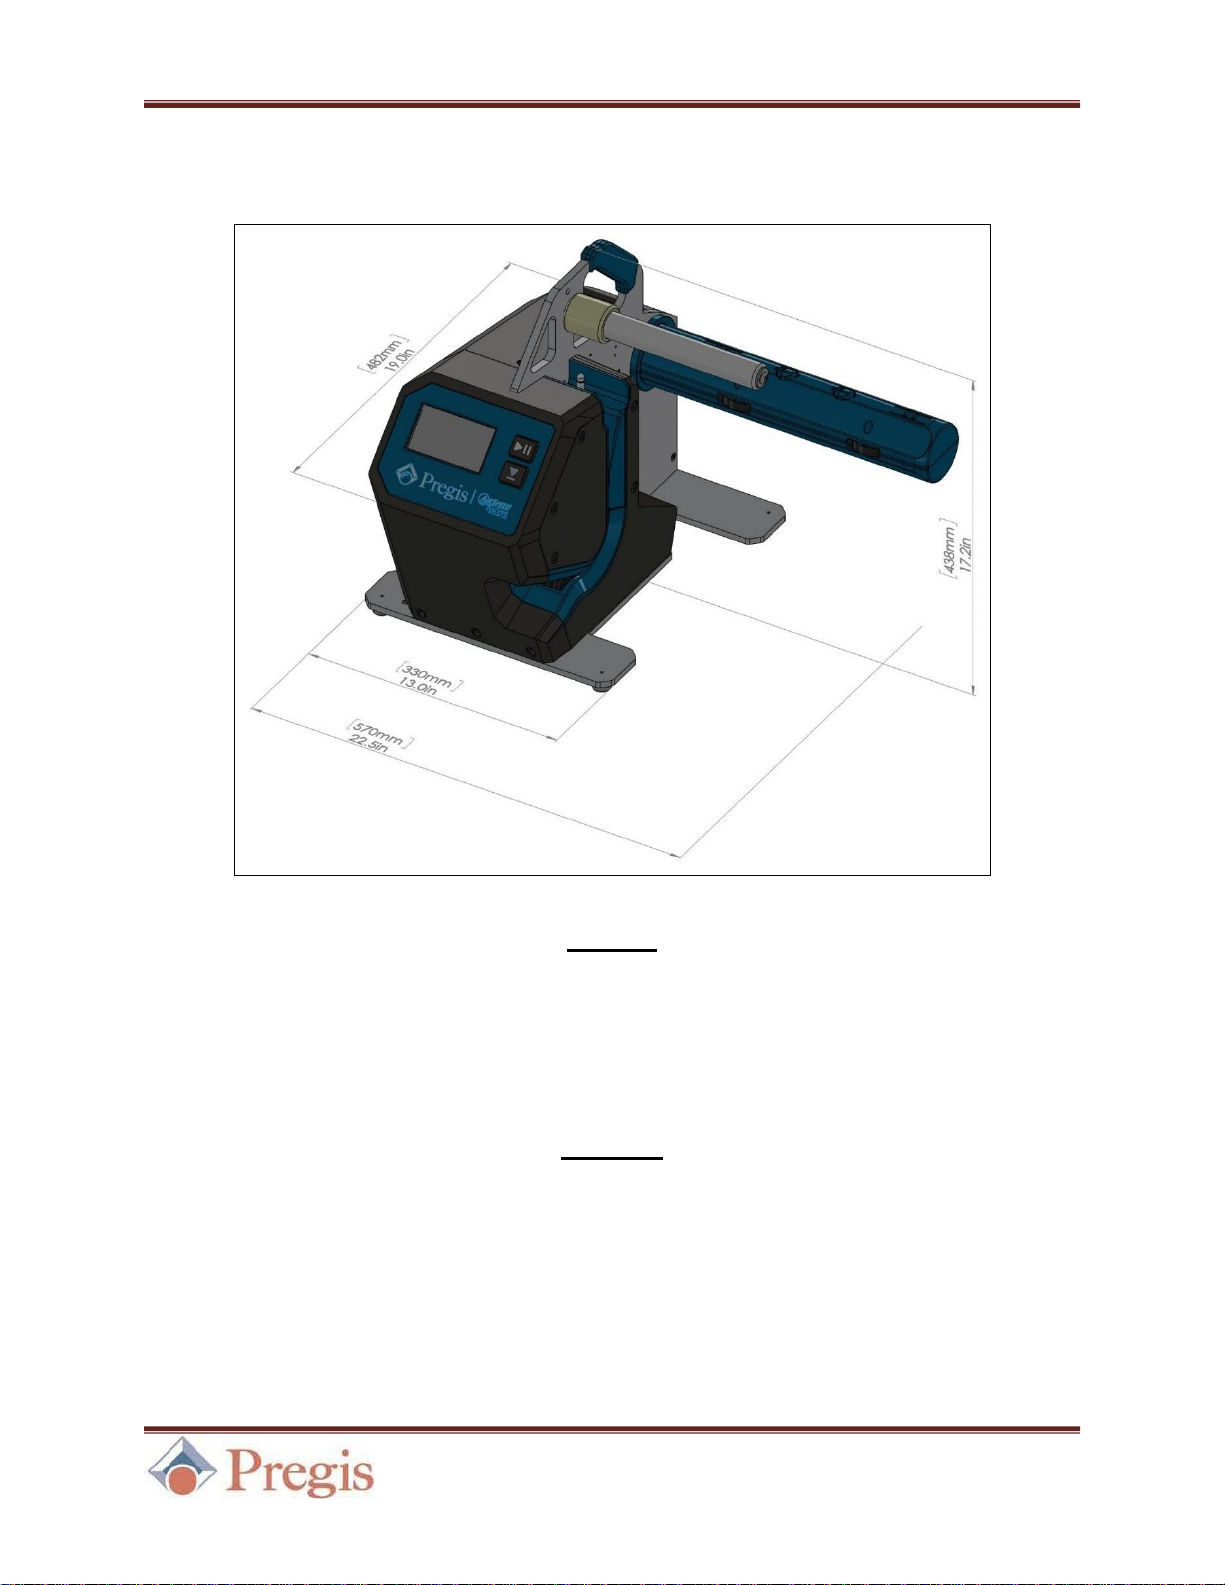
1SPECIFICATIONS
Machine
Weight (without the air pump): 31 lbs / 14.1 kg
Overall Size (L x W x H): 19.0 x 22.5 x 17.2 in / 482 x 570 x 438 mm
Power: 120/230 VAC, 6.6/3.3 A, 60/50 Hz
Production Speed: 100 feet per minute / 30.5 meters per minute
Air Pump
Weight: 28 lbs / 12.8 kg
Size (L x W x H): 10.7 x 8.9 x 9.7 in / 272 x 226 x 247 mm
1.1 Sound Test Declaration
The equivalent sound pressure level Leq at the operator station is 74 dB(A).
Figure 1. Machine dimensions.

AirSpeed®Ascent Operator Manual Tech Service Hotline: 886-904-6979 Original Instructions
November 2020
Copyright Pregis Corporation 2
All Rights Reserved
2OPERATING SAFETY
AirSpeed®Ascent
Air Cushion Machine
Operator safety and the safety of others in the work area depend on the operator using common sense,
good judgment and reasonable care while operating the machine. The Safety, Operation and
Maintenance manual, and warning labels affixed to the machine, provide notification of specific
potential hazards.
2.1 Safety
The following instructions are only a guideline and should be considered a supplement to your plant's
comprehensive safety program. Your company’s policy supersedes these guidelines if at any time
the two contradict each other.
1. Read and understand the manual. If after reading the manual you have questions, get answers
before working with the machine.
2. Read and understand all the danger, warning, and caution statements in the manual and on the
signs attached to the equipment.
3. Never deface or remove factory installed warning decals. If a decal ever becomes lost,
damaged, or illegible, report this condition to a supervisor and obtain a replacement decal.
4. Keep the work area clean and uncluttered. Walking surfaces should always be free of packing
material and debris to prevent a slipping or tripping hazard.
5. Ensure that all covers, guards, and other safety devices are in place. Never remove a safety
device for any reason.
6. Follow the manufacturer's recommended startup procedure.
7. Never leave the equipment unattended while operating. Shut the machine off if you must leave
the work area.
8. Keep body parts and clothing away from moving components. Ties, scarves, long hair, and
gloves are especially dangerous.
9. Understand what will happen when you operate the various controls.
10. Understand the proper web path and the safe method for threading the web.
11. Learn the safe procedure for clearing the machine of web wraps or jams.
12. Exercise extreme care whenever it is required to inspect or adjust the machine while it is in
motion. NEVER reach into the machine for any reason while it is in motion.
13. Understand which adjustments are operator adjustments; only trained and qualified service
personnel may maintain/clean any electrical and or mechanical part of the machine.
14. Never operate or work around equipment if you are under the influence of alcohol, drugs or
medications that can make you less alert or affect your judgment.
15. The machine shall be used in a facility adequately ventilated for air renewal.

AirSpeed®Ascent Operator Manual Tech Service Hotline: 886-904-6979 Original Instructions
November 2020
Copyright Pregis Corporation 3
All Rights Reserved
2.2 Warning Labels
The Operating Safety section of this manual, the Operator manual, and warning labels affixed to the
machine provide notification of specific potential hazards.
Safety signs are used to alert operating and maintenance personnel to potential hazards. The machine
manual also calls attention to potential hazards with statements describing the hazard. Warning labels
used on the machine are depicted below.
Electric Shock
Hot Surface
Refer to Instruction Manual
The meanings of the warning labels and the potential hazards they represent must be clearly
understood before attempting to operate or maintain the machine. If, at any time, a warning label on
the machine becomes lost, damaged, or illegible, contact Pregis to order replacement signs.

AirSpeed®Ascent Operator Manual Tech Service Hotline: 886-904-6979 Original Instructions
November 2020
Copyright Pregis Corporation 4
All Rights Reserved
3SCOPE AND LIMITS
AirSpeed®Ascent
Air Cushion Machine
3.1 Introduction
The Pregis AirSpeed®Ascent produces panels of air-filled packing cushions in any quantity, as
needed. The ability to create packing cushions on demand saves storage space and reduces packaging
material waste.
Supported film rolls have a maximum size of the following:
Figure 2. Supported roll dimensions.
Use of the machine for any purpose –other than stated –may cause severe injury to the
operator and/or damage to the machine.
32.25" Width
9.25" Diameter
38 lbs Weight
3" Paper Core
AirSpeed®Ascent Operator Manual Tech Service Hotline: 886-904-6979 Original Instructions
November 2020
Copyright Pregis Corporation 5
All Rights Reserved
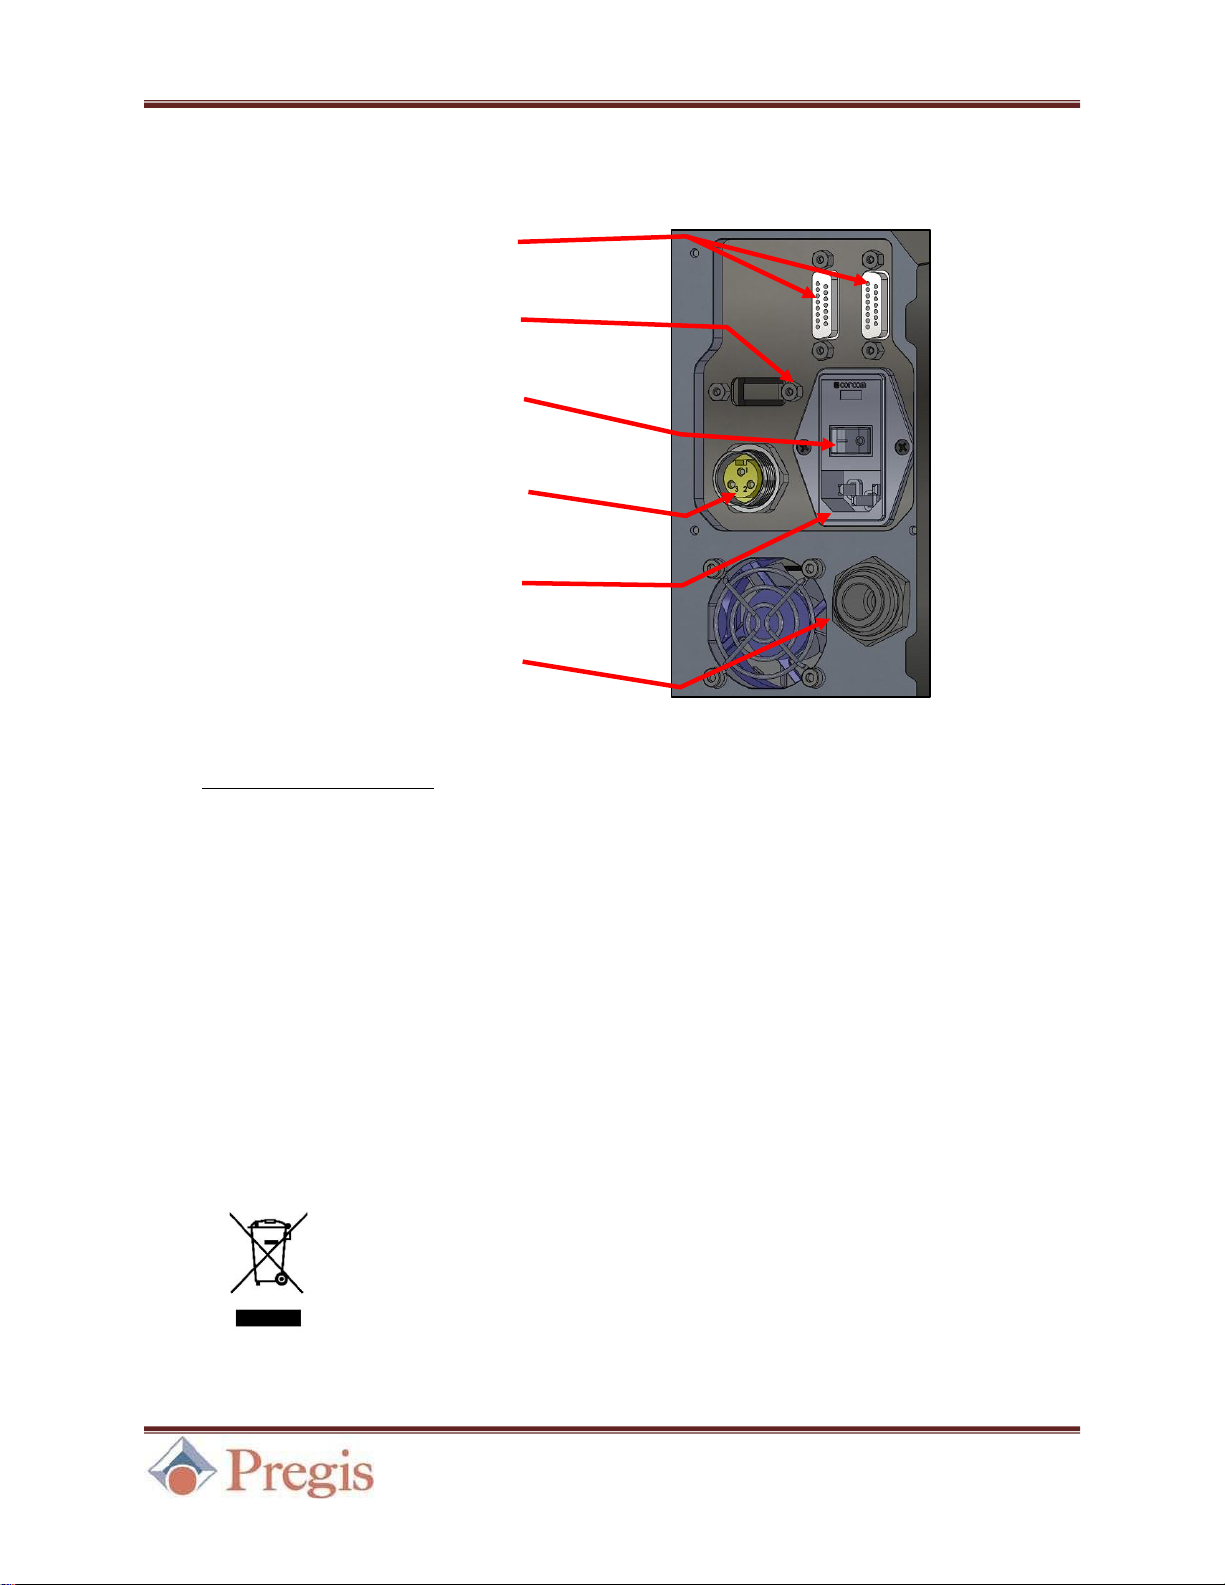
3.2 Inputs and Outputs
3.2.1 Compatible Accessories
For a list of accessories compatible with the AirSpeed®Ascent, see the Pregis Systems Catalog.
3.3 Dismantling
Upon dismantling of this system at the end of its service life, please follow the
local recycling laws and regulations in effect at that time.
Programming Port
Power Switch
Power Input
Accessory Port I/O
Power Output to
Air Pump
Air Hose Input
Figure 3. Inputs and Outputs.

AirSpeed®Ascent Operator Manual Tech Service Hotline: 886-904-6979 Original Instructions
November 2020
Copyright Pregis Corporation 6
All Rights Reserved
4GENERAL OPERATION
4.1 Setting up the Machine
4.1.1 Mounting Options
The machine can be mounted either horizontally, vertically, or on a “C” frame. Horizontal mounting
utilizes a floor stand with casters for ease of movement. Place the machine on the stand and secure
with (4) M8 bolts (SAP# 1031638).
Optionally, the machine can be mounted vertically on a frame with an attached bin, called a “C”
frame. The “C” frame is mounted on casters for ease of movement.
Vertical mounting utilizes a baseplate to assist in mounting to a vertical plane. This configuration is
ideal for use with overhead delivery systems.
4.1.2 Installing Feet and Mounting Hardware
To install the feet (SAP# 1027857, 1027881) or mounting hardware (SAP# 1031638), reference the
figure below.
Note: If the machine is used without a stand or frame, ensure that the four rubber feet are fastened
to the base of the machine.
Figure 4. To remove or fasten the four rubber feet,
use a 3mm hex wrench. (Two out of four shown.)
Figure 5. To mount the machine to a stand or frame,
use a 6mm hex wrench.

AirSpeed®Ascent Operator Manual Tech Service Hotline: 886-904-6979 Original Instructions
November 2020
Copyright Pregis Corporation 7
All Rights Reserved
4.1.3 Installing Air Pump
Securely attach the Air Pump to the Air Hose using a slotted screwdriver or a 1/4" hex driver. Then
attach the Air Hose and Air Pump power to the rear of the machine. See Section 3.2.
4.1.4 Power On
Plug the AC power cord into the back of the machine. Insert power cord into a suitable outlet. Power
the machine on or off using the Power Switch on the rear of the machine. See Section 3.2.
DO NOT POWER ON MACHINE UNTIL IT IS SECURED.
Figure 6. Attaching Air Hose to Air Pump.
Figure 7. Connecting Air Pump to rear of machine.

AirSpeed®Ascent Operator Manual Tech Service Hotline: 886-904-6979 Original Instructions
November 2020
Copyright Pregis Corporation 8
All Rights Reserved
4.2 Changing Film
4.2.1 Loading Film
Figure 8. With the air channel first,
slide the film roll onto the Spindle.
Figure 9. Firmly press the roll to the end of the
Spindle, up against the flange.
Figure 10.Pull the film off the roll
and over the Guide Roller.
Figure 11.Thread the Air Tube into the air channel.
Figure 12.Pull the film forward to the Backing
Wheel (larger, red wheel).
Figure 13. While holding down the Jog button, pull
the film past the Nip Roller (lower, black wheel).
Jog Button
Start/Stop Button

AirSpeed®Ascent Operator Manual Tech Service Hotline: 886-904-6979 Original Instructions
November 2020
Copyright Pregis Corporation 9
All Rights Reserved
4.2.2 Removing Film
4.3 Starting the Machine
4.3.1 Initial Startup
Upon startup, the machine will require user interaction to warm up. Once this step is complete, the
machine will be ready to run film.
4.3.2 Running Film
To run film through the machine, first follow all prior steps outlined in Section 4. To start the
machine, press the physical or touchscreen Start/Stop button. See Section 5.2.
Figure 14.Tear the film along a perforation between
the roller and the air channel.
Figure 15.Use the Jog button to pass the remainder
of the film through the machine.
Figure 16.Wake up the machine by pressing the
Wake from Seep Button.
Figure 17.Wait for the heater to warm up. Progress
is displayed on the right side of the screen.
Jog Button

AirSpeed®Ascent Operator Manual Tech Service Hotline: 886-904-6979 Original Instructions
November 2020
Copyright Pregis Corporation 10
All Rights Reserved
5ADVANCED OPERATION
5.1 Home Screen
Each item displayed below is described in the Table of Symbols, located in Section 5.2.
5.1.1 RFID Recipe Overview
The recipe (preset operating parameters) for each film type is automatically loaded from the RFID
tag on the roll. Air Level and Temperature settings are adjustable within a predefined range.
See Section 5.4.
Start/Stop Button
Seal Temperature
Button
Run Time/
Length Button
Figure 18.Home Screen.
Seal Temperature
Indicator
RFID Film Type
Fill Mode Button
Air Level Button
Production
Speed Setting
Product Select

AirSpeed®Ascent Operator Manual Tech Service Hotline: 886-904-6979 Original Instructions
November 2020
Copyright Pregis Corporation 11
All Rights Reserved
5.2 Table of Symbols
Symbol
Name
Description
Sleep/Wake Symbol
Displayed on startup, this symbol indicates
whether the machine is in Sleep Mode. See Section 4.3.
Wake from Sleep
Button
Use this button to wake the machine from Sleep Mode.
See Section 4.3.
Progress Bar
Function progress is displayed on the right side of the
screen for various processes, including Wake from Sleep.
Start/Stop Button
Use this button to Start the machine. While the machine is
running, this turns into a Stop button able to stop the
machine if pressed. See Section 5.1.
Start/Stop Button
(Physical)
The physical Start button performs similarly to the
touchscreen button. It is located near the lower right corner
of the front panel. See Figure 13 in Section 4.2.
Jog Indicator and
Button
The Jog button is used to load film. Hold the touchscreen
Start/Stop button for 3 seconds access the Jog feature.
Alternatively, use the physical Jog button.
Jog Button (Physical)
The physical Jog button is used to load film. It is located
near the upper right corner of the front panel.
See Figure 13 in Section 4.2.
Back Button
The Back button allows the user to return to the Home
Screen.
Fill Mode Button
This button brings up the Fill Mode menu. Depending
on fill mode, length/time per run can be set be pressing the
Run Time/Length button. See Section 5.3.
Run Time/Length
Buttons
Once a mode is selected in the Fill Mode menu,
length/time per run can be set by pressing either indicator.
See Figure 20 in Section 5.3.
Run Time/Length
Indicator
Once Run Time or Length is selected in the Fill Mode
menu, the appropriate indicator will display on the Home
Screen.

AirSpeed®Ascent Operator Manual Tech Service Hotline: 886-904-6979 Original Instructions
November 2020
Copyright Pregis Corporation 12
All Rights Reserved
Symbol
Name
Description
Seal Temperature
Indicator and Button
By selecting the Seal Temperature button, one can adjust
the sealing temperature. Once set, the Seal Temperature
Indicator will blink until the machine is ready.
Wait Symbol
The Start/Stop button will turn into a Wait symbol while
a temperature change is in progress. See Section 5.1.
Air Level Button
By selecting the Air Level Button, one can adjust the air
level. See Section 5.1.
Production Speed
Button
By selecting the Production Speed button, an authorized
user can adjust the production speed. This setting is not
customer adjustable. See Section 5.1.
RFID Film Type
Indicator
This indicates the detected RFID Film Type and is located
to the right of the Fill Mode button. See Section 5.1.
Enter/Delete Key
When changing a value via the Keypad, use the Enter Key
to save the displayed value. The Delete button can be used
to erase numbers as needed.
Keypad and
Level Visualizer
When changing a setting such as Fill Mode, Seal
Temperature, or Air Level, use the keypad to change the
value. The Level Visualizer will display the range of
acceptable values.
Bin Mode Toggle
If the machine is attached to a bin, this setting will be
enabled. This setting is not customer adjustable.
Bin Mode Indicator
This indicates that Bin Mode is enabled when/if the
machine is attached to a bin.
Bin Empty/Full
Indicator
While in Bin Mode, indicators will activate if the bin is
empty or full.
Winder Enabled
This indicates that Winder Mode is enabled when/if the
machine is attached to a winder.
Winder Idle /
Threading Indicator
While in Winder Mode, indicators will activate if the
winder is idle or threading.

AirSpeed®Ascent Operator Manual Tech Service Hotline: 886-904-6979 Original Instructions
November 2020
Copyright Pregis Corporation 13
All Rights Reserved
5.3 Fill Mode Adjustments
Pressing the Fill Mode button brings up the Fill Mode Selection menu.
After desired value is entered, click the Enter key and return to the Home Screen using the Back
button. Continuous Mode can be activated by entering zero (“0”) for either setting in Time or
Length modes. In this mode, the machine will run until stopped by the user.
5.4 Air Level and Temperature Adjustments
Pressing the Air Level button and Seal Temperature button opens the Blower Setting and Seal
Drum Setting menus, respectively.
Figure 19.The Fill Mode Selection menu allows the
user to toggle between length and time per run.
Figure 20.Both length and time per run can be
adjusted by selecting the Run Time/Length
icon.
Figure 21.Length mode allows the user to select set
length of pillow whenever the
Start
button is pressed.
Figure 22.Time mode has a similar function, but
run time is determined in minutes and seconds.
Figure 23.Input the desired value, click the Enter key, return to the Home Screen using the Back button.
Back
Button

AirSpeed®Ascent Operator Manual Tech Service Hotline: 886-904-6979 Original Instructions
November 2020
Copyright Pregis Corporation 14
All Rights Reserved
6TROUBLESHOOTING
6.1 Error Codes
Code
Name
Cause
Solution
*136
CM Power
Fault <CR>
See Manual
AC Common Mode Error detected.
Latching Error
Check all AC wiring and components.
Power cycle the machine.
250
Film Jam
Error /
Film NOT
Advancing
Roll is out of film
Replace with full roll. See Section 4.2.
Material not properly threaded onto
air tube
Ensure material is properly threaded onto
air tube. See Section 4.2.
Material is jammed
Clear jam if possible. See Section 6.2.
460
RFID Error:
No Tag
No RFID tag detected
Rotate roll of material.
Verify material type.
Load an alternate roll of material.
462
RFID Error:
Invalid
Material
RFID tag detected is not for the
Ascent Machine
Verify material type.
Power cycle the machine.
Load an alternate roll of material.
464
RFID Error:
Bad Tag
Status
RFID tag detected is not readable
Rotate roll of material.
Power cycle the machine.
Load an alternate roll of material.
466
RFID Error:
Bad
Checksum
RFID tag detected has a bad
checksum
Rotate roll of material.
Power cycle the machine.
Load an alternate roll of material.
468
RFID Error:
No Recipe
RFID tag detected has no recipe on
the Ascent Machine
Load an alternate roll of material.
Load latest recipe set.
470
RFID Tag
Error:
Invalid Tag
Invalid number of Blocks on RFID
Tag, may be corrupted
Rotate roll of material.
Power cycle the machine.
Load an alternate roll of material.
*Note: Error 136 may present during power surges or lightning events. This is expected behavior.
Power cycle the machine to restore operation in this event.
6.1.1 Resolving Errors
Errors displayed that are not described above should be resolved by attempting the following steps.
(For Error 136 start with item 2.)
1. Clear the error. Remove the machine from sleep or start a cycle.
2. Locate the power switch on the rear of the machine and restart the machine. Start a cycle after
allowing the machine to heat.
3. Power off the machine and remove the power cord for 30 seconds. Plug back in the power
cord and repower the machine. Start a cycle after allowing the machine to heat.
4. If a problem persists, call Technical Services at 886-904-6979.
Table of contents
Other Pregis Industrial Equipment manuals


Popular Industrial Equipment manuals by other brands


DESSALATOR
DESSALATOR PRO COMPACT D300 Assembly and user's manual

FLENDER
FLENDER FASTEX IC250 Assembly and operating instructions

Uniflex
Uniflex UA 4 Operation manual

JohnDow Industries
JohnDow Industries JDI-AF10E owner's manual

Jäger
Jäger Z33-D060.12 S15A manual

GSI Group
GSI Group SCR Series instruction manual


