Pregis MINI PAK'R V3 User manual

MINI PAK`R®V3 air cushion system
USER MANUAL V1.1 (Original Manual)
Pregis LLC
www.pregis.com
Heerlen, The Netherlands
Deerfield, Illinios USA

MINI PAK’R V3 - MM2I2IN115 / MM2I2IN230 Page 2 of 21
This product is compliant with Directive 2012/65/EC, Restriction of Hazardous
Substances.
Disposal: Power tools, accessories and packaging should be sorted for
environmental-friendly recycling.
Only for EC countries: Do not dispose of power tools into household waste!
According to the European Directive 2002/96/EC on waste electrical and
electronic equipment and
It`s incorporation into national law, products that are no longer suitable for use
must be separately collected and sent for recovery in an environmentally-friendly
manner.
Official agency certifications, declaration documents, and RoHS position statements are
available upon request or by visiting our website at www.pregis.com.
Table of content:
Box Contents ............................................................................................................................. 3
Technical Data........................................................................................................................... 4
Safety instructions...................................................................................................................... 4
Machine Parts............................................................................................................................ 5
Film roll ...................................................................................................................................... 5
Loading a film roll....................................................................................................................... 6
Connecting power .................................................................................................................. 6
Film loading............................................................................................................................ 6
Threading the Film.................................................................................................................. 7
Advance film........................................................................................................................... 7
Rotating control panel ................................................................................................................ 8
Disconnect power................................................................................................................... 8
Open cover............................................................................................................................. 8
Basic operation .........................................................................................................................12
Start production.........................................................................................................................12
Sleep mode...............................................................................................................................13
Machine settings .......................................................................................................................13
Changing Machine Settings...................................................................................................13
Length control........................................................................................................................13
Continuous Mode ..................................................................................................................13
Number of Cushions..............................................................................................................13
Air control ..............................................................................................................................14

MINI PAK’R V3 - MM2I2IN115 / MM2I2IN230 Page 3 of 21
Seal temperature control .......................................................................................................14
Maintaining MINI PAK’R V3 ......................................................................................................15
Risk of Burn!..........................................................................................................................15
Improving slit performance ....................................................................................................15
Display codes ...................................................................................................................... - 17 -
Error codes .......................................................................................................................... - 17 -
Electrical Schematic............................................................................................................. - 19 -
CE Declaration..................................................................................................................... - 21 -
Box Contents
As you unpack the box, you will find the following:
•MINI PAK’R V3®air cushion system
•Power Cord
•User Manual or USB Stick with documentation

MINI PAK’R V3 - MM2I2IN115 / MM2I2IN230 Page 4 of 21
Technical Data
The MINI PAK’R V3 air cushion system (“the machine” or “the system”) creates air cushions on-
demand for use as cushioning, protective wrap, and general transport packaging. Strict
compliance with the safety instructions are required to ensure personal safety. (See Safety
Instructions in this manual)
Specification
Film roll product
Preconfigured MINI PAK’R V3 film
Production Rate
12 meters per minute (40ft./minute)
Power Rating
Model # MM2I2IN230 – 230V, 2.5A
Mode l# MM212IN115 – 115V. 5.0A
Machine Dimensions
37cm (14.6”) wide X 36cm (14”) long X 30cm (11.8”) tall
Recommended Power Fuse
5mm X 20mm, Slow-Blow: 250V 2.5A (230V System)
5mm X 20mm, Slow-Blow: 250V 5.0A (115V System)
Machine Weight
8 kg (17.6 lbs.)
Sound pressure
< 70dbA
Safety instructions
To ensure the personal safety of operating personnel and/or users of this machine, the
instructions below must be followed at all times.
1. The machine may only be used in industrial applications. Usage in a home or office
environment is excluded.
2. The machine shall be used in a facility that is correctly ventilated for air renewal.
3. Avoid all contact with internal electrical components.
4. In case of emergency, switch off the machine and disconnect power.
5. If the machine is not used for any length of time, the Power Switch must be turned OFF
at the rear of the machine.
6. During Installation and Maintenance, the Power Switch must be in the OFF position, with
the Power Cord disconnected.
7. All safety and protection measures must be fitted and adequately maintained in
accordance with Iocal regulations.
8. Only trained and qualified service personnel may maintain any electrical and or
mechanical part of the machine.
9. During machine operation, NEVER touch the film at its point of entry into the machine.
Do not attempt to guide the film into the machine. Injury may result.
10. Under no circumstances may any installed safety feature be overridden.
11. After loading the Film Roll, the machine will automatically adjust to the right seal
temperature for the film. Any contact with the heating element must be avoided
(or any part in direct contact with the heating element), since it may remain hot for
several minutes after the machine has been switched OFF.
MINI PAK’R V3 - MM2I2IN115 / MM2I2IN230 Page 5 of 21
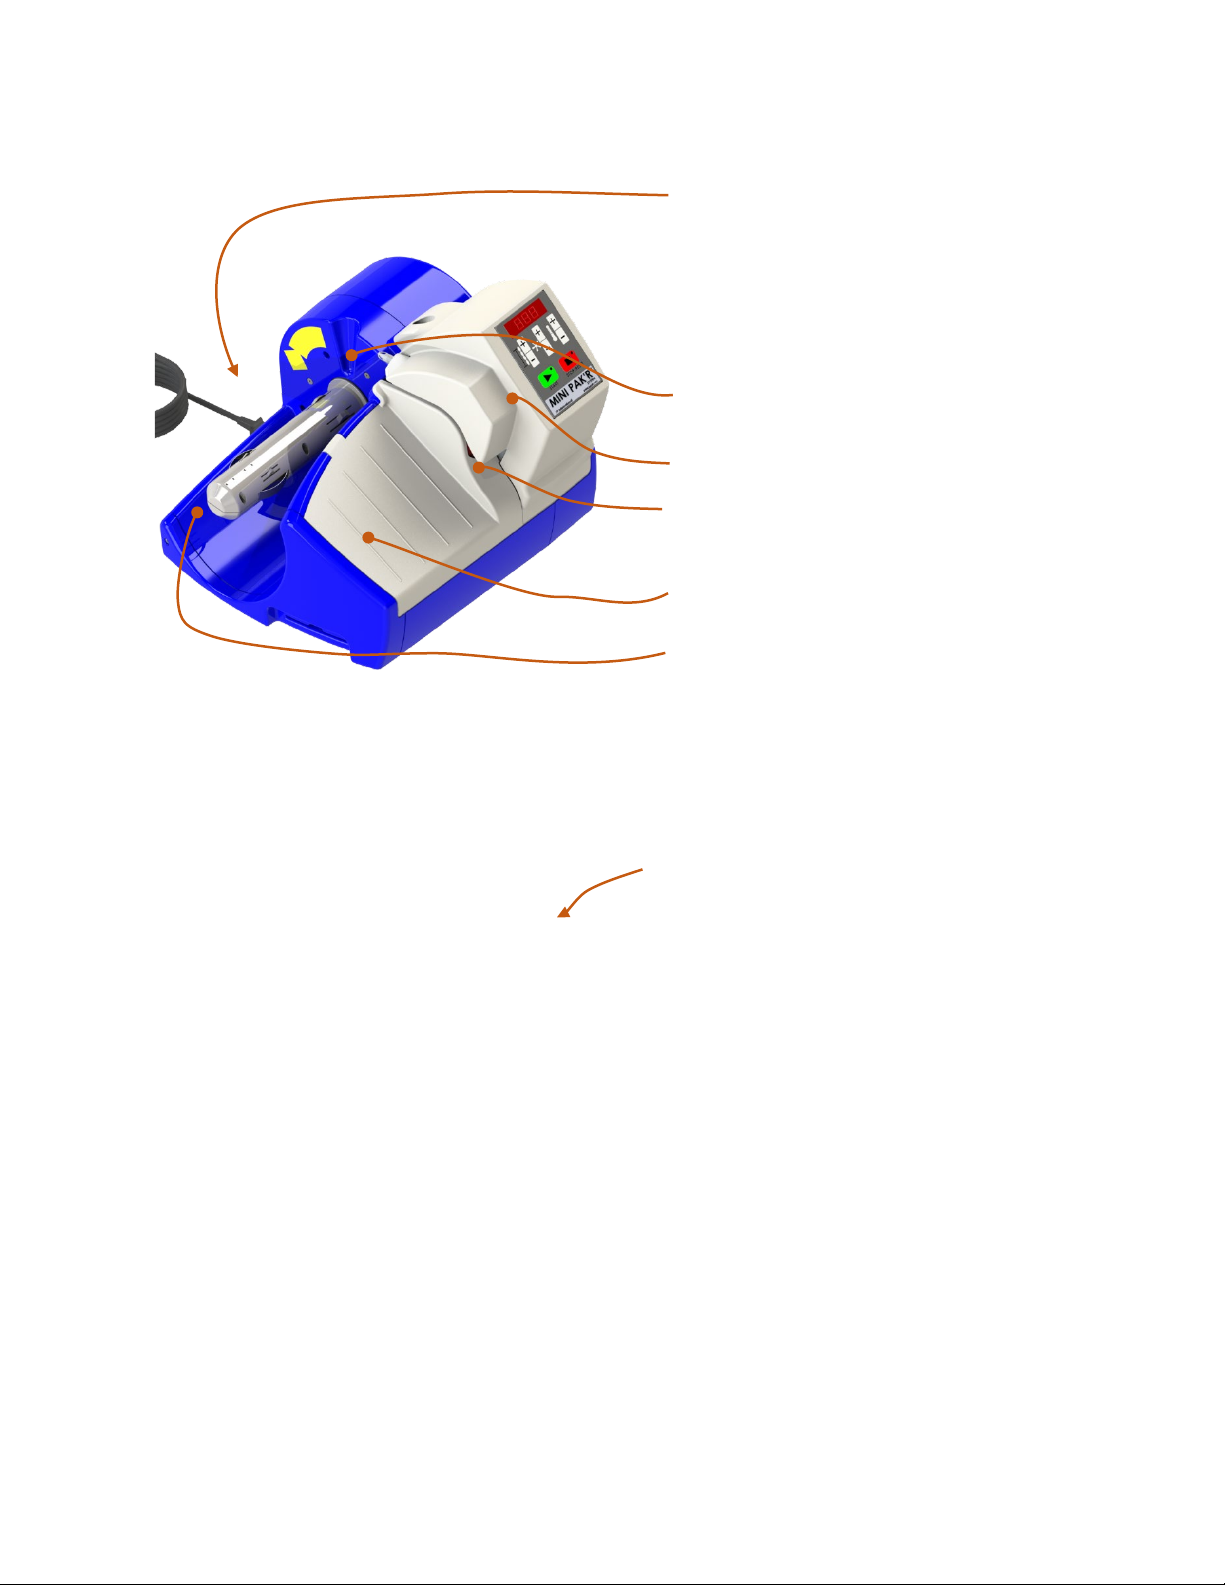
Machine Parts
1. Power cord, power switch,
fuse
2. Air filling tube
3. Control Panel
4. Upper seal cover
5. Lower seal cover
6. Film roll holder
Film roll
1. Film
2. Opened air channel
3. Film core
MINI PAK’R V3 - MM2I2IN115 / MM2I2IN230 Page 6 of 21
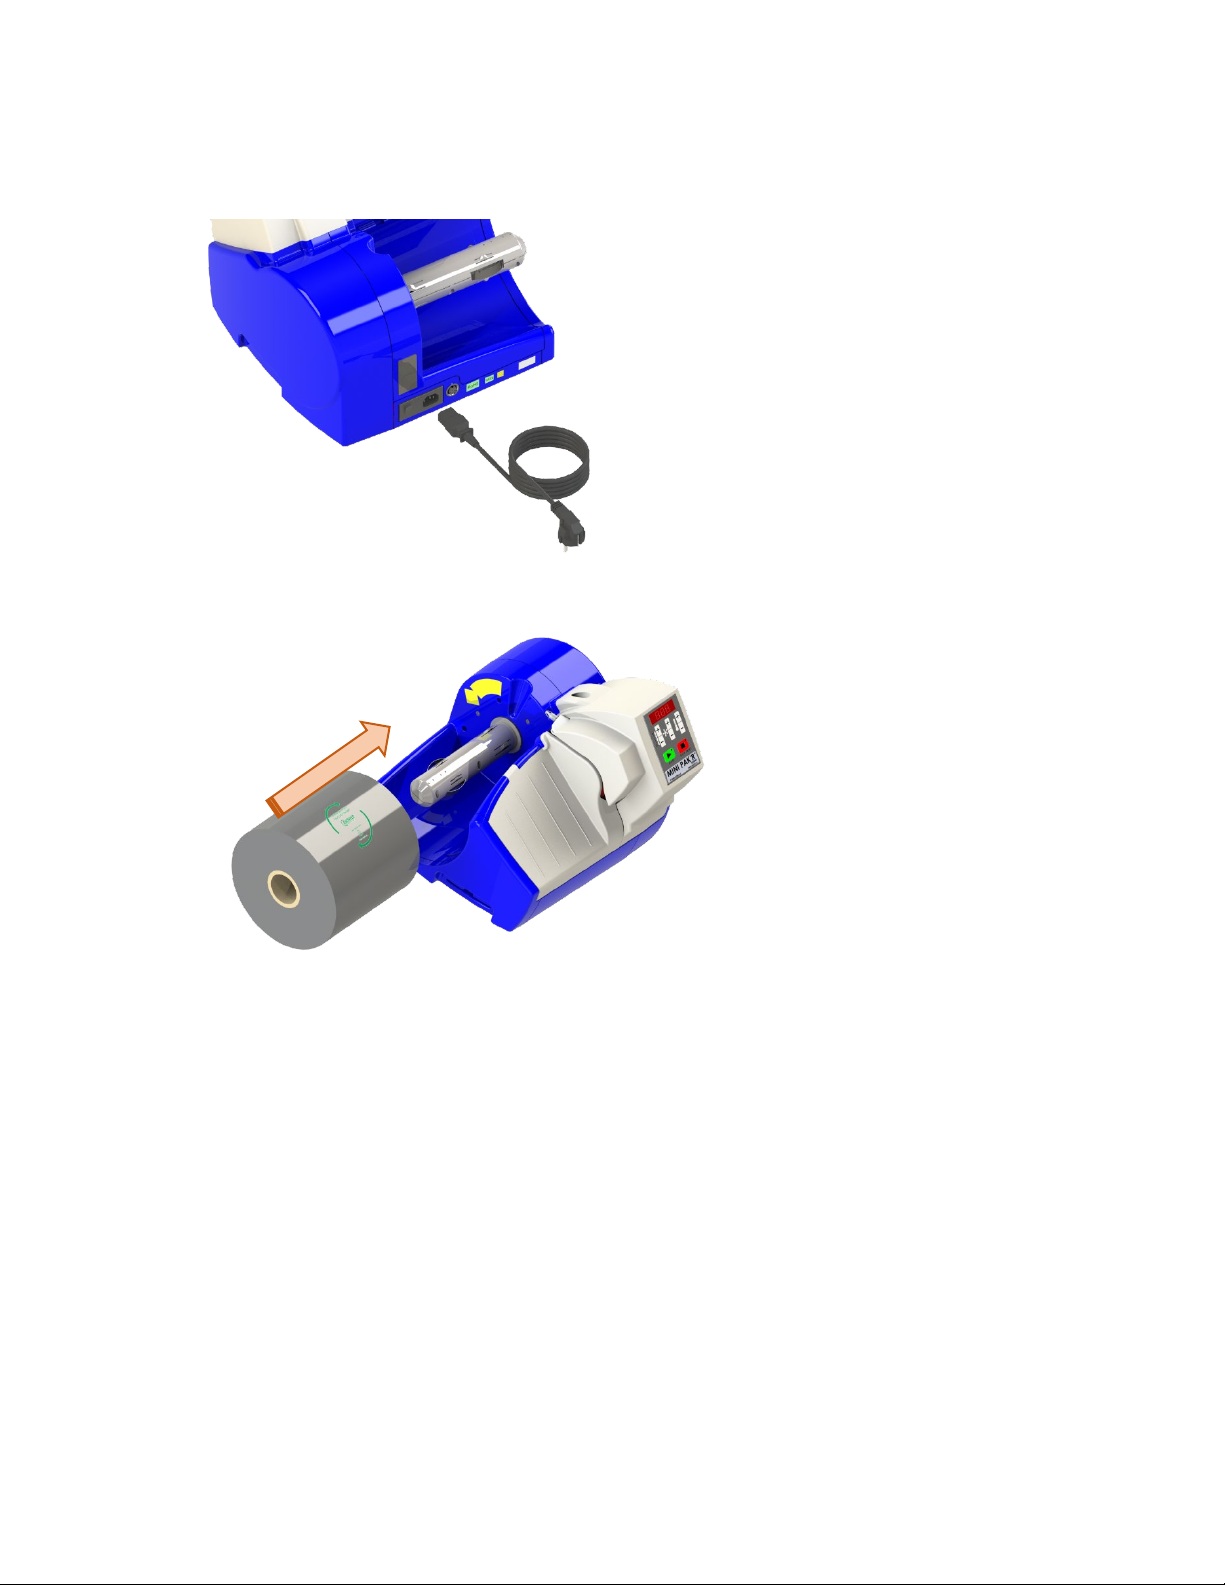
Loading a film roll
Step1:
Connecting power
1. Insert provided Power Cord
into the rear of the
machine.
2. Plug Power Cord into a
dedicated, grounded outlet.
3. Switch machine power ON
(I).
Step 2:
Film loading
Push Film Roll onto the Roll
Holder (with the film feeding off
the top of the roll as shown)
until it seats firmly.

MINI PAK’R V3 - MM2I2IN115 / MM2I2IN230 Page 7 of 21
Step 3:
Threading the Film
Open the Air Channel at the
right side of the Film Roll.
Slip the Air Channel over
the end of the Air fill tube.
Step 4:
Advance film
1. Advance film up to
bend
2. Push play and hold
3. Guide film through
the MINI PAK`R V3
MINI PAK’R V3 - MM2I2IN115 / MM2I2IN230 Page 8 of 21
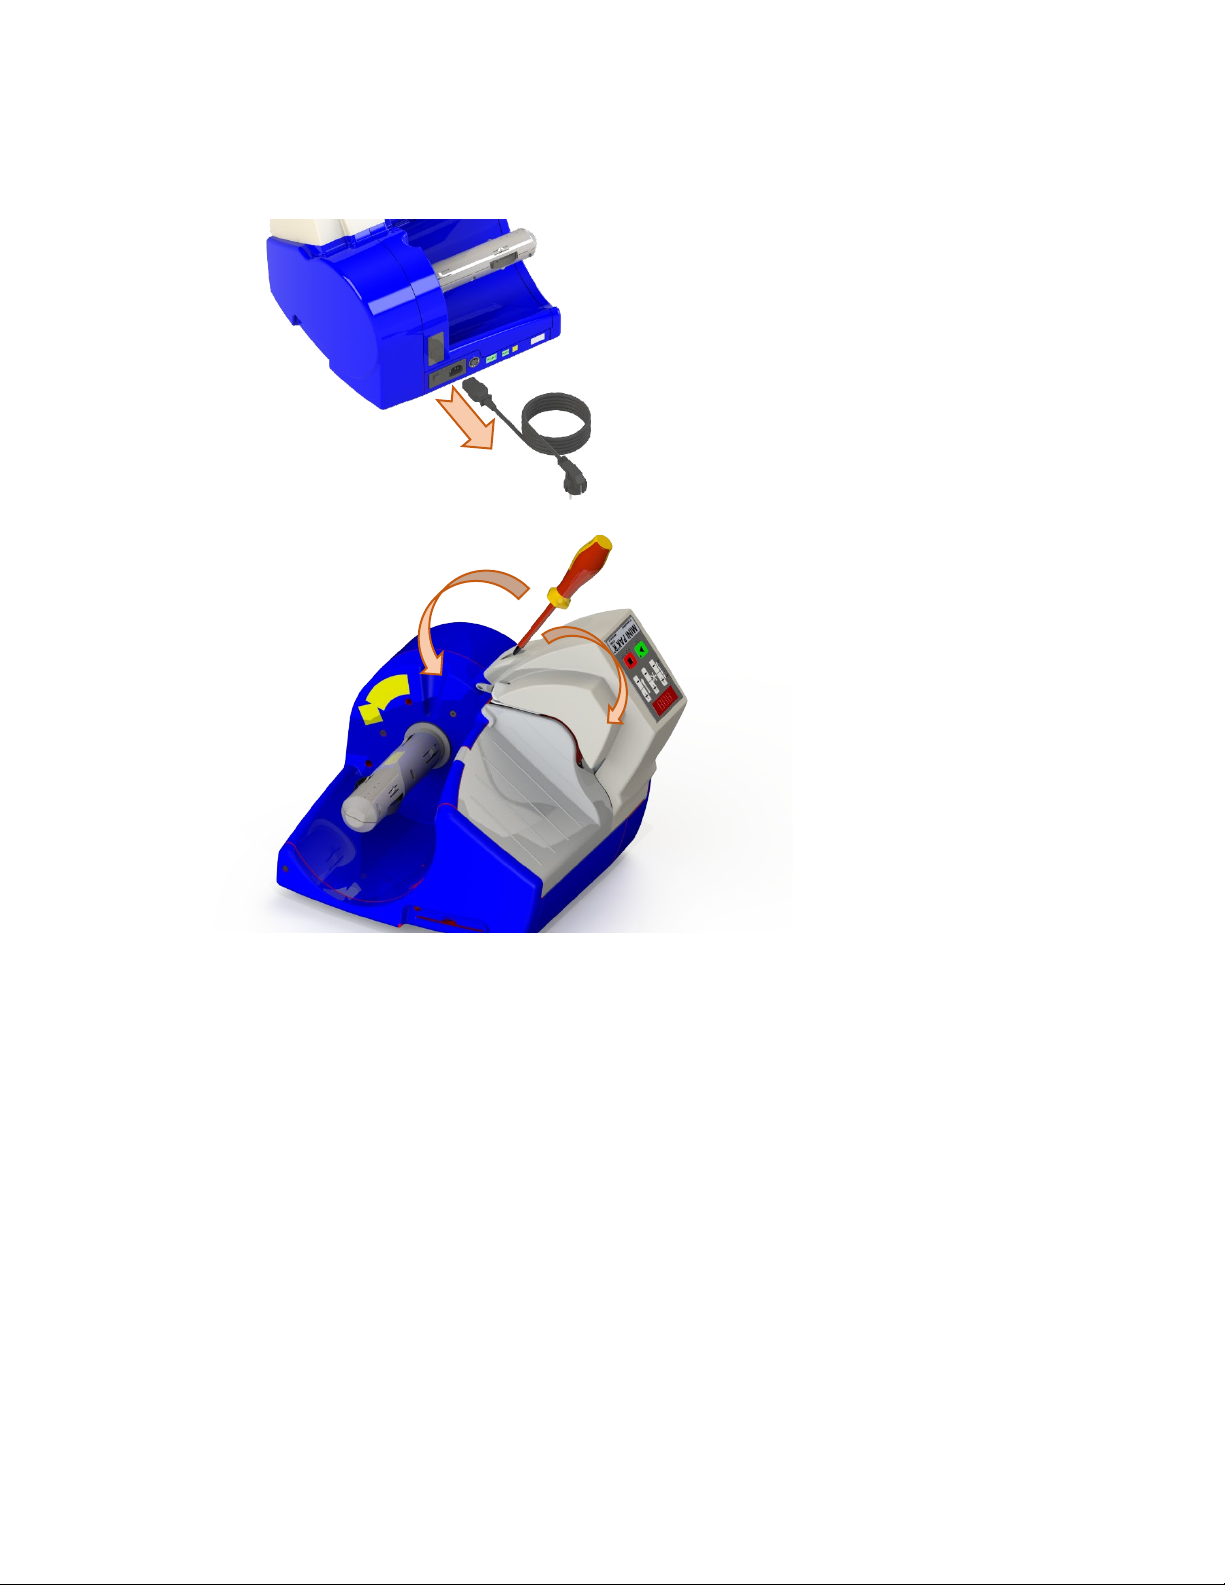
Rotating control panel
Step1:
Disconnect power
1. Switch machine power OFF
(0)
2. Remove power cable
Step 2:
Open cover
1. Unscrew cover lock with
screwdriver
2. Open top cover
MINI PAK’R V3 - MM2I2IN115 / MM2I2IN230 Page 9 of 21
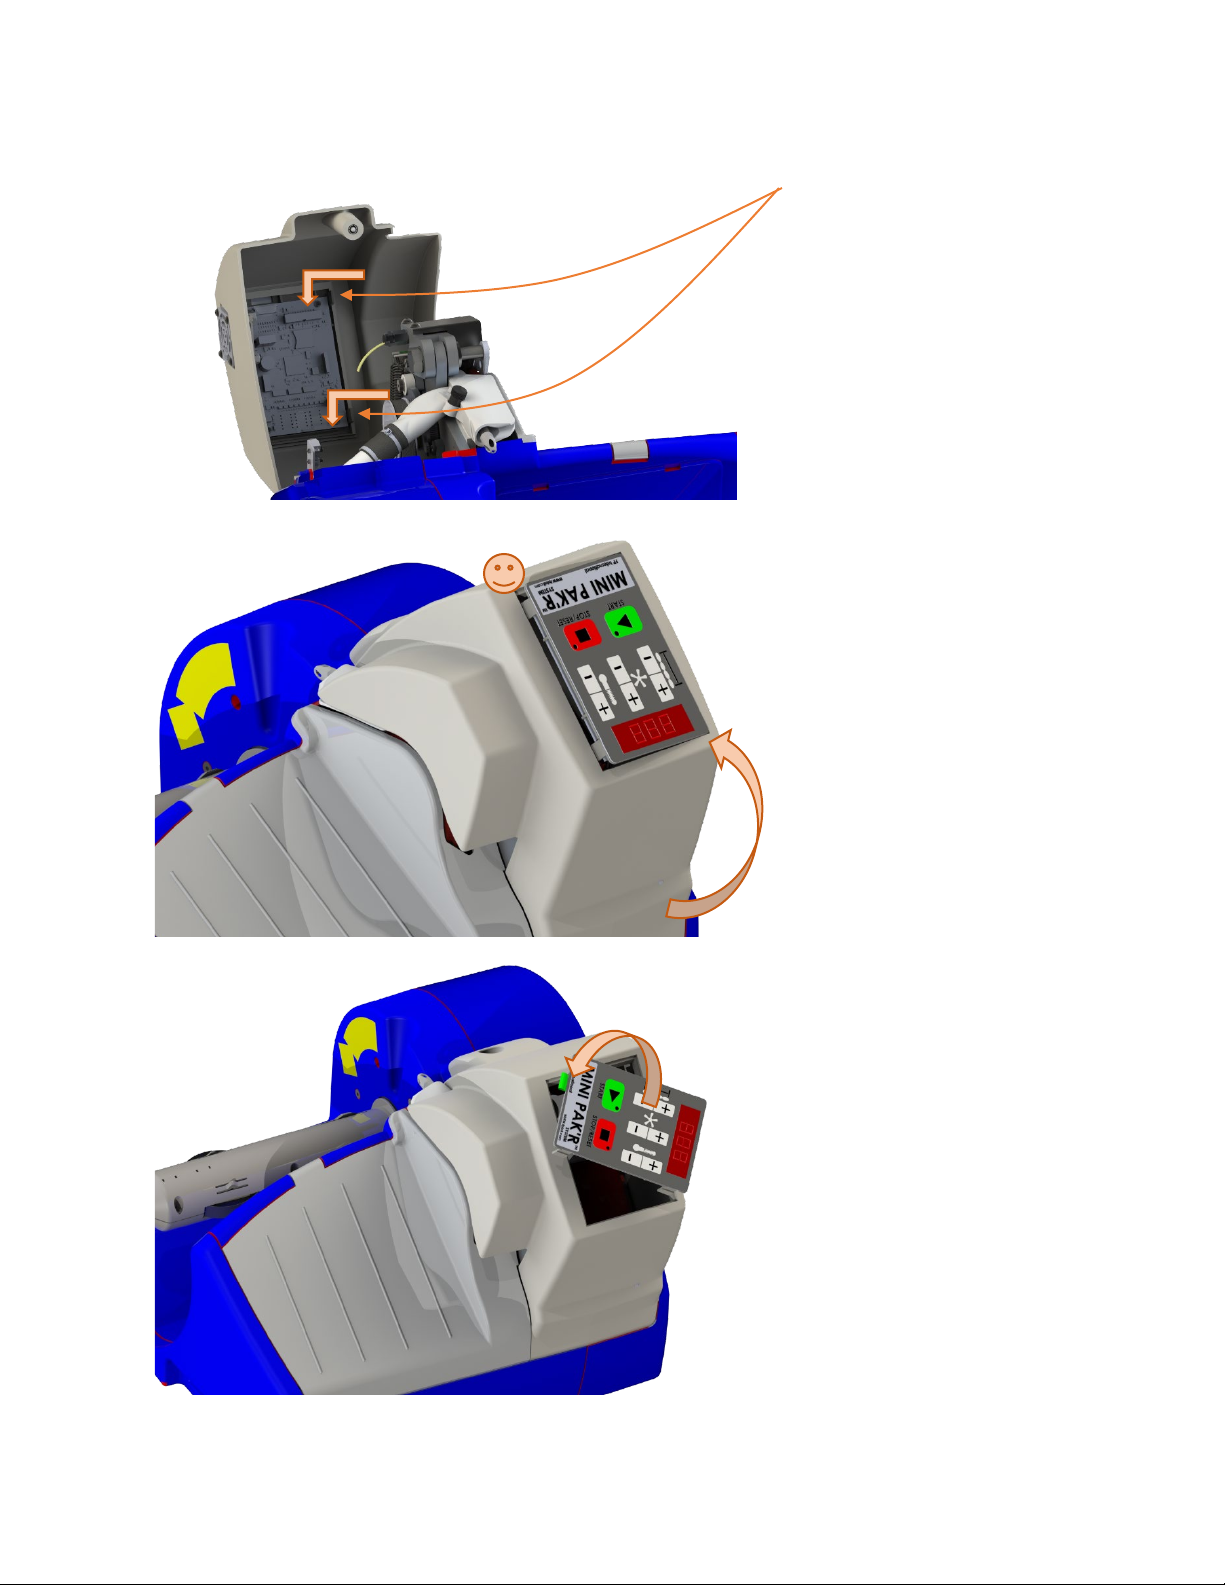
Step 3:
Unclick control panel
Push lips to the left and push
down to move the panel out of the
top cover
Step 4:
Close top cover
1. Close the top cover
2. Check if control panel can
be grabbed from the
outsize
Step 5:
Rotate control panel
1. Gently take the display
out of the top cover
2. Do not pull or remove any
cables
3. Rotate panel counter
clockwise

MINI PAK’R V3 - MM2I2IN115 / MM2I2IN230 Page 10 of 21
Step 6:
Reposition panel
1. Reposition the control
panel down into the cover
2. Guide the green flat cable
into the cover
Step 7:
Check green flat cable
Check if the green flat cable is
inside of the top cover

MINI PAK’R V3 - MM2I2IN115 / MM2I2IN230 Page 11 of 21
Step 8:
Click control panel in place
1. Click control panel back
into the top cover
2. Lock top cover with
screwdriver
MINI PAK’R V3 - MM2I2IN115 / MM2I2IN230 Page 12 of 21
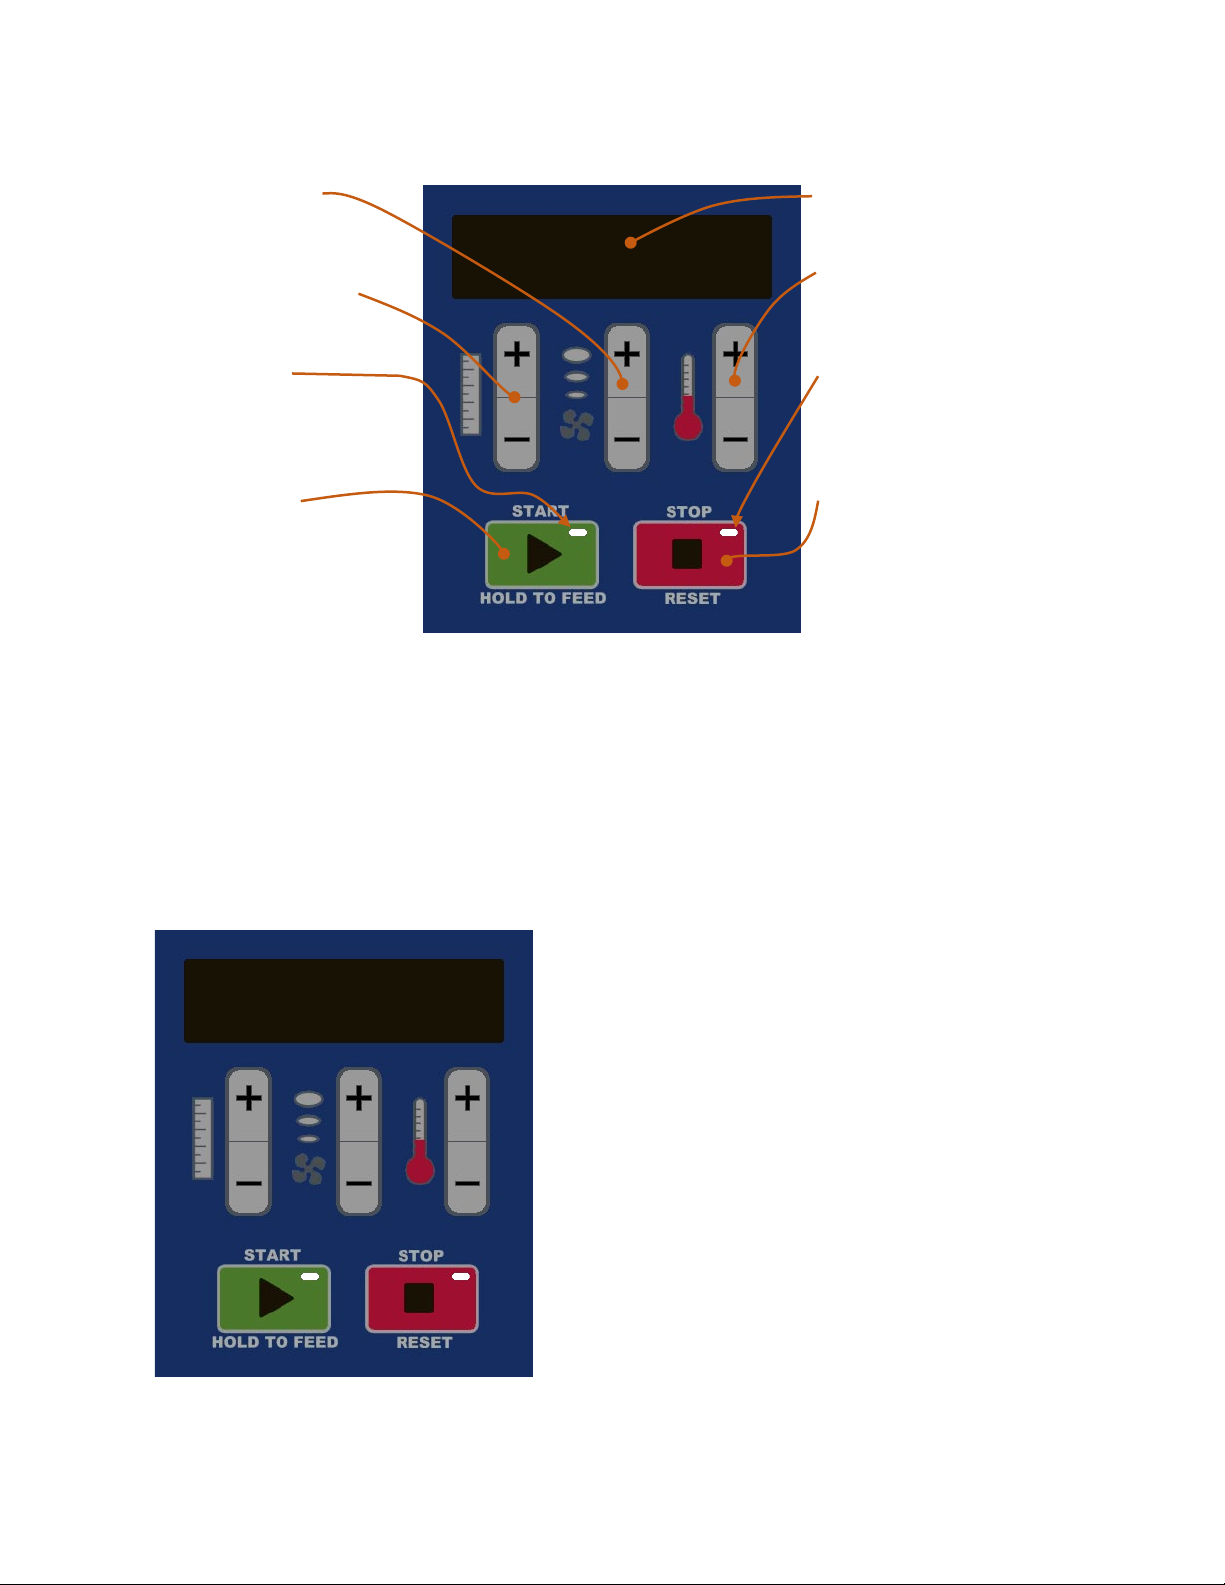
Basic operation
Set air fill level
Set number of cushions
to produce
Green LED
•Blinks while warming up
•Solid when ready
Start button
•Warm up the machine
•Start production of Air
Cushions
Display
Set seal temperature
Red LED
Stop button
•Stop production
•Reset MINI PAK’R
Industrial after error is
corrected
Initially, the display will show “SLP” (Sleep). Once film is loaded, the machine will detect the roll.
The green LED on the Start Button will begin flashing. A flashing green LED indicates that the
machine is warming to the correct seal temperature. The Control Panel will display seal
temperature while adjusting.
When the correct temperature is reached, the green LED will remain solid green. The display
will show “RDY” (Ready). The machine is ready for production. Press the Start Button to begin
making Air Cushions.
Start production
When the green LED remains steady green, and the
Display reads “RDY” (Ready), press and release the
Start Button again to begin production. The Air
Pump will force air into the film, and after a few
seconds the Drive Motor will advance the inflated Air
Cushions through the Seal Bar and past the Slitting
Blade. Air Cushions will emerge at the front of the
machine.
Press the Stop Button to stop production. The
machine is factory set in continuous mode, and will
create Air Cushions until the Film Roll is empty. To
create a fixed length of Air Cushions, use the Length
Control buttons (next page).
F
rdy

MINI PAK’R V3 - MM2I2IN115 / MM2I2IN230 Page 13 of 21
Sleep mode
If the machine is not used for 30 minutes, it will enter
“Sleep” mode. The Display will read “SLP”. To
resume Air Cushion production, press the Reset
Button. The Seal Bar will begin heating. Press the
Start Button again when the green LED remains
steady green and the Display reads “rdy” to resume
Air Cushion production.
Machine settings
Changing Machine Settings
The machine automatically chooses the correct air and temperature settings for the Film Roll
you have loaded. You do not need to adjust Machine settings manually. However, if the
automatic settings are not optimal, the Control Panel allows you to change the following
settings:
•Length control
•Air – Fill level control
•Seal temperature control
Length control
Length Control sets the number of Air Cushions to be
produced each time you press the Start Button. You have
2 options:
Continuous Mode
Length Control at the factory is preset at continuous
production. Press the Start Button and the machine will
run the film until the Film Roll is empty or the Stop Button
is pressed. The Machine will display the number of Air
Cushions produced.
Number of Cushions
If you want to produce a fixed length of Air Cushions,
press the + Button until the desired number is displayed.
The machine will count down the number of Air Cushions
yet to produce.
To change from Fixed to Continuous mode, press the
- Button until the Display shows ”---”.
--
SL

MINI PAK’R V3 - MM2I2IN115 / MM2I2IN230 Page 14 of 21
Air control
Air Control regulates the amount of air in the Air
Cushions.
If you want fuller Air Cushions, press the + Button.
If you want less full Air Cushions, press the - Button.
Seal temperature control
The Temperature Control regulates the temperature of
the Seal unit that fuses the front and back film sheets
together.
If the Air Cushions become flat, and upon inspection the
Heat Seals are leaking air, increase the Temperature
Control by pressing the + Button.
If the Air Cushions become flat because the seals are
burned through at the seal line, as evidenced by holes in
the Air Cushions, decrease the Temperature Control by
pressing the - Button.
NOTE: After changing the Temperature Control setting,
the MINI PAK’R V3 may take a few moments to establish
the new seal temperature. During heat-up or cool down,
the green LED will flash until the correct temperature has
been achieved.
If Air Cushions continue to show poor seals and produce
flat cushions, contact Pregis for assistance.
15
.0
215

MINI PAK’R V3 - MM2I2IN115 / MM2I2IN230 Page 15 of 21
Maintaining MINI PAK’R V3
Risk of Burn!
Before opening Covers, turn Power OFF, unplug the Power Cord, and
wait 10 minutes for the machine to cool down.
Improving slit performance
The slit performance can be improved by reposition, flip or replace the slitting blade:
•If the film jams frequently
•If the blade is not cutting the film properly or is making a very rough cut
1. Turn power off, unplug power
cord, then wait 10 minutes for
the machine to cool down.
2. Loosen the integrated screw in
the top cover, with a slotted or
Philips screwdriver.
3. Open the top cover

MINI PAK’R V3 - MM2I2IN115 / MM2I2IN230 Page 16 of 21
4. Unscrew thumbscrew to
loosen the blade
5. The slit performance can be
improved by repositioning the
blade, so that the film is again
cut by a sharp section of the
blade. This is achieved by a
number of options:
a) Reposition blade further
into the manifold
b) Flip the blade on the short
edge
c) Exchange blade if cut
edge is fully used
6. (Re-)position the blade
7. Tighten the thumb screw

MINI PAK’R V3 - MM2I2IN115 / MM2I2IN230 Page - 17 - of 21
Display codes
Display
code
Explanation
RDY
The machine is ready for air cushion production.
SLP
After 90 minutes without operation the machine enters in sleep mode to safe
power.
No actions needed.
STY
Machine is in reduced temperature mode.
No actions needed.
Error codes
If the Display shows an Error Code, and the red LED flashes, consult the chart below to
determine the cause. Clear the problem as described below, then press the STOP/RESET
Button to resume normal operation.
Display
code
Error
Action
E1
Cover open
Make sure covers are closed.
E2
Jam / end of roll
In case of jam, open cover and remove jammed film
carefully.
E3
Heater high temp.
issue
Contact Pregis for assistance and swap the machine.
E4
Heater low temp.
issue
Contact Pregis for assistance and swap the machine.
E5
Heating fault
Contact Pregis for assistance and swap the machine.
E6
No RFID tag
detected
Swap the film roll and reset the system. If error repeats,
contact Pregis for assistance and swap the machine.
E8
Temp. read fault
Contact Pregis for assistance and swap the machine.
E9
Incompatible tag
detected
Swap roll with compatible film roll. If the error still appears,
contact Pregis for assistance and swap the machine.
E10
Temp. read fault
Clear error and allow machine to reheat. If error repeats,
cycle power. If error repeats, contact Pregis for assistance
and swap the machine.
E11
Temp. read fault
Clear error and allow machine to reheat. If error repeats,
cycle power. If error repeats, contact Pregis for assistance
and swap the machine.
E12
Thermocouple
fault
Reset power to the machine. If error persists, contact
Pregis for assistance and swap the machine.
E16
Power monitor
fault
Contact Pregis for assistance and swap the machine.
E17
Power monitor
fault
Contact Pregis for assistance and swap the machine.

MINI PAK’R V3 - MM2I2IN115 / MM2I2IN230 Page - 18 - of 21
E18
Power monitor
fault
Contact Pregis for assistance and swap the machine.
E28
Drive motor driver
fault
Contact Pregis for assistance and swap the machine.
E31
Drive motor start
fault
Contact Pregis for assistance and swap the machine.
E32
Drive motor stop
fault
Contact Pregis for assistance and swap the machine.
E36
Blower load fault
Contact Pregis for assistance and swap the machine.
E40
Blower start fault
Contact Pregis for assistance and swap the machine.
E41
Blower stop fault
Contact Pregis for assistance and swap the machine.
E44
Seal motor driver
fault
Contact Pregis for assistance and swap the machine.
E45
Seal position fault
Power cycle the machine, if the error repeats, contact
Pregis for assistance and swap the machine.
E47
USB load fault
Remove USB device. Contact Pregis for assistance and
swap the machine.
E48
USB general fault
Contact Pregis for assistance and swap the machine.
E49
USB device not
compatible
Remove USB device. Contact Pregis for assistance and
swap the machine.
E50
Incorrect USB file
format
Format USB to FAT or FAT32, Use Pregis recommended
USB drive, not all drives are compatible.
E59
Control board
reset
Unexpected reset detected. Contact Pregis for assistance
and swap the machine.

MINI PAK’R V3 - MM2I2IN115 / MM2I2IN230 Page - 19 - of 21
Electrical Schematic

MINI PAK’R V3 - MM2I2IN115 / MM2I2IN230 Page - 20 - of 21
Table of contents
Other Pregis Industrial Equipment manuals


Popular Industrial Equipment manuals by other brands


SafanDarley
SafanDarley E-Brake Premium 100-3100 instruction manual

DOLD
DOLD MINISTART GF 9016 manual

DESSALATOR
DESSALATOR PRO COMPACT D300 Assembly and user's manual

SCHUNK
SCHUNK TRIBOS SVP-2D Assembly and operating manual

ABB
ABB HT846935 Operation manual

Wilo
Wilo RexaLift FIT L1 Installation and operating instructions


