manuals.online logo
Brands
  1. Home
  2. •
  3. Brands
  4. •
  5. EHS Ltd.
  6. •
  7. Patio Heater
  8. •
  9. EHS Ltd. HQH-2000W User manual

EHS Ltd. HQH-2000W User manual

PATIO FAR-INFRARED QUARTZ HEATER
HQH-2000W
Please read this instruction manual before operating and
keep safe for future reference.
CAUTION: Read and follow all instructions before operating this heater.
Failure to comply with these instructions may cause a fire, electrical
shocks or other injury to persons or property
1. This heater is hot when in use. To avoid burns DO NOT touch the Heating
element. DO NOT adjust the angle of the heater head when the unit is
hot.
2. Extreme care should be taken whenever the heater is left operating and
unattended.
3. Before operating the heater remove the unit from it’s packaging, fully
assemble the heater and check it is in good condition.
4. DO NOT let children play with the packaging, for example plastic bags.
5. DO NOT operate any heater with a damaged cord or plug, or after the
heater malfunctions, has been dropped, or damaged in any manner.
Return the heater to an authorised service facility for examination and
repair.
6. DO NOT attempt to repair or adjust any electrical or mechanical functions
as this may void warranty.
7. Check the household voltage to ensure it matches the appliance's rated
specification before using the heater.
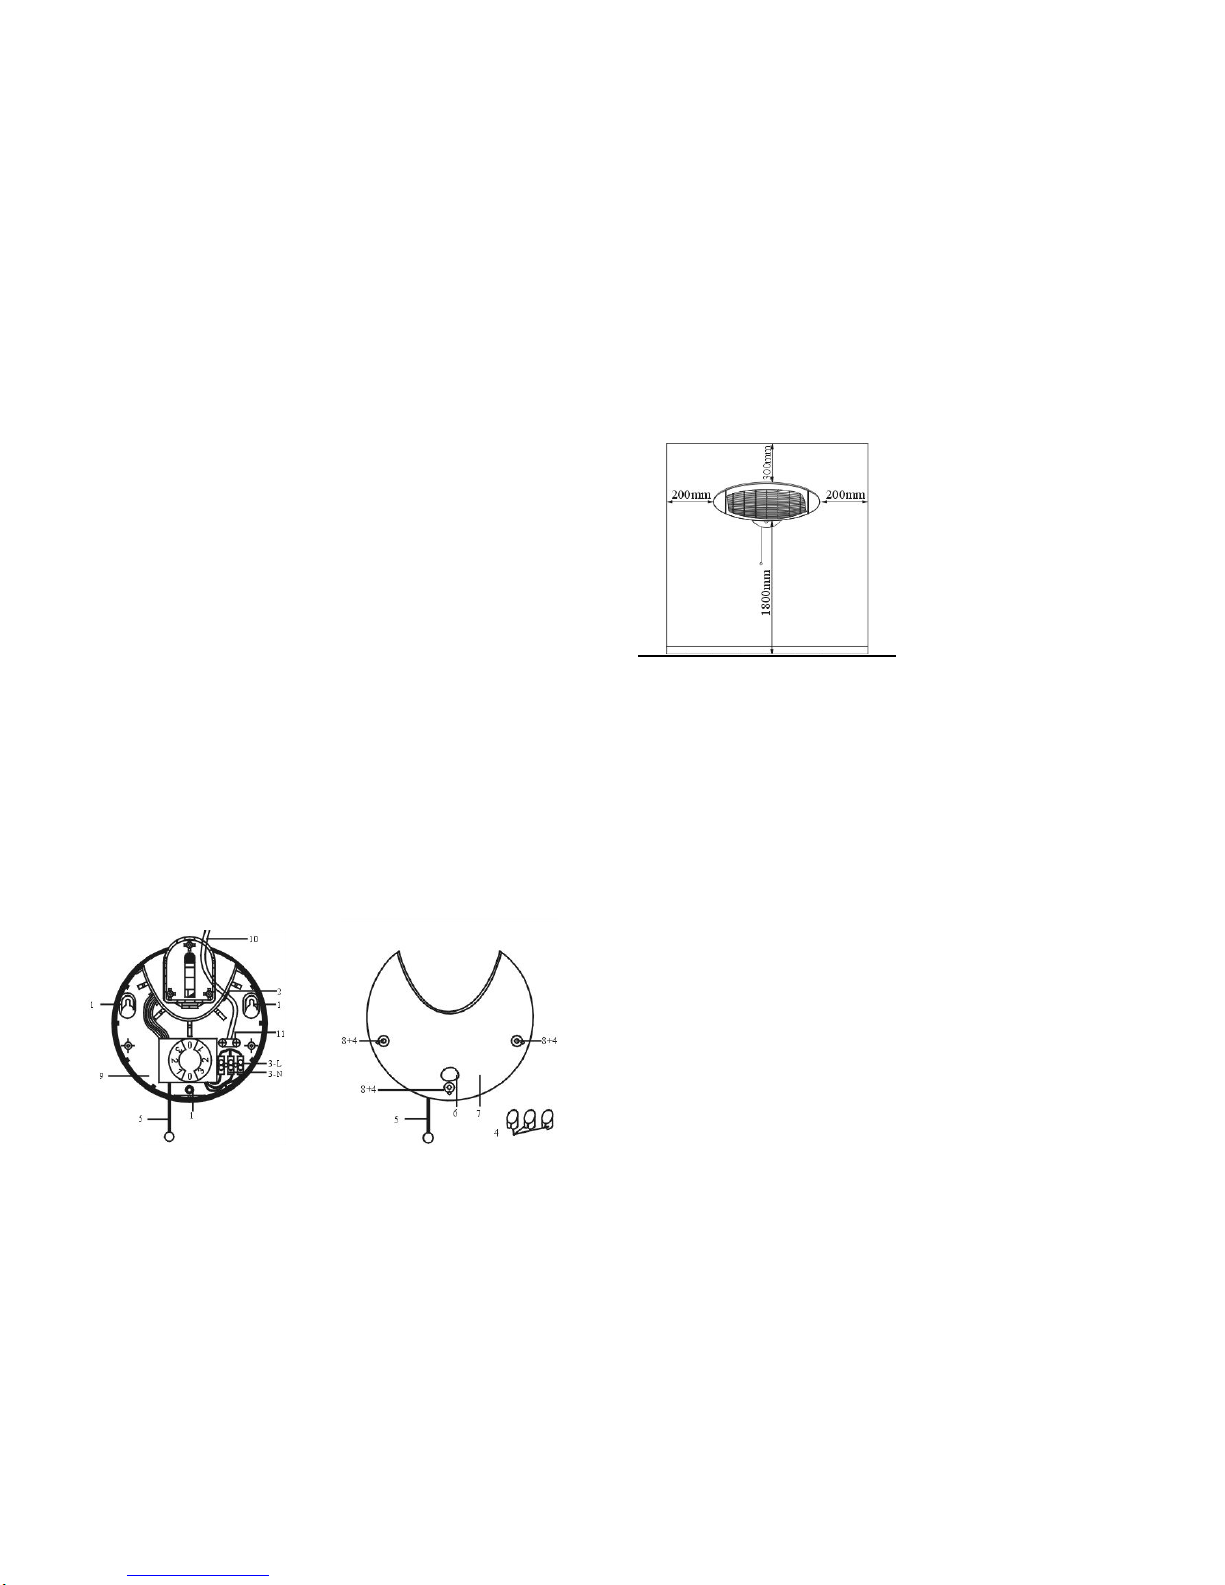
8. Mount the heater on a flat stable surface e.g. house wall.
9. This heater is designed for use in gardens. The unit has been IPX4
approved, which means that it is splash proof. However, it is strongly
recommended that the heater is stored in a shed or garage during heavy
rain. When not in use always store in a dry area.
10. The installation and use of your appliance must comply with the
applicable standards in your country. If you have any questions please
consult a qualified electrician or call the EHS help desk number listed on
the back cover.
11. DO NOT run power cord under carpeting, or cover with rugs or runners.
DO NOT hide the power cord in long grass or leave close to an operating
lawnmower. Arrange the cord away from areas where it may be tripped
over.
12. DO NOT insert or allow objects to touch the heating element and never
place anything on the heater safety guard (e.g. towels), as this may
damage the heater and could cause an electrical shock or fire. Never use
your heater to dry washing.
13. If the heating element has stopped glowing it may still be live, please
check that the heat setting indicates the heater is off ‘0’.
14. DO NOT use the heater in areas where petrol, paint, or other flammable
substances are stored.
15. Where possible, avoid the use of extension cords as they may overheat
and cause a risk of fire. However, if you have to use an extension cord,
the cord must be of minimum 1.5 mm2 core cross sectional area or larger
and rated a minimum of 2000 Watts. If you use a coiled (cable-tidy type)
extension cord, ensure that all cable is uncoiled from the cable drum.
Leaving coiled cable on the drum will cause overheating of the cable.
Never use a single extension cord to operate more than one heater.
16. Always check power cord for damage before plugging the appliance into
the mains socket. Do not use the appliance if the power cord or insulation
is damaged. Always use an RCD (Residual Current Device) socket or
plug adaptor to prevent an electrical shock due to accidental damage of
the power cord or appliance.
17. Always unplug the heater when not in use. To disconnect from the power
supply, grip the plug and pull from the power socket. Never pull by the
cord.
Parts Description
1. Fastening holes
2. Power cable holding clip
3. Live & Neutral wires
4. Screw hole covers
5. Heat setting & heat selector pull switch
6. Heat setting display window
7. Front covering plate
8. Screw holes
9. Backing plate
10. Power cable exit point
11. Power cable clamp
fig 1 fig 2
fig 3
 The unit must be screwed to the wall in a horizontal position
 Never install in vertical position this may damage the heating
elements and void the warranty
 Never install directly above or below wall sockets
 Ensure you have a suitable clearance from each side of the unit,
minimum space indicated above (fig 3)
Installation instructions
When installing DO NOT connect the mains power.
The heater is supplied with accessories for wall mounting:
3 wall plugs, 3 screws, 3 screw covers
N.B. Power cord length is 1.8m Please ensure suitable location to
accommodate this.
1) Remove the three screw caps from the front cover and screws to take
off plastic front cover (Fig 2).
2) Select the correct positioning as per the diagram (Fig3).
 Do not install in a vertical position. This will damage the unit.
 Do not install below an electrical socket or appliance due to high very
radiant heat.
 Do not install close to any flammable objects such as petrol or paint.
 Ensure that the wall is of sound construction. The appliance weighs
1.65 kg’s.
3) When installing DO NOT connect the mains power.
Once position has been selected
4) When fixing the mounting plate to the wall measure to the correct
distance between screw holes, 140 mm. Do not fully insert the screws
into the wall, leave the screw heads 2-3mm above the wall surface.
5) Mount the backing plate onto the protruding screw heads and mark
the hole for the final screw that secures the unit to the wall. Remove
unit and drill final hole and insert the wall plug.
6) Refit the unit on the screws and fix the bottom securing screw.
7) Replace the front cover, screws and screw caps.
Storage
When heater is not in use or during heavy whether conditions remove bottom
screw and lift heater off holding screw and store in original packaging in a dry
area.
OPERATING INSTRUCTIONS
The appliance is switched on and off using the pull switch (parts description
point 5). The slight vibration noticeable when the appliance is switched on will
stop after a few seconds.
- Position 0: OFF
- Position 1: 650W (Low heat) only 1 element will heat
- Position 2: 1350W (Medium heat) 2 elements will heat
- Position 3: 2000W (High heat) 3 elements will heat
MAINTENANCE
Warning: always remove the plug from the mains socket before moving or
servicing. Do not immerse your heater in water.
• Before cleaning turn the heater off and unplug from the power
Supply. Allow the heater to cool down for a minimum of 15 minutes.
• To clean the heater use a soft cloth to wipe off any dust. If the heater
is very dirty use a damp cloth to wipe the exterior casing and wipe
dry. Do not use any cleaning
detergents, sprays or other chemicals, as they will damage the heater.
• Store the heater in the original packaging in a ventilated dry area.
SPECIFICATION
Power: 2000W
Voltage: 220-240V ~ 50Hz
Net weight: 1.65 kg
Gross weight: 2.1kg
SERVICE & WARRANTY
 Do not operate the unit with a damaged cord or plug, after the unit
malfunctions, or has been dropped or damaged.
 For your convenience, record the complete model number and
product name (located on the Product Identification Plate), the date
you purchased the product, and attach your purchase receipt docket
as proof of purchase. To ensure your product is covered by warranty,
the complete faulty product together with your purchase receipt
should be returned to your retailer.
ONE (1) YEAR LIMITED WARRANTY
SAVE THIS WARRANTY INFORMATION
EHS (International) Ltd. guarantees this product free from
defects in materials and workmanship for a period of one (1)
year.
Should this unit be operated under conditions other than those
recommended, at voltages other than the voltage indicated on the unit, or
any attempts made to service or modify the unit, this will render
WARRANTY VOID. The product you buy may sometimes differ slightly from
illustration. This warranty is in addition to, and does not affect, your statutory
rights
Should you have a problem with this product, please contact to our help
desk, Tel: (0870) 742 5021
This product has been manufactured to comply with EEC Directives
73/23/EEC and 89/336/EEC
EHS, Manchester, M17 1RN
EHS 04/06
Waste electrical products should not be disposed of with
household waste. Please recycle where facilities exist.
Check with your Local Authority or retailer for recycling advice.

Popular Patio Heater manuals by other brands

Paramount Fitness KLD7002S instruction manual

Paramount Fitness

Paramount Fitness KLD7002S instruction manual

hykolity WHC-0201 owner's manual

hykolity

hykolity WHC-0201 owner's manual

EUROM PD2100XXL instruction manual

EUROM

EUROM PD2100XXL instruction manual

Bodenheizung 24 LDHR1503 quick start guide

Bodenheizung 24

Bodenheizung 24 LDHR1503 quick start guide

Blooboost 545150006 manual

Blooboost

Blooboost 545150006 manual

Belleze 014-HG-PH00 owner's manual

Belleze

Belleze 014-HG-PH00 owner's manual

Napoleon SRPH02-XXXX owner's manual

Napoleon

Napoleon SRPH02-XXXX owner's manual

Firesense Morrison 62235 manual

Firesense

Firesense Morrison 62235 manual

MrHeater MH40PH Instructions and parts list

MrHeater

MrHeater MH40PH Instructions and parts list

Comfort Zone CZPH20R Series instructions

Comfort Zone

Comfort Zone CZPH20R Series instructions

HomComfort HCPHPRSS manual

HomComfort

HomComfort HCPHPRSS manual

BlueRhino Endless Summer 233010 Cleaning instructions

BlueRhino

BlueRhino Endless Summer 233010 Cleaning instructions

Firesense PH01-S instruction manual

Firesense

Firesense PH01-S instruction manual

BlueRhino Endless Summer 450000 Series owner's manual

BlueRhino

BlueRhino Endless Summer 450000 Series owner's manual

Firesense Lux Series manual

Firesense

Firesense Lux Series manual

FireKing PG209T-B manual

FireKing

FireKing PG209T-B manual

Hortus Golden tube ZHQ1580-S instructions

Hortus

Hortus Golden tube ZHQ1580-S instructions

Hotspot Spiral user guide

Hotspot

Hotspot Spiral user guide

manuals.online logo
manuals.online logoBrands
  • About & Mission
  • Contact us
  • Privacy Policy
  • Terms and Conditions

Copyright 2025 Manuals.Online. All Rights Reserved.