Prince Castle Redi-Gril 164-B User manual

OPERATING
INSTRUCTIONS
Manual Grill Tool Sharpener
Model No. 164-B
355 East Kehoe Blvd. l Carol Stream, IL 60188
Tel: (630) 62-8800 l Fax: (630) 62-1 60
Toll Free: 1-800-PCASTLE
Printed in September 2005
Prince Castle Inc.164-505
SPECIFICATION
164-B Dimensions
Length 16" (40.64 cm)
Width 5" (15.24 cm)
Height 7 (17.78 cm)
Shipping Weight 12 lbs (5.5 kg)
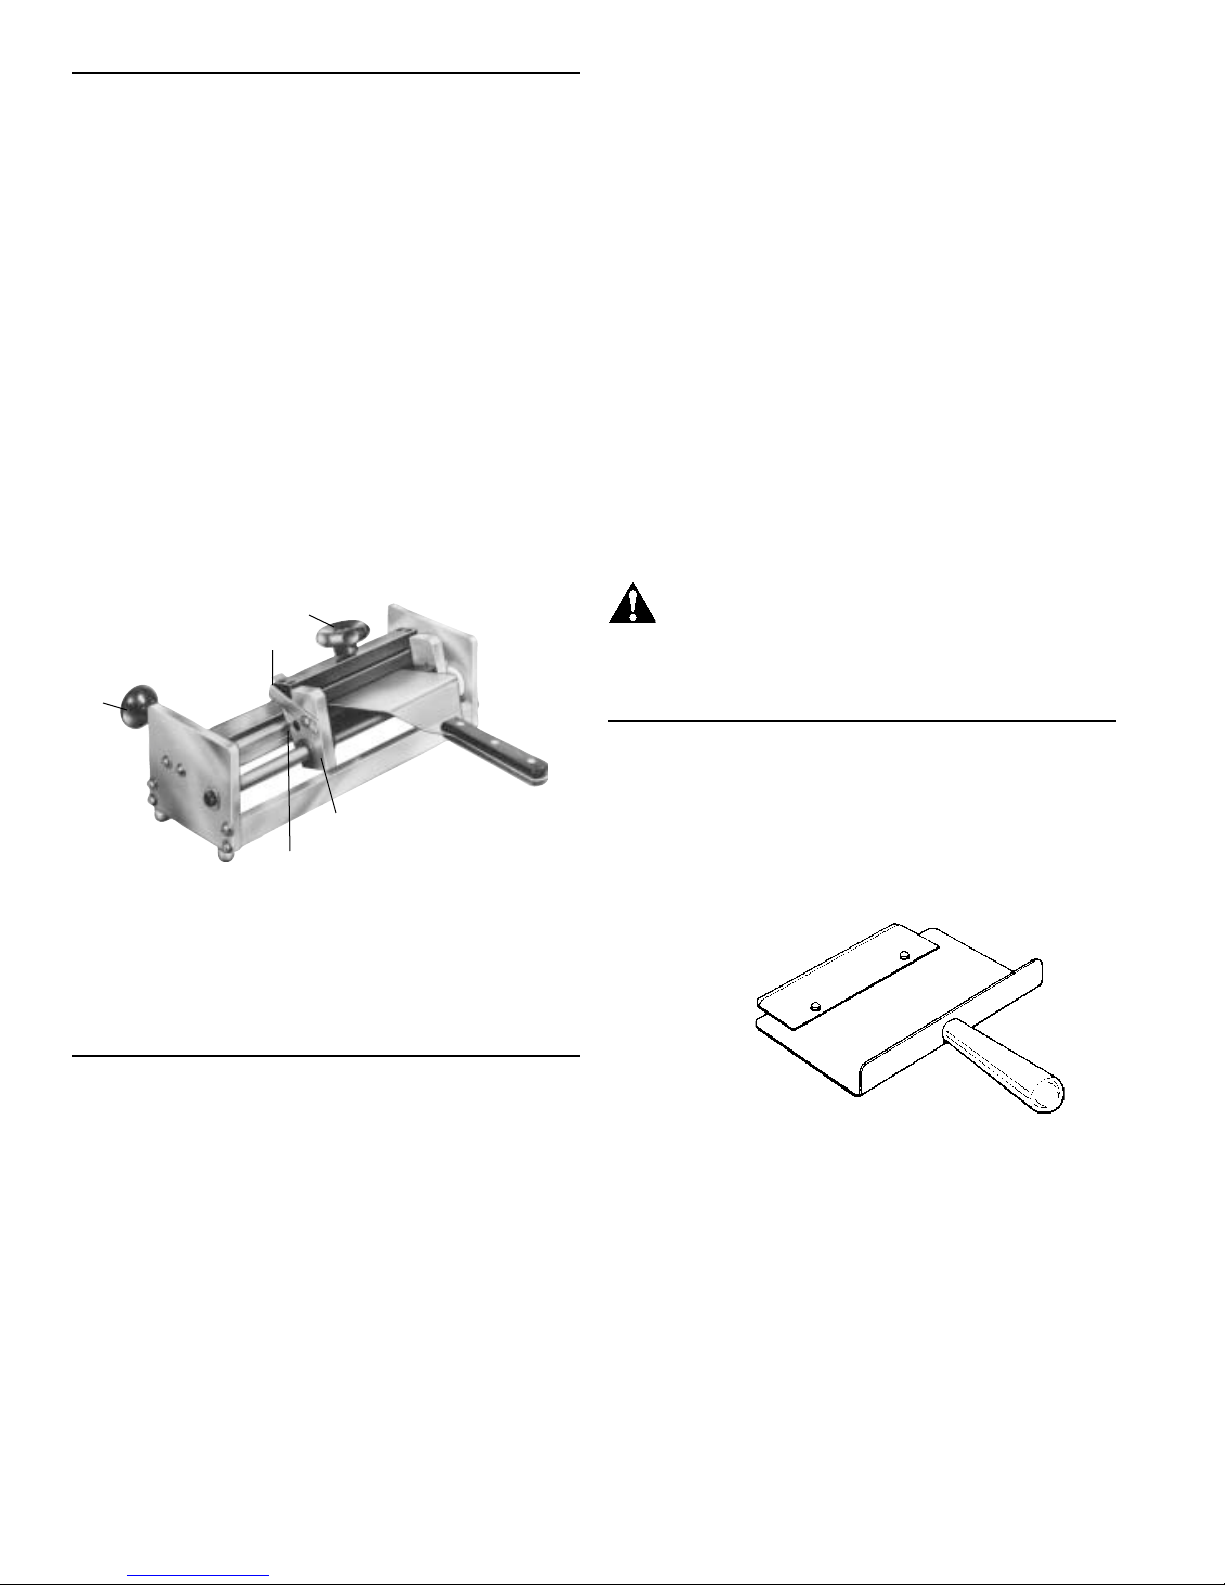
The Prince Castle manual grill tool sharpener gives a
quick sharpene straight e ge to scrapers an
spatulas. Sharp spatulas pick up grille meat
cleanly without tearing the seare surface. Natural
juices are kept in foo for more flavor, an a more
appetizing appearance. With precision e ges
cleanup is quick an easy without scratching. Plus,
compact size of the manual grill tool sharpener
saves valuable counter space.
LIMITED WARRANTY
This pro uct is warrante to be free from efects in
material an /or workmanship for a perio of one
year from ate of original installation, not to excee
18 months from ate of shipment from our factory.
Any component which proves to be faulty in material
an /or workmanship will be replace or repaire (at
the option of Prince Castle, Inc.) without cost to the
customer for parts or labor.
This warranty is subject to the following exceptions/
con itions:
lUse of any non-genuine Prince Castle parts
voi s this warranty. All genuine Prince Castle
replacement spare parts are warrante for ninety
(90) ays from ate of purchase.
lDamage cause by carelessness, neglect, an /
or abuse (e.g., ropping, tampering or altering
parts), equipment amage in shipment, by fire,
floo or an act of Go is not covere un er this
warranty.
lThis unit is portable, charges for on location
service (i.e. trip charges, mileage) are not in-
clu e in the provisions of the warranty.
TABLE OF CONTENTS PAGE
Installation..................................................................... 2
Operating ....................................................................... 2
Parts List....................................................................... 3
Troubleshooting ............................................................ 4
Non-sche ule Maintenance ....................................... 4

INSTALLATION
1. After you have remove the sharpener from the
carton, inspect the unit for signs of amage. If there
is amage to the unit:
lNotify carrier within 24 hours after elivery.
lSave carton an packing materials for inspection
purposes.
lContact the Prince Castle Customer Sales
Department at 1-800-722-7853 to arrange for
a replacement to be sent.
2. Verify that all parts have been receive .
3. Clean spatulas an scraper bla es with soap an
water. Dry thoroughly before sharpening.
4. Assemble knob (item A in figure 1) to back frame of
sharpener.
IMPORTANT: The knob can be assemble to either
si e of back frame epen ing if operator is left or right
han e .
OPERATION
5. Turn carriage knob (item C in figure 1) counter-
clockwise to open jaws.
6. Lift carriage assembly (item B in figure 1) by large
knob (item C in figure 1) upwar until it stops. Hol
in this position.
8. Press gauge stop bar (item D in figure 1) tab
downward until it makes contact with the socket
head screw (item E in figure 1) .
9. Insert meat spatula or grill scraper bla e squarely
against gauge stop bar (item D in figure 1).
IMPORTANT: Center spatula in carriage.
10. Tighten jaws by turning carriage knob (item C in
figure 1) clockwise while hol ing carriage in the up
position. NOTE: Do not over-tighten screw.
11.Lift guage bar (item D in figure 1) upward and
hold in place with thumb.
12. Lower carriage assembly (item B in figure 1) with
tool to rest on the file.
13. While hol ing carriage knob (item C in figure 1) with
one han an knob (item A in figure 1) with the
other, sli e carriage back an forth on file, applying
mo erate pressure. Continue until spatula has
goo sharp e ge.
14.Remove sharpene tool an burn from back si e by
sli ing along file.
15. Roun corners by using a curve motion against the
e ge of the file. Use the bar as a gui e.
16. Wash tool, sanitize an ry.
CAUTION: Handle ool carefully o avoid
ge ing cu .
TO SHARPEN REDI-GRIL BLADES
1. Place bla e in special hol er over pins with bevele
si e up. See figure 2.
2. Hol bla e with fingers an turn hol er over.
3. Insert tool in carriage assembly against gauge
stop.
4. Repeat steps three through 13 un er operation.
2
figure 1
B
D
E
A
C
figure 2

ITEM PART NO. DESCRIPTION
1 164-232S Repl. Foot Kit (Pkg. of 4, incl. #14))
2 164-60S Hand Support Knob with Stud (incl. #3)
3 164-60S Hand Support Know with Stud (incl. #2)
4 164-098S File & Clamp Kit
5 164-70S File Clamp Kit (incl. #12)
6 164-39 Carriage Bumper
7 164-58S Carriage Knob
EXPLODED VIEW
PARTS LIST
3
ITEM PART NO. DESCRIPTION
8 164-094S Locking Jaw Mounting Bar Kit
9 578-239S Clamping Handle Stem Kit
10 164-093S Mounting Bar Kit
11 943-015S Bearing Kit (pkg of 3)
12 164-70S File Clamp Kit (incl. #5)
13 89-305S Retaining Ring Kit (Pkg. of 5)
14 164-232S Repl. Foot Kit (Pkg. of 4, incl. #1)
Accessories (Not Shown)
86-350 File Cleaner
578-282S Scraper Blade Holder

TROUBLESHOOTING GUIDE
4
NON-SCHEDULED MAINTENANCE
Un er normal con itions with proper use an cleaning,
very little non-sche ule maintenance is require for
this unit. However, this section provi es proce ures for
checking an replacement of the various parts use
within the cabinet in the event that it becomes neces-
sary. Before replacement of any parts, refer to the
troubleshooting gui e above. This gui e will assist in
etermining the cause of any malfunction to insure
maintenance is require .
To change file or change to new position on existing
file:
A.Remove (2) screws. See item A in figure 3.
B. Rotate file 180 degress and/or turn file over.
C.Tighten screws.
Note: For older style files with a tapered end, you must
reverse the positions of the file clamps (Fig. 3, Item B)
figure 3*
A
B
A
B
PROBLEM
Tool e ge not Tool not line up properly in carriage Reposition tool in carriage hol er.
parallel.against gauge stop.
File worn.Reposition file to new surface.
IMPORTANT: The file can be turne to four
positions.
PROBABLE CAUSE CORRECTIVE ACTION
figure 4*
Rotate 180°
when turning the file 180 degrees.
*Note: Figures 3 and 4 show the older style file with a tapered end. The newest style of file is straight. Straight files may
be used to replace tapered files and include replacement file clips.
Table of contents
Other Prince Castle Power Tools manuals
Popular Power Tools manuals by other brands

Baileigh
Baileigh MD-6000 Operator's manual

ASA Electronics
ASA Electronics APS-201B Product Introductions

Bosch
Bosch GSA 18V-32 Professional manual

Ergomix
Ergomix Ergomix 1000 operating instructions

AmazonBasics
AmazonBasics B0106V1TYS quick start guide

Dolmar
Dolmar PC-6414 HappyStart Instruction and safety manual