Princess 01.333836.01.001 User manual

Garment Steamer
01.333836.01.001
EN Instruction manual
EN
Instruction manual
NL
Gebruiksaanwijzing
FR
Mode d’emploi
DE
Bedienungsanleitung
ES
Manual deusuario
PT
Manual deutilizador
PL
Instrukcja obsługi
IT
Manuale utente
SV
Bruksanvisning
CS
Návod na použití
SK
Návod na použitie
Kettle
01.236001.01.001
2
IMPORTANT SAFETY INSTRUCTIONS
• Please use standard electricity service voltage AC220-240V, 50-60Hz.
• Do not share power supply with other high-power electrical appliance.
• Use this appliance only as described in this manual. Please follow the instruction of this manual to
avoid accident.
• Do not immerse the appliance, plug nor power cord in water.
• Do not leave this appliance unattended while it is in operation.
• Children and senior citizens are not allowed to use the appliance independently.
• Please 11 in water before using and observe the water level during use.
• Do not lay Hose on the ground or wind it.
• Be cautious about the steam spraying out from the nozzle.
• Move the appliance by grasping the telescopic pole. Do not force the casters if they are struck .Drain
the water tank and water reservoir before inspecting the casters.
• AIIow the appliance to cool completely for at least 30 minutes and drain the water tank and water
reservoir before storing.
• Unplug the unit BEFORE reling or draining.
• Unplug the appliance BEFORE cleaning, moving or when the appliance is not in use.
• Keep the appliance away from in ammable materials and chemicals.
• Do not operate the appliance in the event of abnormity, or when the power cord or the plug is
damaged.
• Grip the plug to unplug it, do not unplug by tearing the power cord.
• Do not use the power cord board for extension, to avoid the hazard caused by the overload of the
circuit.
• Do not 11 the water tank with hot water or corrosive cleaning agent, otherwise, the appliance will be
damaged. De-mineralized water or distilled water is strongly recommended.
• This appliance is not intended for use by persons(including children) with reduced physical sensory or
mental capabilities, or lack of experience and knowledge, unless they have been given supervision or
instruction concerning use of the appliance by a person responsible for their safety.
• Do not use any accessory that is not provided by the original manufacturer. If the power cord or the
appliance is damaged, stop using the appliance, contact the after-sales service canter for help.
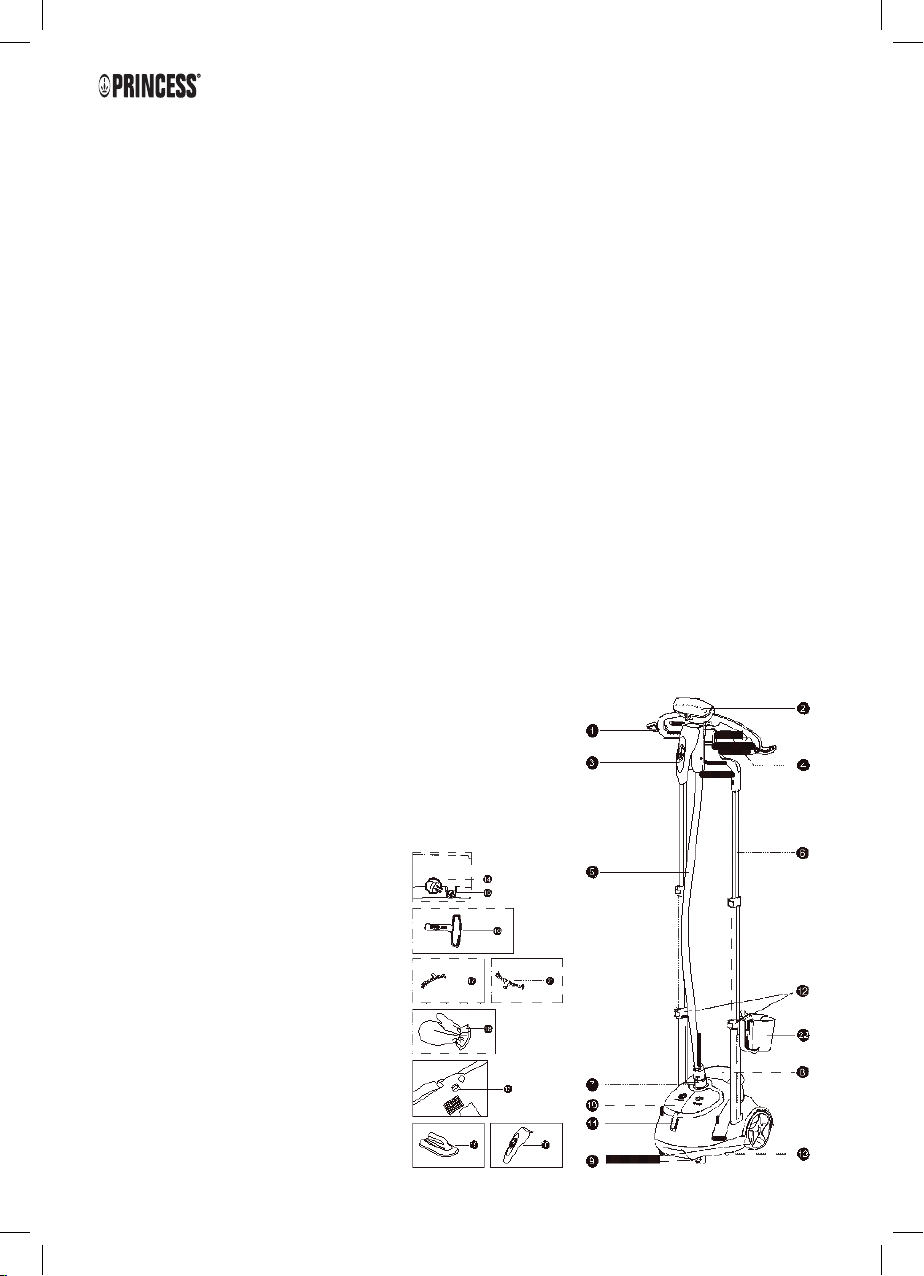
Parts description
1. Main rack
2. Steam nozzle
3. Handle
4. Sub-rack
5. Steam hose
6. Double telescopic poles
7. Hose connector
8. Water tank
9. Rolling caster
10. Foot switch
11. Power indicator
12. Power cord hook
13. Telescopic poles lock
14. Plug
15. Drain plug
16. Pant press
17. Fabric brush
18. Glove
19. Lint pad
20. Hand protection plate
21. Hard sofa brush
22. Accessory box
3
EN
Use appropriate setting provide suitable care for dierent garments and it is energy-saving.
Product Specication:
Water tank capacity: 1.8L
Steam duration with full tank: 50min
Rated Voltage: 220V
Rated Power: 1800W
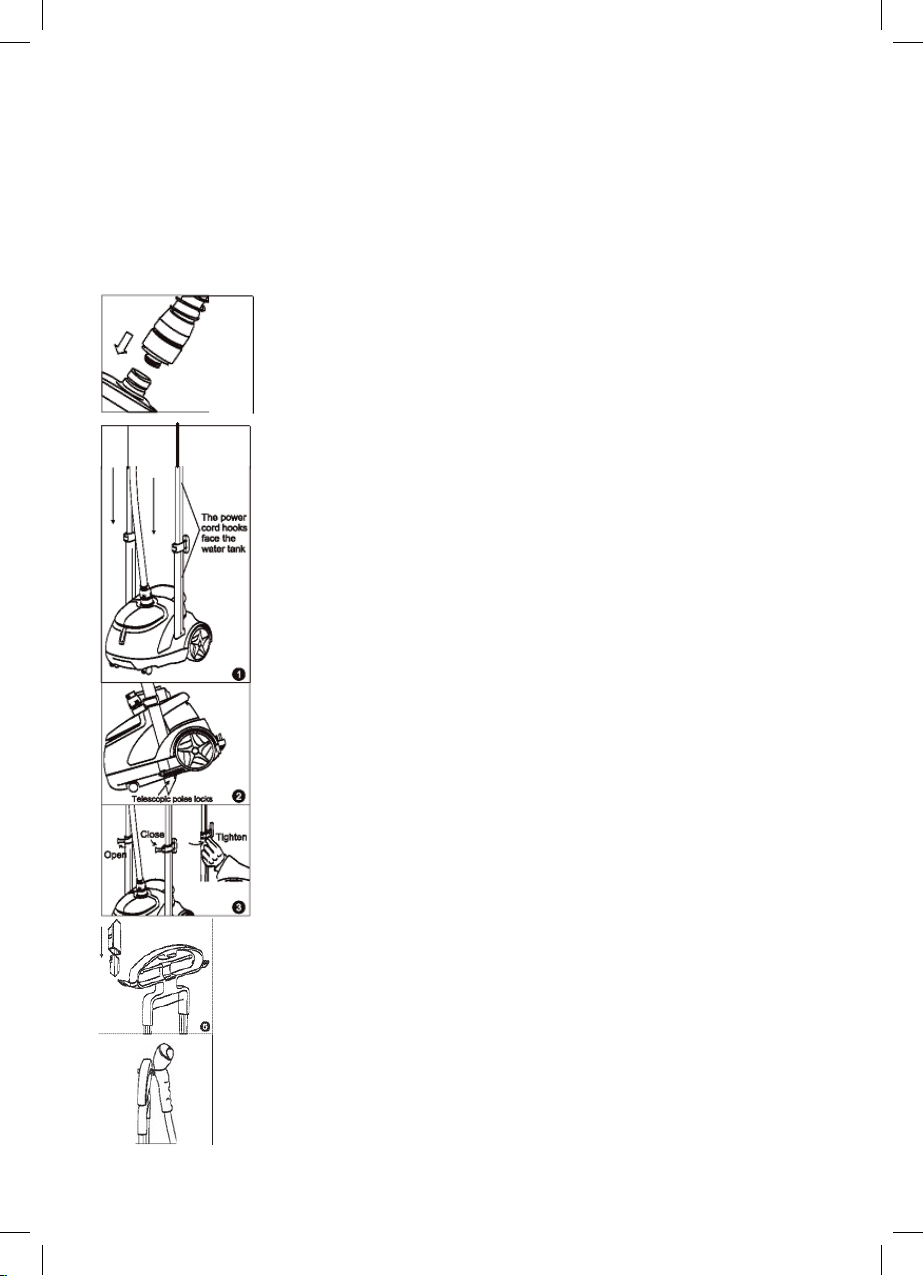
Assembly & disassemble instruction
Press the hose connector
upwards and connect
the hose with the hose
connector base, let the
hose connector lock in
place
Insert two telescopic poles
in the base, press the
poles downwards to lock
in place.
If the telescopic poles
are insert in the wrong
direction or when
disassemble the poles,
press the telescopic poles
locks at the bottom of the
base to unlock the poles
pull out the poles and
reassemble.
Extend the telescopic
poles to their full length.
Tighten the nips on the
poles.
Insert the main rack into
the telescopic poles till the
trigger on the poles lock in
place. When disassemble,
press the trigger to release
the main rack.
Hang the steam nozzle on
either side of the steam
nozzle hook on the main
rack.
4
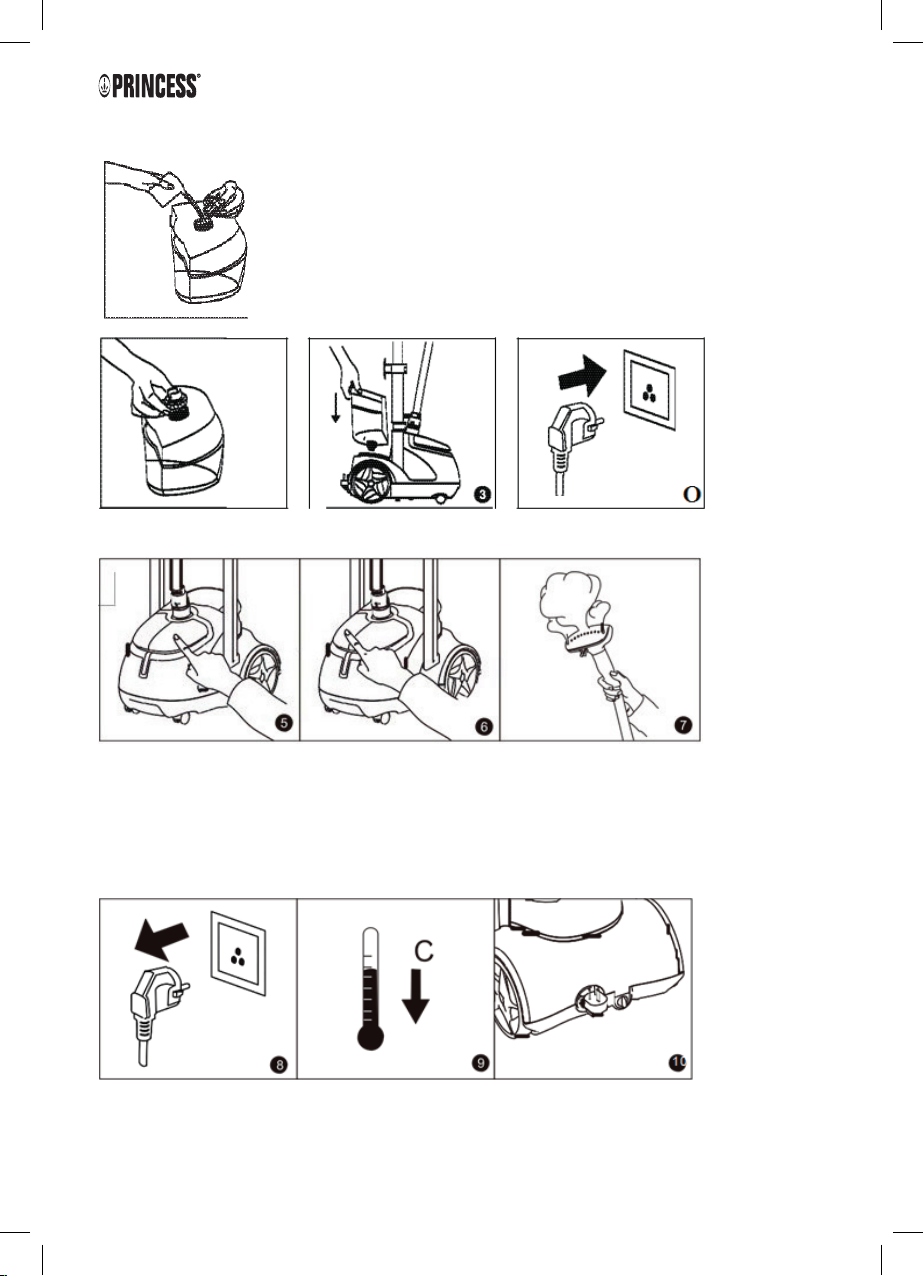
INSTRUCTION FOR USE
Take out the water lank, unscrew the water lank nut. Fill the water tank with full tank (the
temperature of the water should not exceed 50 ). To prolong the life of the appliance we
recommend using distilled or de mineralized water. Do not use water tank without water
during operation, it will damage the appliance.
Screw the water lank nul. Place the water lank in place. Plug in the appliance.
Switch the power switch
to the appropriate fabric
setting.
When press the Min setting,
the indicator light will turn
blue. Then press the Max
setting, the light will turn
orange. On indicator light
color is changeable according
to last using method.
Steam comes out in 45
seconds.
After using the appliance,
unplug the appliance.
Wait for at least 30 minutes
till the appliance cools down
completely.
Take out the water tank and
empty it. Unscrew the drain
of the appliance, empty the
water in the appliance.

5
EN
The appliance is equipped with an automatic power cord winder just by pulling
the power cord out for 2-10cm, or you can place the power cord on the power
cord hook.
Store the appliance in a dry, cool place.
Caution: When operating the appliance for the rst time, make sure the
drain plug is screwed rmly.
Caution: Lightly press the remote button and do not overexert.
Main rack & sub-rack instruction:
1. Pant steaming:
2.Coal& T-shirt steaming:
3. Dress steaming:
4.Small cloth steaming:
6
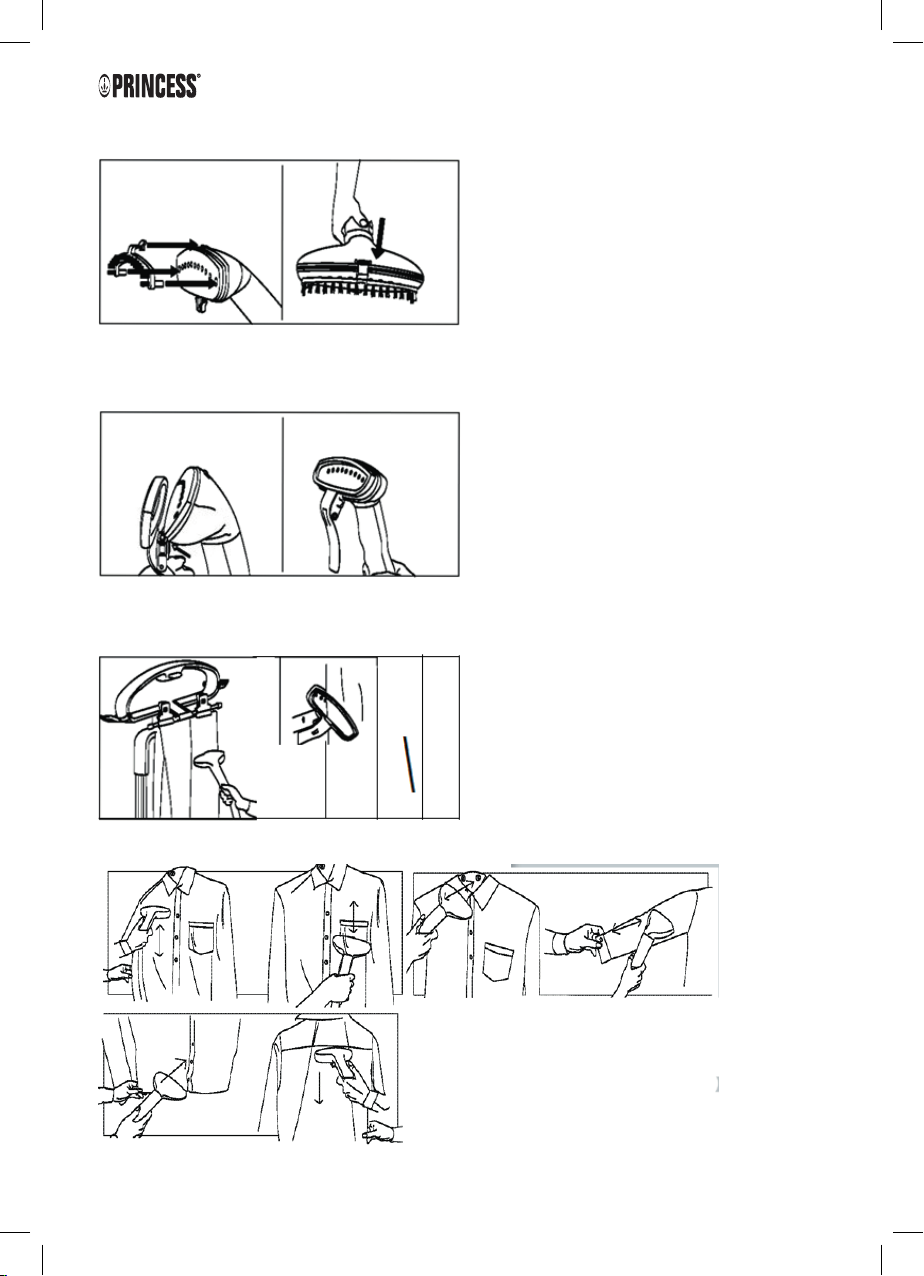
Fabric brush instruction:
Insert the pegs on the brush into the holes in the steam nozzle. Press the brush to the steam nozzle to lock.
Caution: Please Install the accessory when the steam stops spraying.
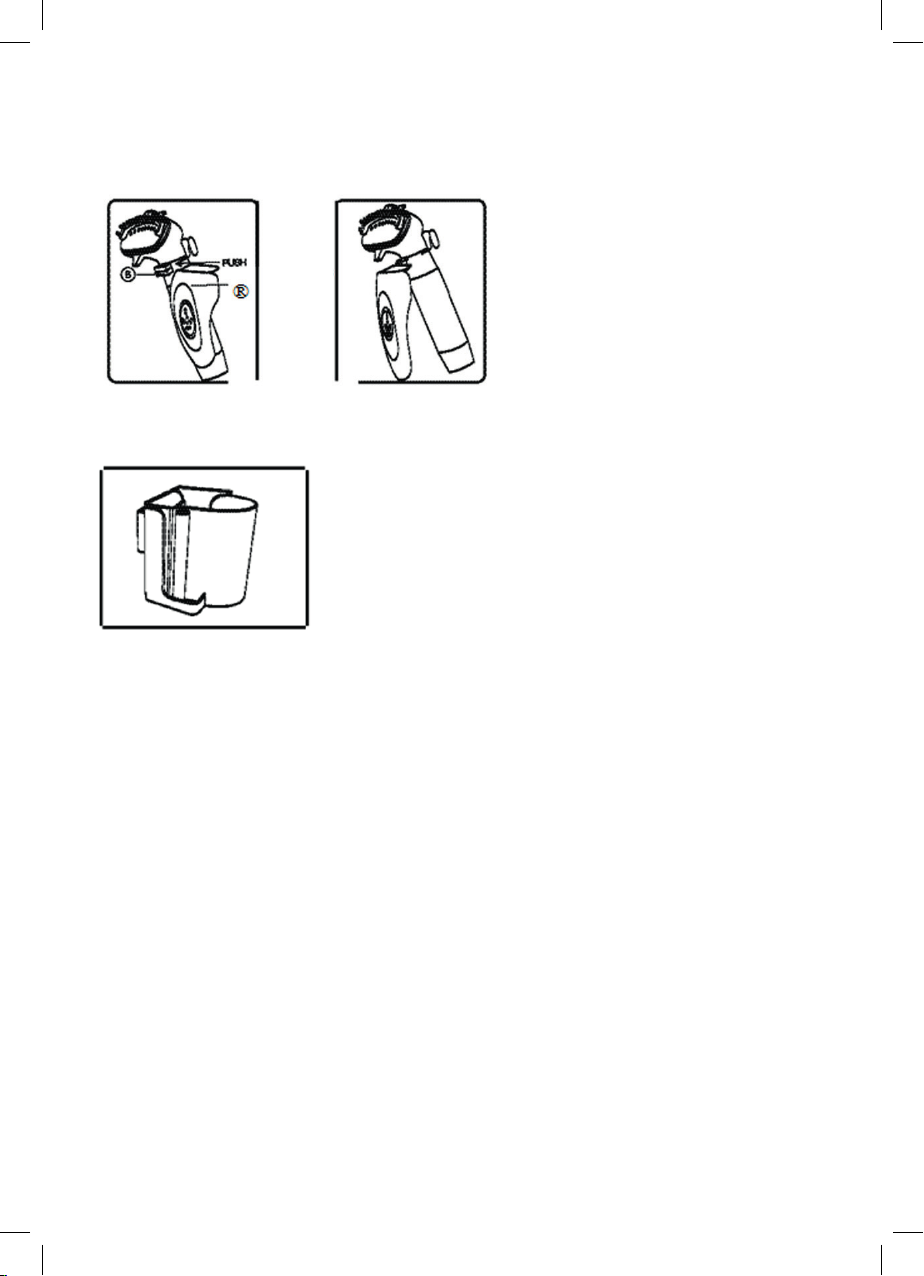
Pant press instruction;
Connect the ute of the pant press to the pegs at the bottom of the steam nozzle. Push the pant press into place
gently until it clicks.
Caution: Please Install the accessory when the steam stops spraying.
Place the fabric between the steam nozzle and the pant press to create the crease. Move the steam nozzle In a
vertical motion to press the crease.
7
EN
Hand protection plate
Insert the protruding parts of the hand protection plate into the slots of steam nozzle
Insert A Into B
Accessories box
It can put brush, pant press into accessories box for storing.
Cleaning and maintenance
We recommend you steps as follow to clean and maintain the appliance after nished steaming and before storage:
• Turn o the appliance.
• Unplug the appliance.
• Allow the appliance to cool for alleasl30 minutes.
• Collapse and remove the telescopic pole and remove the steam hose.
• Remove and drain the water lank. Rinse it with fresh water and let it drain completely. Place it back on the
water reservoir.
• Drain the steamer by removing the drain plug and emptying the contents.
• Flush the unit by lling the water reservoir and the hose connector with fresh water and draining completely.
Replace the Drain Plug.
• Store in a cool, dry place.
Steaming methods
• The high-temperature steam spraying from the nozzle can only soften the garment fabric. lt is the force by
drawing that removes wrinkles.
• Hang the garment on the rotating hanger and place the hanger on the clothes hanging hook on the telescopic
pole. Hold the garment with one hand, and hold the handle of the steam nozzle with the other. Touch the steam
nozzle la the garment tightly, moving it in an up and down vertical motion. The high-temperature steam will
remove wrinkles. Hold the steam nozzle with the steam vents pointing away from your body.
• Hold the edge of both sides of the garment lightly when steaming the bollom of the garment. Steam in dierent
directions until the fabric is wrinkle free. Be cautious about the hot steam spraying out of the steam nozzle.
• Press harder down with the steam nozzle when steaming cloth collar, stay longer and move up and down.
• Straighten the sleeves, move up and down and stay to remove wrinkles.

8
Removing mineral build-up
lt is common for minerals found in hard water to build up inside the appliance, causing intermittent or weak
steam. If you do not use de-mineralized or distilled water in your steamer, follow these steps monthly:
• Turn the switch to "O' and unplug the steamer.
• Remove the steam hose. Collapse and remove the telescopic pole.
• Drain the water reservoir, and empty the water from the water tank.
• Prepare a mixture of 50% vinegar and 50% water.900ml of mixture will be enough in general case.
• Pour the mixture slowly from the hose connector to the water reservoir.
• Continue to pour mixture into the hose connector until the water reservoir is about half full, near the top of
the hose.
• Wait for 40 minutes.
• Drain the mixture by unscrewing the drainage valve and emptying the mixture into a sink or tub.
• Pour clean water into the hose connector and water reservoir inlet and drain. Repeat this step until the vinegar
odor dissipates.
• Reassemble the unit.
Troubleshooting
Problems Reason Solution
• The unit fails to steam. The
indicating lamps do not
illuminate.
• The appliance is not plugged in
• Household circle breaker/
ground fault interrupter is
tripped or fuse is blown.
• Plug into the electrical outlet
• Check the power or ask a
qualied electrician for help.
• The appliance fails to steam. The
indicating lamps illuminate.
• Mineral build-up in the
appliance.
• The water tank is empty.
• Follow the removal mineral
build-up procedure.
• Rell the water tank.
• Noise in steam hose. Steam
hose stops spraying steam.
• Steam in the steam hose gather
into little water drops and
prevents the steam spraying
normally.
• lt is normal to have soft sounds in
the process of steaming. Straight
the steam hose vertically, owing
the water drops back to the water
tank if necessary.
• The steam is intermittent. • Mineral build-up in the water tank. • It is normal for the appliance to
periodically stop steaming for a
few seconds.
• Follow the removal mineral
build-up procedure.
Guarantee
• This product is guaranteed for 24 months granted. Your warranty is valid if the product is used in accordance
to the instructions and for the purpose for which it was created. In addition, the original purchase (invoice,
sales slip or receipt) is to be submitted with the date of purchase, the name of the retailer and the item
number of the product.
• For the detailed warranty conditions, please refer to our service website: service.princess.info
Guidelines for protection of the environment
This appliance should not be put into the domestic garbage at the end of its durability, but must be
oered at a central point for the recycling of electric and electronic domestic appliances. This symbol
on the appliance, instruction manual and packaging puts your attention to this important issue.
The materials used in this appliance can be recycled. By recycling of used domestic appliances you
contribute an important push to the protection of our environment. Ask your local authorities for information
regarding the point of recollection.

9
EN

10

11

service.princess.info
Princess Household Appliances B.V. | Jules Verneweg 87 | 5015 BH Tilburg | The Netherlands
This manual suits for next models
1
Table of contents
Other Princess Steam Cleaner manuals


Popular Steam Cleaner manuals by other brands


AquaPur
AquaPur ADR 1300 B3 operating instructions

Gruene
Gruene 2 in 1 Steam Mop & Steam Cleaner user manual

Conair
Conair IB-7788 Instruction booklet

Bobot
Bobot ZOP 501 instruction manual

XPERT
XPERT RH64 Instructions for use

HoMedics
HoMedics PERFECTSTEAM PS-HH50 Instruction manual and warranty information