HoMedics PERFECTSTEAM PS-HH50 Instruction Manual

INSTRUCTION MANUAL AND WARRANTY INFORMATION
PS-HH50
1-YEAR LIMITED WARRANTY
www.homedics.com/register
Your valuable input regarding this
product will help us create the
products you will want in the future.
PLEASE TAKE A
MOMENT NOW
REGISTER YOUR PRODUCT AT:

2
IMPORTANT SAFETY INSTRUCTIONS
WHEN USING ELECTRICAL PRODUCTS, BASIC SAFETY PRECAUTIONS SHOULD ALWAYS BE FOLLOWED,
INCLUDING THE FOLLOWING:
READ ALL INSTRUCTIONS BEFORE USING.
DANGER
– TO REDUCE THE RISK OF ELECTRIC SHOCK:
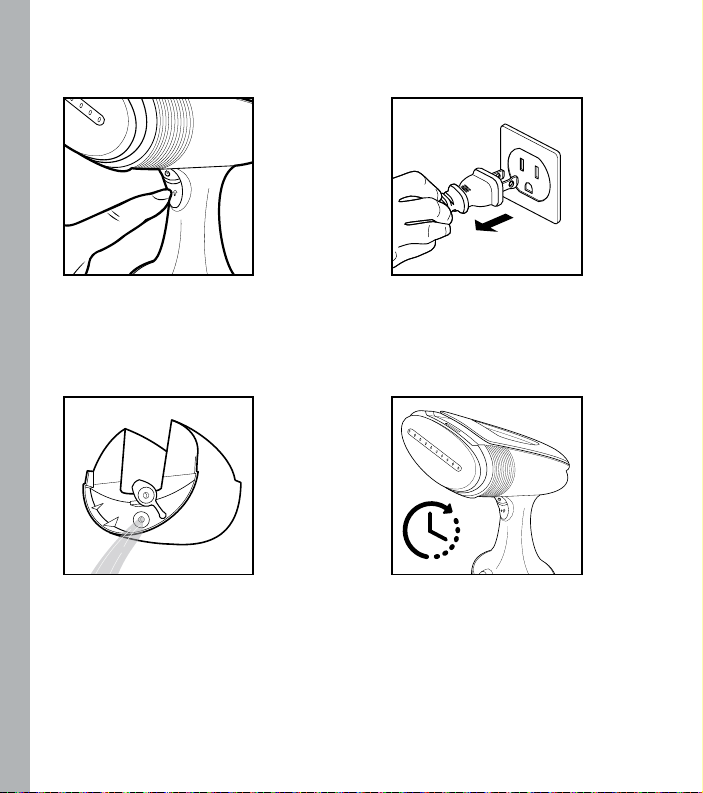
• Always unplug appliance immediately after using and before cleaning.
• DO NOT reach for an appliance that has fallen into water. Unplug it immediately.
• DO NOT place or store appliance where it can fall or be pulled into a tub or sink.
• DO NOT place in or drop into water or other liquids.
• Use only in a dry area.
WARNING
– TO REDUCE THE RISK OF BURNS, FIRE, ELECTRIC SHOCK, OR INJURY TO PERSONS:
• Use this appliance only for its intended use as described in this manual. Do not use attachments not
recommended by HoMedics; specifically, any attachments not provided with this unit.
• NEVER drop or insert any object into any opening.
• DO NOT use outdoors or operate where aerosol (spray) products are being used or where oxygen is
being administered.
• NEVER operate the appliance if it has a damaged cord or plug, if it is not working properly, if it has
been dropped or damaged, or dropped into water. Return the appliance to a HoMedics Service Center
for examination and repair.
• This appliance should never be left unattended when plugged in.
• This appliance is not a toy and is not to be used by children.
• Close supervision is necessary when this appliance is used near children or individuals with certain
disabilities. Unsupervised use could result in fire or personal injury.
• Rest the appliance on a stable surface when placing on its base.
• DO NOT allow the cord to contact heated surfaces. Do not pull or twist cord. Let appliance cool
completely before putting away. Loop cord loosely around appliance when storing.
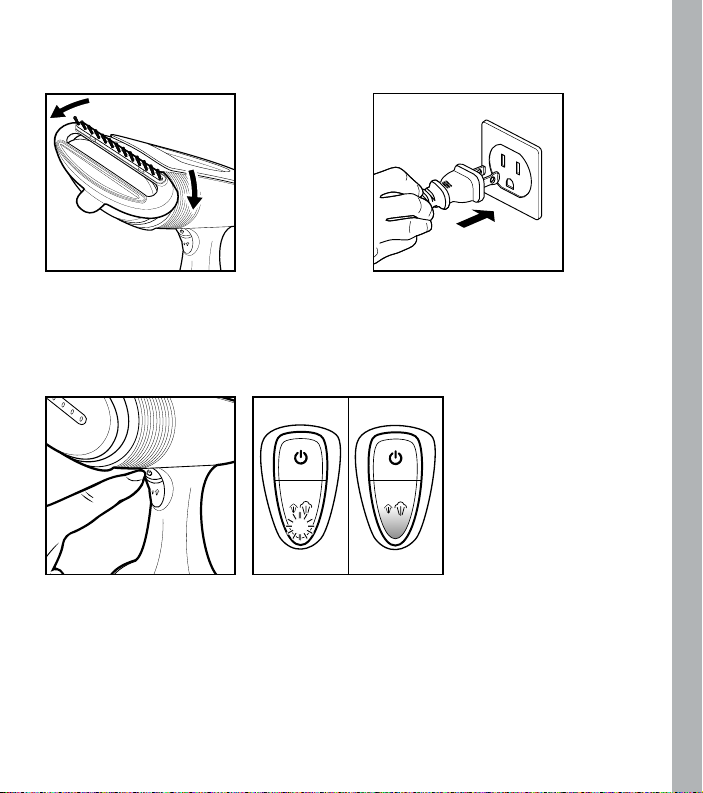
• This appliance has a polarized plug (one blade is wider than the other). As a safety feature, this plug
will fit in a polarized outlet only one way. If the plug does not fit fully in the outlet, reverse the plug. If
it still does not fit, contact a qualified electrician. Do not attempt to defeat this safety feature.
• DO NOT use an extension cord to operate appliance.
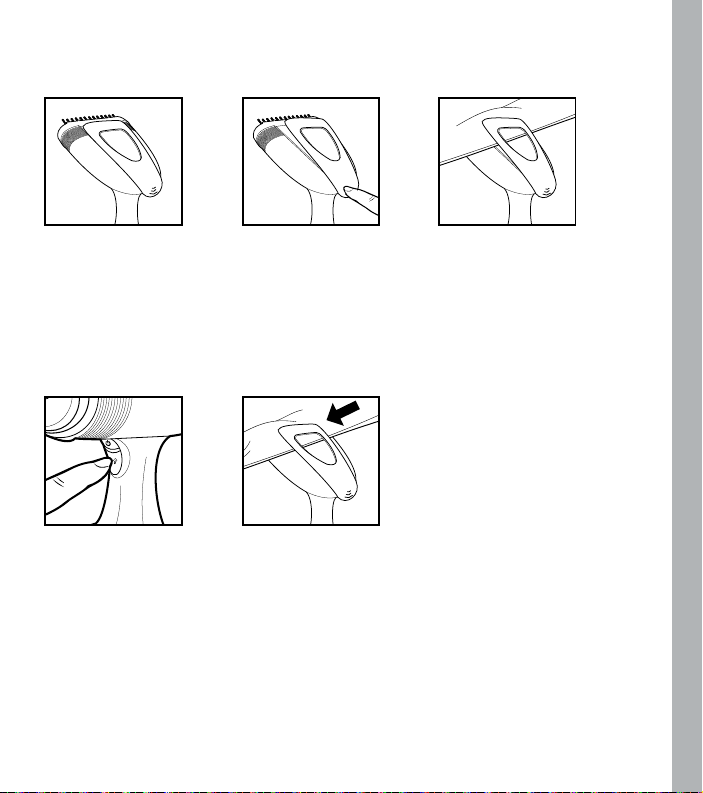
• Surfaces of this appliance are hot when in use. Do not let heated surfaces touch eyes or skin.
• DO NOT place the steam nozzle directly on any surface or on the appliance power cord while it is hot or
plugged in.
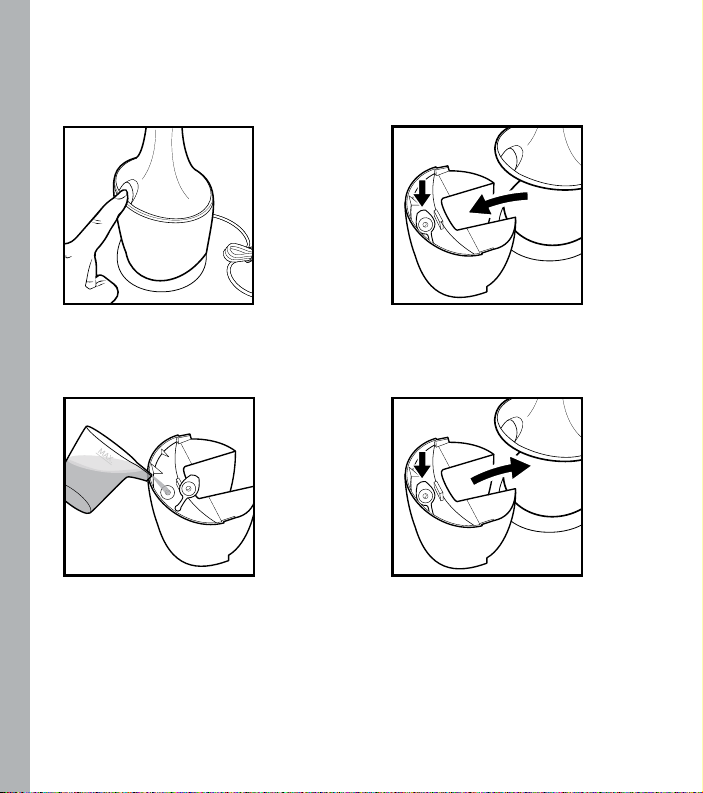
• Unplug this appliance before filling or emptying the water.
• DO NOT operate steamer without properly filling the water container with distilled water.

3
• NEVER yank cord to disconnect from outlet; instead, grasp plug and pull to disconnect.
• Burns could occur from touching hot parts, hot water, or steam. Use care when removing the water
reservoir or when you turn a steam appliance upside down – there may be hot water in reservoir.
Always position steamer with head away from you and any other person when turning on.
• DO NOT hold hand in front of steam.
• To reduce likelihood of circuit overload, do not operate another high-wattage appliance on the same
circuit.
• Use caution when installing or removing an attachment as it may contain hot water from
condensation. Ensure that the unit is off, and the attachment is dry or cooled off to avoid contact with
hot water.
• NEVER steam clothes you, or someone else, are wearing.
• NEVER use water containing additives.
• When emitting steam, this appliance may cause burns if it is used too close to the skin or eyes, or if
it is used incorrectly. To reduce the risk of contact with hot water emitting from the steam vents, test
appliance before use by holding it away from the body.
SAVE THESE INSTRUCTIONS
CAUTION
– PLEASE READ ALL INSTRUCTIONS CAREFULLY BEFORE OPERATING.
• This product is intended for household use only.
• DO NOT use outdoors. For indoor use only.

4
UNIQUE FEATURES & SPECIFICATIONS
TURBO STEAM TECHNOLOGY
Powerful turbo steam powers through tough wrinkles and freshens garments.
QUICK HEAT UP
Ready to use in 40 seconds.
TWO SETTINGS FOR ALL FABRIC TYPES
Choose from regular or turbo steam modes.
AUTO-OFF
Automatically shuts off after being idle for 8 minutes.
SELF-CLEANING MODE
A blue LED will flash after 5 cumulative hours of operation indicating it is time to clean the
garment steamer.
RUNTIME
Up to 15 minutes of continuous steam from a full tank of water. Runtime is based on using the regular
steam setting.
BUILT-IN CREASE ATTACHMENT
Sets a sharp crease.

5
STEAM NOZZLE
BUILT-IN CREASE ATTACHMENT
POWER
WATER TANK LATCH
WATER TANK
STEAM SETTING
POWER PLUG
WATER CUP
2-IN-1 ATTACHMENT

6
FILLING WITH WATER
CAUTION: Before filling the tank with water, turn the power off and unplug the unit from the outlet.
1. Press the water tank latch to remove the
water tank.
4. Close the water inlet stopper and snap the
water tank back into the garment steamer.
2. Open the water inlet stopper.
3. Use the water cup to fill the water tank with
distilled water.
NOTE: We recommend using distilled water
to help reduce water mineral deposits.

7
PRIOR TO USE
1. Attach the 2-in-1 attachment. The fabric
brush opens the fabric weave for better steam
penetration. The silicone pad smooths the fabric
for easier steaming.
3. Press the power button. The steam button will flash green 40 times during
the heat-up process. It will illuminate solid green and go into standby mode.
NOTE: Before first use or if garment steamer has not been used for a long
period of time, you may hear a pumping noise during the heat-up process.
2. Plug into a 120-volt electrical outlet.

8
HOW TO USE
1. Hang your garment on a plastic
clothes hanger.
NOTE: If placing the hanger on a
door for steaming, use care not to
damage the door with steam.
3. For best results, continually pass the steam jets over your
garment steaming from top to bottom. Always keep the
steamer moving over the fabric.
NOTE: Holding the steamer over one spot for more than a few
seconds may damage the fabric.
WARNING: NEVER steam a garment while it is being worn.
2. Press the steam setting button. The steam settings will
cycle with each press illuminating as follows: Regular
Steam (blue light) and Turbo Steam (red light). Select
regular steam for delicate or lightly wrinkled fabrics.
Select turbo steam for thicker or heavily wrinkled fabrics.
NOTE: When first using the steamer, test on an old cloth to
remove any existing water mineral deposits.
NOTE: Test the steamer on an inconspicuous area of the
item to be steamed to be sure the garment can tolerate
the selected steam level.

9
USING THE CREASE ATTACHMENT
1. The crease attachment is
built into the top of the
garment steamer.
4. Press the steam setting
button. Steam will be
released from the steam
nozzle located under clip.
3. Slide the garment under
the clip and release.
2. Press the back of the
crease attachment to
open.
5. Slide the steamer along the edge of the
garment to create a crease.
NOTE: Steam will continue to emit from the
steam nozzle during the crease process.

10
AFTER USE
1. Press the steam setting button to standby
(solid green).
Press the power button to off. All LED lights
will turn off.
3. Empty any remaining water from the water
tank and snap the water tank back into the
garment steamer.
2. Unplug the garment steamer.
4. Wait for the garment steamer to cool
before storing.

11
CLEANING AND CARE
SELF-CLEANING MODE
NOTE: Place steamer on a waterproof surface when using the cleaning mode. It is normal to have water
droplets expel from the steam nozzle.
CLEANING THE GARMENT STEAMER
1. The blue LED will
flash after 5 hours of
accumulated operation,
indicating it is time
to clean the garment
steamer.
1. Clean the outside of the garment steamer
with a soft, damp cloth as necessary.
2. Press and hold the
power button and the
steam setting button
simultaneously for 5
seconds.
3. The unit will enter the cleaning mode
for 1 minute. During this process, the
red LED will flash rapidly while the
pump is activated. This is followed by
a 20-second drying process.
Once the cleaning process is
completed, the garment steamer
will return to normal operation as
indicated by the green LED.

12
PROBLEM POSSIBLE CAUSE SOLUTION
No power • Unit is not plugged in
• Unit is not turned on
• No power at unit
• Plug unit in
• Press the power on and
steam setting button to turn
the unit on
• Check circuits and fuses or
try a different outlet
Not heating • Power button not pressed • Press the power button
Little or no steam • Steam setting not selected
• Out of water
• Steamer needs cleaning
• Auto-off activated
• Press the steam setting
button to select regular or
turbo steam
• Refill the tank with water
• Clean following the self-
cleaning instructions
• Steamer in auto-off mode
after 8 minutes as indicated
by the steam setting button
slowly flashing green. Press
the power button twice to
turn the steamer on. It will
take up to 40 seconds to
heat up before use
TROUBLESHOOTING

13
FCC AND IC STATEMENTS
This device complies with Part 15 of the FCC Rules. Operation is subject to the following two conditions:
(1) this device may not cause harmful interference, and (2) this device must accept any interference
received, including interference that may cause undesired operation.
NOTE: FKA Brands is not responsible for any radio or TV interference caused by unauthorized modifications
to this equipment. Such modifications could void the user authority to operate the equipment.
NOTE: This equipment has been tested and found to comply with the limits for a Class B digital device,
pursuant to Part 15 of the FCC Rules and CAN ICES-3 (B)/NMB-3 (B). These limits are designed to
provide reasonable protection against harmful interference in a residential installation. This equipment
generates, uses, and can radiate radio frequency energy and, if not installed and used in accordance with
the instructions, may cause harmful interference to radio communications. However, there is no guarantee
that interference will not occur in a particular installation. If this equipment does cause harmful
interference to radio or television reception, which can be determined by turning the equipment off and
on, the user is encouraged to try to correct the interference by one or more of the following measures:
• Reorient or relocate the receiving antenna.
• Increase the separation between the equipment and receiver.
• Connect the equipment into an outlet on a circuit different from that to which the receiver
is connected.
• Consult the dealer or an experienced radio/TV technician for help.

HoMedics sells its products with the intent that they are free of defects in manufacture and workmanship for a period of
1 year from the date of original purchase, except as noted below. HoMedics warrants that its products will be free of defects
in material and workmanship under normal use and service. This warranty extends only to consumers and does not extend
to Retailers.
To obtain warranty service on your HoMedics product, contact a Consumer Relations representative for assistance. Please
make sure to have the model number of the product available.
HoMedics does not authorize anyone, including but not limited to Retailers, the subsequent consumer purchaser of the
product from a Retailer, or remote purchasers, to obligate HoMedics in any way beyond the terms set forth herein. This
warranty does not cover damage caused by misuse or abuse; accident; the attachment of any unauthorized accessory;
alteration to the product; improper installation; unauthorized repairs or modifications; improper use of electrical/power
supply; loss of power; dropped product; malfunction or damage of an operating part from failure to provide manufacturer’s
recommended maintenance; transportation damage; theft; neglect; vandalism; or environmental conditions; loss of use
during the period the product is at a repair facility or otherwise awaiting parts or repair; or any other conditions whatsoever
that are beyond the control of HoMedics.
This warranty is effective only if the product is purchased and operated in the country in which the product is purchased. A
product that requires modifications or adoption to enable it to operate in any other country than the country for which it was
designed, manufactured, approved, and/or authorized, or repair of products damaged by these modifications is not covered
under this warranty.
THE WARRANTY PROVIDED HEREIN SHALL BE THE SOLE AND EXCLUSIVE WARRANTY. THERE SHALL BE NO OTHER
WARRANTIES EXPRESS OR IMPLIED, INCLUDING ANY IMPLIED WARRANTY OF MERCHANTABILITY OR FITNESS OR ANY OTHER
OBLIGATION ON THE PART OF THE COMPANY WITH RESPECT TO PRODUCTS COVERED BY THIS WARRANTY. HOMEDICS SHALL
HAVE NO LIABILITY FOR ANY INCIDENTAL, CONSEQUENTIAL, OR SPECIAL DAMAGES. IN NO EVENT SHALL THIS WARRANTY
REQUIRE MORE THAN THE REPAIR OR REPLACEMENT OF ANY PART OR PARTS THAT ARE FOUND TO BE DEFECTIVE WITHIN
THE EFFECTIVE PERIOD OF THE WARRANTY. NO REFUNDS WILL BE GIVEN. IF REPLACEMENT PARTS FOR DEFECTIVE
MATERIALS ARE NOT AVAILABLE, HOMEDICS RESERVES THE RIGHT TO MAKE PRODUCT SUBSTITUTIONS IN LIEU OF REPAIR
OR REPLACEMENT.
This warranty does not extend to the purchase of opened, used, repaired, repackaged, and/or resealed products, including
but not limited to sale of such products on internet auction sites and/or sales of such products by surplus or bulk resellers.
Any and all warranties or guarantees shall immediately cease and terminate as to any products or parts thereof that are
repaired, replaced, altered, or modified, without the prior express and written consent of HoMedics.
This warranty provides you with specific legal rights. You may have additional rights that may vary from country to country.
Because of individual country regulations, some of the above limitations and exclusions may not apply to you.
For more information regarding our product line in the USA, please visit www.homedics.com. For Canada, please visit
www.homedics.ca.
FOR SERVICE IN THE USA
Email: [email protected]
8:30am–7:00pm EST Monday–Friday
1-800-466-3342
1-YEAR LIMITED WARRANTY
FOR SERVICE IN CANADA
Email: [email protected]
8:30am–5:00pm EST Monday–Friday
1-888-225-7378
©2019 HoMedics, LLC. All rights reserved. HoMedics and PerfectSteam are registered trademarks of HoMedics, LLC.
Distributed by HoMedics, LLC, 3000 N Pontiac Trail, Commerce Township, MI 48390
IB-PSHH50
Made in China

PS-HH50
www.homedics.com/register
Votre contribution précieuse
concernant ce produit nous aidera à
créer les produits que vous voudrez
à l'avenir.
VEUILLEZ PRENDRE
MAINTENANT UN MOMENT
ENREGISTRER VOTRE
PRODUIT À :
GARANTIE LIMITÉE DE 1 AN
MODE D’EMPLOI ET INFORMATIONS SUR LA GARANTIE
MD

16
CONSIGNES DE SÉCURITÉ IMPORTANTES
LORS DE L’UTILISATION DE PRODUITS ÉLECTRIQUES, DES MESURES DE SÉCURITÉ DE BASE DOIVENT
TOUJOURS ÊTRE SUIVIES, DONT LES SUIVANTES :
LIRE TOUTES LES INSTRUCTIONS AVANT L’UTILISATION.
DANGER
– POUR RÉDUIRE LE RISQUE DE CHOC ÉLECTRIQUE :
• Toujours débrancher l’appareil après l’utilisation et avant de le nettoyer.
• NE PAS toucher un appareil qui est tombé dans l’eau. Le débrancher immédiatement.
• NE PAS placer ou ranger l’appareil à un endroit d’où il pourrait chuter ou tomber dans un évier ou une
baignoire.
• NE PAS placer ou immerger l’appareil dans de l’eau ou un autre liquide.
• Utiliser uniquement dans un endroit sec.
AVERTISSEMENT
– POUR RÉDUIRE LE RISQUE DE BRÛLURES, D’ÉLECTROCUTION, D’INCENDIE
ET DE BLESSURES :
• Cet appareil ne doit être utilisé qu’aux fins décrites dans ce manuel. Ne pas utiliser d’accessoires non
recommandés par HoMedics, en particulier tout accessoire non fourni avec cet appareil.
• NE JAMAIS laisser tomber ou insérer d’objet dans une ouverture de l’appareil.
• NE PAS utiliser l’appareil à l’extérieur ou lorsque des aérosols (pulvérisateurs) sont utilisés ou lorsque
de l’oxygène est administré.
• NE JAMAIS faire fonctionner l’appareil si le cordon ou la fiche sont endommagés, s’il ne fonctionne pas
correctement, s’il est tombé ou a été endommagé, ou s’il est tombé dans l’eau. Retourner l’appareil à
un centre de réparation HoMedics pour qu’il soit examiné et réparé.
• NE JAMAIS laisser l’appareil sans surveillance lorsqu’il est branché.
• Ce produit n’est pas un jouet et n’est pas destiné aux enfants.
• Une surveillance attentive est requise lorsque cet appareil est utilisé près d’enfants ou des personnes
handicapées. Une utilisation non supervisée peut provoquer un incendie ou des blessures.
• Poser l’appareil sur une surface stable lorsqu’il est placé dans son socle.
• NE PAS laisser le cordon toucher des surfaces chaudes. Ne pas tirer sur le cordon ni le tordre. Laisser
l’appareil refroidir complètement avant de le ranger.
• Cet appareil est muni d’une fiche polarisée (une lame est plus large que l’autre). Par mesure de
sécurité, cette fiche ne peut être insérée dans une prise polarisée que d’une seule manière. Si la fiche
n’entre pas complètement dans la prise, la retourner. Si elle ne rentre toujours pas, contacter un
électricien qualifié. NE PAS tenter de contourner cette caractéristique de sécurité.
• NE PAS utiliser une rallonge avec cet appareil.
• Les surfaces de cet appareil sont chaudes lorsqu’il est utilisé. Ne pas laisser les surfaces chauffées
toucher les yeux ou la peau.

17
• NE PAS placer la buse à vapeur directement sur une surface ou sur le cordon d’alimentation de
l’appareil lorsque l’appareil est chaud ou branché.
• Débrancher cet appareil avant de le remplir d’eau ou de le vider.
• NE PAS utiliser le fer à vapeur sans avoir correctement rempli le réservoir d’eau avec de l’eau distillée.
• NE JAMAIS tirer sur le cordon pour le débrancher de la prise; saisir la fiche et tirer pour débrancher.
• Les parties chaudes, l’eau chaude ou la vapeur peuvent causer des brûlures. Faire attention lors du
retrait du réservoir d’eau ou lorsque l’appareil est retourné. Il peut y avoir de l’eau brûlante dans le
réservoir. Toujours positionner le fer à vapeur en direction opposée à soi et à toute autre personne
présente lorsqu’il est mis en marche.
• NE PAS mettre la main devant la vapeur.
• Pour réduire le risque de surcharge du circuit, ne pas faire fonctionner un autre appareil à haute
puissance sur le même circuit.
• Faire preuve de prudence lors de l’installation ou du retrait d’un accessoire car il peut contenir de
l’eau chaude provenant de la condensation. S’assurer que l’appareil est éteint et que l’accessoire est
sec ou refroidi pour éviter tout contact avec de l’eau chaude.
• NE JAMAIS passer un vêtement à la vapeur lorsqu’il est porté sur une personne.
• NE JAMAIS utiliser d’eau contenant des additifs.
• Lorsqu’il émet de la vapeur, cet appareil peut causer des brûlures s’il est utilisé trop près de la peau
ou des yeux ou s’il est utilisé incorrectement. Pour réduire le risque de contact avec l’eau chaude
émise par les évents à vapeur, tester l’appareil avant de l’utiliser en le tenant loin du corps.
CONSERVER CES INSTRUCTIONS
ATTENTION
– LIRE ATTENTIVEMENT TOUTES LES INSTRUCTIONS AVANT D’UTILISER L’APPAREIL.
• Ce produit est réservé à un usage résidentiel.
• NE PAS utiliser à l’extérieur. Réservé à une utilisation à l’intérieur.

18
CARACTÉRISTIQUES ET FONCTIONNALITÉS UNIQUES
TECHNOLOGIE DE VAPEUR TURBO
La technologie de vapeur turbo puissante élimine les froissures les plus coriaces et rafraîchit les
vêtements.
CHAUFFE RAPIDE
Prêt à l’emploi en 40 secondes.
DEUX RÉGLAGES POUR TOUS LES TYPES DE TISSUS
Sélectionner le mode vapeur normal ou turbo.
ARRÊT AUTOMATIQUE
S’éteint automatiquement après 8 minutes d’inactivité.
MODE DE NETTOYAGE AUTOMATIQUE
Un voyant à DEL bleu clignote après 5 heures d’utilisation cumulative pour indiquer qu’il est temps de
nettoyer le défroisseur.
DURÉE DE FONCTIONNEMENT
Jusqu’à 15 minutes de vapeur continue avec un réservoir rempli d’eau. La durée de fonctionnement est
indiquée pour le réglage de vapeur normal.
PLISSEUSE INTÉGRÉE
Crée des plis parfaits.

19
BUSE À VAPEUR
PLISSEUSE INTÉGRÉE
MARCHE/ARRÊT
LOQUET DU RÉSERVOIR D’EAU
RÉSERVOIR D’EAU
RÉGLAGE DE LA VAPEUR
FICHE ÉLECTRIQUE
TASSE POUR VERSER L’EAU
ACCESSOIRE 2 EN 1

20
REMPLISSAGE D’EAU
MISE EN GARDE : Avant de remplir le réservoir d’eau, mettre l’appareil hors tension et le débrancher
de la prise.
1. Appuyer sur le loquet du réservoir d’eau pour
retirer le réservoir d’eau.
4. Fermer le bouchon d’entrée d’eau et
remettre le réservoir d’eau dans
le défroisseur.
2. Ouvrir le bouchon d’entrée d’eau.
3. Utiliser la tasse pour remplir le réservoir
d’eau distillée.
REMARQUE : Il est recommandé d’utiliser de
l’eau distillée pour réduire les dépôts d’eau
minérale.
Table of contents
Languages:
Other HoMedics Steam Cleaner manuals