Prismatibro Prisma Light Elton User manual

MANUAL
MOUNTING AND INSTALLATION

2Prisma Light | prismatibro.se
CONTENT
Product facts...............................................................................................................................................................................................................................3
Mechanical installation........................................................................................................................................................4-7
Electrical Installation................................................................................................................................................................................8
Deployment
Prisma Light Elton DALI..............................................................................................................................................................9
Prisma Light Elton Remote.............................................................................................................................................9
Prisma Light Elton Detect...................................................................................................................................................9
Prisma Light Elton Nema.......................................................................................................................................................9
Prisma Light Elton SR..........................................................................................................................................................................9
Gateway installation.......................................................................................................................................................... 10-11
Troubleshooting......................................................................................................................................................Back cover
Service and maintenance........... .........................................................................................Back cover
Warranty..................................................................................................................................................................................................Back cover
Recycling and packaging......................................................................................................Back cover
Support, contact information............................................................................Back cover
3
prismatibro.se | Prisma Light
PRODUCT FACTS
PRODUCT DESCRIPTION Prisma Light Elton is a luminaire with
LED-technology.
AREA OF USE Outdoors: Main roads, urban roads,
bicycle paths, parking lots, industrial areas,
skiing tracks, highways, harbours
MOUNTING HEIGHT Maximum 20 meters
WEIGHT, kg Model
Prisma Light Elton 1-S 4,5
Prisma Light Elton 1-M 6,5
Prisma Light Elton 1-L 9,5
Prisma Light Elton 1-XL 13,5
MEASUREMENTS, mm Model Length Width Height
Prisma Light Elton 1-S 433 260 99
Prisma Light Elton 1-M 565 330 110
Prisma Light Elton 1-L 665 381 118
Prisma Light Elton 1-XL 865 455 125
WIND RESISTANCE Model
AREA, m2Prisma Light Elton 1-S 0,024
Prisma Light Elton 1-M 0,035
Prisma Light Elton 1-L 0,043
Prisma Light Elton 1-XL 0,058

4Prisma Light | prismatibro.se
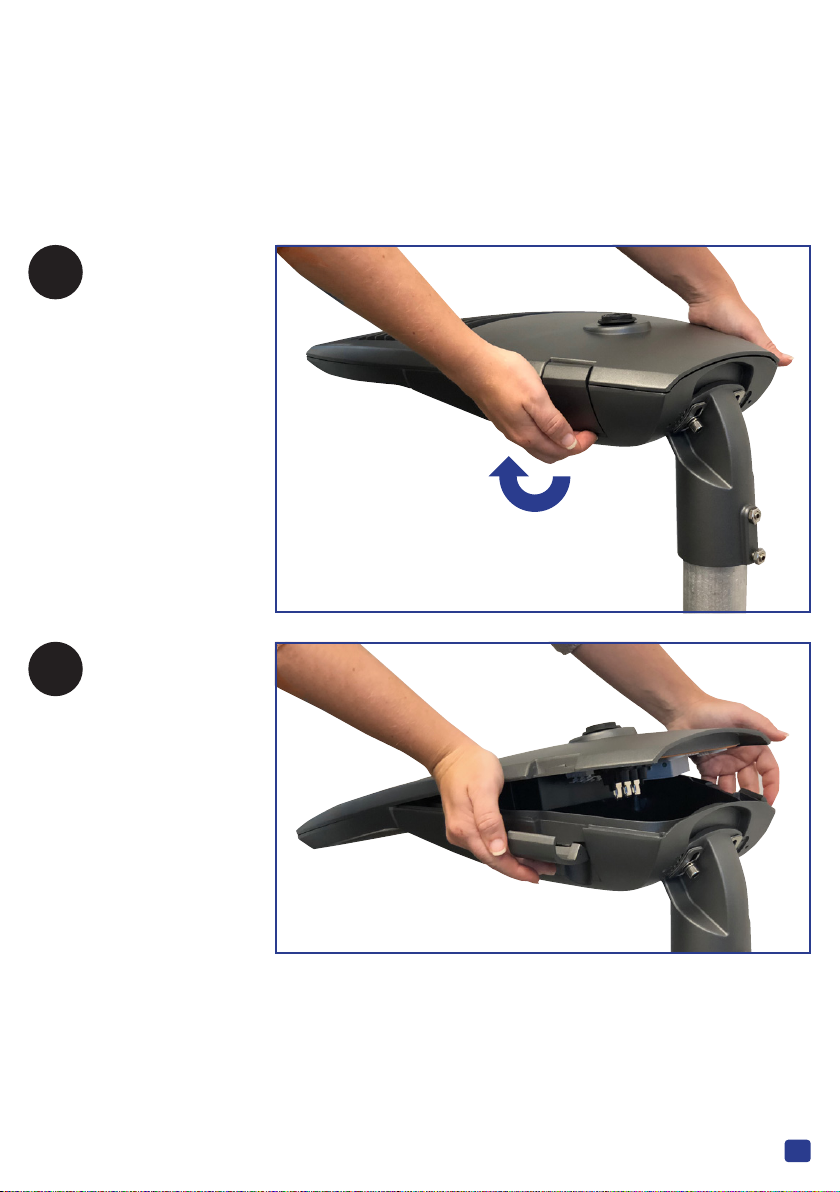
Pole tting
The luminaire can be mounted on a pole top as well as a pole with arm.
The picture below show how you release, turn and adjust from a pole top to
a pole with arm.
Tools
Hex screw, size 6: Pole tting - Housing
1-S, 1-M Hex screw, size 4: Pole tting - Pole
1-L, 1-XL Hex screw, size 5: Pole tting - Pole
1
2
6
6
6
6
MECHANICAL INSTALLATION

5
prismatibro.se | Prisma Light
Mount on pole top or arm
Use you hands or a screwdriver mith maximum torque: 8Nm +/- 2 Nm
Adjust the angle
Use you hands or a screwdriver mith maximum torque: 8Nm.
±°
±10° Prisma Light Elton 1-S
±10° Prisma Light Elton 1-M
±15° Prisma Light Elton 1-L
±15° Prisma Light Elton 1-XL
6
6
4
4
5
5

6Prisma Light | prismatibro.se
Prisma Light Elton 1-S
Grab the clasp in the
front of the luminaire,
pull up.
The lid is now easy to
lift up and let it rest
in full open position.
OPEN
1
2
7
prismatibro.se | Prisma Light
Grab the clasps at both
sides of the luminaire,
pull up.
The upper part with
all the electronics is
now easy to lift and
to let it rest in full
open position.
Prisma Light Elton 1-M
Prisma Light Elton 1-L
Prisma Light Elton 1-XL
OPEN
1
2

8Prisma Light | prismatibro.se
ELECTRICAL INSTALLATION
Supply voltage 220-240V AC, 50 Hz
Total power 5-240W depending on the model
230 V CLASS II
• Prisma Light Elton DALI
• Prisma Light Elton Remote
• Prisma Light Elton Detect
• Prisma Light Elton Nema
• Prisma Light Elton SR
230 V CLASS I
• Prisma Light Elton DALI
• Prisma Light Elton SR
CLASS II
1. Attach the luminaire to the pole,
adjust according to pages 4-5
2. Connect Live (Brown) and
Neutral (Blue) in the fuse holder.
3. If necessary, connect
DALI (Black, Gray)
4. Turn on voltage
CLASS I
1. Attach the luminaire to the pole,
adjust according to pages 4-5
2. Connect Live (Brown) and
Neutral (Blue) in the fuse holder
3. Connect Protective Earth
(Yellow-Green) on the models
of CLASS I
4. If necessary, connect
DALI (Black, Gray)
5. Turn on voltage
NOTE!
It is important to check that there are no bad connections with the
Neutral (Blue) wires in the system. A poorly connected Neutral can
lead to electrical surges that will aect the warranty.

9
prismatibro.se | Prisma Light
DEPLOYMENT AND USE
Prisma Light DALI
• With a DALI-driver it is possible to change the power output later on as
well as the night reduction.
The adjustments can be made in dierent ways.
Alternative 1 You go all the way up to the luminaire that is mounted
on the pole and you make the adjustments close to the driver.
Alternative 2 You buy the luminaire with a 5-wired cable, then you
can make the adjusments down at the access point in the pole.
Prisma Light Remote
INSTALLATION
• Power on to the luminaire.
• Prisma Light Elton should now have
the factory setting that the customer
wanted when ordered.
• Prisma Light Elton has a PCB with
built in IR-communication.
Prisma
USE
• The settings are changed
with a remote control.
Manual can be downloaded from:
www.prismatibro.se
Prisma Light Detect
INSTALLATION
• Power on the luminaire
When it starts up the luminaire will blink as it calibrates it’s self.
Before it is programmed by the customer -see installation manual control systems
- the luminaire will be att 40% when there is no detection and 50% at detection.
At this stage it doesn’t communicate with other luminaries.
Prisma Light Nema
Turn on the power. The luminaire is delivered with maximum power output from
the driver, which later can be adjusted with the customers own Nema-control.
Alternatively, tell us the settings that should apply before you
connect your Nema-control and we will make those settings at
the factory.
Prisma Light SR
Turn on the power. The luminaire is delivered with maximum
power output from the driver, which later can be adjusted with
the customers own SR-control. Alternatively, tell us the settings
that should apply before you connect your SR-control and we
will make those settings at the factory.
CONTROL SYSTEMS
MANUAL
10 Prisma Light | prismatibro.se
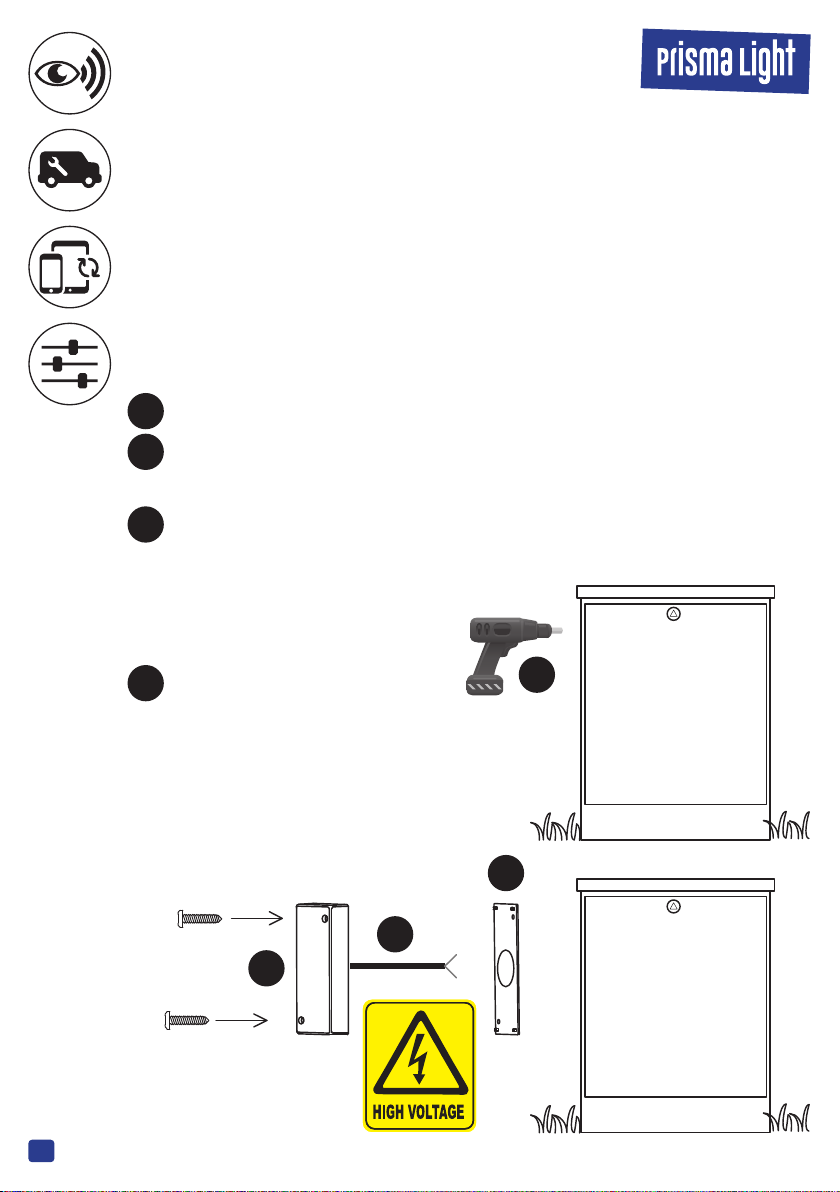
GATEWAY INSTALLATION
Light cabinet
The gateway should be installed within 30 meters from the closest
Detect-luminaire.
The gateway will communicate wirelessly with the luminaries.
The installation should be done by the manufactorer or by someone
educated by the manufactorer.
* The installer should contact the producer of the light cabinet to get
the correct instruction about making holes in the light cabinet.
1Drill a hole for the power cable, Ø 20 mm*
2Rubber gasket:
Add the rubber gasket to the backside of the Gateway.
3Connect the power cable to the backside of the Gateway:
Press down the coupling ring, and keep turning the ring
(clock wise) until you feel a
”click”. Now the connector
is locked.
4Mount the Gateway to
the light cabinet - use
the supplied screws.
1
4
3
2
11
prismatibro.se | Prisma Light
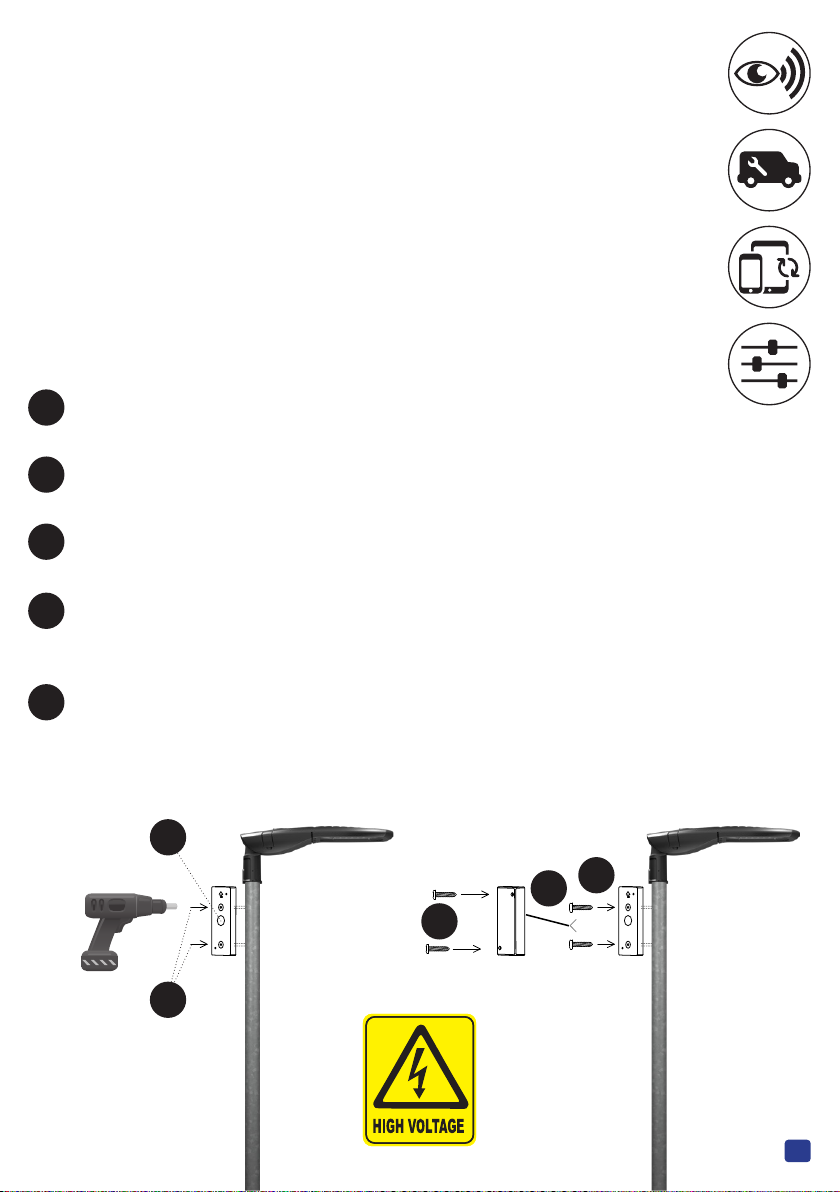
GATEWAY INSTALLATION GATEWAY INSTALLATION
Light pole
The gateway should be installed within 30 meters from the closest
Detect-luminaire.
The gateway will communicate wirelessly with the luminaries.
The installation should be done by the manufactorer or by someone
educated by the manufactorer.
1Drill a hole, Ø 20 mm, for the power cable on the light pole
at prefered height.
2Use the pole adaptor to drill the two mounting holes with a
Ø 3,5mm drill.
3Mount the adaptor:
Use the supplied screws
4Connect the power cable to backside of the Gateway:
Press down the coupling ring, and keep turning the ring (clock wise)
until you feel a ”click”. Now the connector is locked.
5Mount the Gateway:
Use the supplied screws.
1
2
5
43
The LED in the luminaire should only be changed by qualied personnel.
The PCB can only be changed by demounting the entire luminaire.
If you open the casing, the IP-classication is at risk.
If a problem appears return the entire luminaire and we will solve
the problem.
Cleaning Wash with water at low pressure. Do not use high pressure washer.
SERVICE AND MAINTENANCE
TROUBLESHOOTING
WARRANTY
RECYCLING AND PACKAGING
If a problem appears, return the
entire luminaire and we will solve
the problem.
For complete warranty visit our
website www.prismatibro.se or call
+46 504-400 40 or send an e-mail
The packaging material is reuseable and/or recyclable.
More help!
prismatibro.se/en/error-el/
Or scan the QR-code
This and other documents
can be downloaded from
prismatibro.se/en
the QR-code will
take you there.
DOWNLOAD DOCUMENTS
Table of contents
Other Prismatibro Lantern manuals


Popular Lantern manuals by other brands


Sunna Design
Sunna Design iSSL Maxi user manual

Mills
Mills A-WAH09 Installation and instruction manual

kenall
kenall STRATALUME UCDD installation instructions

CALIMA
CALIMA 46002 operating instructions

Nimbus Water Systems
Nimbus Water Systems ROXXANE LEGGERA 52 CL - SET 552-719 manual

Emos
Emos TROFFER ZR1722 manual