Promate Pixels-170 User manual

Pixels-170
Professional Aluminium Video Tripod With
Mid-Level Spreader
Maximum Stability • 3-Segment Interlocking Legs • 10kg Load Capacity

Pixels-170 is a combination of stability and innovative technical features for photographers and
videographers alike. This Tripod is a 3-segment interlocking tripod featuring durable aluminum
telescopic legs that offer immense stability and durability. Its leg locking levers are secure.
Pixels-170 is an extremely versatile tripod, suitable for a wide range of photography and
videography applications.
Introduction
• Pixels-170
• Carry Case
• User Guide
Packaging Contents
• Maximum Height: 170cm
• Minimum Height: 80cm
• Folded Height: 86cm
• Sections: 3
• Load Capacity: kg
• Weight: 3.5kg
Specifications
Features
•3-Way Pan and Tilt Head: The pan and tilt head allows for fluid camera positioning and
accurate alignment.
• Secure Telescoping Legs: The flip-locks allow for quick and secure adjustment of the
telescoping tripod legs, while the center brace adds stability by connecting the legs to make
them more rigid.
• Quick-Release Plate: The quick release plate is the quickest way to mount or unmount and
align your camera to the tripod head.

• Bubble Level: The bubble level ensures that your shot is aligned to the best angle always.
• Maximum Stability: The mid-level spreader offers great stability imperative to videography.
• Sure-Grip Feet: Get maximum traction on any surface for that impeccable shot in any
environment be it a concrete floor or grass.
• Carrying Case with Shoulder Strap: Carry this tripod anywhere easily using the provided carry
case
Precautions
Please read all safety instructions and warnings thoroughly before using this product. Improper
use of this product may result in damage to this or attached products.
1. Do not disassemble the product or attempt to fix it.
2. Do not attempt to replace any part of this product.
3. Do not store or use the product in a high temperature environment, including intense sunlight
or heat.

1. Quick Release Plate Lock
2. Mounting Plate
3. Handle Lock Knob
4. Handle
5. Pan Head Locking Knob
6. Center Column Adjustment Lever
7. Grip Handle
8. Telescopic Legs
9. Center Column Lock
10. Gravity Hook
Appearance & Interface Description:
1.Installation and Removal Of Mounting Plate
• Press the safety button.
• Slide out the Mounting plate.
Operation Instructions
7
9
10
8
1
2
6
5
4
3

2. Adjusting the Tilt of the Mounting Plate
• Loosen the Handle Lock Knob
• Reposition the pan head to the desired angle.
• Tighten the Handle Lock Knob.
3. Using the Secure Leg Locks
• Pull the Secure Flip Leg Locks Outward as shown.
• Adjust the tripod leg height.
• Press the flip lock to secure the legs.

1. Bloqueo de la placa de liberación rápida
2. Placa de montaje
3. Tirador de bloqueo de la manija
4. Mango
5. Perilla de bloqueo de cabeza panorámica
6. Palanca de ajuste de la columna central
7. Manija del enganche
8. Patas telescópicas
9. Bloqueo de la columna central
10. Gancho de gravedad
Apariencia & Descripcion de la Interfaz
1. Instalación y Extracción de la Placa de Montaje
• Presionar el botón de seguridad.
• Deslizar hacia fuera la Placa de Montaje.
Instrucciones de Uso
7
9
10
8
1
2
6
5
4
3

2. Réglage de l'Inclinaison de la Plaque de Montage
• Desserrez le Bouton de Verrouillage de Poignée
• Repositionnez la tête panoramique à l'angle désiré.
• Serrez le Bouton de Verrouillage de la Poignée.
3.Utilisation des Serrures de Pieds Sécurisées
• Tirez les Serrures de Pieds Sécurisées Rabattables vers l'Extérieur comme indiqué.
• Réglez la hauteur de pied du trépied.
• Appuyez sur le verrou rabattable pour fixer les pieds.

1. Plaque de Verrouillage à Déclenchement Rapide
2. Plaque de Montage
3. Bouton de Verrouillage de Poignée
4. Poignée
5. Bouton de Verrouillage à Tête Panoramique
6. Levier de Réglage de la Colonne Centrale
7. Poignée de Saisie
8. Pieds Télescopiques
9. Serrure de Colonne Centrale
10. Crochet de Gravité
Apparence et Description d’Interface
1. Installation et Désinstallation de la Plaque de Montage
• Appuyez sur le Bouton de Sécurité.
• Faites Glisser la Plaque de Montage en dehors.
Instructions d’Utilisation
7
9
10
8
1
2
6
5
4
3

2. Réglage de l'Inclinaison de la Plaque de Montage
• Desserrez le Bouton de Verrouillage de Poignée
• Repositionnez la tête panoramique à l'angle désiré.
• Serrez le Bouton de Verrouillage de la Poignée.
3.Utilisation des Serrures de Pieds Sécurisées
• Tirez les Serrures de Pieds Sécurisées Rabattables vers l'Extérieur comme indiqué.
• Réglez la hauteur de pied du trépied.
• Appuyez sur le verrou rabattable pour fixer les pieds.
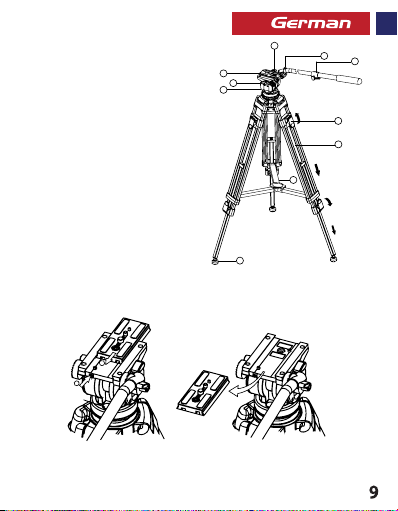
1. Schnellverschluss
2. Befestigungsplatte
3. Handgriff-Verriegelungsknopf
4. Griff
5. Schwenkkopf-Verriegelungsknopf
6. Mittenverstellhebel
7. Griff
8. Teleskopische Beine
9. Sperrschloss
10. Schwerkrafthaken
Aussehen & Schnittstellenbeschreibung
1. Montage und Demontage der Montageplatte
• Drücken Sie die Sicherheitstaste.
• Schieben Sie die Montageplatte heraus.
Gebrauchsanweisung
7
9
10
8
1
2
6
5
4
3
Table of contents
Languages:
Other Promate Camera Accessories manuals

Promate
Promate Precise-180 User manual

Promate
Promate Precise-160 User manual

Promate
Promate Cloy-12 User manual

Promate
Promate Precise-150 User manual

Promate
Promate polymax-lt6lt6 User manual

Promate
Promate snapShot User manual

Promate
Promate Precise-155 User manual

Promate
Promate TripodDolly User manual
Popular Camera Accessories manuals by other brands

Viltrox
Viltrox EF-NEX Mount instructions

Calumet
Calumet 7100 Series CK7114 operating instructions

Ropox
Ropox 4Single Series User manual and installation instructions

Cambo
Cambo Wide DS Digital Series Main operating instructions

Samsung
Samsung SHG-120 Specification sheet

Ryobi
Ryobi BPL-1820 Owner's operating manual


