Promate Precise-180 User manual

4 Section Convertible Aluminium Alloy Tripod
with Integrated Monopod
3-Way Precision Head • 4kg Load Capacity • Secure Leg Locking System
Precise-180

1
English
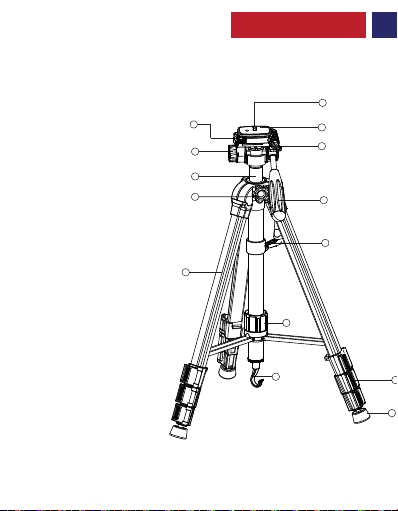
Precise-180 is a combination of sturdiness and innovative technical features for
photographers and videographers alike. This Tripod is a 4-section tripod featuring
durable aluminum telescopic legs that offer stability and durability. This tripod’s key
feature is the center column mechanism, which allows the column to be extended
vertically with great fluidity and can be detached easily to be used as a monopod. This
makes it an extremely versatile tripod, suitable for a wide range of photography and
videography applications. Get twice as much functionality without carrying any extra
gear.
Introduction
•MaximumHeight:178cm
•MinimumHeight:55cm
•FoldedHeight:53cm
•Sections:4
•LoadCapacity:4kgs
•Weight:1.73kgs
Specifications
Features
• 3-Way Pan andTilt Head:
Thepanandtiltheadallowsforfluidcamerapositioning
andaccuratealignment.
• Secure Telescoping Legs:
Theflip-locksallowforquickandsecureadjustmentof
thetelescopingtripodlegs,whilethecenterbraceaddsstabilitybyconnecting
thelegstomakethemmorerigid.
• Rapid Adjustment Center Column:
Therapidcentercolumnallowsquickandeasy
cameraheightadjustment.
• Quick-Release Plate:
The quick release plate is the quickest way to mount or
unmountandalignyourcameratothetripodhead
.
•Bubble Level:
Thebubblelevelensuresthatyourshotisalignedtothebestangle
alwaays.
• Precise-180
• Carry Case
• User Guide
Packaging Contents

English
2
Please read all safety instructions and warnings thoroughly before using this
product. Improper use of this product may result in damage to this or attached
products.
1. Do not disassemble the product or attempt to fix it.
2. Do not attempt to replace any part of this product.
3. Do not store or use the product in a high temperature environment, including
intense sunlight or heat.
• Sure-Grip Rubber Feet: Get maximum traction on any surface for that impeccable
shot in any environment
• Monopod Convertible: The rapid release column detaches to serve as an
adjustable 4-section monopod.
• Carrying Case with Shoulder Strap:Carry this tripod anywhere easily and without
any hassle using the provided carry case
Precautions:

English
3
Appearance & Interface Description
1. Quick Release Lock
2. Mounting Screw
3. Mounting Plate
4. Vertical Tilt Lock Knob
5. Rapid Adjustment Center
Column
6. Handle
7. Center Column Locking Knob
8. Center Column Adjustment Lever
9. Grip Handle
10. Telescopic Legs
11. Center Column Lock
12. Gravity Hook
13. Secure Leg Locks
14. Rubber Feet
1
5
6
7
10
13
14
11
12
9
8
4
3
2

English
4
1. Adjusting the Height Of The Center Column:
Operation Instructions
• Loosen the Center Column Locking Knob.
• Elevate the center column to the desired height.
• Tighten the Center Column Locking Knob.

English
5
• Pull the Quick Release Lock outward to release the Mounting Plate.
2. Installation and Removal Of Mounting Plate
3. Adjusting the Tilt of the Mounting Plate
• Loosen the Vertical Tilt Lock Knob.
• Reposition the mounting plate to the desired angle.
• Tighten the Vertical Tilt Lock Knob.

English
6
• Pull out the center column along with the tripod head.
• Grasp the monopod’s rubber foot and twist it clockwise to loosen.
• Extend the monopod leg sections to the desired height.
• Twist the foot counter clockwise to lock the legs.
• Pull the Secure Flip Leg Locks Outward as shown.
• Adjust the tripod leg height.
• Press the flip lock to secure the legs.
4. Monopod Functionality
5. Using the Secure Leg Locks

7
Spanish
Aspecto y Descripcion del Interfaz
1. Bloqueo de Liberación Rápida
2. Tornillo de montaje
3. Placa de montaje
4. Botón de bloqueo de inclinación
vertical
5. Botón de ajuste horizontal
6. Columna central de ajuste rápido
7. Perilla de bloqueo de la columna
central
8. Manija de control
9. Mango
10. Patas telescópicas
11. Bloqueo de la columna central
12. Gancho de gravedad
13. seguro de cierre de la pata
14. Pies de goma
1
5
6
7
10
13
14
11
12
9
8
4
3
2

Spanish
8
1. Ajustar la altura de la columna central the Height Of The Center Column:
Instrucciones de Manejo
• Aflojar la perilla de bloqueo de la columna central.
• Elevar la columna central a la altura deseada.
• Apretar la perilla de bloqueo de la columna central.

Spanish
9
• Tire de la cerradura de liberación rápida hacia afuera para liberar la placa de montaje
2. Installation and Removal Of Mounting Plate
3. Adjusting the Tilt of the Mounting Plate
• Afloje la perilla de bloqueo de inclinación vertical.
• Vuelva a colocar la placa de montaje en el ángulo deseado.
• Apriete la perilla de bloqueo de inclinación vertical.

Spanish
10
• Saque la columna central junto con la cabeza del trípode.
• Sujete el pie de goma del monópodo y gírelo en el sentido de las agujas del reloj
para aflojarlo.
• Extienda las secciones de la pata del monopod a la altura deseada.
• Gire el pie hacia la izquierda para bloquear las patas.
• Tire de los cierres de seguridad de las patas hacia afuera como se muestra en el dibujo.
• Ajuste la altura de la pierna del trípode.
• Presione el bloqueo para asegurar las patas.
4. Función Monópodo
5. Using the Secure Leg Locks

11
French
Apparence et Description d’Interface
1. Verrou à Blocage Rapide
2. Vis de Montage
3. Plaque de Montage
4. Bouton de Verrouillage Inclinable
Vertical
5. Bouton d’Ajustement Horizontal
6. Colonne Centrale d’Ajustement Rapide
7. Bouton de Verrouillage de la Colonne
Centrale
8. Poignée Panoramique
9. Poignée
10. Pieds Télescopiques
11. Verrou Colonne Centrale
12. Crochet Gravité
13. Verrous Sécurisés pour les Pieds
14. Pieds en Caoutchouc
1
5
6
7
10
13
14
11
12
9
8
4
3
2

French
12
1. Réglage de la Hauteur De La Colonne Centrale :
Instructions d’Utilisation
• Desserrez le Bouton de Verrouillage de la Colonne Centrale.
• Haussez la colonne centrale à la hauteur souhaitée.
• Resserrez le Bouton de Verrouillage de la Colonne Centrale.

French
13
• Tirez le Verrou à Blocage Rapide vers l’extérieur pour libérer la Plaque de Montage.
2. Installation et Démontage De La Plaque de Montage
3. Réglage de l’Inclinaison de la Plaque de Montage
• Desserrez le Bouton de Verrouillage Inclinable Vertical
• Repositionnez la plaque de montage à l'angle souhaité.
• Resserrez le Bouton de Verrouillage Inclinable Vertical.

French
14
• Tirez la colonne centrale avec la tête du trépied.
• Saisissez le pied en caoutchouc du monopied et tournez-le dans le sens des aiguilles
d’une montre pour le desserrer.
• Rallongez les sections de pied du monopied à la hauteur souhaitée.
• Tournez le pied dans le sens contraire des aiguilles d'une montre pour verrouiller les
pieds.
• Tirez les verrous sécurisés pour les pieds rabattus vers l'Extérieur comme indiqué.
• Réglez la hauteur des pied du trépied
• Pressez le verrou à rabat pour fixer les pieds.
4. Fonctionnalité Monopied
5. Utilisation des Verrous Sécurisés pour les Pieds

15
German
Aussehen & Schnittstellenbeschreibung
1. Schnellverschluss
2. Befestigungsschraube
3. Montageplatte
4. Vertikaler Verriegelungsknopf
5. Horizontaler Einstellknopf
6. Schnellverstellmittelsäule
7. Mittelsäuleverriegelungsknopf
8. Schwenkgriff
9. Griff
10. Teleskopbeine
11. Mittelsäulenverschluss
12. Schwerkraftshaken
13. Beinsicherheitsverschlüsse
14. Gummifüße
1
5
6
7
10
13
14
11
12
9
8
4
3
2

German
16
1. Höhenjustierung der Mittelsäule:
Benutzungsanleitung
• Lösen Sie den Verriegelungsknopf der Mittelsäule.
• Ziehen Sie die Mittelsäule bis zur gewünschten Höhe heraus.
• Ziehen Sie den Verriegelungsknopf der Mittelsäule an.

German
17
2. Installation und Entfernen der Montageplatte
• Ziehen Sie den Schnellverschluss nach außen, um die Montageplatte frei zu geben.
3. Anpassen des Neigungswinkels der Montageplatte
• Lösen Sie den vertikalenVerriegelungsknopf.
• Richten Sie die Montageplatte auf den gewünschten Winkel aus.
• Ziehen Sie den vertikalen Verriegelungsknopf an.

German
18
• Ziehen Sie die Mittelsäule mit dem Stativkopf heraus.
• Fassen Sie den Gummifuß des Einbeinstativs und drehen ihn zum Lösen im
Uhrzeigersinn.
• verlängern Sie die Beinbereiche des Einbeinstativs auf die gewünschte Höhe.
• Drehen Sie den Fuß gegen den Uhrzeigersinn, um die Beine zu verriegeln.
• Ziehen Sie die Sicherheitsklemmen für die Stativbeine wie abgebildet nach außen.
• Passen Sie die Höhe des Stativbeines an.
• Zum Sichern der Beine drücken Sie die Sicherheitsklemme.
4. Funktionalität des Einbeinstativs
5. Verwendung der Beinsicherheitsverschlüsse

19
Portuguese
Descrição da Aparência e Interface
1. Trava de desengate rápido
2. Parafuso de montagem
3. Placa de montagem
4. Maçaneta de bloqueio da inclinação
vertical
5. Maçaneta de ajuste horizontal
6. Coluna central de ajuste rápido
7. Maçaneta de bloqueio da coluna
central
8. Alça panorâmica
9. Alça
10. Pernas telescópicas
11. Trava da coluna central
12. Gancho de gravidade
13. Travas de pernas seguras
14. Pés de borracha
1
5
6
7
10
13
14
11
12
9
8
4
3
2
Table of contents
Languages:
Other Promate Camera Accessories manuals