Promate polymax-lt6lt6 User manual

Robust Li-Polymer
Back-up Battery
with Ultra-fast USB Charging Port and
Built-In
Lightning Connector
polyMax -LT6

1
English
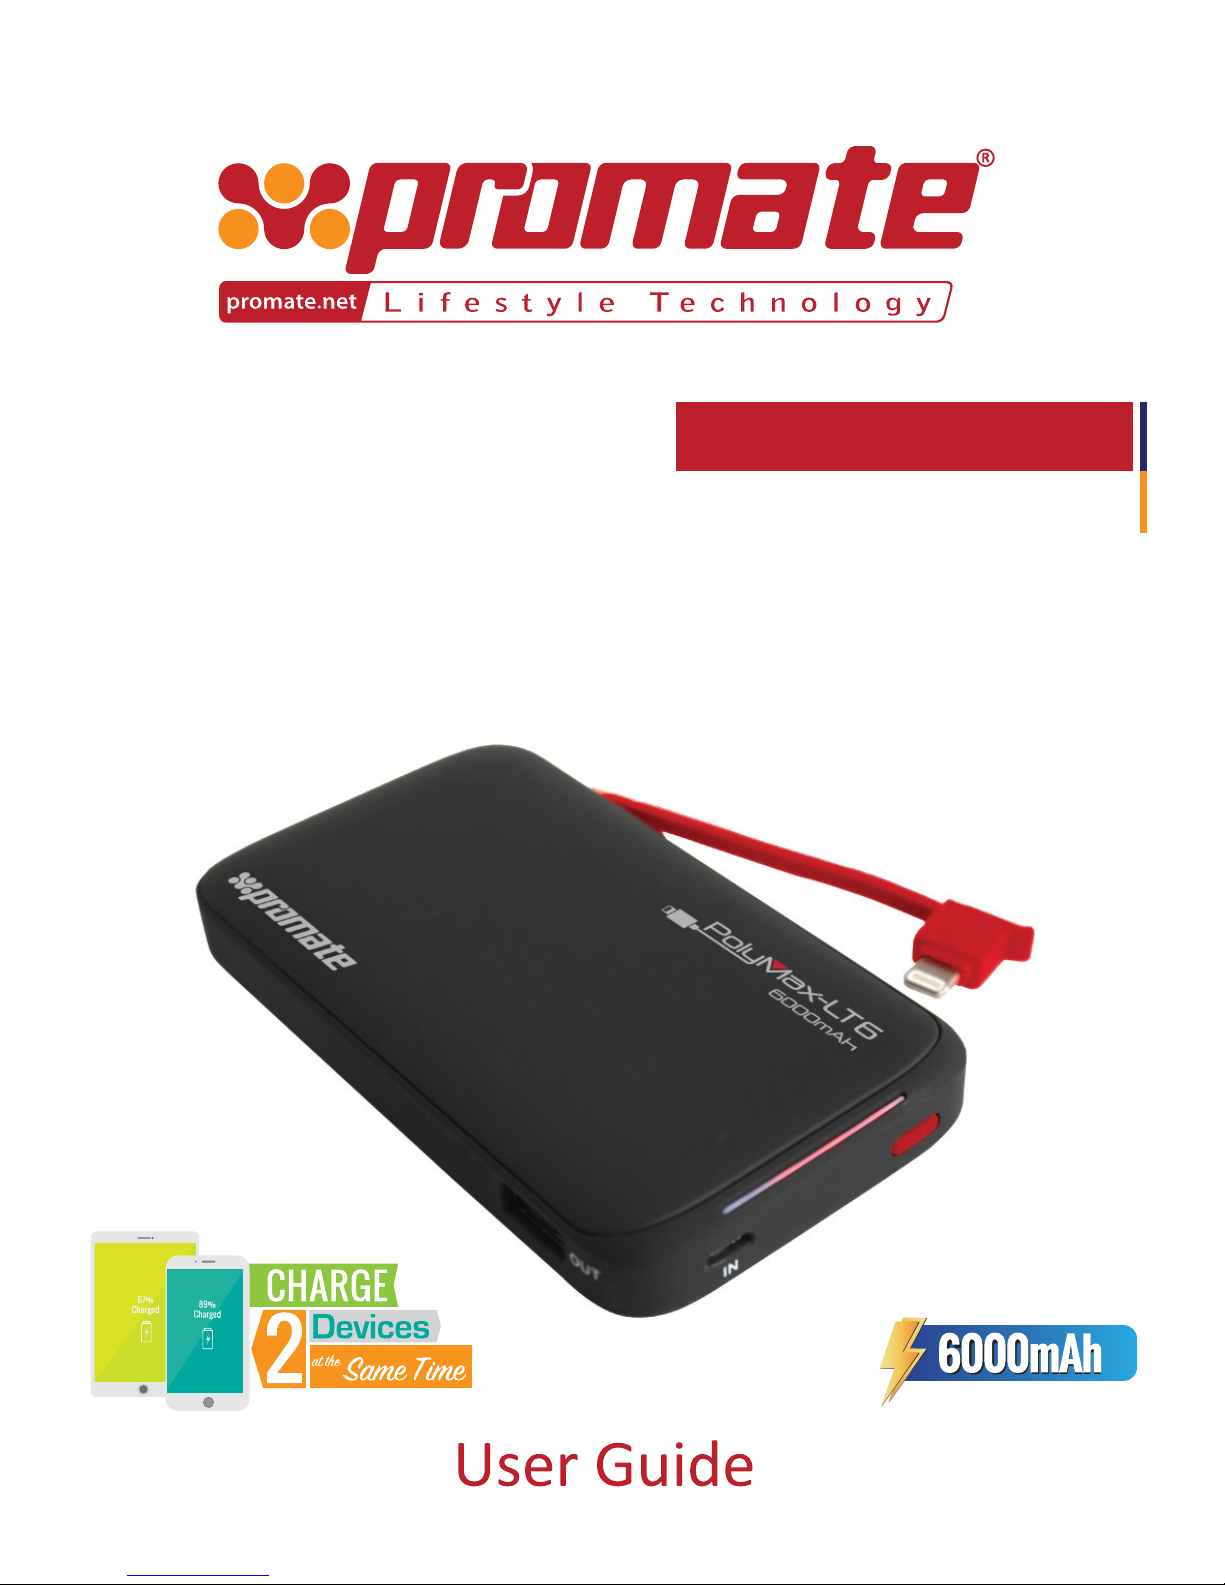
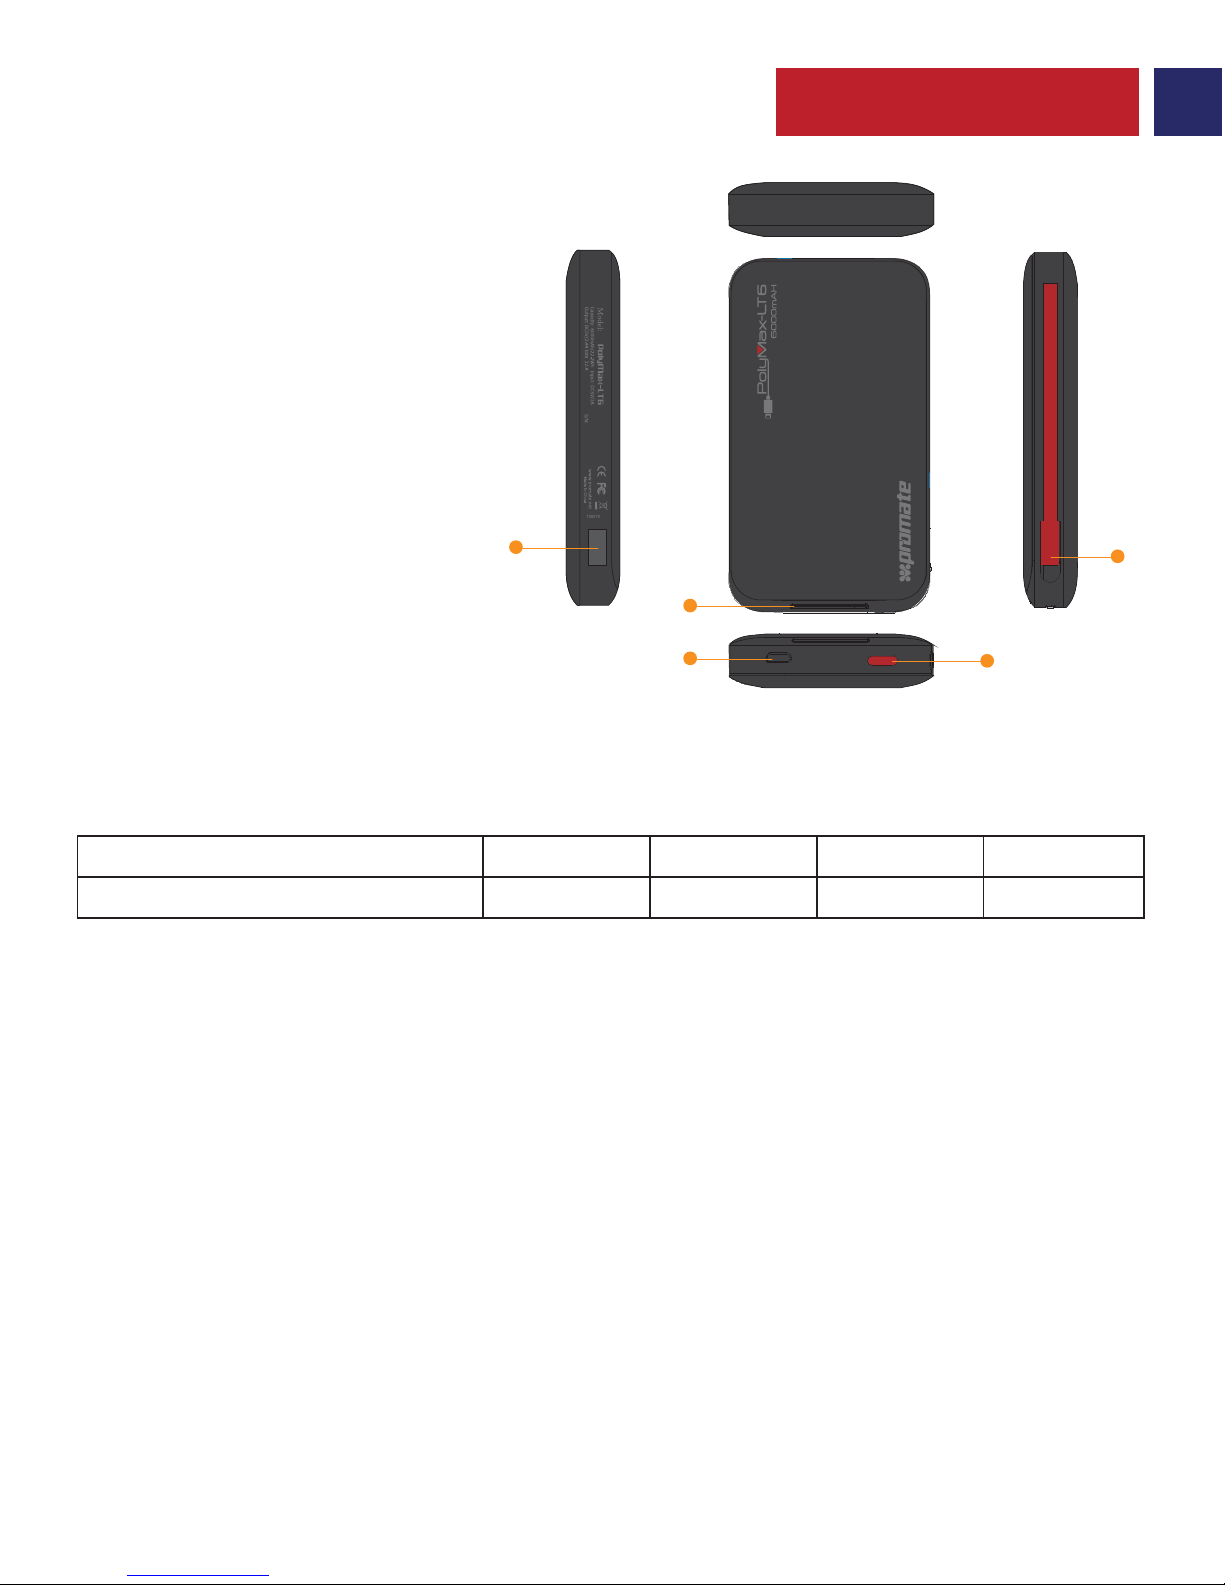
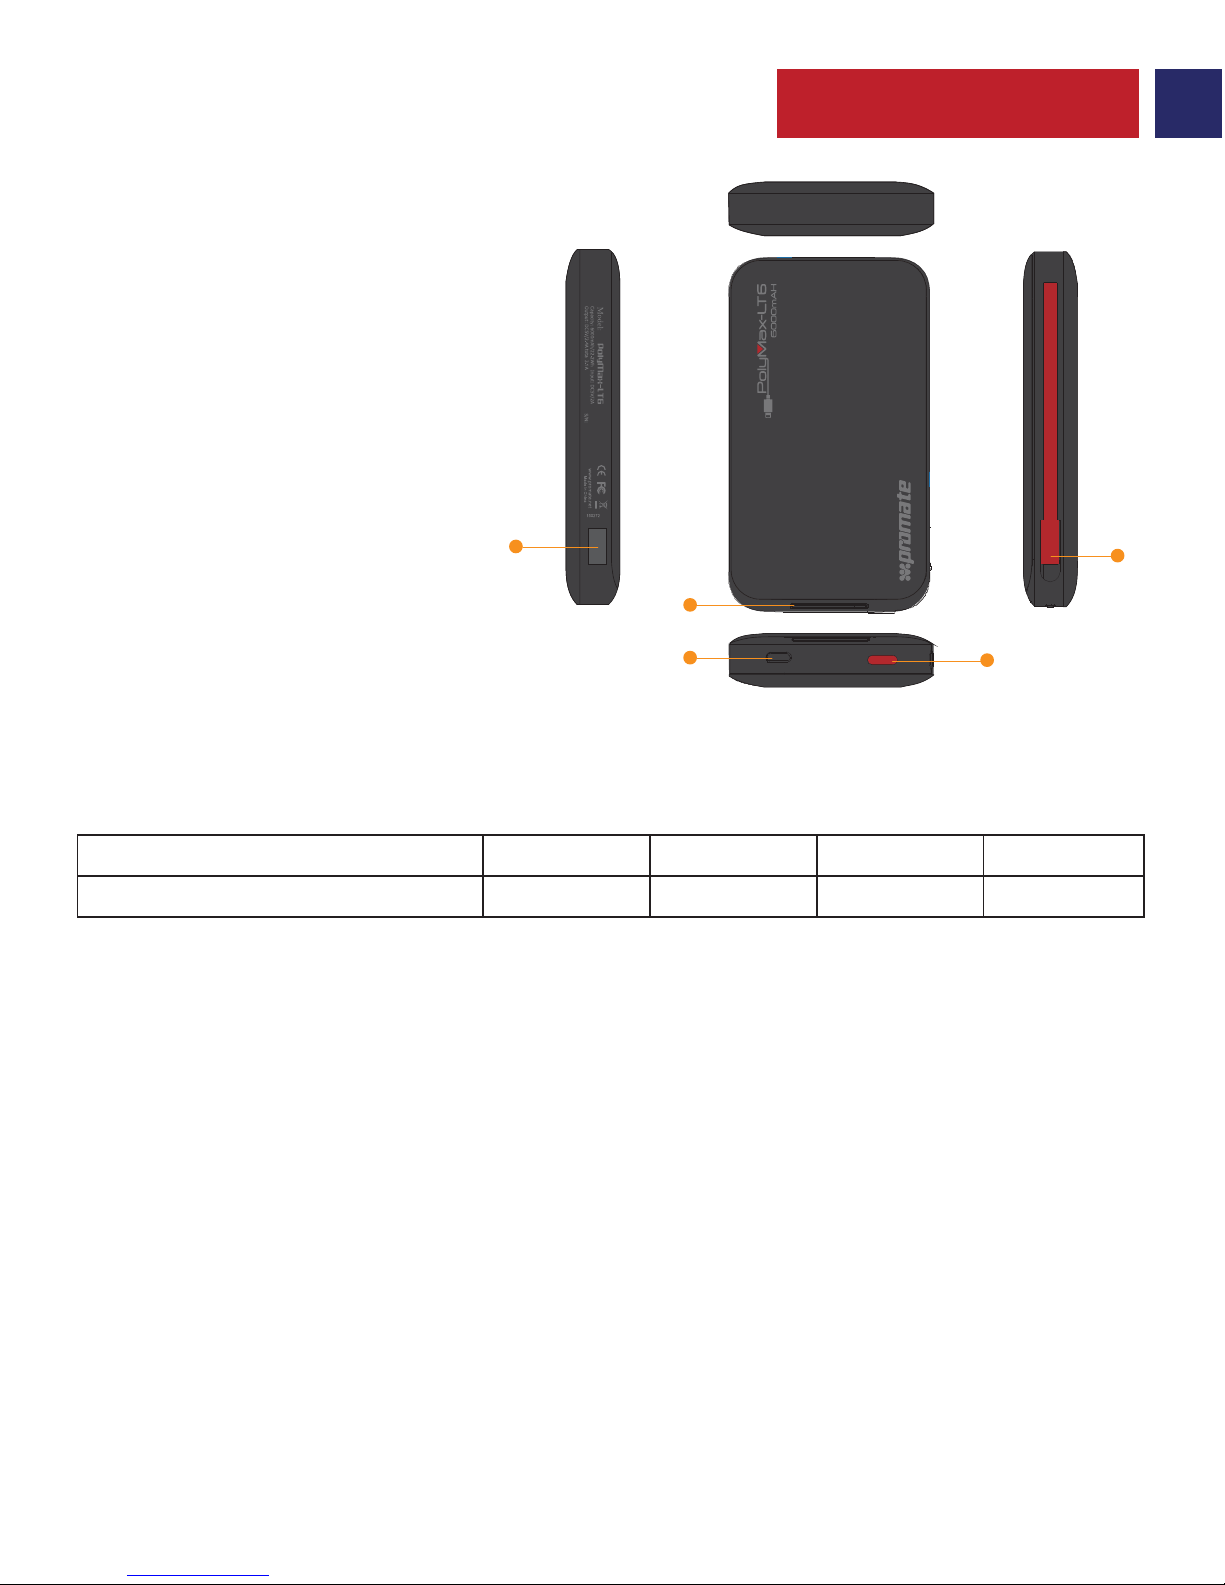
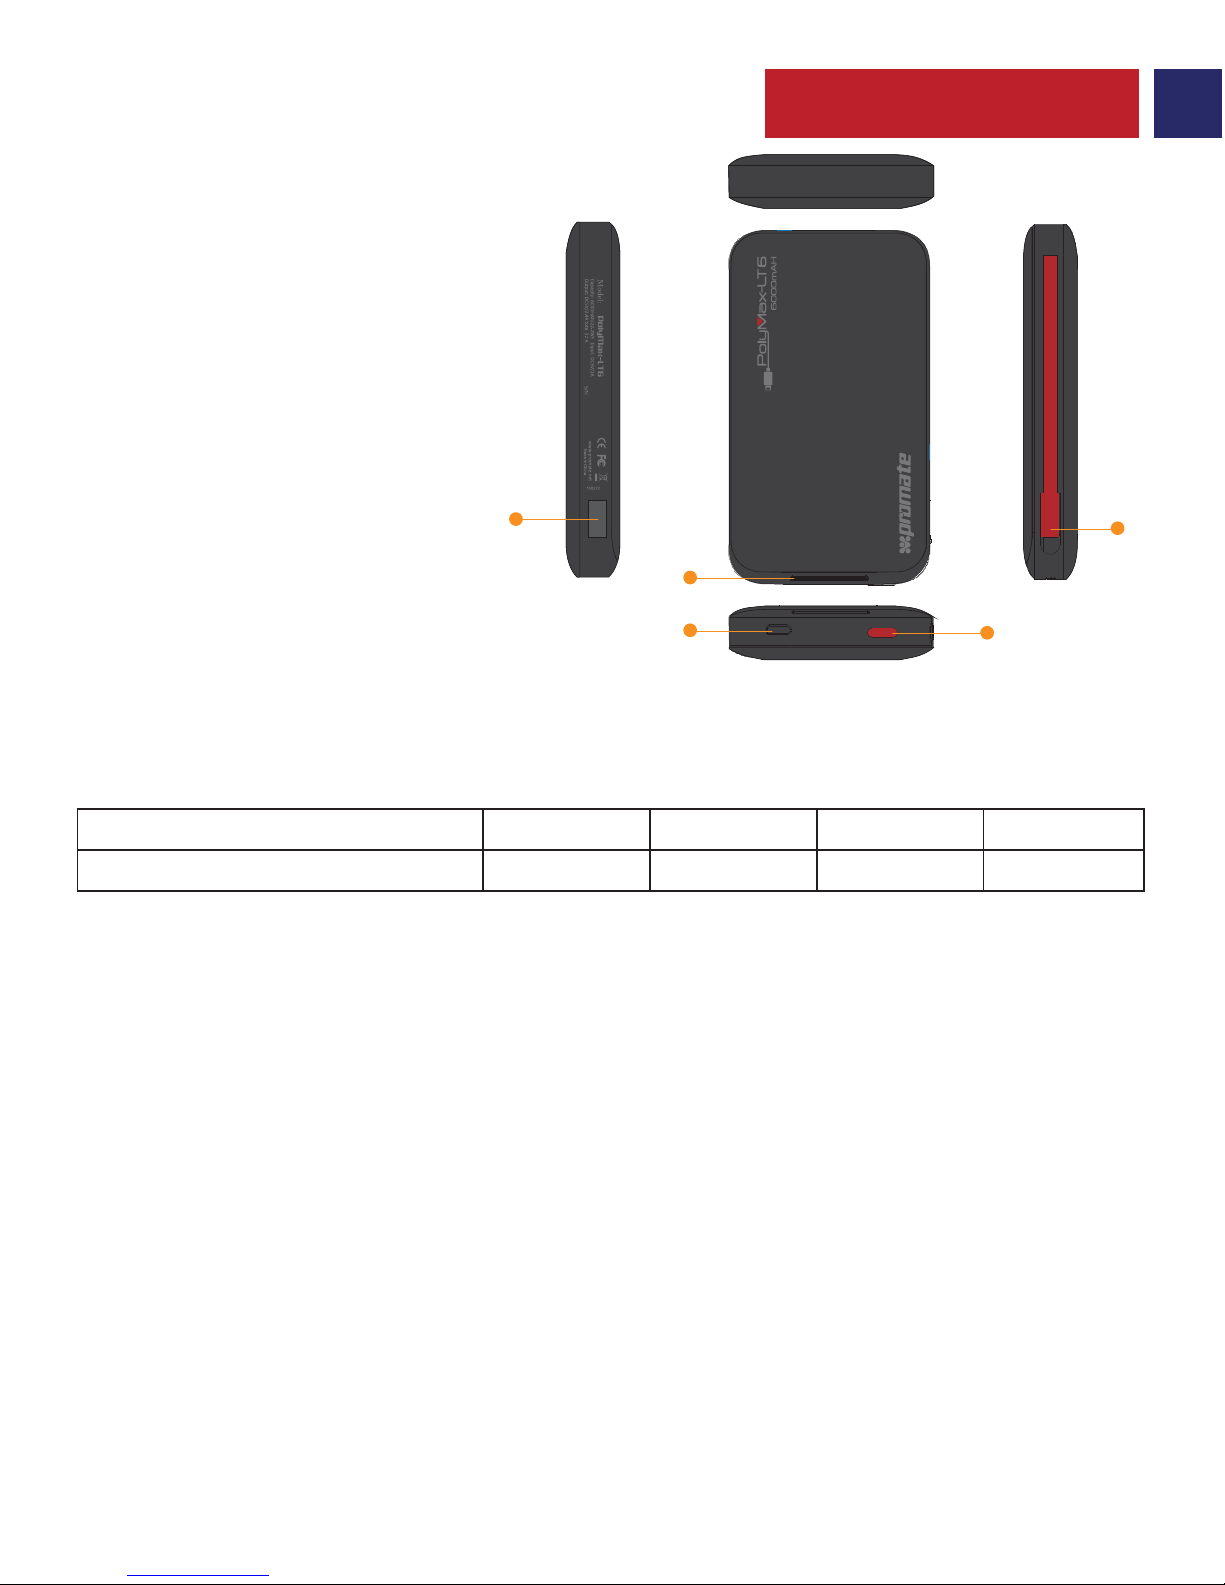
Charge your device on-the-go with this powerful 6000mAh lithium polymer power bank:
polyMax-LT6. polyMax-LT6 features a built-in Lightning Connector to charge all your devices
supporting Lightning Connector. polyMax-LT6 also features an ultra-fast 2.4A USB Port to charge
other devices. polyMax-LT6 features Automatic Voltage Regulation i.e. it provides an optimum
output based on the device connected. polyMax-LT6 is compatible with all smartphones &
tablets.
Introduction
• polyMax-LT6 Power Bank
• Micro-USB Charging Cable
• User Guide
Packaging Contents
• Battery Capacity: 6000mAh
• Battery Type: Lithium Polymer
• Input: 5V, 2A
• Output: 5V, 3.1A (max)
• Charging Time: 4 hours
Specifications
Features
• Powerful Battery: polyMax-LT6 features a powerful 6000mAh li-polymer power bank
• Built-in Lightning Connector: polyMax-LT6 features a built-in Lightning Connector so that you
can charge your device without any hassle
• Ultra-Fast USB Port: Charge your devices via the ultra-fast 2.4A USB charging port
• Lightweight & Portable: polyMax-LT6 is lightweight and easy to carry around
• Automatic Voltage Regulation: polyMax-LT6 features Automatic Voltage Regulation i.e. it
provides an optimum output based on the device connected.
• Charge Two Devices: With polyMax-LT6, charge two devices simultaneously
• Compatibility: polyMax-LT6 is compatible with all devices supporting Lightning Connector & USB Power
• Safe & Reliable: polyMax-LT6 features short-circuit & over-charging protection
Please read all safety instructions and warnings thoroughly before using this product. Improper
use of this product may result in damage to this or attached products.
1. Do not disassemble the power bank or attempt to fix it.
2. Kindly use an original charging cable provided to charge the product.
3. Do not attempt to replace any part of this power bank or battery inside.
4. Do not crush, puncture, dispose of in fire, short the contacts or expose the battery to water or other liquids.
5. Do not connect input and output in reverse.
6. Do not store or use the battery in a high temperature environment, including intense sunlight or heat.
7. Avoid drops, bumps, abrasions and impacts.
8. If there is any reason to believe that there is damage to the battery, discontinue use immediately.
9. If you find that the battery is too hot, is emitting an odor, or is deformed, punctured or exhibits
any suspicious or abnormal behavior, discontinue use immediately and contact our customer service.
10. Always charge this product before extended storage.
Precautions:

2
English
• In order to view the amount of power left in polyMax-LT6, press the Multi-function Button
once. The LED Indicator will light up indicating the amount of battery left in polyMax-LT6.
1. Checking the remaining power left in polyMax-LT6 power bank
• Connect one end of the Micro-USB Cable to polyMax-LT6 and the other end to any
Laptop/Desktop or to any USB Power Adapter, the LED Indicators will light up indicating that
polyMax-LT6 is charging normally. Once all the LED Indicators light up, polyMax-LT6 is fully
charged.
2. Charging polyMax-LT6 power bank
• polyMax-LT6 is compatible with all smartphones & tablets.
• Use the 2.4A USB Output Port to charge USB powered smartphones & tablets. Plug in one
end of the cable into the 2.4A USB Output Port and the other into the device you wish to
charge. Press the Multi-function Button once to start charging your device.
• Use the built-in Lightning Connector to charge Lightning Connector supported devices. Plug
in the Lightning Connector into your device. Press the Multi-function Button once to start
charging your device.
• You can charge two devices simultaneously with polyMax-LT6.
• Press the Multi-function Button for about 3 seconds to turn off polyMax-LT6.
3. Charging devices using polyMax-LT6
Operation Instructions
1 2 3 4
0-25% 25-50% 50-75% 75%-100%
No. of LED’s Active
% of power remaining
1. Multi-function Button
2. Lightning Connector
3. Micro-USB Charging Port
4. Battery Level LED Indicators
5. USB Output Port
Appearance & Interface Description
OUT
IN 1
2
3
5
4

3
Spanish
• Para ver la cantidad de energía remanente en polyMax-LT6, presione el botón multifunción una
vez. El indicador LED se encenderá indicando la cantidad de batería remanente en polyMax-LT6.
1. Verificación de la energía remanente en el cargador portátil de baterías polyMax-LT6
• Conecte un extremo del cable micro-USB al polyMax-LT6 y el otro extremo a cualquier
Laptop/ordenador o a cualquier adaptador de carga USB, los indicadores LED se encenderán
indicando que polyMax-LT6 está cargando normalmente. Cuando todos los indicadores se
enciendan, polyMax-LT6 estará completamente cargado.
2. Carga del cargador portátil de baterías polyMax-LT6
• polyMax-LT6 es compatible con todos los smartphones y tabletas.
• Use el Puerto de salida USB 2.4A para cargar smartphones y tabletas energizadas vía USB.
Enchufe un extremo del cable al Puerto de salida USB 2.4A USB y el otro al dispositivo que
desea cargar. Presione el Botón multifunción una vez para comenzar la carga de su dispositivo.
• Use el Lightning Connector incorporado para cargar dispositivos soportados por Lightning
Connector. Enchufe el Lightning Connector a su dispositivo. Presione una vez el Botón
multifunción para comenzar la carga de su dispositivo.
• Puede cargar dos dispositivos simultáneamente con polyMax-LT6.
• Presione el Botón multifunción durante aproximadamente 3 segundos para apagar
polyMax-LT6.
3. Carga de dispositivos usando polyMax-LT6
Instrucciones de operación
1 2 3 4
0-25% 25-50% 50-75% 75%-100%
Cantidad de LEDs Activos
% de energía remanente
1. Botón multifunción
2. Lightning Connector
3. Puerto de carga micro-USB
4. Indicadores LED de nivel de batería
5. Puerto USB de salida
Apariencia y descripción de la interfaz
OUT
IN 1
2
3
5
4

4
French
• Afin de visualiser la quantité d'énergie restante dans le polyMax-LT6, appuyez une fois sur le Bouton
Multifonction. Le voyant indicateur LED s’allume et indique la quantité d’énergie qui reste sur le PolyMax-LT6.
1. Vérifier l’énergie qui reste dans le Power Bank polyMax-LT6
• Connectez une des extrémités du câble Micro USB au PolyMax-LT6 et l’autre extrémité à un
ordinateur de bureau, un ordinateur portable ou un adaptateur de secteur USB : les voyants
indicateurs LED s’allument et indiquent que le PolyMax-LT6 se recharge normalement. Le
PolyMax-LT6 sera complètement chargé lorsque tous les voyants seront allumés.
2. Charger le Power Bank du PolyMax-LT6
• Le PolyMax-LT6 est compatible avec tous les smartphones & tablettes.
• Utilisez le Port de Sortie 2. 4A USB pour charger les smartphones et tablettes avec USB.
Branchez une extrémité du câble sur le Port de Sortie 2. 4A USB et l'autre sur l'appareil que vous
voulez charger. Appuyez une fois sur le Bouton Multifonction pour commencer à charger votre appareil.
• Utilisez le Lightning Connector intégré pour charger les appareils compatibles. Branchez
l’appareil sur le Lightning Connector. Appuyez une fois sur le Bouton Multifonction pour
commencer le chargement de votre appareil.
• Vous pouvez recharger en même temps deux appareils avec le PolyMax-LT6.
• Appuyez sur le Bouton Multifonction pendant environ 3 secondes pur éteindre le
PolyMax-LT6.
3. Chargement de dispositifs à l’aide du PolyMax-LT6
Mode d’Emploi
1 2 3 4
0-25% 25-50% 50-75% 75%-100%
No. LED Allumés
% d’énergie restante
1. Bouton Multifonction
2. Lightning Connector
3. Port de Charge Micro-USB
4. Voyant Indicateur du Niveau de Batterie
5. Port de Sortie USB
Aspect & Description de l’Interphase
OUT
IN 1
2
3
5
4
Table of contents
Languages:
Other Promate Camera Accessories manuals
Popular Camera Accessories manuals by other brands

Trojan
Trojan GC2 48V quick start guide

Calumet
Calumet 7100 Series CK7114 operating instructions

Ropox
Ropox 4Single Series User manual and installation instructions

Cambo
Cambo Wide DS Digital Series Main operating instructions

Samsung
Samsung SHG-120 Specification sheet

Ryobi
Ryobi BPL-1820 Owner's operating manual