Promise SmartStor NS6700 User manual

1


1
Contents
English.................................................................................................. 2
Deutsch............................................................................................... 17
Français.............................................................................................. 33
Italiano ................................................................................................ 49
Español............................................................................................... 65
Pусский язык...................................................................................... 81
日本語................................................................................................. 97
繁體中文 ........................................................................................... 113
简体中文 ........................................................................................... 129
한국어 ............................................................................................... 145

SmartStor NAS Quick Start Guide
2
Chapter 1: Introduction
1.1 About This Manual
This Product Manual describes how to setup, use, and maintain the
SmartStor NSx700. It also describes how to use:
• SmartNAVI software that you install and run on your Windows or Mac
• Promise Advanced Manager WEBPAM PROe software that runs on
the SmartStor by browser.
This manual includes a full table of contents, chapter task lists, and
numerous cross-references to help you find the specific information you
are looking for.
Also included are four levels of notices:
Note
A Note provides helpful information such as hints or alternative ways of
doing a task.
Important
An Important calls attention to an essential step or point required to
complete a task. Important items include things often missed.
Caution
A Caution informs you of possible equipment damage or loss of data and
how to avoid them.
Warning
A Warning notifies you of probable equipment damage or loss of data, or
the possibility of physical injury, and how to avoid them.

3
1.2 Protocol Support
SmartStor NSx700 series supports:
• SMB/CIFS for Microsoft Windows
• NFS for Linux/Unix
• AFP for Mac
• FTP
• WebDAV for the file transform over the Internet
• iSCSI Target model and Initiator model
• DLNA and UPnP for media stream
1.3 Hardware Specifications
Model Name SmartStor NS4700/6700
CPU 1.8 GHz
FLASH 256 MB
SDRAM 1GB DDRII (up to 2 GB)
Smart Fan Yes
Gigabit Ethernet 2
USB 2.0 Host port 5 (Front x 1/ Back x 4)
LCD Display Yes
Internal HDD Support 3.5" 3 Gb/s SATAII
Hot Plug Yes
# of Bays 4/6
Power Supply 250W (80 PLUS)
NS6700 243(L)*188(W) *251(H)mm
Dimension
NS4700 243(L)*188(W) *191(H)mm
Please visit Promise website for more detail.

SmartStor NAS Quick Start Guide
4
1.4 Client Utility OS Support
The following operating systems support SmartNAVI:
• Windows XP 32/64 Bit
• Windows Vista 32/64 Bit
• Windows Server 2003 32/64 Bit
• Windows Server 2008 32/64 Bit
• Windows Server 2008 R2
• Windows 7 32/64 Bit
• Mac OS 10.5 and above
• Mac OS 10.6 XServer
1.5 Browser Support
Choose one of the following browsers to use with WEBPAM PROe:
• Internet Explorer 7 and above
• Firefox 3 and above
• Safari 5 and above
• Google Chrome 8 and above
Warning
The electronic components within the SmartStor are
sensitive to damage from Electro-Static Discharge (ESD).
Observe appropriate precautions at all times when handling
the SmartStor or its subassemblies.

5
Important
To configure the SmartStor, you are advised to install
SmartNAVI. Please refer to the User’s Manual.
Warning
The fan contains hazardous moving parts. Keep fingers
and other body parts away.
Caution
RISK OFF EXPLOSION IF BATTERY IS REPLACED
BY AN INCORRECT TYPE.
DISPOSE OF USED BATTERIES ACCORDING TO
THE INSTRUCTIONS.
VCCI

SmartStor NAS Quick Start Guide
6
Chapter 2: Quick Setting-up
2.1 Unpacking the SmartStor NAS
The SmartStor NSx700 series box contains the following items:
• SmartStor NAS Unit
• Quick Start Guide
• Screws for disk drives
• Ethernet cable
• Power cord
• CD for client utility and reference document
Figure 1. SmartStor NSx700 Front View
Disk Status LED
Disk Activity LED
Disk Carrier
USB Connection
LCD
One-Touch
Backup Button
Select Button
Enter Button
Power Button
Ethernet status LED
One-Touch
Backup LED
System Status LED

7
Figure 2. SmartStor NSx700 Rear View
System Cooling
FAN
Power Connection
USB Connection
RJ45 Network
Connection
VGA output
SmartStor NAS Quick Start Guide
8
2.2 Installing Disk Drives
Note: You are highly recommended to select Enterprise Level HDD to
achieve the best data protection.
You can populate the SmartStor NSx700 series NAS with SATA 1.5 Gb/s
or 3.0 Gb/s disk drives. For optimal performance, install disk drives of
the same model and capacity. Your disk drives will become a RAID
Volume on the SmartStor.
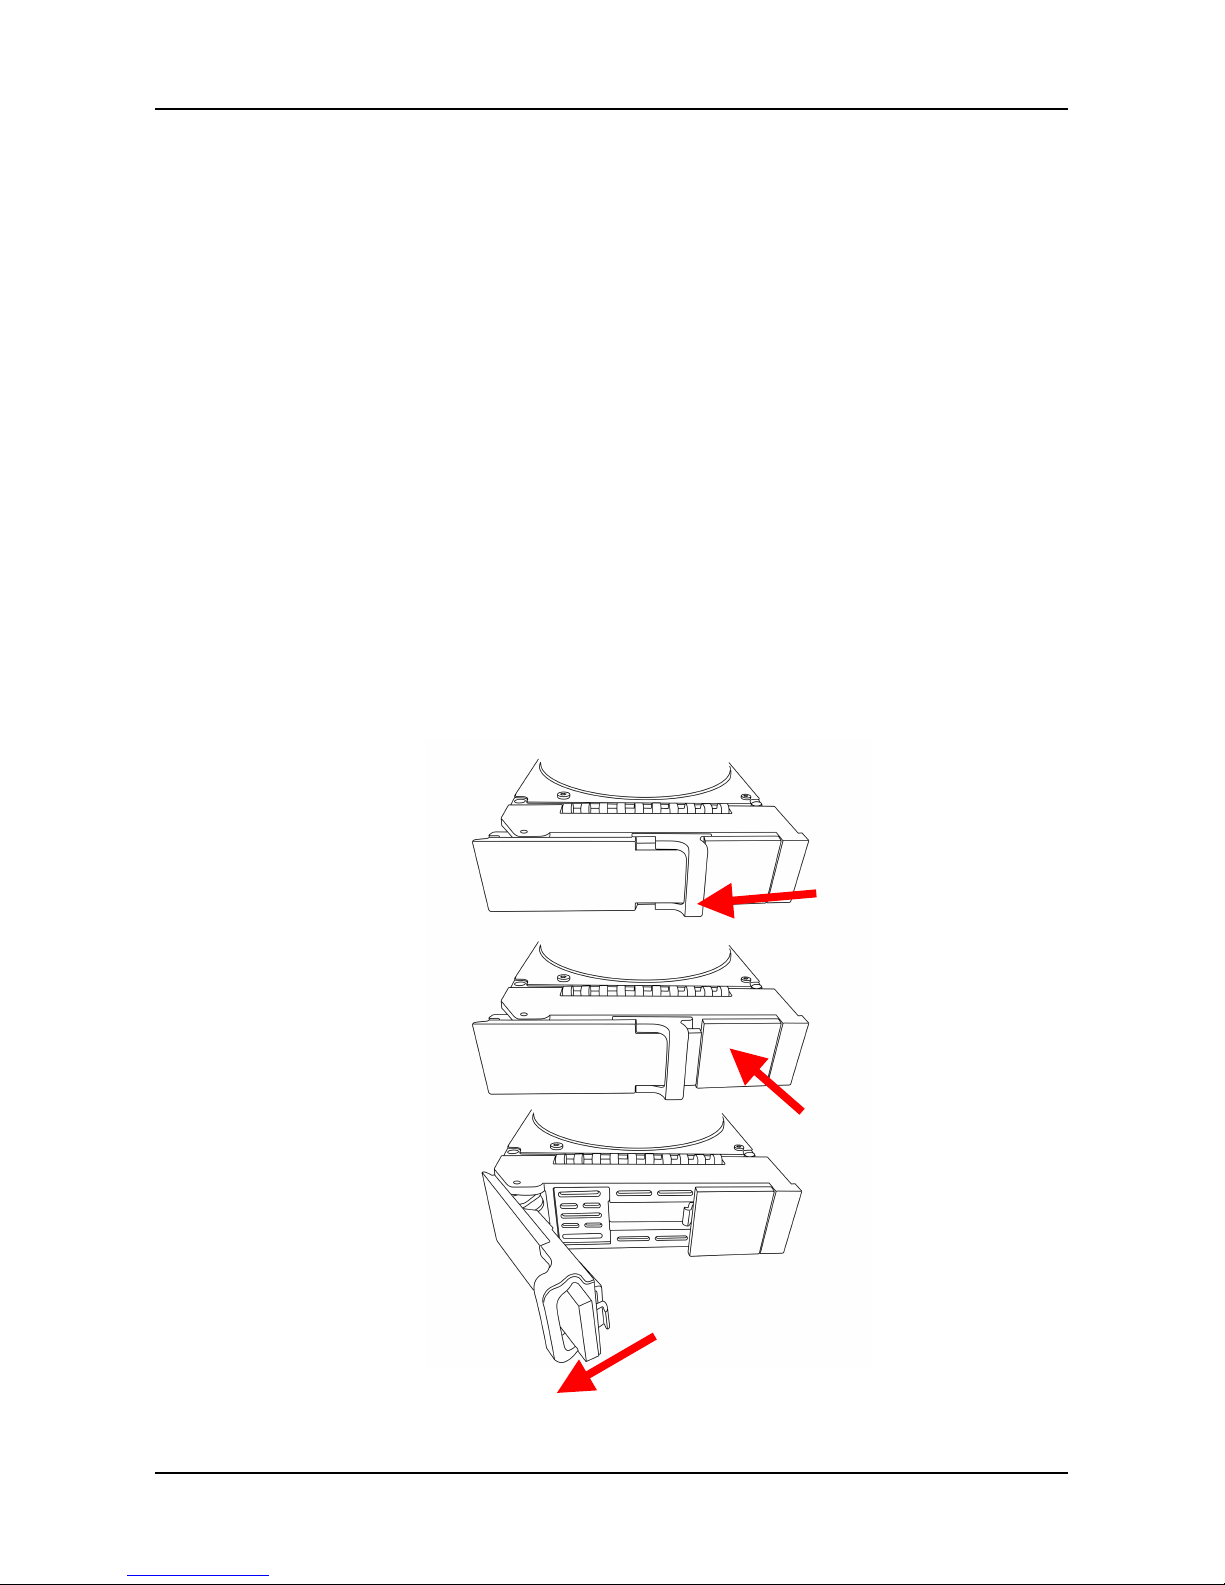
To install disk drives:
1. Remove the disk tray from the device by the following steps:
a. Slide the latch leftwards.
b. Press the button next to the latch.
c. Pull the latch out to open the door of disk tray, then you can
pull the disk tray out from the enclosure.

9
2. Carefully lay the disk drive into the drive tray, so that the screw
holes on the sides of the carrier align with the screw holes in the
drive.
3. Insert the screws through the holes in the drive carrier and into the
sides of the disk drive.
․ Install only the counter-sink screws supplied with the
SmartStor.
․ Install four screws per drive.
․ Snug each screw. Be careful not to over-tighten.

SmartStor NAS Quick Start Guide
10
4. Reinstall the drive tray into the SmartStor enclosure.
Tip: Repeat steps 1 through 4 until all of your disk drives are
installed.
Caution
Support disk drive hot-swapping. To avoid hand contact
with an electrical hazard, remove only one drive carrier a
time.

11
2.3 Connecting the Ethernet cable
To connect the SmartStor NAS to your network:
1. Attach one end of the network cable to the RJ45 network
connection.
Please rep See Figure 2.
2. Attach the other end of the network cable to your Ethernet hub or
switch.
2.4 Connecting the Power
To power the SmartStor NAS:
1. Attach the power cord on the back of the SmartStor enclosure and
plug the other end into the power source. See Figure 2.
2. On the front of the SmartStor NAS, press the power button. See
Figure 1. It takes about a minute to boot the SmartStor. When fully
booted:
․ The System Status LED turns blue. See Figure 1.
․ The buzzer beeps one time.
2.5 Shutting Down the SmartStor NAS
To shut down the SmartStor NAS, press and hold the power button until
the power LED indicator turns red.

SmartStor NAS Quick Start Guide
12
Figure 3. Press and hold the Power button about 5 seconds
Figure 4. System status LED turns red, and then goes dark
To restart the SmartStor, press the power button again.
Power Button
Disk Status LED

13
2.6 Using LCD
The SmartStor provides you with a LCD on the front panel that allows
you to easily monitor the system status, and configure the network.
Figure 5. LCD panel
• To monitor the system status, press the Select button repeatedly.
The system status will be displayed on the LCD panel sequentially,
including the system temperature, voltage, ventilator status, firmware
& BIOS version, etc.
• To configure the networking settings:
1. Press the Enter button to display the Network Setup option on
the LCD.
2. Press the Select Button to select the options and then press the
Enter button to change the setting values.
3. When done, select OK and press the Enter button to apply the
networking configuration.
Select Button
Enter Button

SmartStor NAS Quick Start Guide
14
2.7 Setup Wizard
The system’s Wizard lets you configure your disk array(s) easily and quickly.
The Wizard will guide you through the required settings step by step.
You can choose to configure automatically by using One-Click Setup, or
configure manually by using Advance Setup.
Using Automatic Configuration Wizard
1. Click NAS tab >Wizard.
2. Click the One-Click Setup button. The Automatic Configuration box
displays:
3. The Summary window displays the general information of the
system, including:
․ Computer Name
․ IP Address
․ Storage Type
4. To accept the proposed configuration, click the Submit button.
If you disagree with the proposed configuration, click the Advance
Setup button to directly specify all parameters for a new disk array,
logical drives, and spare drives.

15
Using Advanced Configuration Wizard
1. Click NAS tab >Wizard.
2. Click the Advance Setup button. The Advanced Configuration box
displays:
3. Complete the required settings in the Network Settings window,
including:
․ Computer Name
․ Obtain an IP address automatically
․ IP Address
․ Subnet Mask
․ Default Gateway
․ Primary DNS
․ Secondary DNS
When done, click the Next button.
4. Select Storage Type: Data Protection or Maximum Capacity, and
then click the Next button.
5. The Summary window displays the general information of the
system, including:
․ Computer Name
․ IP Address
․ Storage Type
To accept the proposed configuration, click the Submit button.

SmartStor NAS Quick Start Guide
16
2.8 GNU General Public License
This product includes copyrighted third-party software licensed under
the terms of the GNU General Public License. Please see the GNU
General Public License (“GPL”) for the exact terms and conditions of this
license at www.gnu.org. The GPL source code incorporated into the
product is available for free download at our web site
http://www.promise.com/support/download/download_eng.asp. Subject
to GPL, you may re-use, re-distribute and modify the GPL source code.
Note that with respect solely to the GPL Software, no warranty is
provided, we do not offer direct support for the distribution.
2.9 SmartStor Product Support
If you experience problems with setup and or use of your new SmartStor
NAS, PLEASE contact technical support BEFORE attempting to return
SmartStor NAS. Our experienced support staff will assist you with any
issue or question you may have regarding SmartStor NAS.
Promise Online Support: https://support.promise.com
2.10 Replaceable batteries
If an equipment is provided with a replaceable battery, and if
replacement by an incorrect type could result in an explosion (for
example, with some lithium batteries), the following applies:
• if the battery is placed in an OPERATOR ACCESS AREA, there shall
be a marking close to the battery or a statement in the servicing
instructions.
• if the battery is placed elsewhere in the equipment, there shall be a
marking close to the battery or a statement in the servicing
instructions.

17
Kapitel 1: Einleitung
1.1 Über dieses Handbuch
Dieses Produkthandbuch beschreibt die Einrichtung, Benutzung und
Wartung des SmartStor NSx700. Es beschreibt außerdem die
Benutzung:
• Der SmartNAVI Software, die Sie auf Ihrem Windows oder Mac
System installieren.
• Der Promise Advanced Manager WEBPAM PROe Software, die auf
dem SmartStor über den Browser ausgeführt wird.
Dieses Handbuch enthält ein vollständiges Inhaltsverzeichnis,
Aufgabenlisten nach Kapitel und eine Reihe von Querverweisen, um
Ihnen beim Finden der gewünschten Information behilflich zu sein.
Außerdem sind vier verschiedene Arten von Hinweisen enthalten:
Anmerkung
Eine Anmerkung bietet nützliche Informationen sowie Tipps oder
alternative Möglichkeiten zur Durchführung einer Aufgabe.
Wichtig
Der Hinweis Wichtig weist auf einen wichtigen Schritt oder Punkt zur
Durchführung einer Aufgabe hin. Diese Art von Hinweis enthält oft
Sachen, die leicht vergessen werden.
Achtung
Der Hinweis Achtung weist Sie auf mögliche Schäden oder Datenverlust
hin und wie Sie diese vermeiden können.
Warnung
Der Hinweis Warnung weist Sie auf mögliche Schäden oder
Datenverlust oder der Möglichkeit von Verletzungen hin und wie Sie
diese vermeiden können.

SmartStor NAS-Kurzanleitung
18
1.2 Unterstützte Protokolle
Die SmartStor NSx700 Serie unterstützt:
• SMB/CIFS für Microsoft Windows
• NFS für Linux/Unix
• AFP für Mac
• FTP
• WebDAV für die Dateiübertragung über das Internet
• iSCSI Target Modell und Initiator Modell
• DLNA und UPnP für Mediastream
1.3 Hardwarespezifikationen
Modellname Smartstor NS4700/6700
CPU 1,8 GHz
FLASH 256 MB
SDRAM 1 GB DDRII (bis zu 2 GB)
Smart Fan Ja
Gigabit Ethernet 2
USB 2.0 Host Port 5 (Vorne x 1/Hinten x 4)
LCD Display Ja
Interne HDD 3,5” 3 Gb/s SATAII
Hot Plug Ja
Anzahl Schächte 4/6
Stromversorgung 250W x1 (80 PLUS)
NS6700 243 (L) x 188 (B) x 251 (H) mm
Abmessungen
NS4700 243 (L) x 188 (B) x 191 (H) mm
Weitere Informationen finden Sie auf der Promise Webseite.
This manual suits for next models
1
Table of contents
Other Promise Network Hardware manuals


