Protool VCP 450 E-L User manual
626627A
302000883 - 2007-01-01
VCP 450 E-L

SK
GB
RUS
GR
P
PL
I
N
NL
S
RO
FIN
F
E
DK
D
...12
...17
...22
...27
...32
...37
...42
...47
...52
...57
...62
...67
...72
...77
...82
...87
CZ
... 7
2
3
1
2
3
4
5
6
10 11 12
7
8
9
12
56
34
4
79
8
5
10
11
B
A
C
D
6
12
13
16
14
15
10
11
B
A
C
D

Mehrzweckstaubsauger VCP 450 E-L
Betriebsspannung 230 V - 240 V
Leistungsaufnahme 1200 W
Anschlusswert an Gerätesteckdose max. EU 2400 W
CH / DK 1100 W
GB 1800 W
AUS 1200 W
Luftvolumenstrom 3400 l/min
Unterdruck (max.) 23 kPa
Gerät: Breite 476 mm
Tiefe 506 mm
Höhe 655 mm
Schutzart IP X4
Schalldruckpegel nach EN 60704-1 66 dB (A)
Länge des Netzkabels 7,5 m
Gewicht 16 kg
Technische Angaben D
Sicherheitsrelevante Bauteile
Bedienelemente
Sicherheitshinweise
Filter Best.-Nr.: 626437
Entsorgungssack VPE 5 St. Best.-Nr.: 626436
Filtersack VPE 5 St. Best.-Nr.: 626434
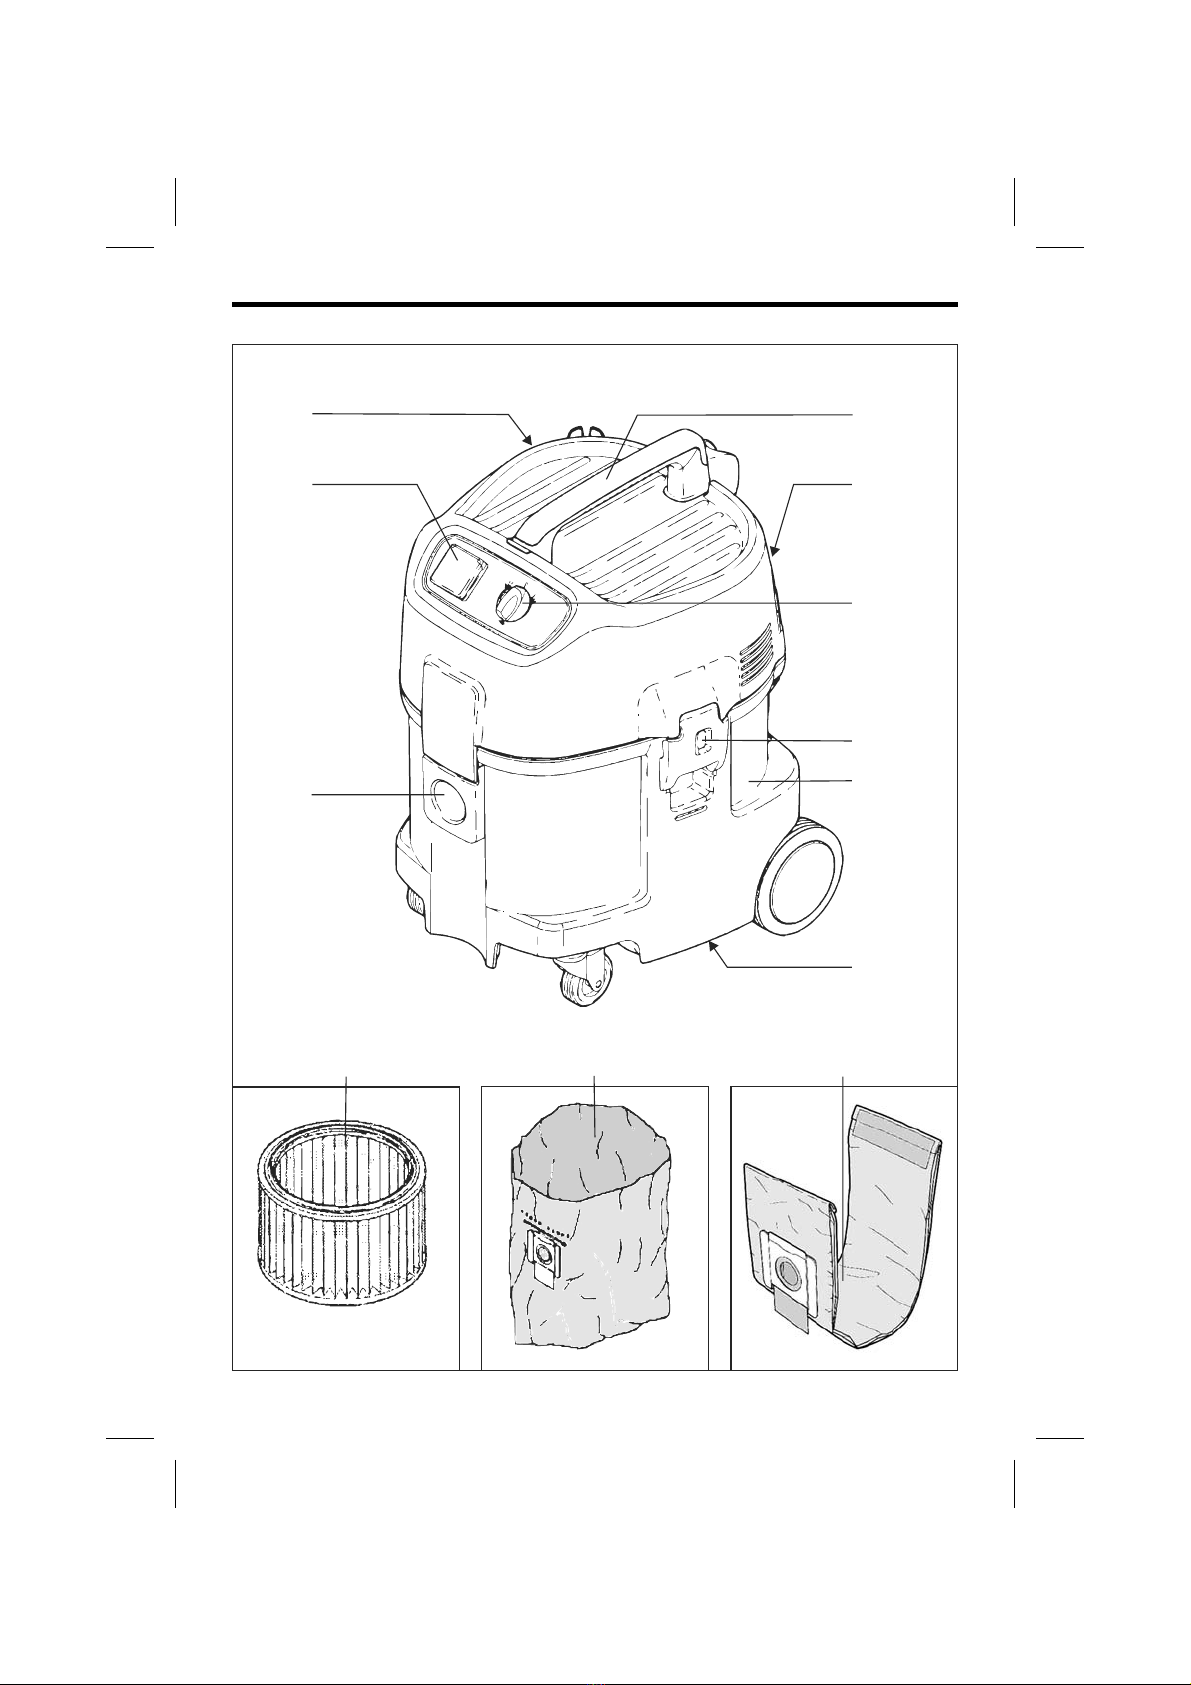
1. Griff
2. Zubehörhalterung
3. Schalter mit Saugkraftregulierung
4. Verschlussklammer
5. Schmutzbehälter
6. Griffmulde zur Behälterentleerung
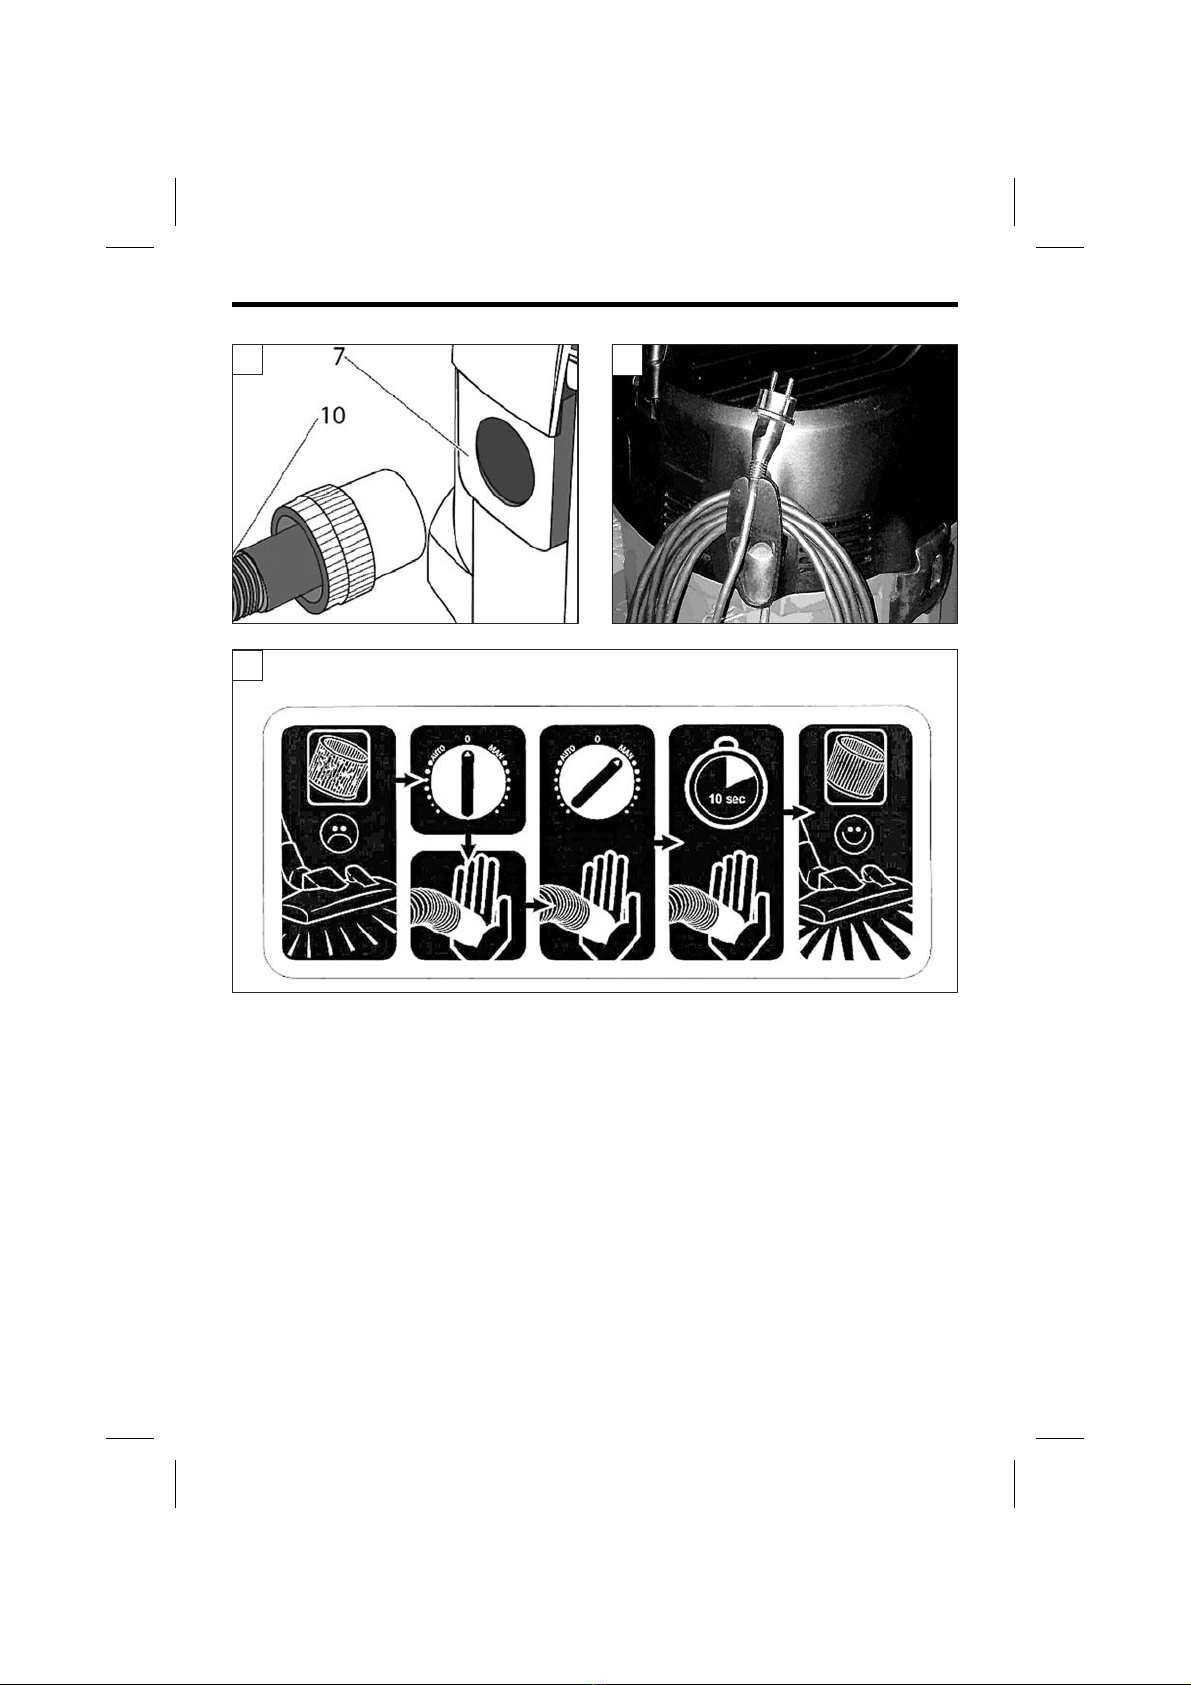
7. Schlauchanschluss
8. Steckdose
9. Kabelhaken
10. Filter
11. Entsorgungssack
12. Filtersack
Das abgebildete oder beschriebene Zubehör
muss nicht Bestandteil der Lieferung sein.
Der Staubsauger ist für industrielle und
gewerbliche Anwendung geeignet.
Er ist geeignet für gesundheitsgefährliche
Stäube der Staubklasse ‚L‘ (MAK-Werte
1mg/m ). Es dürfen keine heißen Materialien
(glimmende Zigaretten, heiße Asche u.ä.), keine
brennbaren, explosiven oder aggressiven
Flüssigkeiten (z.B. Benzin, Lösemittel, Säuren,
Laugen u.ä.) sowie keine brennbaren oder
explosiven Stäube (Magnesium- oder
Aluminiumstaub) gesaugt werden.
³3
Verwendung
Eine sichere Arbeit mit dem
Staubsauger ist nur dann
möglich, wenn Sie diese
Bedienungsanleitung sorgfältig
durchlesen und die angeführten
Hinweise genau einhalten.
o
o
Halten Sie die Sicherheitshinweise, die jeder
Lieferung beiliegen, sorgfältig ein.
Durch die Verbindung des Staubsaugers mit
einem Elektrowerkzeug entsteht eine Vor-
richtung, auf die sich die Sicherheits-
hinweise zum entsprechenden
Elektrowerkzeug beziehen.
7
o
o
o
o
o
o
o
o
o
o
o
o
o
o
o
o
Der Staubsauger darf nur in Räumen und
kurzzeitig im Freien verwendet werden. Für
die dauerhafte Verwendung im Freien ist ein
Netzkabel des Typs H07 RN-F erforderlich.
Der Austausch des Netzkabels sollte einer
Vertragswerkstatt überlassen werden.
Überprüfen Sie den Filter vor jeder
Benutzung des Staubsaugers auf
Unversehrtheit.
Überprüfen Sie den Schlauch der Füll-
standsüberwachung vor jeder Benutzung
des Staubsaugers auf freie Öffnung.
Saugen Sie mit dem Staubsauger keine
brennbaren Flüssigkeiten wie Benzin,
Verdünner usw. Explosionsgefahr!
Entnehmen Sie vor dem Nass-Saugen den
Filtersack bzw. Entsorgungssack.
Das Netzkabel darf nicht durch Zug belastet
werden und darf nicht auf scharfen Kanten
liegen oder über solche verlaufen und darf
nicht überfahren oder auf andere Weise
mechanisch beschädigt werden.
Überprüfen Sie regelmäßig das Netzkabel.
Bei beschädigtem Netzkabel darf der
Staubsauger nicht verwendet werden. Beim
Austausch der Verlängerungskabel, des
Netzkabels usw. dürfen die Schutzklasse,
Schutzart und mechanische Festigkeit nicht
beeinträchtigt werden.
Verwenden Sie stets ein vom Hersteller
festgelegtes Netzkabel (H05 RR-F / H07
RN-F).
Hinsichtlich des Arbeitsschutzes gegen
Elektrounfälle und Gewährleistung der
Schutzklasse sind diese Arbeiten von einer
Elektrowerkstatt durchzuführen, die zu
Reparaturen solcher Art zugelassen ist.
Wenden Sie sich bitte an eine PROTOOL -
Vertragswerkstatt.
Entfernen Sie bei sämtlichen Reparatur-
oder Wartungsarbeiten das Netzkabel aus
der Steckdose.
Verwenden Sie die Steckdose am Staub-
sauger nur zu den in der Bedienungs-
anleitung beschriebenen Zwecken.
Netzstecker, Steckdose und Verbindungs-
stücke der Netzkabel vor Kontakt mit
Wasser schützen.
Verwenden Sie nur Originalersatzteile.
Schützen Sie das Staubsaugeroberteil
gegen Wasser. Kurzschlussgefahr!
VORSICHT! Bei Schaum-/Flüssigkeits-
austritt das Gerät sofort abschalten.
Wartung und Reinigung müssen so aus-
geführt werden, dass keine Gefahr durch
am Gerät anhaftende, abgelagerte oder
austretende gefährliche Stäube für das
Wartungspersonal und andere Personen
entsteht.
Kabellänge Querschnitt
bis 20 m 1,5 mm
20 bis 50 m 2,5 mm
2
2
8
o
o
Das Gerät muss jährlich mindestens einmal
von einer ausgebildeten Person auf seine
sichere Funktion technisch überprüft
werden.
Bei Betrieb in geschlossenen Räumen ist für
eine ausreichende Belüftung zu sorgen.
Beachten Sie etwaige nationale
Bestimmungen.
Der Staubsauger darf NICHT an das Netz
angeschlossen und eingeschaltet werden.
Das Zubehör befindet sich bei der
Lieferung des Staubsaugers im
Schmutzbehälter und muss vor der
Inbetriebnahme aus diesem entnommen
werden.
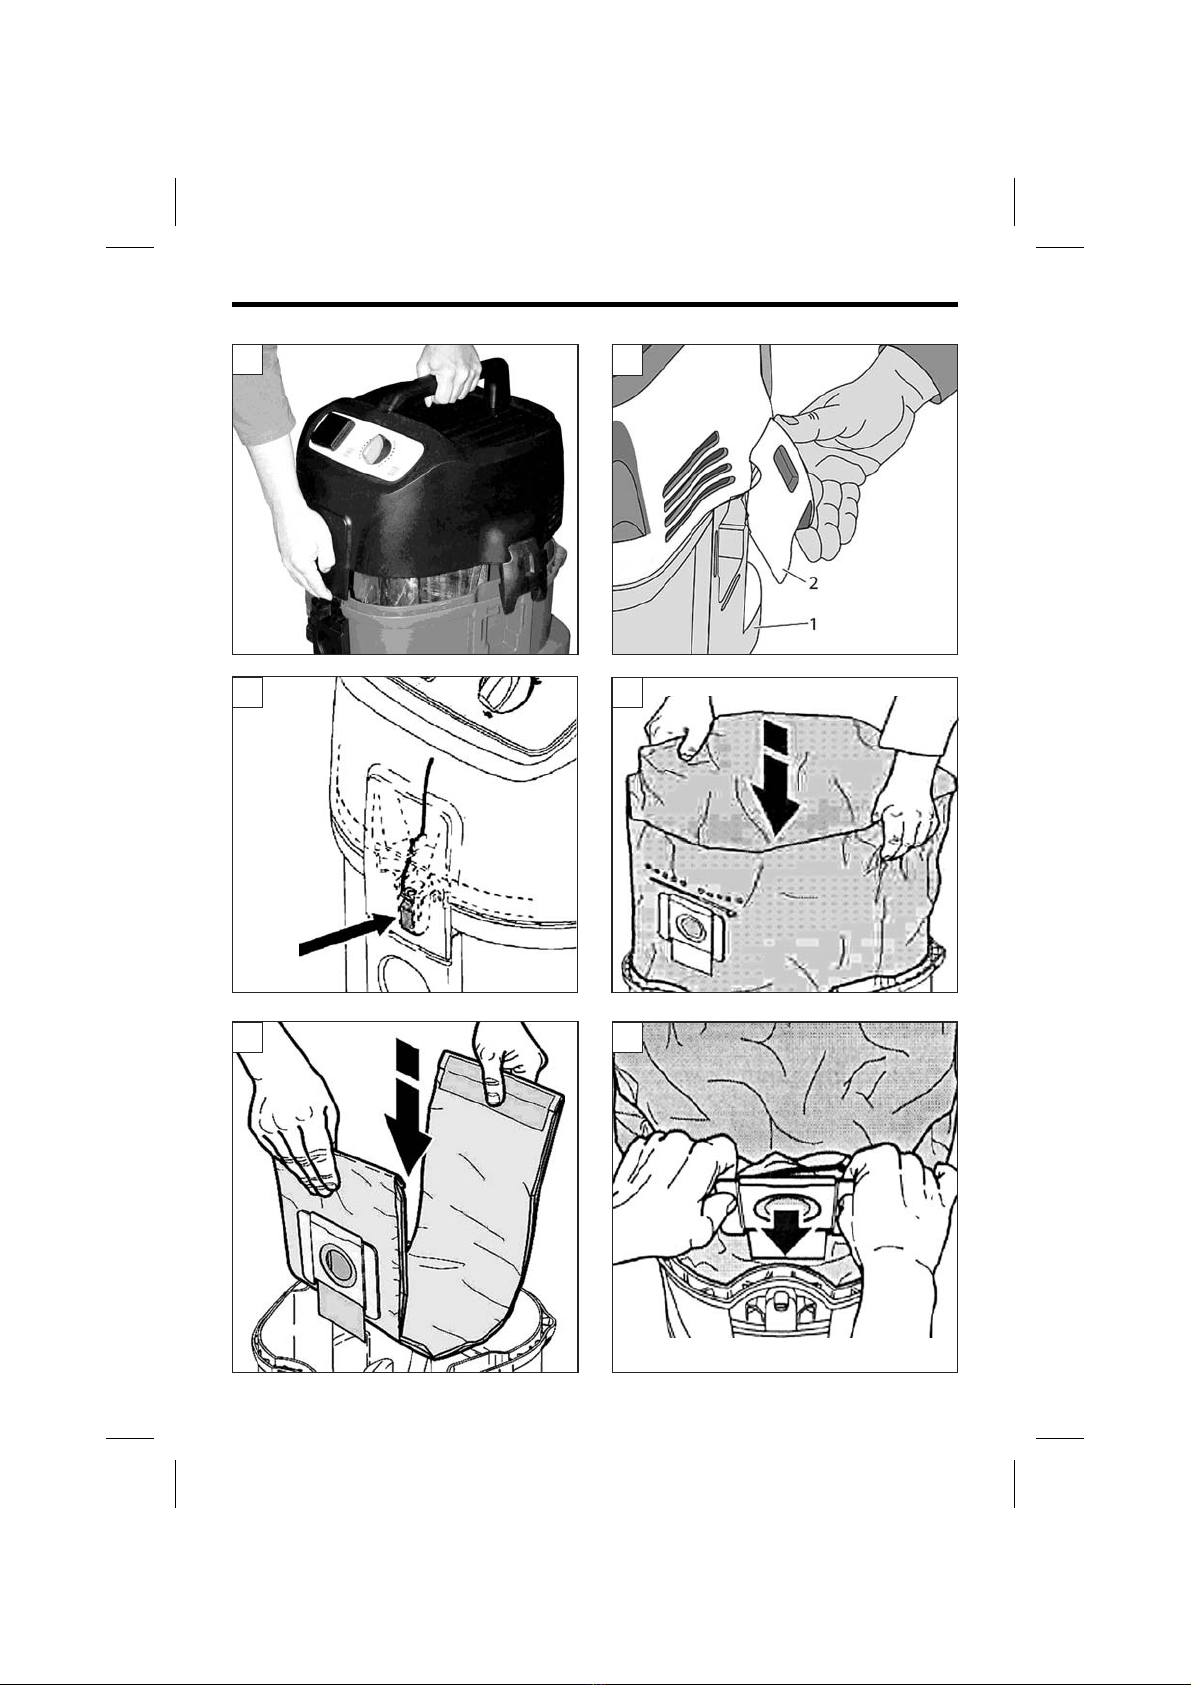
1. Verschlussklammern (4) öffnen und
Staubsaugeroberteil abnehmen (Abb. 1, 2).
Zubehörteile aus dem Schmutzbehälter
herausnehmen.
2. Entsorgungssack (11) laut Anleitung in den
Schmutzbehälter (5) einsetzen (Abb. 4).
Filtersackflansch kräftig über die Schlauch-
anschlussöffnung schieben (7) (Abb. 6).
2b. Filtersack (12) laut Anleitung in den
Schmutzbehälter (5) einsetzen (Abb. 5).
Filtersackflansch kräftig über die Schlauch-
anschlussöffnung schieben (7) (Abb. 6).
3. Staubsaugeroberteil aufsetzen und Ver-
schlussklammern schließen. Achten Sie
dabei auf die richtige Lage der Verschluss-
klammern!
4. Staubsaugerschlauch in Schlauchanschluss-
öffnung stecken (Abb. 7).
5. Die auf dem Typenschild angeführte Betriebs-
spannung muss der Netzspannung
entsprechen.
6. Es wird empfohlen, den Staubsauger über
einen Schutzschalter abzusichern.
7. Netzstecker an Stromquelle anschließen.
Bei Verwendung von Verlängerungskabeln sind
folgende Mindestquerschnitte einzuhalten.
ACHTUNG!
alternativ:
Vor der Inbetriebnahme

9
Einsatzbereiche und Verwendung
Saugen von Flüssigkeiten
ACHTUNG! Es dürfen keine brennbaren
Flüssigkeiten gesaugt werden!
Vor dem Saugen von Flüssigkeiten ist unbedingt
der Filtersack bzw. Entsorgungssack zu ent-
fernen!
Bei Schaumbildung Arbeit sofort unterbrechen
und Schmutzbehälter leeren.
Nach dem Saugen von Flüssigkeiten ist der
Filter feucht und setzt sich beim Saugen von
trockenem Material schneller zu. Aus diesem
Grund ist der Filter vor dem Trockensaugen
entweder auszuwaschen und zu trocknen oder
gegen einen trockenen zu ersetzen. Vor dem
Saugen von trockenen Materialien Entsorgungs-
sack oder Filtersack einsetzen. Das gesaugte
Material kann dann einfach und hygienisch
entsorgt werden.
(Abb. 4)
Verschlussklammern öffnen. Oberteil des
Staubsaugers abnehmen. Folienstreifen von
PE-Beutel abreißen und Beutel damit zubinden.
Pappflansch von Schlauchanschlussöffnung
abziehen und mittels Schieber verschließen.
Gefüllten Entsorgungssack entsprechend
gesetzlicher Vorschriften entsorgen. Neuen
Entsorgungssack gemäß Einbauanleitung
einsetzen. Pappflansch kräftig über die
Schlauchanschlussöffnung schieben.
(Abb. 5)
Verschlussklammern öffnen. Oberteil des
Staubsaugers abnehmen. Filtersackflansch von
Schlauchanschlussöffnung abziehen. Filtersack
mittels Schieber verschließen und entsprechend
gesetzlicher Vorschriften entsorgen. Neuen
Filtersack gemäß Einbauanleitung einsetzen.
Filtersackflansch kräftig über die Schlauchan-
schlussöffnung schieben.
(Abb. 14, 15, 16)
Oberteil des Staubsaugers aus dem
Schmutzbehälter herausnehmen und mit
Filter nach oben ablegen.
Spannlasche (A) des Spannbügels öffnen
und Spannbügel abnehmen.
Filterspannscheibe (B) abnehmen.
Filter vorsichtig abnehmen.
Filterdichtung (C) von Saugeroberteil und
Filterspannscheibe reinigen, auf Beschädi-
gung prüfen, wenn notwendig, ersetzen.
Leichtgängigkeit der Steuerklappe (D) für die
Filterabreinigung prüfen.
Neuen Filter und Filterspannscheibe auf-
setzen. Dichtlippen des Filters müssen
auf Filterdichtungen (C) aufliegen.
Saugen von trockenem Material
Wechseln des Entsorgungssackssackes
Wechseln der Filtersackes
Filterwechsel
ACHTUNG! Es dürfen keine brennbaren
Materialien gesaugt werden!
o
o
o
o
o
o
o
Bedienung und Betrieb
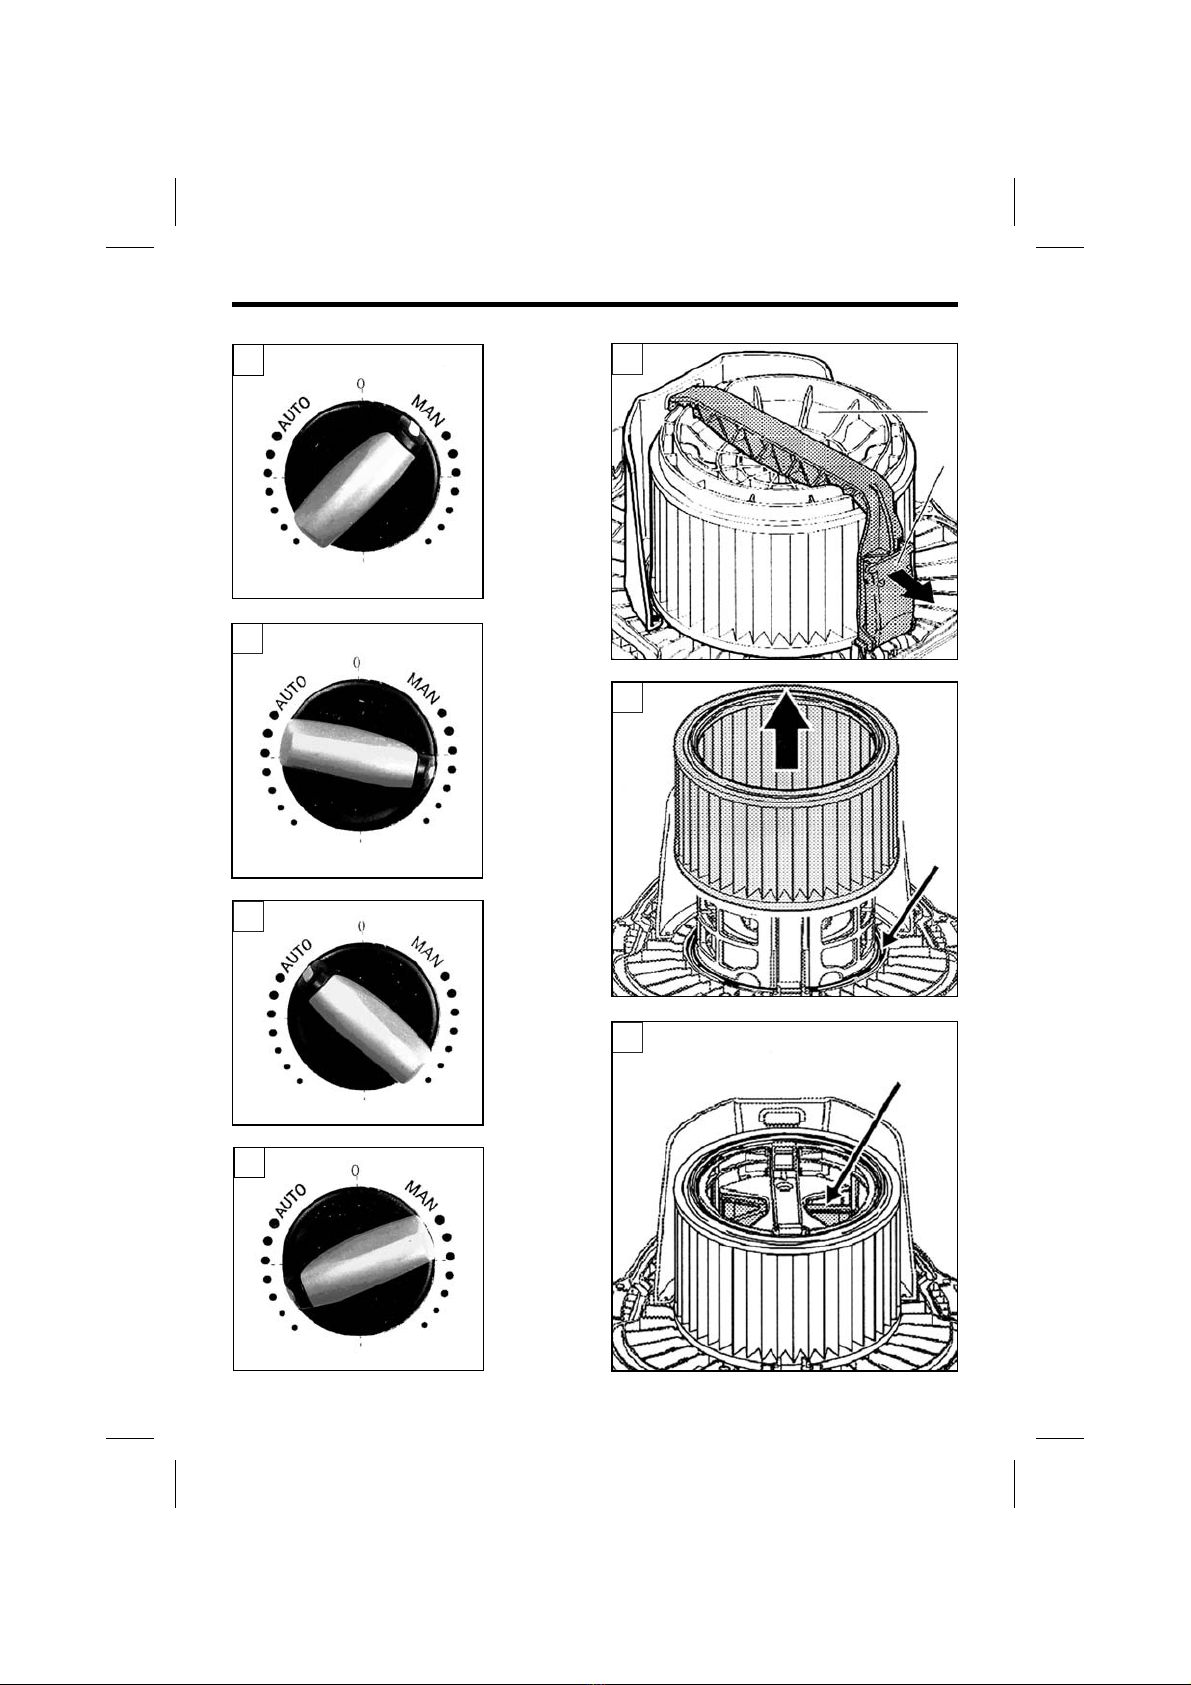
Einschalten des Staubsaugers:
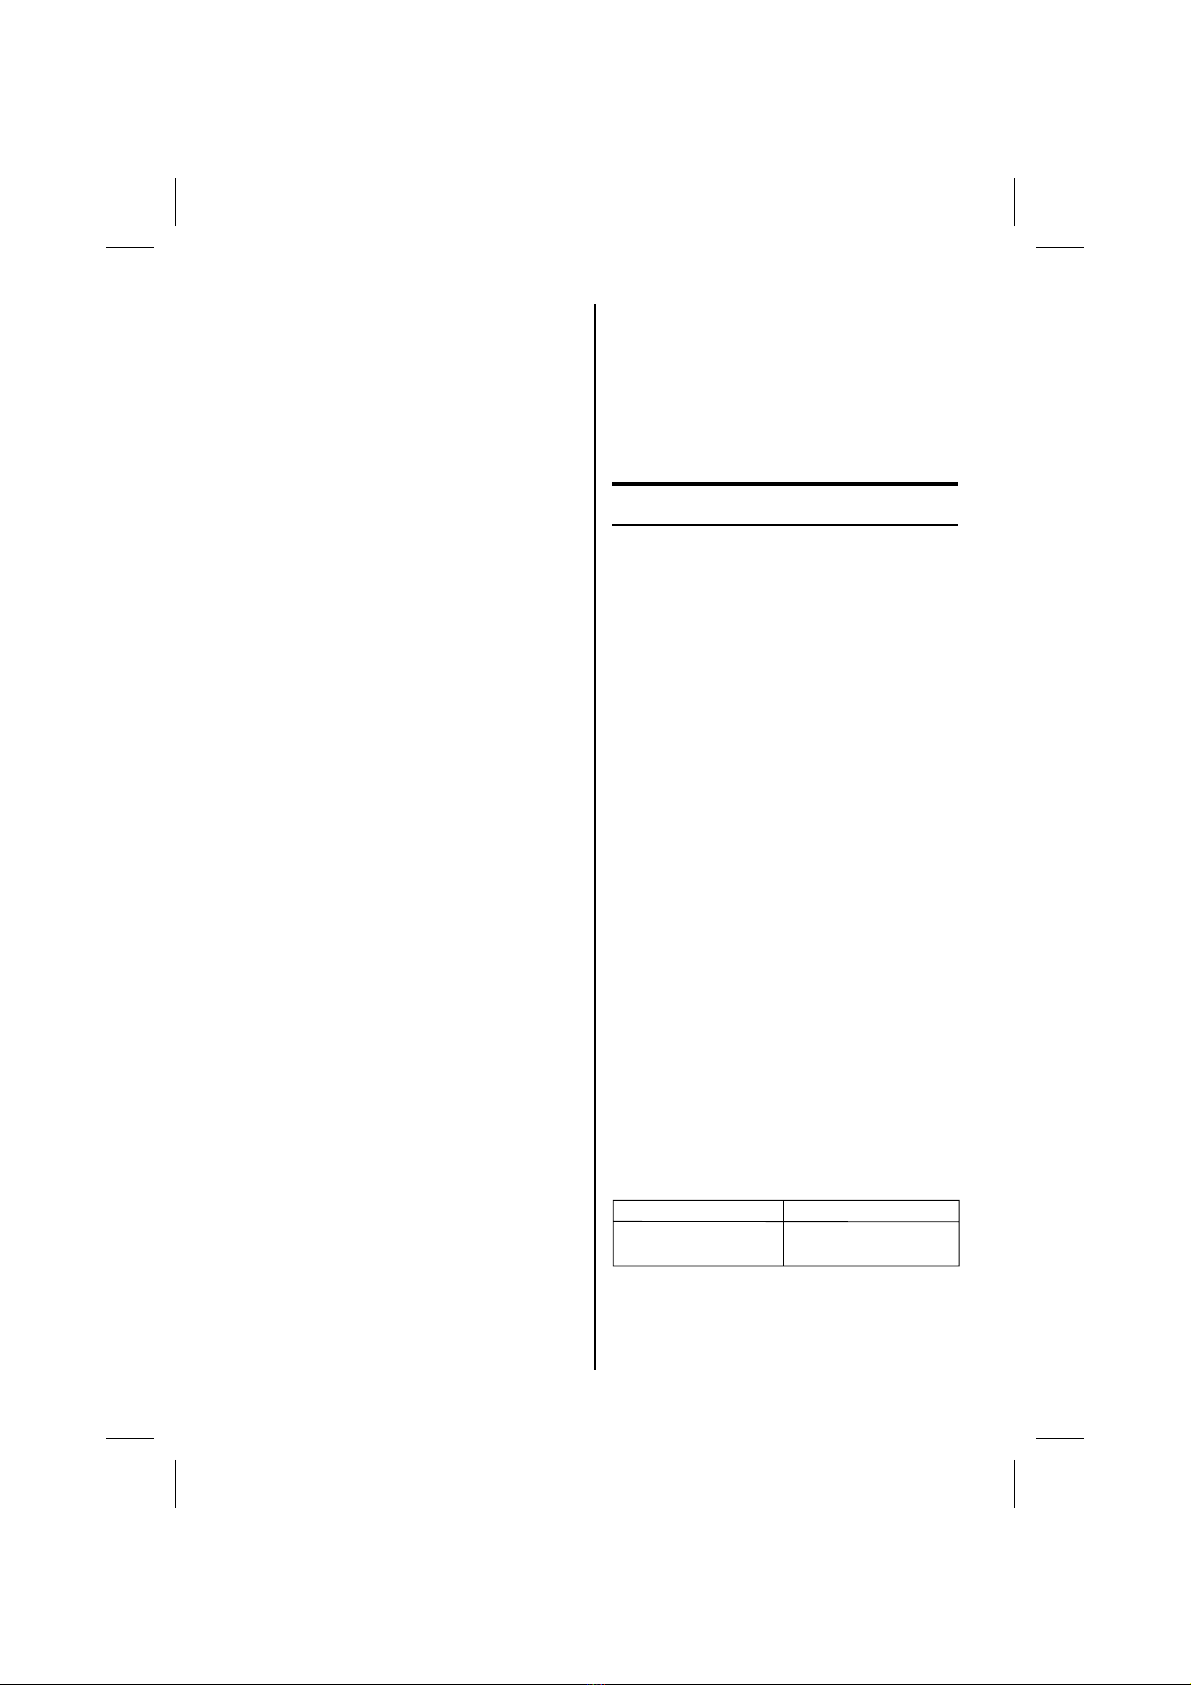
Saugkraftregelung
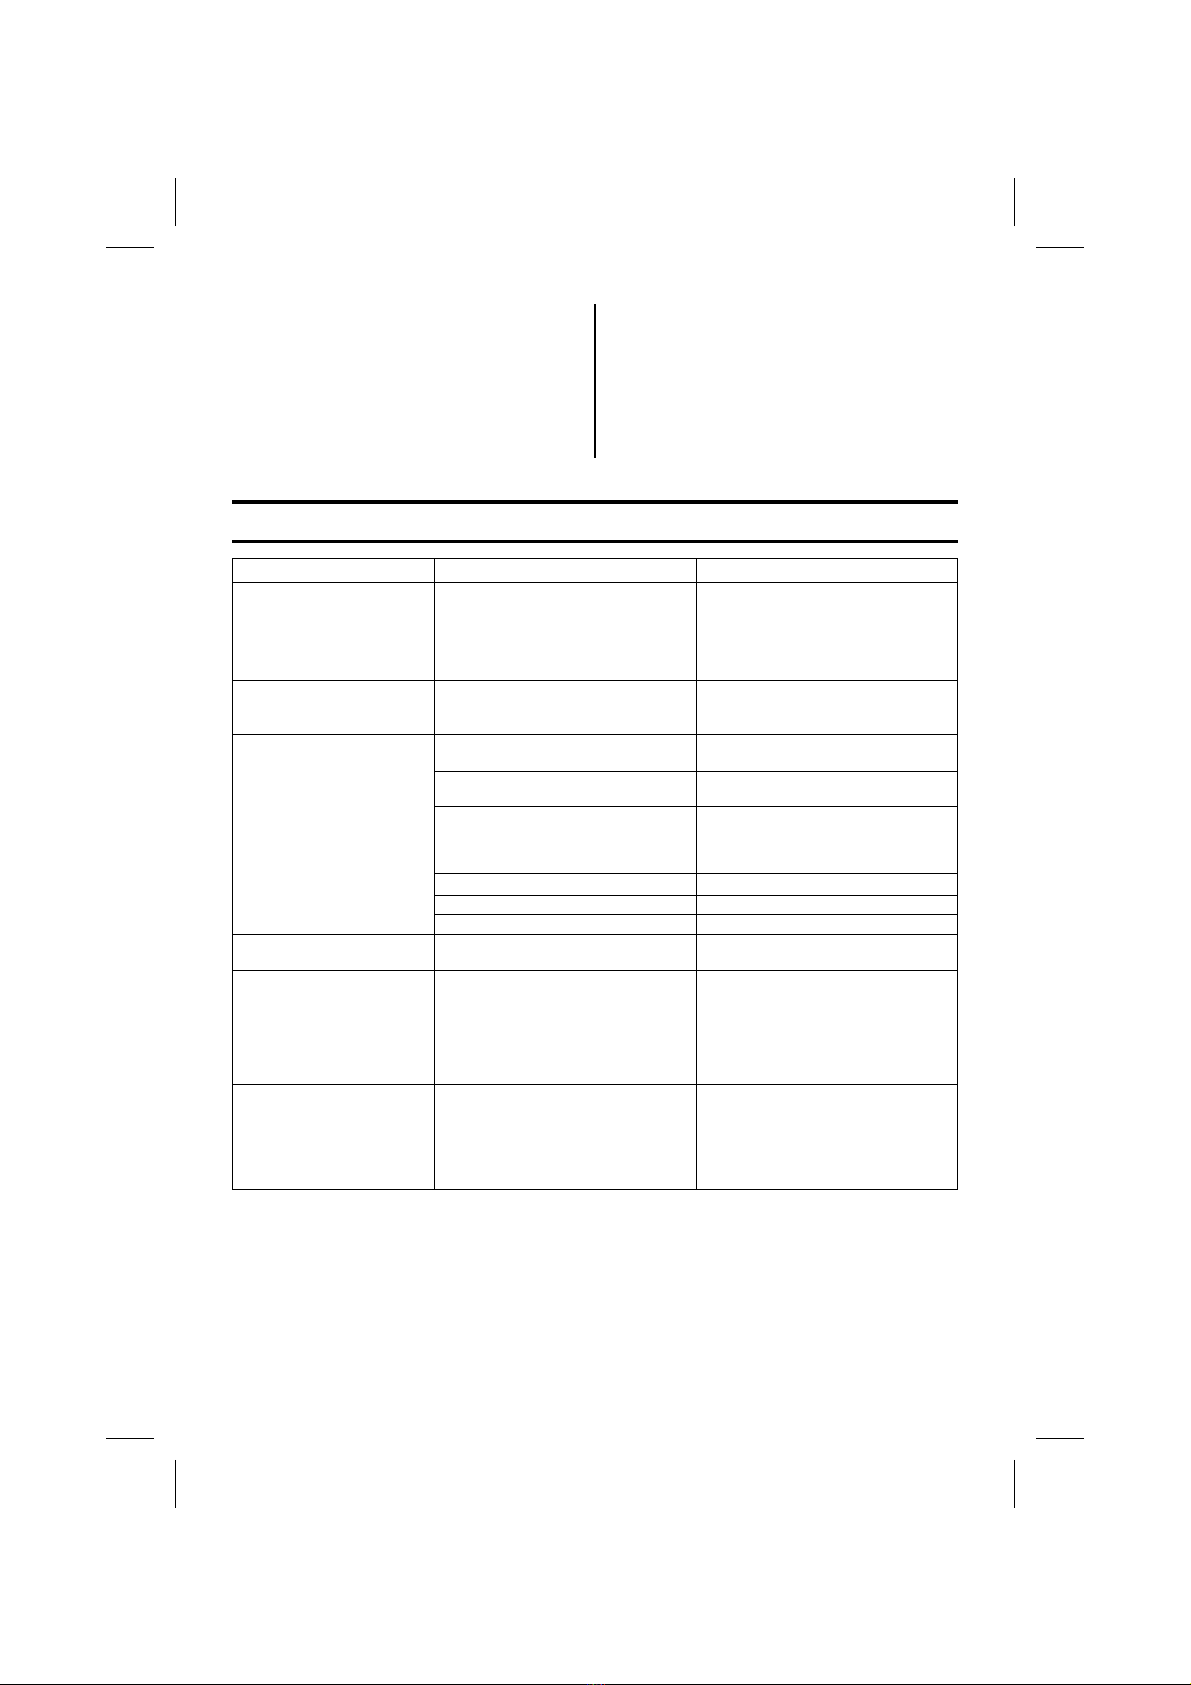
Einschalten des Staubsaugers mit
angeschlossenem Elektrowerkzeug:
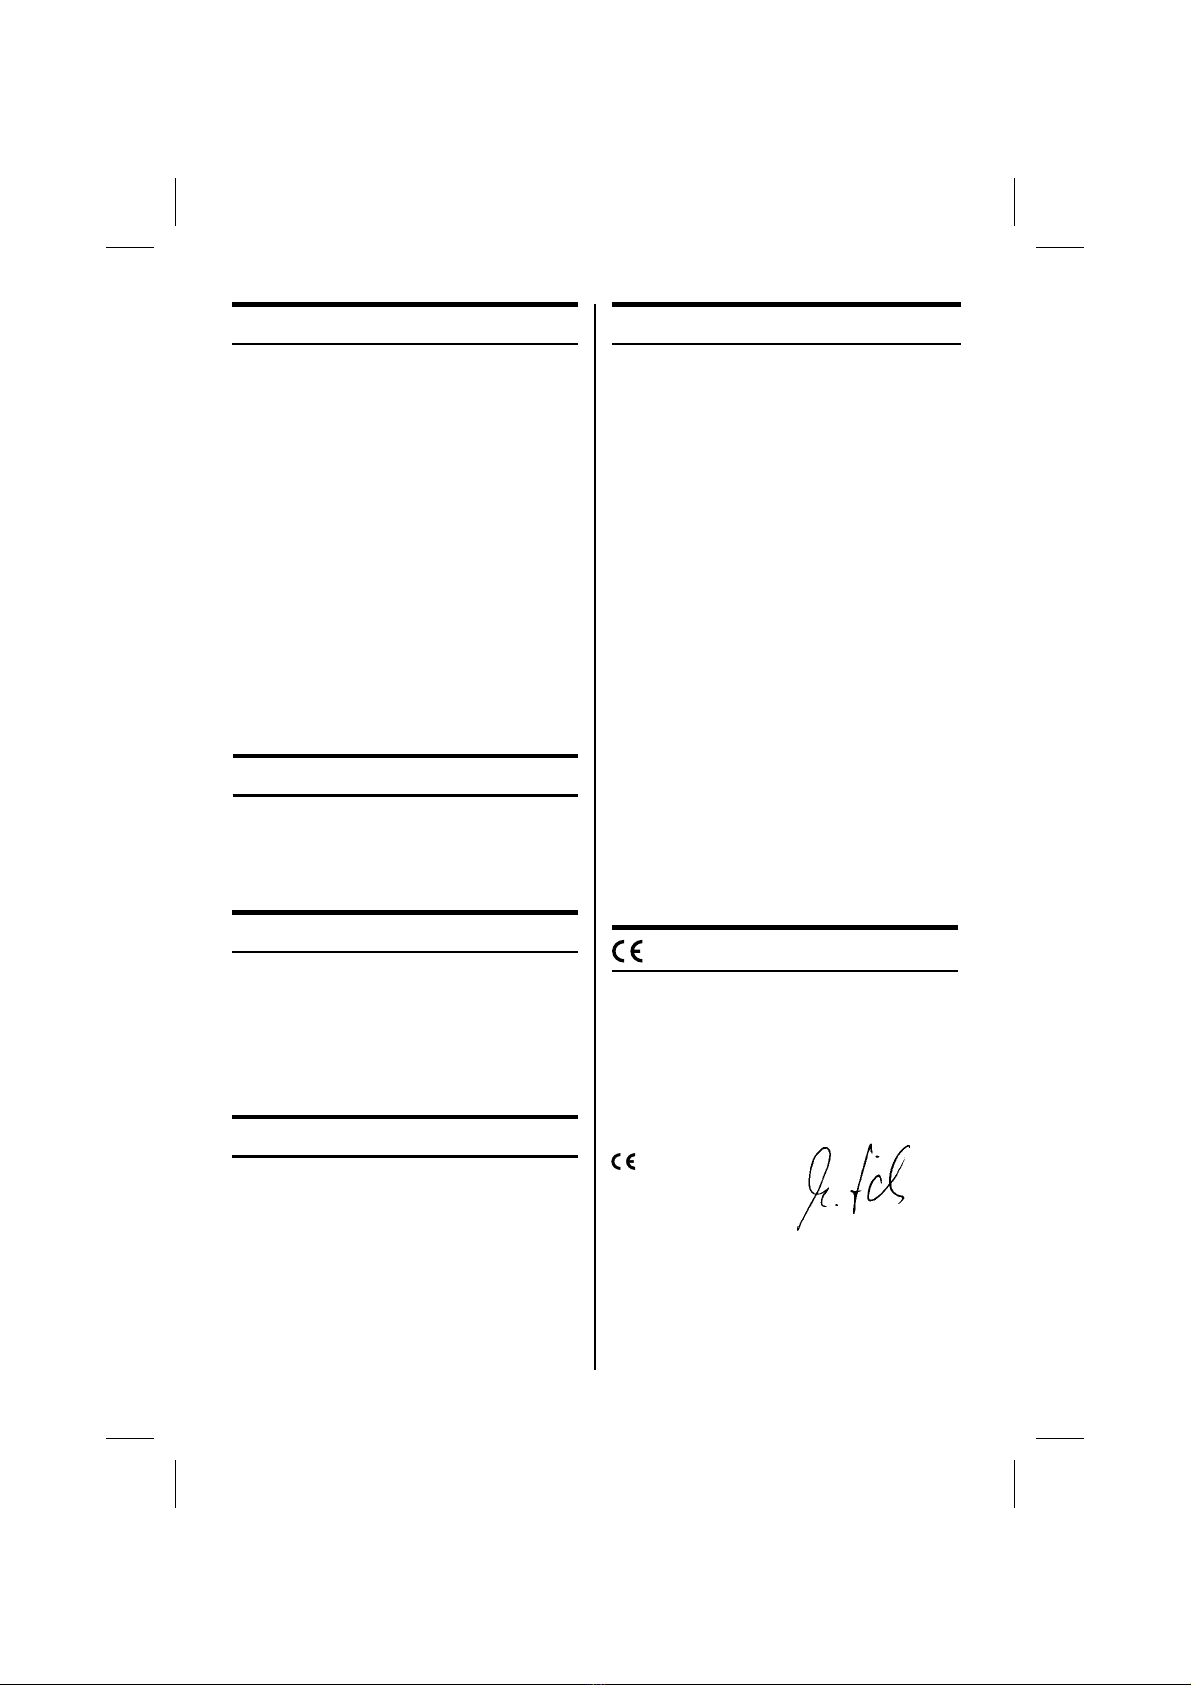
Saugkraftregelung
Reinigen des Filters
Schalter (3) in Stellung MAN schalten (Abb. 10).
Der Saugmotor läuft an.
Durch Weiterdrehen des Schalters lässt sich die
Saugleistung individuell anpassen (Abb. 11)
Elektrowerkzeug an Gerätesteckdose (8) auf
dem Bedienfeld anschließen.
Achten Sie bevor sie den Schalter in Stellung
AUTO bringen darauf, dass das Elektro-
werkzeug ausgeschaltet ist.
Schalter in Stellung AUTO (Abb. 12) schalten.
Der Saugmotor läuft nach Einschalten des
angeschlossenen Elektrowerkzeuges an.
Der Staubsauger läuft nach dem Ausschalten
des Elektrowerkzeugs noch eine gewisse Zeit
nach, damit sämtlicher im Schlauch befindlicher
Staub abgesaugt wird.
Durch Weiterdrehen des Schalters lässt sich die
Saugleistung individuell anpassen (Abb. 13)
Das Filter wird während des Betriebes in
Intervallen automatisch gereinigt. Bei extrem
starker Verschmutzung des Filters empfiehlt sich
eine manuelle Vollabreinigung (Abb. 8):
Saugschlauch von Werkzeug oder Düse
abziehen
Sauger einschalten (MAN/max.Leistung)
(Abb. 10)
Saugschlauch ca. 10 sec. mit Hand
verschließen
Saugschlauch wieder an Werkzeug oder
Düse anschließen und weiterarbeiten oder
Gerät abschalten.
o
o
o
o
Fehlerursachen und Beseitigung
o
o
Spannbügel aufsetzen und mit Spannlasche
verschließen.
Gebrauchten Filter entsprechend gesetz-
lichen Vorschriften entsorgen.
ACHTUNG!
Nie ohne eingesetzten Filter arbeiten!
Fehler
Motor läuft nicht
Motor läuft nicht in Betriebsart
AUTO
Geringe Saugleistung
Keine Saugleistung beim
Nass-Saugen
Schwankende
Spannung
Anwender lädt sich statisch
auf
Ursache
Sicherung der stromversorgenden
Steckdose hat angesprochen
Fehlerhafter oder falscher Anschluss des
Elektrowerkzeuges
Saugkraftregelung auf zu kleine Leistung
eingestellt
Schlauch/ Ansaugöffnung
zugesetzt
Verschmutzte/ beschädigte Dichtung
bzw. Behälterrand zwischen
Staubsaugeroberteil und
Schmutzbehälter
Entsorgungssack voll
Filtersack voll
Filter zugesetzt
Schmutzbehälter voll (Schwimmer
verschließt Ansaugöffnung)
Zu große Impedanz der
Stromzuführung
Ableitung der statischen Aufladung
unterbrochen
Sauggut erzeugt hohe statische
Aufladung
Beseitigung
Sicherung einschalten, Staubsauger
etwa 5 Minuten abkühlen lassen und
PROTOOL-Vertragswerkstatt auf-
suchen, wenn sich der Staubsauger
nach dem Verstreichen der Zeit nicht
selbst wieder einschaltet.
Elektrowerkzeug auf Funktionsfähigkeit
überprüfen, Anschlussstecker fest
einstecken.
Höhere Saugleistung einstellen
Schlauch/ Ansaugöffnung/ Luftkanäle
des Elektrowerkzeuges säubern
Dichtung säubern/ ersetzen
Entsorgungssack auswechseln
Filtersack auswechseln
Filter säubern/ ersetzen
Staubsauger ausschalten und
Schmutzbehälter leeren.
Antistatikklammer (Abb. 3) auf
Beschädigung prüfen, wenn
notwendig, durch PROTOOL-Service
ersetzen lassen.
Antistatischen Saugschlauch
verwenden
Geeignetes Verlängerungskabel
verwenden, Staubsauger an Steckdose
anschließen, die näher zum
Sicherungskasten gelegen ist. Bei einer
Impedanz von 0,15 an der
Übergabestelle ist kein Schwanken
über 7 % zu erwarten.
£W
o
o
10
Wartung
Recyklierbarkeit Konformitätserklärung
Beim Saugen ohne Entsorgungssack oder
Filtersack ist das Staubsaugeroberteil vom
Schmutzbehälter abzunehmen, der Griff an der
Unterseite des Schmutzbehälters mit einer Hand
zu ergreifen und das gesaugte Material
auszuschütten.
Gesaugtes Material gemäß gesetzlichen
Vorschriften entsorgen. Rand des Schmutz-
behälters vor dem Aufsetzen des Oberteils
reinigen.
Staubsauger ausschalten und Netzstecker aus
der Steckdose ziehen. Netzkabel aufwickeln und
am Halter aufhängen (Abb. 9). Schmutzbehälter
leeren und Staubsauger reinigen.
Staubsaugeroberteil nach dem Saugen von
Flüssigkeiten getrennt abstellen, damit der
Filter trocknen kann. Staubsauger in
trockener Umgebung aufbewahren und
unbefugte Benutzung vermeiden.
Die Maschine, ihr Zubehör und die Verpackung
übergeben Sie nach Beendigung ihrer
Verwendbarkeit der Sammelstelle zur
Wiederverwendung der Materialien. Zur
Ermöglichung eines artreinen Recyclings sind
die Plastteile gekennzeichnet.
Wir erklären mit unserer vollen Verantwortung,
dass dieses Erzeugnis mit folgenden Normen
oder normativen Dokumenten übereinstimmt:
EN 60 335-1, EN 60 335-2-69, EN 55 014-1,
EN 55 014-2, EN 61 000-3-2, EN 61 000-3-3
gemäß den Bestimmungen der Richtlinien
73/23/EWG, 89/336 EWG.
Manfred Kirchner
Gewährleistung
Für unsere Geräte leisten wir auf Material- oder
Fertigungsfehler Gewährleistung gemäß den
länderspezifischen gesetzlichen Bestimmungen,
mindestens jedoch 12 Monate. Innerhalb der
Staaten der EU beträgt die Gewährleistungszeit
24 Monate (Nachweis durch Rechnung oder
Lieferschein).
Schäden, die insbesondere auf natürliche
Abnützung/Verschleiß, Überlastung,
unsachgemäße Behandlung bzw. durch den
Verwender verschuldete Schäden oder sonstige
Verwendung entgegen der Bedienungsanleitung
zurückzuführen sind oder beim Kauf bekannt
waren, bleiben von der Gewährleistung
ausgeschlossen.
Beanstandungen können nur anerkannt werden,
wenn das Gerät unzerlegt an den Lieferanten
oder an eine autorisierte Kundendienstwerkstätte
zurückgesendet wird.Bewahren Sie
Bedienungsanleitung, Sicherheitshinweise,
Ersatzteilliste und Kaufbeleg gut auf. Im übrigen
gelten die jeweils aktuellen
Gewährleistungsbedingungen des Herstellers.
Aufgrund der ständigen Forschungs- und
Entwicklungsarbeiten sind Änderungen der hierin
gemachten technischen Angaben vorbehalten.
Anmerkung
Lagerung
Die verpackte Maschine kann in einem
trockenen Lager ohne Heizung gelagert werden,
in dem die Temperatur nicht unter-5°Cabsinkt.
Die unverpackte Maschine bewahren Sie nur in
einem trockenen abgeschlossenen Lager auf, in
dem die Temperatur nicht unter+5°Cabsinkt
und in dem plötzliche Temperaturveränderungen
vermieden werden.
11
Service - Kundendienst
Reparaturen in der Garantiezeit und danach
führen die in der Übersicht angeführten
Kundendienststellen aus.

Multipurpose vacuum cleaner VCP 450 E-L
Voltage 230 - 240 V
Power input 1200 W
Maximum power input of the connected appliance EU 2400 W
CH / DK 1100 W
GB 1800 W
AUS 1200 W
Volume of the air stream 3400 l/min
Under-pressure (max.) 23 kPa
Vessel: Width 476 mm
Depth 506 mm
Height 655 mm
Protection IP X4
Sound pressure level in compliance with EN 60704-1 66 dB (A)
Length of the flexible lead-in cable 7,5 m
Weight 16 kg
Technical data GB
Parts important for safety
Operation elements
Safety instructions
Filter Order No: 626437
Liquidating bag VPE 5 pcs Order No: 626436
Filtering bag VPE 5 pcs Order No: 626434
1. Pull
2. Holder for accessories
3. Suction power regulating switch
4. Closing clasp
5. Container for dirt
6. Hinged pull to empty the container
7. Hose attachment
8. Electric outlet
9. Cable hook
10. Filter
11. Liquidating bag
12. Filtering bag
Figured or described accessories do not have to
be included in the supply.
The vacuum cleaner is intended to be utilised in
industrial sector as well as for commercial
purposes.
It is suitable for removing dusts that are
dangerous to health of the dust class "L”
(MAK values 1 mg/m³). It is forbidden to suck
off hot materials (lit cigarettes, hot ash etc.),
inflammable, explosive or aggressive liquids
(e.g. petrol, solvents, acids, lye etc.) and
inflammable or explosive dust mixtures
(magnesium dust or aluminium dust).
³
Employment
Your work with the vacuum
cleaner will be safe only after
you have read the following
instructions carefully. It is
strongly recommended to
observe the safety instructions.
o
o
o
Respect conscientiously the safety
instructions accompanying each supply.
Connecting the vacuum cleaner with electric
apparatus, you establish a device for which
safety regulations related to the respective
electric apparatus must be applied.
The vacuum cleaner is intended for indoor
environment or for short-time outdoor use. If
you need to use it outside permanently, a
cable type H07 RN-F must be used.
12
To replace the cable, ask an authorized
service centre.
Any time you start working with the vacuum
cleaner, first check integrity of the filter.
Any time you start working with the vacuum
cleaner, check the condition of the hose: the
opening must be free.
Do not suck in any inflammable liquids, e.g.
petrol, diluents, etc. Danger of explosion!
Before you start wet hovering, remove the
filtering bag / liquidation bag.
Supply cable must not be under tensile load
or laid on/through sharp edges, and cannot
be passed over by any machine or damaged
mechanically in any other way.
Check the supply cable regularly. If dama-
ged, do not use the vacuum cleaner. At
replacement of extension cables, supply
cable, etc., protective class, type of protec-
tion or mechanical strength must be kept the
same.
Always use the supply cable recommended
by the manufacturer (H05 RR-F /
H07 RN-F).
With respect to protection at work, preven-
tion against electric accident, and guarantee
of the protective class, the above repair jobs
must be performed by a professional service
centre, authorized to deal with repairs of this
type. Kindly contact the authorized service
centre PROTOOL.
While performing any repair or maintenance
work, disconnect the supply cable.
The electric outlet on the vacuum cleaner
may be used only for the purpose as
described in the instruction manual.
Protect the plug, electric outlet and
connecting parts of the supply cables
against any contact with water.
Use original spare parts only.
Protect the upper part of the vacuum cleaner
against water. Danger of short-circuits!
WARNING! If foam/liquid is leaking out of
the machine, switch the device off
immediately.
Maintenance and cleaning should be per-
formed so that persons doing maintenance
jobs or other persons are not in danger due
to dangerous dust that may appear, adheres
or is being settled on the device.
It is required to have the device checked for
safety technical function at least once a year
by a well-trained professional.
While operating the device in closed rooms,
sufficient ventilation must be provided. Any
additional national or local regulations must
be respected.
o
o
o
o
o
o
o
o
o
o
o
o
o
o
o
o
o
The vacuum cleaner must not be connected to
the source of electric current with the switch in
the position "OFF".
The parts of the accessories are
delivered in the vessel of the vacuum
cleaner and they must be removed before
bringing it in operation.
If using en extension cable, the following
minimum cross-sections of the conductors must
be observed:
CAUTION!
1. Open the closing clamps (4) and take off the
upper section of the vacuum cleaner. Take
out the parts of accessories from the waste
vessel (fig. 1;2).
2. Insert the waste bag (11) following the
instruction manual into the basket for
impurities (5) (Fig. 4). Slide on tightly the
filtration bag flange onto the hose's
connecting opening (7) (Fig. 6).
Option:
2b. Insert the waste bag (12) following the
instruction manual into the basket for
impurities (5) (Fig. 5). Slide on tightly the
filtration bag flange onto the hose's
connecting opening (7) (Fig. 6)
3. Mount the upper section of the vacuum
cleaner back and close the closing clamps.
Pay attention to a proper position of the
clamps!
4. Connect the suction hose (fig. 7).
5. The operating voltage shown in the machine
plate must comply with the voltage in the
mains.
6. It is recommended to connect the vacuum
cleaner via an overcurrent protection.
7. Connect the plug of the lead-in cable to the
source of electric current.
Before bringing in operation
13
Length of the cable Cross section
Up 20 m 1,5 mm
From 20 to 50 m 2,5 mm
2
2
Switching on the vacuum cleaner (fig. 4)
Bring the switch (3) to the position MAN. The
suction motor starts running
Attendance and operation

Areas of employment and
operating methods
Hovering liquids
WARNING!
Exhaustion of dry materials
CAUTION!
Never use the device for hovering inflammable
liquids!
Before you start hovering any liquid, you must
remove the filtering / liquidating bag!
If foam appears in the course of operation, stop
the work immediately and empty the container
with dirt.
After the exhaustion of liquids the filter is wet.
Such filter gets clogged more quickly when
exhausting dry materials; therefore, it is
It is forbidden to exhaust inflammable
materials!
necessary to wash the filter and to dry it or to
replace it with a dry one before proceeding to
the dry exhaustion. Before exhaustion of dry
materials insert a filtration bag into the vessel.
In such a case, the exhausted material can be
liquidated simply and hygienically.
(Fig. 4)
Open the closing clasps.
Remove the upper part of the vacuum cleaner.
Tear a foil tape off the PE bag and tie up the bag
with it. Pull a cardboard flange off the opening
for the hose and close the flap. Full liquidation
bags must be treated in compliance with the
legal provisions related.
Attach a new liquidating bag according to the
instructions.
Push the cardboard flange over the opening for
the hose.
(Fig. 5)
Open the closing clamps. Remove the upper
part of the vacuum cleaner.
Pull the filtering bag cardboard flange off the
opening for the hose.
Close the filtering bag with a flap and liquidate it
in compliance with the legal provisions related.
Attach a new filtering bag according to the
instructions.
Push the filtering bag flange over the opening for
the hose.
(Fig. 14, 15, and 16)
Remove the upper part of the vacuum
cleaner out of the container with dirt and put
it aside, filter upward.
Open a tension clamp (A) of the tension
fixing and remove the tension fixing. ·
Remove the filter-tensioning wheel (B).
Remove the filter carefully.
Clean the filter seal (C) from the upper part
of the vacuum cleaner and the filter-
tensioning wheel, check for integrity and
damage, replace either of them if necessary.
Check for easiness of the controlling valve
operation (D) in order to clean the filter.
Attach a new filter and the filter-tensioning
wheel. The filter sealing tabs must be tight to
the filter seal (C).
Attach the tension fixing and close with the
tension clamp.
The used filter must be liquidated in
compliance with the legal provisions related.
Liquidating bag replacement
Filtering bag replacement
Filter replacement
o
o
o
o
o
o
o
o
WARNING!
Never start working without a filter!
Switching on the vacuum cleaner with
electric tools
Suction power regulation
Filter cleaning
Connect the electric tools to the instrument
socket (8) on the control panel.
Before bringing the switch to the position AUTO
make sure that the electric tools are
disconnected.
Bring the switch to the position AUTO. The
suction motor starts running once the electric
tools are switched on.
Once the electric tools have been switched off,
the vacuum cleaner still runs out for a little while,
in order to transfer all the dust from the hose into
the filtration bag.
By turning the switch, you can adjust the suction
power (Fig. 13)
In the course of the operation, the filter is
automatically cleaned in certain intervals. If the
filter is extremely dirty, it is recommended to
clean the filter manually (Fig. 8):
Pull the suction hose off the tool or jet,
Switch the vacuum cleaner on
(MAN/maximum performance), see Fig. 10.
Close the suction hose with your hand for
approximately 10 seconds.
Attach the suction hose back to the tool or
jet and continue working or switch the
device off.
o
o
o
o
14
Troubleshooting
Defect
Motor is not running
Motor is not running in the
AUTO mode
Unsatisfactory suction
performance
No suction performance at wet
hovering
Fluctuating voltage
User has experienced static
electricity discharging
Cause
Reaction by the fuse in the power
point
Defective or wrong connection of the
electric tool
Suction power regulation is set to too low
performance
The hose or the suction opening is
blocked or clogged
Dirty / damaged sealing or the edge of
the container between the upper part of
the vacuum cleaner and the container
with dirt
Liquidating bag is full
Filtering bag is full
Filter is blocked
Container with dirt is full (the float has
closed the suction opening)
Too high impedance of the current
supply cable
Transfer of static electricity is interrupted
The substance being sucked forms too
high discharge of the static electricity
Remedy
Switch the fuse on
Let the vacuum cleaner get cold for
approx. 5 minutes and contact an
authorized service centre PROTOOL if
the vacuum cleaner does not start
running after the resting time
Check the electric tool for function; plug
in the connecting plug firmly.
Set a higher suction power
Clean the hose / suction opening / the
airways of the electric tool
Clean or replace the sealing
Replace the liquidating bag
Replace the filtering bag
Clean or replace the filter
Switch the vacuum cleaner off and
empty the container with dirt
Use an appropriate extension cable;
connect the vacuum cleaner in a socket
situated closer to the fuse box.
In case of impedance the
fluctuation at the power point must not
exceed 7 %.
Check the antistatic clamp (Fig. 3)
for damage, ask a service centre
PROTOOL for replacement if
necessary.
Use an antistatic suction hose
o
o
£W0,15
15
Repairs and servicing
Recycling
Product conformity
declaration
Repairs in the warranty and post-warranty
periods are carried out by the servicing
workshops listed in the index of addresses.
After their service life is ended, submit the
electric tool, its accessories and packages to a
disposal premise to allow reusing of the raw
materials.
To allow material-sorted recycling, all plastic
components are marked with relevant symbols.
We declare with our full responsibility that this
product complies with the requirements of the
following standards and regulations:
according to the provisions of the directives
73/23/EEC, 89/336/EEC.
EN 60 335-1, EN 60 335-2- , EN 55 014-1,
EN 55 014-2, EN 61 000-3-2, EN 61 000-3-3
69
Manfred Kirchner
Warranty
Our equipment is under warranty for at least
12 months with regard to material or production
faults in accordance with national legislation. In
the EU countries, the warranty period for
exclusively private use is 24 months (an invoice
or delivery note is required as proof of purchase).
Damage resulting from, in particular, normal
wear and tear, overloading, improper handling,
or caused by the user or other damage caused
by not following the operating instructions, or any
fault acknowledged at the time of purchase, is
not covered by the warranty.
Complaints will only be acknowledged if the
equipment has not been dismantled before being
sent back to the suppliers or to an authorised
customer support workshop. Store the operating
instructions, safety notes, spare parts list and
proof of purchase in a safe place. In addition, the
manufacturer's current warranty conditions apply.
We reserve the right to make changes to the
technical data contained in this information as a
result of ongoing research and development
work.
Note
Maintenance
At hovering without a liquidation or a filtering
bag, it is necessary to remove the upper part of
the vacuum cleaner out of the container with dirt,
find the pull on the bottom part of the container
by touch and the sucked-in material must be
emptied. The collected material must be
liquidated in compliance with the legal provisions
related. Clean the edge of the container with dirt
before you attach the upper part of the vacuum
cleaner back. Switch the vacuum cleaner and
disconnect the supply plug. Wind up the supply
cable and hang it on the holder (Fig. 9). Empty
the container with dirt and clean the vacuum
cleaner.
After you have finished hovering liquids, put
the upper side of the vacuum cleaner
separated in order to let the filter get dry.
The vacuum cleaner should be kept in dry
environment. Unauthorized use should be
prevented.
Storage
Packed electric tools may be stored in dry
unheated storerooms with temperatures not
dropping below - 5°C. Unpacked electric tools
shall be stored only in dry self-contained
storerooms with temperatures not dropping
below + 5°C, where sudden temperature
changes are prevented.
16
Aspirateur à usage multiple VCP 450 E-L
Données techniques F
Pour la sécurité d´une
composante importante
Éléments de service
Instructions de sécurité
Filtre com.- nr.: 626437
Sac de liquidation VPE 5 pc com.- nr.: 626436
Sac de filtration VPE 5 pc com..- nr: 626434
1. Main courante
2. Manette d´accessoires
3. Commutateur réglant la force d´aspiration
4. Boucle obturatrice
5. Petit récipient à ordures
6. Main courante abaissable pour le vidage du
petit récipient
7. Adjonction du tuyau
8. Targette
9. Croc des câbles
10. Filtre
11. Sac de liquidation
12. Sac de filtration
Les accessoires représentés sur les images ou
décrits ne doivent pas inévitablement faire part
de la livraison.
L'aspirateur est réservé à l'usage dans l'industrie
et aux affaires commerciales.Il est convenable à
un enlèvement de la poussière malsaine (classe
‚L' - valeurs MAK 1mg/m³). Il est interdit
d'aspirer les matériaux chauds (cigarettes
brûlantes, cendre chaude etc.), les liquides
inflammables, explosifs ou agressifs (par ex.
benzine, essence, dissolvants, acides, lessives
etc.) et les mélanges poussiéreux inflammables
ou explosifs (poussière magnésienne ou
poussière en aluminium).
³
Usage
Pour qu´on travaille en
sûreté avec l´aspirateur, il
faut lire soigneusement ce
mode d´emploi et observer
avec précision les instruc-
tions mentionnées.
o
o
Observez avec précision les instructions de
sécurité jointes à chaque livraison.
En réunissant l´aspirateur et les outillages
électriques nous recevons un dispositif
auquel les instructions de sécurité pour les
outillages électriques respectifs sont
rapportées.
17
Tension
Puissance 1200 W
Puissance maximale de l'appareil branché EU 2400 W
CH / DK 1100 W
GB 1800 W
AUS 1200 W
Débit d'air 3400 l/min
Dépression (maxi.) 23 kPa
Récipient: Largeur 476 mm
Epaisseur
Hauteur
Protection IP X4
Niveau de pression acoustique selon EN 60704-1 66 dB (A)
Longueur de câble souple 7,5 m
Poids 16 kg
230 V -240 V
506 mm
655 mm
o
o
o
o
o
o
o
o
o
o
o
o
o
o
o
o
L´aspirateur ne peut être utilisé qu´au-
dedans, il est possible de l´utiliser dehors
seulement á court terme. Pour une utilisation
dehors à long terme il faut avoir un câble du
réseau du type H07 RN-F. Le remplacement
du câble du réseau devrait être effectué par
un service d´entretien autorisé.
Chaque fois, avant d´utiliser l´aspirateur il
est indispensable de contrôler si le filtre
reste intact.
Chaque fois, avant d´utiliser l´aspirateur il
est indispensable de contrôler l´indicateur de
tension sur le tuyau et si son orifice est libre.
Il est défendu de passer à l´aspirateur des
matières inflammables en état liquide tels
que la benzine, les diluants, etc.
Danger de l´explosion!
Avant de procéder à l´aspiration humide,
enlevez le sac de filtration, éventuellement
le sac de liquidation.
Le câble du réseau ne peut pas être exposé
à la traction et il ne peut pas être en contact
avec des arêtes ou les traverser; il n´est pas
possible d´aller et venir au-dessus du câble
ou de l´endommager mécaniquement d´une
autre manière.
Il faut contrôler régulièrement le câble du
réseau. S´il est endommagé, il est défendu
d´utiliser l´aspirateur. En changeant les
câbles de prolongement, le câble du réseau,
etc. on ne peut pas détériorer la classe de
protection, le genre de la protection et la
consistance mécanique.
Utilisez toujours le câble du réseau déter-
miné par le producteur (H05 RR-F /
H07 RN-F).
En considération de la protection du travail,
de la prévention des accidents du travail
causés par le courant électrique et de la
garantie de la classe de protection, tous les
travaux doivent être effectués par un atelier
électrotechnique autorisé pour ce type des
réparations. Adressez-vous, s´il vous plaît,
au service après vente autorisé PROTOOL.
En effectuant tous travaux de réparation et
de maintien, débranchez le câble du réseau
de la prise de courant.
Utilisez la prise de courant de l´aspirateur
exclusivement aux fins décrites dans le
mode d´emploi.
Protégez la targette du réseau, la prise de
courant et les éléments de jonction des
câbles du réseau contre l´humidité.
Utilisez exclusivement les pièces de
rechange originelles.
Protégez la partie supérieure de l´aspirateur
contre l´humidité. Danger du court-circuit!
ATTENTION! Dans la mesure où un liquide
ou une mousse s´écoulent, débranchez
immédiatement l´appareil.
Il faut assurer tel niveau de la maintenance
18
et du nettoyage lequel évite tout danger
éventuel qui pourrait être causé par la
poussière dangereuse attachée sur
l´appareil aux personnes responsables du
service d´entretien et aux autres personnes
aussi.
L´appareil doit être contrôlé au minimum une
fois par an par une personne formée en
matière de la sécurité du fonctionnement
technique de l´appareil.
Quand l´appareil est en marche au-dedans,
il faut assurer une aération satisfaisante.
Observez les règles nationales éventuelles.
o
o
L'aspirateur ne peut pas être connecté à une
source de courant et l'interrupteur ne peut pas
être en position "INTERROMPU".
Les parts d'accessoires sont
livrées dans le récipient d'aspirateur et elles
doivent être avant une mise en service
enlevées.
1. Ouvrir les agrafes de fermeture (4) et
enlever la haute part d'aspirateur. Tirer du
récipient à déchets les parts d'accessoires
(Fig. 1; 2).
2. Mettez le sac à déchets (11) conformément
au mode d'emploi dans le panier à ordures
(5) (Fig. 4). Passez la bride de sac filtrant
d'une manière solide sur l'orifice
d'assemblage de tuyau (7) (Fig. 6).
2b. Mettez le sac filtrant (12) conformément au
mode d'emploi dans le panier à ordures (5)
(Fig. 5). Passez la bride de sac filtrant d'une
manière solide sur l'orifice d'assemblage de
tuyau (7) (Fig. 6).
3. Mettre la haute part d'aspirateur et fermer
les agrafes de fermeture. Respectez une
position correcte des agrafes de fermeture!
4. Connecter le tuyau d'aspiration (Fig. 7).
5. La tension de service citée sur l'étiquette
doit correspondre à la tension de réseau
électrique.
6. Une connexion de l'aspirateur via un
interrupteur de protection est recommandée.
7. Connecter la fiche de câble d'alimentation à
une source de courant.
Lors de l'utilisation d'un prolongateur il est
nécessaire de respecter les diametres minimaux
de conducteurs:
ATTENTION!
alternativement:
Avant une mise en service
20 m 1,5 mm
20 a 50 m 2,5 mm
Longueur de câble Diametre
<
de
2
2

19
Utilisation et exploitation
Aspiration des liquides
ATTENTION!
Il est défendu d´aspirer les liquides
inflammables!
Avant de procéder à l´aspiration des liquides,
il est indispensable d´enlever le sac de filtra-
tion, éventuellement le sac de liquidation!
En assistant à la formation de la mousse, il faut
immédiatement interrompre le travail et procéder
au vidage du petit récipient à ordures.
Apres une aspiration des liquides le filtre est
humide. Un tel filtre s'encrasse lors d'une
aspiration d'un matériau sec beaucoup plus
vite. Pour cette raison il faut avant une
aspiration seche le filtre laver et sécher ou
remplacer pour un autre. Apres une aspiration
des matériaux secs mettez dans le récipient un
sachet filtrant. De telle façon il est possible de
liquider le matériau aspiré simplement et
hygiéniquement.
(voir image 4)
Ouvrir les boucles obturatrices. Enlever la partie
supérieure de l´aspirateur. D´un sachet en PE
détacher une bande de feuille et lier le sachet
avec elle. Enlever la bride en carton de l´orifice
pour le rattachement du tuyau et fermer à l´aide
de la valve. Liquider le sac de liquidation rempli
en conformité des lois en vigueur respectives.
Ajuster un autre sac de liquidation selon les
instructions de montage. Déplacer par la force la
bride en carton sur l´orifice pour le rattachement
du tuyau.
(voir image 5)
Ouvrir les boucles obturatrices. Enlever la partie
supérieure de l´aspirateur. Enlever la bride du
sac de filtration de l´orifice pour le rattachement
du tuyau. Fermer le sac de filtration à l´aide de
la valve et liquider en conformité des lois en
vigueur respectives. Ajuster un autre sac de
filtration selon les instructions de montage.
Déplacer par la force la bride du sac de filtration
sur l´orifice pour le rattachement du tuyau.
( voir images 14, 15, 16)
Enlever la partie supérieure de l´aspirateur
du petit récipient à ordures et la poser à
coté - le filtre vers haut.
Ouvrir la boucle tenseuse (A) de l´étrier
tenseur et enlever l´étrier tenseur.
Enlever le disque tenseur du filtre (B).
Enlever prudemment le filtre.
Nettoyer, contrôler et, dans le cas de la
détérioration, échanger les joints du filtre (C)
de la partie supérieure de l´aspirateur et le
disque tenseur du filtre.
Aspiration des matériaux secs
ATTENTION!
Les matériaux inflammables ne peuvent pas
être aspirés!
Échange du sac de liquidation
Échange du sac de filtration
Échange du filtre
o
o
o
o
o
Service et marche
Mise en marche de l' aspirateur
Mise en marche de l'aspirateur avec un
outil électrique
Le commutateur (3) commuter en position MAN.
Le moteur d'aspiration se mets en marche.
L'outil électrique connecter dans la prise de
courant (8) sur le panneau de commande.
Avant une mise du commutateur à la position
AUTO tenez compte du fait que l'outil électrique
soit mis 'hors de circuit.
Le commutateur mettez en position AUTO.
L'outil électrique une fois étant mis sous tension,
le moteur d'aspiration se mets en marche.
L'outil électrique étant mis 'hors de circuit,
l'aspirateur marche encore peu de temps pour
que toute la poussière soit transporté du tuyau
dans le sachet filtrant.
Régulation de la force de l´aspiration
Nettoyage du filtre
En faisant tourner le commutateur, il est possible
d´adapter individuellement la capacité
d´aspiration ( voir image 13)
Quand le filtre est en marche, il se nettoie
automatiquement par intervalles.
Quand le filtre est extrêmement souillé, il est
recommandé de procéder à un nettoyage
général manuel (voir image. 8):
enlever le tuyau d´aspiration de l´appareil ou
de la buse
brancher l´aspirateur (MAN/ capacité max.)
(voir image 10)
fermer le tuyau d´aspiration par la main -
environ 10 secondes
brancher le tuyau d´aspiration de nouveau à
l´appareil ou à la buse et continuer à
travailler ou débrancher l´appareil.
o
o
o
o

Causes des pannes et leur élimination
o
o
o
Contrôler le travail de la valve de commande
(D) pour le nettoyage du filtre.
Poser un autre filtre et le disque tenseur du
filtre. Les aiguilles de joint du filtre doivent
adhérer étroitement aux joints du filtre (C).
Poser l´étrier tenseur et fermer à l´aide d´une
boucle tenseuse.
Panne
Moteur n´est pas en
marche
Moteur n´est pas en marche
au régime AUTO
Faible capacité de l´aspiration
Pas de capacité de l´aspiration
pendant l´aspiration humide
Oscillation de la tension
Utilisateur ressent les
décharges de l´électricité
statique
Cause
Réaction du coupe-circuit de la prise de
courant d´alimentation
Un branchement mauvais ou défectueux
de l´appareil électrique
Régulation de la force de l´aspiration
réglée à une capacité trop faible
Tuyau / orifice de l´aspiration
bouchés
Les joints souillés / endommagés,
éventuellement les bord du petit
récipient entre la partie supérieure de
l´aspirateur et le petit récipient à ordures
Le sac de liquidation est rempli
Le sac de filtration est rempli
Le filtre est bouché
Le petit récipient à ordures est rempli (le
flotteur ferme l´orifice de l´aspiration)
Une impédance trop élevée auprès du
conducteur d´alimentation
Le circuit de l´électricité statique est
interrompu
La matière aspirée est en train de créer
les décharges de l´électricité statique qui
sont trop élevées.
Élimination
o
Brancher le coupe-circuit.
Laisser refroidir l´aspirateur pendant
environ 5 minutes et s´il ne se remet
pas en marche de nouveau, aller
chercher le service après vente autorisé
PROTOOL.
Contrôler les fonctions de l´appareil
électrique, introduire solidement la
targette de raccordement.
Régler à une capacité de l´aspiration
plus élevée
Nettoyer le tuyau / l´orifice de
l´aspiration / les conduites d´air de
l´appareil électrique
Nettoyer / échanger les joints.
Échanger le sac de liquidation
Échanger le sac de filtration.
Nettoyer / échanger le filtre
Débrancher l´aspirateur et procéder à
vidage du petit récipient à ordures.
Contrôler la griffe antistatique ( voir
image 3) et, si nécessaire, la faire
échanger par l´intermédiaire du
service après vente PROTOOL.
Utiliser un tuyau d´aspiration
antistatique
Utiliser un câble de prolongement
pertinent, brancher l´aspirateur dans une
prise de courant qui est proche de la
boîte de coupe-circuit.
En ce qui concerne l´impédance de
0,15 , l´oscillation de la tension ne
peut pas dépasser dans le point
d´alimentation 7 %.
o
£W
20
oLiquider le filtre usé en conformité des lois
en vigueur respectives.
ATTENTION!
Ne pas travailler sans le filtre!
Table of contents
Languages:
Other Protool Vacuum Cleaner manuals


