Providence HBL-3 User manual

HEAT BLASTER HBL-3
取扱説明書このたびはPROVIDENCE製品をお買い上げ頂きまして誠にありがとうございます。本製品を末永くご使用頂くためにも、必ずこの取扱説明書をご一読下さい。■特 長●PROVIDENCE/HEAT BLASTERはモダンなサウンドを持つディストーションペダルです。ペダルサイズのエフェクターですが、モダンなハイゲインチューブアンプに肉薄する豊かな倍音と立ち上がりの速さを持っています。バンドサウンドのアンサンブルの中で存在感のあるディストーションサウンドを作りだすことができます。また、ディストーションペダルに多く見られるコンプレッションの効きすぎを軽減しています。マルチチャンネル・アンプのクリーンチャンネルと組み合わせての使用もお薦めです。●通常のTrue-Bypassサーキットは音声信号がバイパス時にスイッチ回路を2回路通りますが、HEAT BLASTERのサーキットはバイパス時にスイッチ回路を1回路しか通らないシングル・コンタクト・トゥルーバイパス・サーキットを採用しています。その結果、いままで以上に製品の信頼性の向上と、より高いサウンドクオリティーを得ることができます。●出力ジャックに接続されるモノプラグのシールド側に2接点でエフェクターのグランド側を接続するD.C.G.サーキット(ダブル・コンタクト・グランディング・サーキット)を採用。接点の面積を増やすことで接触不良が起きにくくなり、音質面でも有利に働きます。●HEAT BLASTERのLEDは、エフェクトのON/OFF状態を表示するだけでなく、バッテリーの電圧を監視する機能を持っています。バッテリーの電圧が約7V以下になるとLEDが消灯しはじめます。この状態でもエフェクト音は出力しますが、本機の性能を十分に発揮させるためにバッテリーの交換をお奨めいたします。■機能説明①DRIVE:歪の深さを調節します。右に回すと歪の深さが増します。②TONE:音色の調整を行います。左に回すと高音域がカットされ、右に回すと高音域がブーストされます。 ③LEVEL:エフェクト・オン時のレベルを調整します。左に回すとエフェクト・オン時の出力レベルが小さくなります。右に回すとエフェクト・オン時の出力レベルが大きくなります。④BASS BOOSTスイッチ:低音域をブーストします。スイッチが押しこまれた状態でBASSBOOST機能が働きます。⑤LEDインジケーター:エフェクト・オン時にLEDが点灯します。バッテリーの電圧が約7V以下になるとLEDが消灯しはじめます。この状態でもエフェクト音は出力しますが、本機の性能を十分に発揮させるためにバッテリーの交換をお奨めいたします。⑥IN:ギターやその他の電子楽器、または他のエフェクターからの出力を接続するジャックです。⑦OUT:アンプや他のエフェクターの入力に接続するジャックです。⑧フットスイッチ(ON/OFF):エフェクト・オン/オフを切り替えるスイッチです。⑨DC9V:ACアダプター(PAP-509DCJ: 別売)を接続するジャックです。■主な仕様●コントロール:LEVEL、TONE、DRIVE、BASS BOOSTスイッチ●端子:1/4インチ標準フォーン・ジャック(入力、出力)、DC9V入力ジャック(ACアダプター・ジャック)●電源:9Vバッテリー(1個)、ACアダプター●消費電力:DC9V約8mA●サイズ:115(D) × 72(W) × 50(H)mm●重量:約250g(電池含まず)■バッテリーの交換について本体裏ブタの4本のネジを外し、バッテリーを交換します。バッテリーは9V/006Pをご使用下さい。交換の際には、ケーブルを強く引っ張ったりしないでください。断線など、故障の原因となります。■取扱上の注意●アンプ等スピーカーがつながっている機器の電源を入れた状態で、本機の入出力ジャックの抜き差しをしないでください。ノイズが発生し、スピーカーを痛める可能性があります。●故障や異常が生じた場合はただちに使用を中止しお買い上げ店または当社までご相談ください。●長時間、本機を使用しない場合はバッテリーの液漏れを防ぐためにバッテリーを取り出して保存してください。●ACアダプターには定電圧回路の入ったもの(PROVIDENCE PAP-509DCJ等)を必ずご使用ください。●電池の電圧が低下すると、エフェクトのかかり具合が弱くなったり、出力レベルが低下したり、音が出なくなったりします。このような場合は、新しい電池と交換してください。■トラブルシューティング ●LEDが点灯しない。電池を新しい物に交換して下さい。※ 規格および外観は改良のため予告なく変更する場合があります。PPD1101-01
株式会社
Rev1.0
HEAT BLASTER HBL-3
OWNER’S MANUAL
Thank you for choosing Providence. In order to take full advantage of the roduct’s features and erformance, lease read
this manual thoroughly and kee it in a safe lace for future reference.
■HEAT BLASTER Features
●The Providence HEAT BLASTER HBL-3 pedal is designed to deliver a modern distortion sound that is rich in harmonics and has a
fast attack - high-gain tube distortion in a compact pedal. This is a sound that won’t get buried in any band. What’s more, the HEAT-
BLASTER does not produce the excessive compression that can be a problem with many distortion pedals, for exceptionally natural
response. The Heat Blaster is ideal for use with the clean channel of a multi-channel amplifier.
●In a normal True-Bypass circuit, in bypass mode the audio signal passes through two switch contacts. But in the HEAT BLASTER, in
bypass mode the audio passes through a single contact, thanks to a single contact true-bypass circuit. The result is much higher sound
quality and reliability than that provided by previously existing products.
●Due to the adoption of the new double-contact grounding circuit (D.C.G. Circuit), by inserting a monaural plug into the output jack, the
shield (sleeve) of the plug provides two points of contact to the pedal’s ground circuit. By increasing the area of the point of contact, it
becomes more difficult for a loose connection to occur, and provides the additional advantage of improved sound quality.
●In addition to indicating the pedal’s on/off status, the HEAT BLASTER LED provides effective visual battery power monitoring. When
the battery voltage drops below 7 volts the LED will become dimmer and begin to go out. The effect will still operate at this voltage, but to
ensure optimum performance the battery should be replaced as soon as possible.
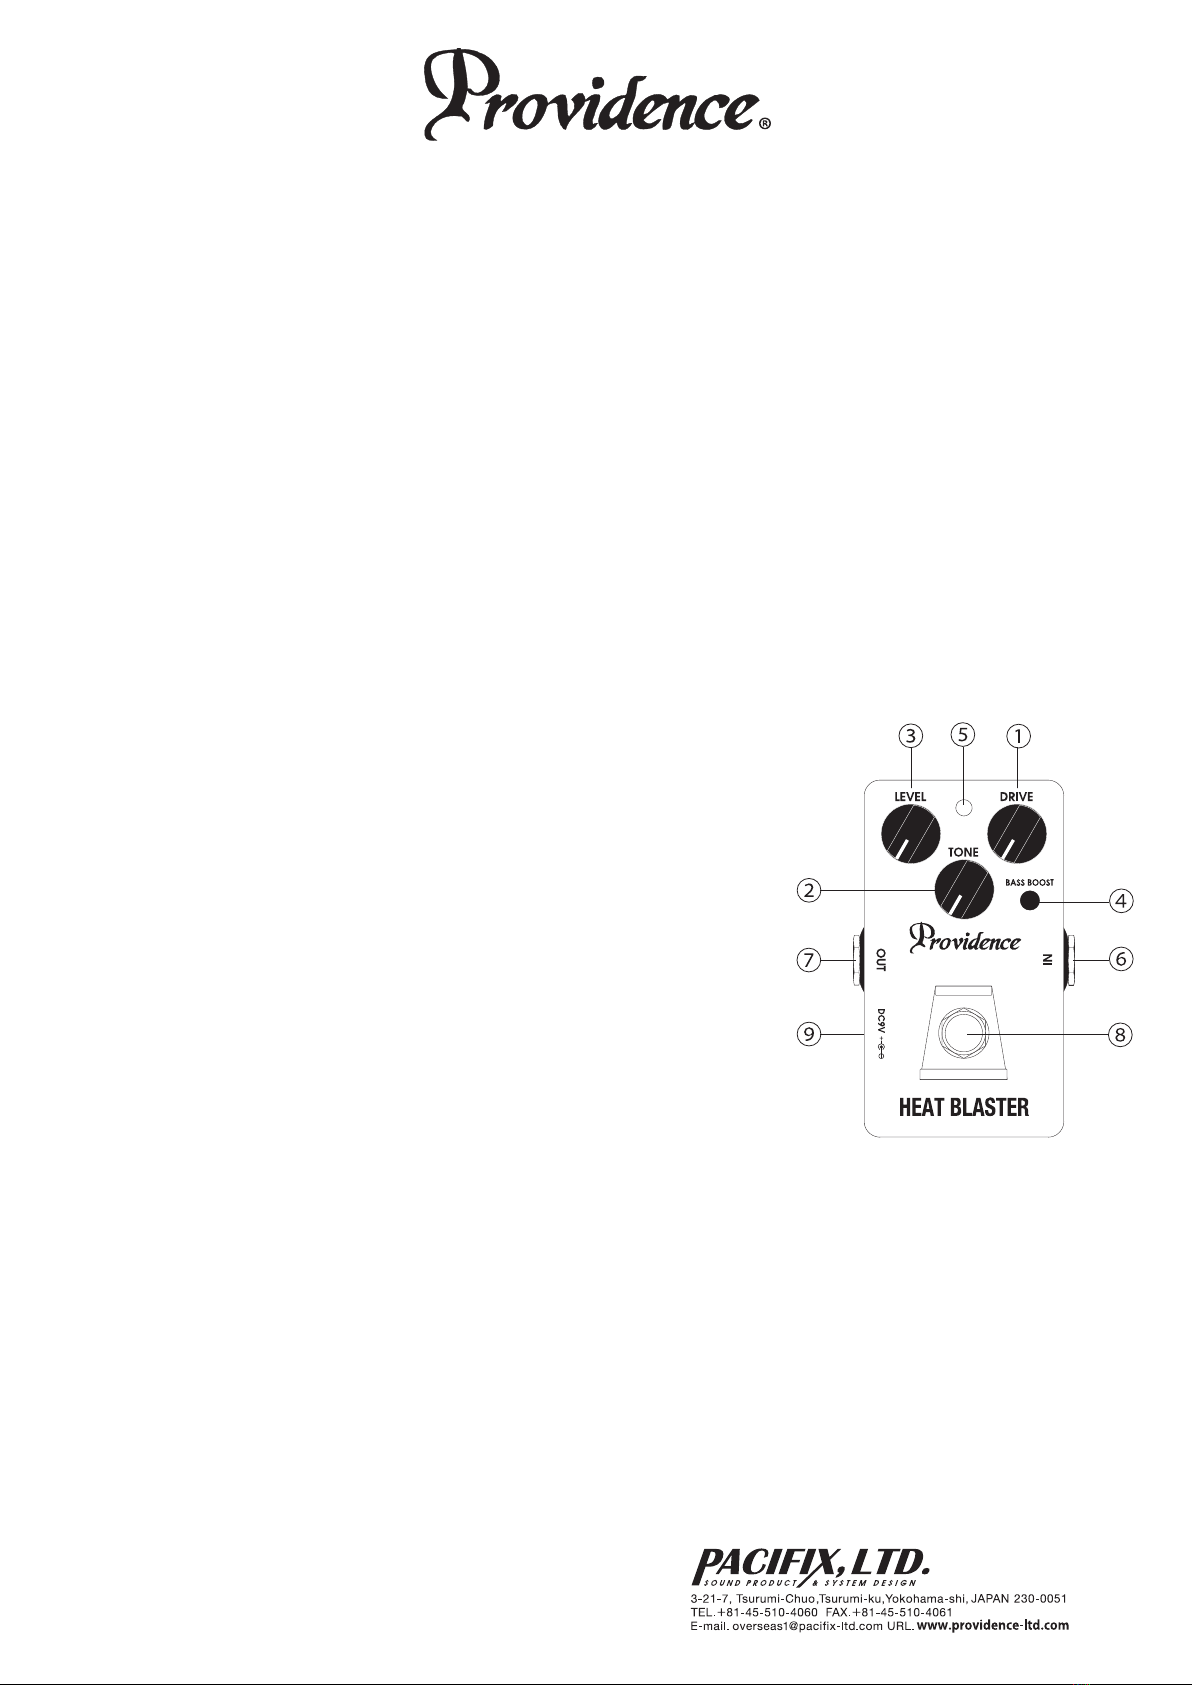
■Controls & Functions
①DRIVE:Adjusts the overdrive depth. Rotate clockwise for deeper overdrive.
②T NE:Adjusts tone. Rotate counterclockwise to cut the high frequencies, or clockwise
to boost the high frequencies.
③LEVEL:Adjusts the output level when the effect is on. Rotate clockwise to increase the
output level when the effect is on.
④BASS B ST Switch:Boosts the low frequencies. Press the switch in to engage the
BASS B ST function.
⑤LED Indicator:Lights blue when the effect is N. The LED will begin to go out if the bat-
tery voltage drops to less than about 7V.
⑥INPUT Jack:INPUT Jack:This is the input to the HBL-3. The output from a guitar or
other source device (electronic musical instrument or effect unit) should be connected here.
⑦UTPUT Jack:This is the output from the HBL-3. The UTPUT jack should be con-
nected to an amplifier, or a subsequent effect device.
⑧N/ FF Footswitch:This footswitch turns the effect N or FF.
⑨DC9V INPUT:The DC output cable from the regulated 9V AC adaptor connects here.
■Main S ecification
●Controls: LEVEL, T NE, DRIVE, BASS B ST
●Connectors: 1/4-inch phone jack x 2 (INPUT and UTPUT), DC 9V input jack (AC adaptor jack)
●Power Supply: 9V battery or AC adaptor
●Power Consumption: DC 9V, 8 mA approx.
●Dimensions: 115 (D) x 72 (H) x 50 (H) mm
●Weight: 250 g approx. (Not including battery)
■Battery Re lacement
To replace the battery, remove the bottom panel by unscrewing the four screws that hold it in place. Use a 9-volt 006P type battery. Be care-
ful not to apply excessive force to the wiring when changing the battery to avoid broken connections and other damage.
■Precautions
• Inserting or removing a plug from the input jack while the unit's output is connected to an amplifier/speakers can cause noise that can dam-
age the speakers.
• If the unit malfunctions or behaves abnormally, cease operation immediately and refer the problem to the supplier.
• If the unit will not be used for an extended period of time, remove the battery to prevent damage due to chemical leakage from the battery.
• Use only an AC adaptor with internal voltage regulation.
• When the battery voltage drops too low for proper operation the effect sound may become weak, the output level may drop, or no output
will be produced at all. Be sure to replace the battery as soon as possible if such symptoms occur.
■Troubleshooting
If the indicator LED does not light: Replace the battery with a new one or
connect an appropriate AC adaptor.
* Specifications and appearance are subject to change without notice.
PPD1102-01
Rev1.0
Table of contents
Other Providence Tuner manuals


