PRYME Synergy User manual

4
911 Mariner St., Brea, CA 92821
PH: 714.257.0300 FAX: 714.257.0600
TOLL FREE: 800.666.2654
WWW.PRYME.COM
SPM-600-AMP“Synergy” / SPM-2100-AMP “Trooper”
Amplified Speaker Microphones
Wired, amplified remote speaker microphones for use with 2-way radios
PRYME® is a trademark owned by PRYME Radio Products, Brea, CA.
All other product or service names are the property of their respective owners.
© 2021 PRYME Radio Products, Brea CA. All Rights Reserved
Applies to: All SPM-600-AMP
and SPM-2100-AMP models
Made in Taiwan
* Typical battery life,
based on 5/5/90 cycle
SUPPORT AND WARRANTY
PRYME Radio Products warrants this product against defects in materials or
workmanship for a period of one year from the date of retail purchase. PRYME will
repair or replace a defective unit, at our option, without charge for parts or labor.
The limited warranty is extended only to the original purchaser and is valid only to
consumers in the United States and Canada. It does not cover damage or failure
caused by or attributable to Acts of God, abuse, misuse, improper or abnormal
usage, faulty installation, improper maintenance, lightning, or other incidences of
excessive voltage, or any tampering or repairs by other than a PRYME authorized
repair facility. It does not cover replacement of consumable parts, transportation
costs, or damage in transit.
Repair or replacement under the terms of this warranty does not extend the terms
of this warranty. This warranty can only be modified by an officer of PRYME Radio
Products, and then only in writing. Should this product prove defective in workman-
ship or material, the consumer’s sole remedies shall be such repair or replacement as
provided by the terms of this warranty. Under no circumstances shall PRYME Radio
Products be liable for any loss or damage, direct, consequential, or incidental, arising
out of the use of or inability to use this product. Some states do not allow limitations
on how long an implied warranty lasts or the exclusions or limitations of incidental or
consequential damages, so the above limitations or exclusions may not apply to you.
This warranty gives you specific legal rights. You may also have other rights, which
may vary, from state to state.
For support or warranty service on your PRYME product, contact us at
1-800-666-2654 or visit us on the web at www.PRYME.com.
COPYRIGHT AND TRADEMARK INFO
© 2020 PRYME Radio Products, Brea CA. All rights reserved. PRYME® is a trademark
owned by PRYME Radio Products. All other product or service names are the property
of their respective owners.
version 2.0 MARCH 2021
26 Hours* 15 Hours*
2 3
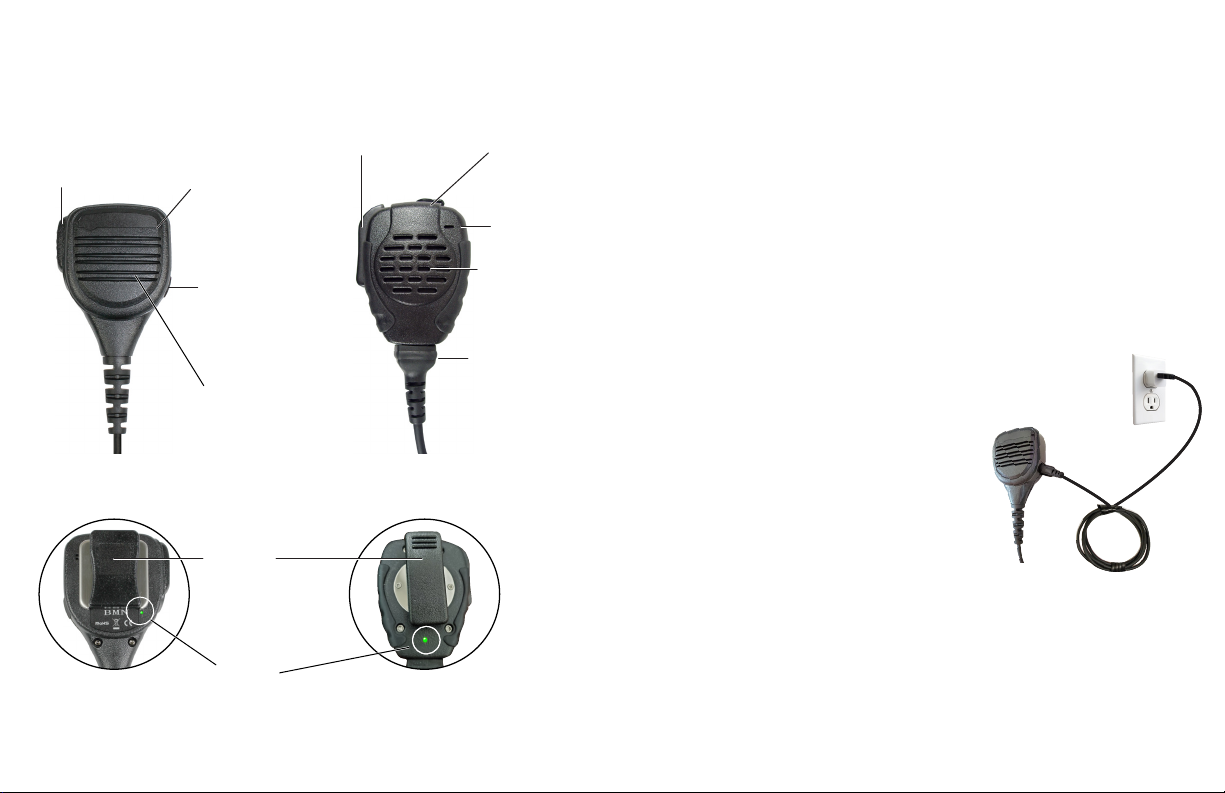
Controls and Connections Charging the Speaker Microphone
The amplified speaker microphone has an internal Lithium Ion rechargeable battery pack which must
be charged prior to operation and which must be recharged regularly.
A fully charged battery will provide up to 15 hours (for the SPM-600-AMP) or 26 hours (for the
SPM-2100-AMP) of continuous operation before needing to be recharged. However, operating time can
vary depending on how you use the microphone and on the condition of the battery pack. Please
recharge the battery regularly.
To charge the speaker microphone:
1. Ensure the radio is turned off or disconnected from the speaker mic.
2. Plug the charge cable into any powered USB outlet, such as an AC wall charger, and then into the
earphone/charge jack on the speaker microphone. You will need to remove the protective rubber cover
that is inserted into the charge jack. (To prevent dust and moisture from damaging your speaker
microphone, always ensure this cover is in place when you are not charging or using an earphone.)
3. Once the charging process has begun, the LED indicator on the speaker microphone will show a
constant red light.
4. Typical charge time is approximately five (for the SPM-600-AMP) or eight (for the SPM-2100-AMP)
hours. Actual charge time will vary depending on several factors including the battery’s
charge state, condition, and age.
5. When the battery is fully charged the red LED indicator on the
speaker microphone will go off. This indicates that charging is complete.
6. Disconnect the charger from the adapter when charging is completed.
Charging Cautions
- Do not use a wall charger or charge cable that appears to be
damaged. (Example: frayed wires, melted plastic, etc.) Contact
PRYME to get a new manufacturer-approved replacement charger.
- Do not tamper with or modify the speaker microphone or charger.
- Always turn the radio off or disconnect the speaker
microphone when charging.
Using the Speaker Microphone
To use the speaker microphone once it has been charged, simply connect it to your two-way radio and
power the radio on. The LED on the microphone will show a constant green during normal operation.
Received calls will be heard through the front-firing speaker. You can adjust the volume using the
volume control on the radio. NOTE: that it may be necessary to set the volume on the radio to less than
100%. On some radios, turning the volume up too high could result in distorted sounding audio.
To make a call, press and hold the PTT button on the microphone. Voice audio will be picked up by the
internal microphone.
Earphone Jack / Charge Jack
Earphone Jack / Charge Jack
This jack is used to connect an
(optional) wired listen-only
earphone to the speaker
microphone for enhanced
privacy. It is also used to
connect the supplied charger
and cable to the microphone
to recharge the internal
battery of the speaker
microphone.
Status LED
The red and green LED lets the
user know the current status of
the speaker microphone.
Replaceable Cable
(SPM-2100-AMP only)
The cable connects to
the microphone using
an RJ45 connector. This
allows the cable to be
quickly and easily
removed and replaced if
needed.
Front Firing Speaker
Received calls are heard over this speaker.
The volume level can be controlled using
either the Volume Up / Down buttons on the
speaker microphone, or by using the volume
controls on the two-way radio or phone.
Front Firing Speaker
Microphone
This microphone picks
up the user’s voice audio
when sending a call.
Microphone
PTT Button
This button is used to activate
the push-to-talk feature of the
two-way radio.
PTT Button
Clothing Clip
The alligator-type clip
secures the speaker
microphone to the user’s
clothing during use. The clip
can be rotated to allow the
microphone to be better
positioned.
This manual suits for next models
3
Other PRYME Microphone manuals

PRYME
PRYME PRYMEBLU BTH-500-VOX User manual

PRYME
PRYME nano 99A User manual

PRYME
PRYME SPM-2200 TrooperII User manual

PRYME
PRYME PRYMEBLU WTX-PTT1500D User manual

PRYME
PRYME Trooper SPM-2100 User manual

PRYME
PRYME PRYMEMAX BTH-300-MAX KIT 1 User manual

PRYME
PRYME PRYMEMAX BTH-600-MAX User manual

PRYME
PRYME PRYMEBLU BTH-600 User manual

PRYME
PRYME PRYMEBLU BTH-500 User manual

PRYME
PRYME PRYMEBLU BTH-300-ZD User manual


