PTW DIADOS E User manual
User Manual
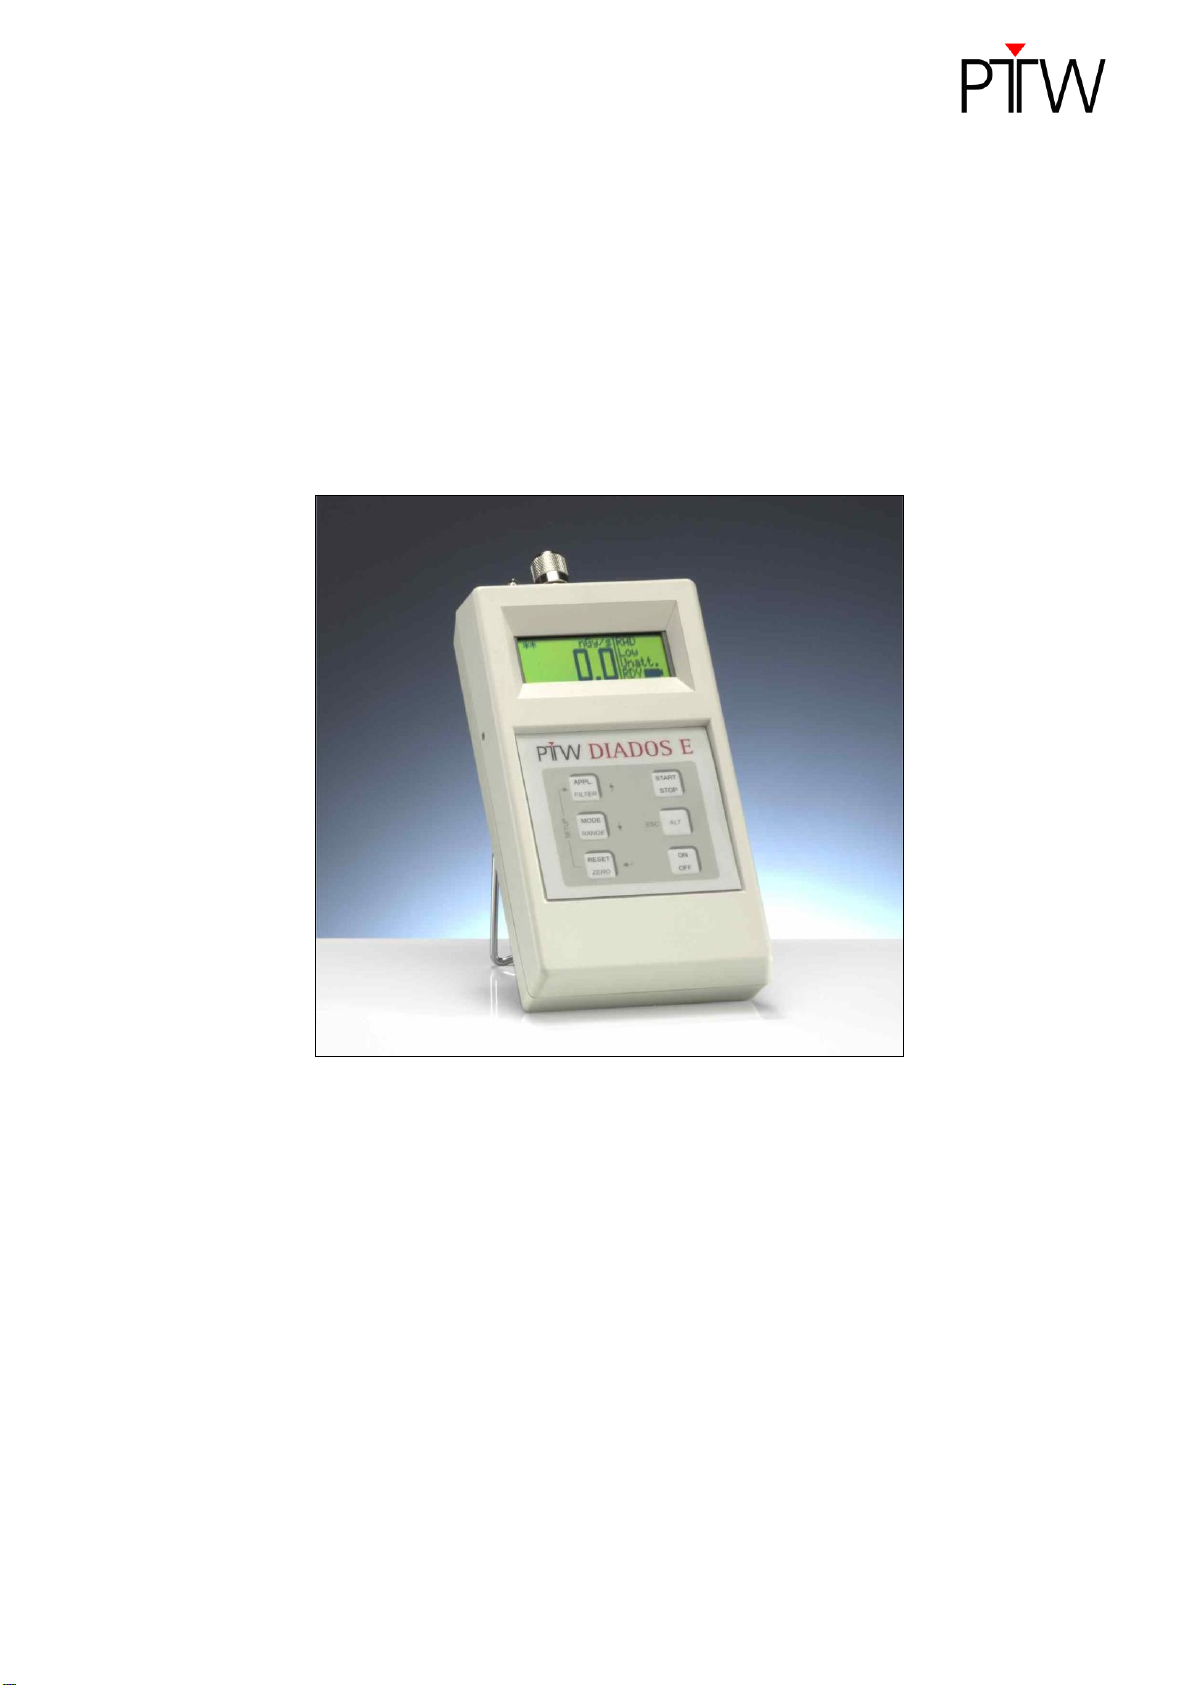
DIADOS E
T11035
firmware 1.30 or higher
Contents
Operating Manual
Technical Manual
Service Manual
D616.131.00/10 en
2015-10 Hn/Az

DIADOS E
T11035
General Information
2
D616.131.00/10 en
General Information
The product bears the CE-mark "CE-0124" in
accordance with the Council Directive
93/42/EEC about Medical Devices and fulfills
the essential requirements of Annex 1 of this
directive. The product is a class IIb device
(MDD).
The product was granted the type approval as
diagnostic dosemeter DIADOS E in accord-
ance with § 13 of the German Verification Act
(Eichgesetz) by the German National Metrolo-
gy Institute (Physikalisch-Technische Bun-
desanstalt, PTB) in Braunschweig. For de-
tailed information, refer to section "Technical
Specifications".
Product standard
The product fully complies with the require-
ments of the following standard IEC 61674.
Electrical safety
The product fully complies with the require-
ments of the following standard IEC 61010-1.
Electromagnetic immunity
The product fully complies with the require-
ments of the following standards:
IEC 61326-1 / IEC 61674.
The user manual is an integral part of the
product. It should always be kept near the
product. Observance of the manual is a pre-
requisite for proper product performance and
correct operation.
Operator safety, specified measuring accuracy
and interference-free operation can be guaran-
teed only if original products and parts are
used. Furthermore only the accessories listed
in this manual are approved by PTW-Freiburg
and may be used in conjunction with the prod-
uct, or else accessories whose use has been
expressly permitted by PTW-Freiburg. Safe
operation and proper product performance are
not guaranteed if accessories or consumables
from other manufacturers are used.
PTW-Freiburg cannot be held liable for dam-
ages resulting from the use of accessories,
consumables from other manufacturers or
when the user ignores the instructions and in-
formation given in this manual.
The warranty period is 1 (one) year and begins
on the day of delivery. It is unaffected by re-
pairs covered by the warranty regulations.
PTW-Freiburg considers itself responsible for
safety, reliability and performance of the prod-
uct only, if assembly, extension, readjustment,
modification or repair is carried out by PTW-
Freiburg or by persons authorized by PTW-
Freiburg, and if the product is used in compli-
ance with the technical documentation.
In case of any questions concerning service,
support or warranty please contact your sup-
plier.

DIADOS E
T11035
General Information
D616.131.00/10 en
3
This manual is in conformity with the device
specifications and all applicable safety stand-
ards valid at the time of printing. All rights are
reserved for devices, circuits, techniques,
software programs, and names appearing in
this manual.
PTW-Freiburg reserves the right to make mod-
ifications.
Please contact PTW or your local representa-
tive for the most current information concern-
ing the products of interest.
No part of the technical documentation may be
reproduced without written permission from
PTW-Freiburg.
PTW-Freiburg is registered manufacturer ac-
cording to the ElektroG (Elektro- und Elektro-
nikgeräte-Gesetz).
Elektro-Altgeräte-Register (EAR) Registration
number DE15599992
PTW-Freiburg works in strict accordance with
a quality management system which is contin-
uously updated according to national and in-
ternational standards.
PTW-Freiburg
Physikalisch-Technische Werkstätten
Dr. Pychlau GmbH
Lörracher Str. 7
79115 FREIBURG
GERMANY
Phone: +49 761 49055-0
Fax: +49 761 49055-70
www.ptw.de

DIADOS E
T11035
Contents
4
D616.131.00/10 en
Contents
General Information 2
Contents 4
Illustrations 5
Intended Use 6
Safety Information 6
Operating Manual 11
1Description of the Device 11
1.1 General Features 11
1.2 Connection Panel 12
1.3 Display 12
1.4 Keypad 13
1.5 Control Keys/Functions 14
2Putting the System into Operation 19
2.1 Inserting the Rechargeable Batteries 19
2.2 Putting DIADOS E into Operation 20
2.3 Connecting the Detector 20
2.4 Positioning DIADOS E 21
2.5 Basic Settings (Setup Menu) 22
2.6 Modes of Operation 23
2.7 Measuring Quantities 23
2.8 Measuring Ranges 25
2.9 Digital Resolution 27
2.10 Entering the Chamber Calibration Factor 27
3DIADOS E –Brief Operating Instructions 28
4Performing a Measurement 29
4.1 General Information for Measurements 29
4.2 Dose, Dose Rate and Dose per Pulse Measurement 29
4.3 Charge and Current Measurement 32
4.4 Measurements in Computed Tomography 34
4.5 Measurement at Dental X-ray Units 35
5Error Messages and Troubleshooting 37
5.1 Equipment Error Messages 37
5.2 Problems during Operation 38

DIADOS E
T11035
Illustrations
D616.131.00/10 en
5
Technical Manual 39
6Technical Specifications 39
Service Manual 43
7Cleaning 43
8Maintenance 44
8.1 Checks before each use 44
8.2 Repair 44
8.3 Safety Inspections 44
8.4Technical Inspections of the Measuring System 44
8.5 Maintenance of Officially Calibrated Dosemeters 45
8.6 Calibration 45
8.7 Rechargeable Batteries 45
9Disposal of the Product 47
Literature 48
Appendix A: China Electronic Industry Standard Compliance 49
Index 51
Illustrations
Figure 1: Definition of patient environment 10
Figure 2: DIADOS E connection Panel 12
Figure 3: DIADOS E display 12
Figure 4: DIADOS E keypad 13
Figure 5: Timer function 18
Figure 6: Mounting the rechargeable batteries 19
Figure 7: Setup menu 1/2 22
Figure 8: Setup menu 2/2 22
Figure 9: Calibration data menu 1/4 22
Figure 10: Calibration data menu 2/4 22
Figure 11: Calibration data menu 3/4 22
Figure 12: Calibration data menu 3/4 22
Figure 13: Calibration data menu, example for the RAD application 23
Figure 14: DIADOS E display for radiological measurements 29
Figure 15: Display in electrometer mode 32
DIADOS E
T11035
Intended Use
6
D616.131.00/10 en
Intended Use
DIADOS E is a diagnostic dosemeter according to
IEC 61674 and can be used for acceptance testing
and constancy checks. It can be employed in con-
ventional X-ray diagnostics, in dental and mammo-
graphic applications as well as with CT systems.
DIADOS E is capable of measuring dose and dose
rate in diagnostic X-ray applications, dose length
product and the dose length product rate in CT
applications and current and charge if used as elec-
trometer. DIADOS E is capable of measuring in
front of and behind phantoms.
The following detectors are required for the meas-
urement:
DIADOS Diagnostic Detector T60004 for con-
ventional diagnostic radiology and for dental im-
aging
DIADOS MAM Detector T60005 for mammogra-
phy
CT ion chamber 3.14 cm³ TM30009 with CT
adapter T16018
CT ion chamber 300 mm long TM30017 with CT
adapter T16018
Note: In the United States, federal law restricts
this device to sale by or on the order of a
physician.
NOTE
Please observe the user manuals of all connect-
ed detectors!
Safety Information
This is the safety alert symbol. It is used to
alert the user to potential hazards. Obey all
safety messages that follow this symbol to
avoid possible bodily injury or equipment
damage.
All safety messages consist of the following com-
ponents:
–Safety alert symbol and signal word
–Type of danger
–Source of danger
–Consequence
–Measures to prevent hazard
Signal Words
DANGER
Indicates an imminent hazard. If not avoided, the
hazard will result in death or serious injury.
WARNING
Indicates a hazard. If not avoided, the hazard
can result in death or serious injury.
CAUTION
Indicates a potential hazard. If not avoided, the
hazard could result in minor injury or product /
property damage.
NOTE
Provides useful information to assure that you
get the most from your equipment.
DIADOS E
T11035
Safety Information
D616.131.00/10 en
7
Safety Information
DANGER
Operation in areas where an explosion hazard
may occur or in oxygen-enriched atmospheres
Explosion Hazard!
The product is not suitable for operation in areas
of risk where an explosion hazard may occur.
Explosion hazards may be caused by the use of
combustible anaesthetics, skin-cleansing agents
and disinfectants.
Furthermore the product is not suitable for appli-
cation in oxygen-enriched atmospheres. The
atmosphere is considered to be oxygen-enriched
when more than 25 % of oxygen or nitrous oxide
is added to the ambient air.
WARNING
Electricity is a source of risk, particularly when
the product is not in perfect operating condition
or when it is operated inappropriately.
Shock Hazard!
Strictly observe the following warnings. Failure to
do so may endanger the lives of the patient, the
user and other persons involved.
Before using the product, the user must as-
certain that it is in correct working order and
operating condition.
Before putting the device into operation, visu-
ally inspect all connection cables for signs of
damage. Damaged cables and connectors
must be replaced immediately.
When disconnecting the device from the pow-
er line, first remove the plug from the wall out-
let, then disconnect the power cord from the
device.
WARNING
Devices on which moisture condensation has
developed as a result of temperature changes
must not be switched on unless completely
dry.
Liquids must not enter the product. If liquids
have entered the product, it must be thor-
oughly inspected before being used again.
The product is a device of IEC 61140 protec-
tion class II.
Extension cords must not be used.
All devices of a system must be connected to
the same electric circuit. Devices which are
not connected to the same circuit must be
electrically isolated (use RS232 interface with
galvanic insulation).
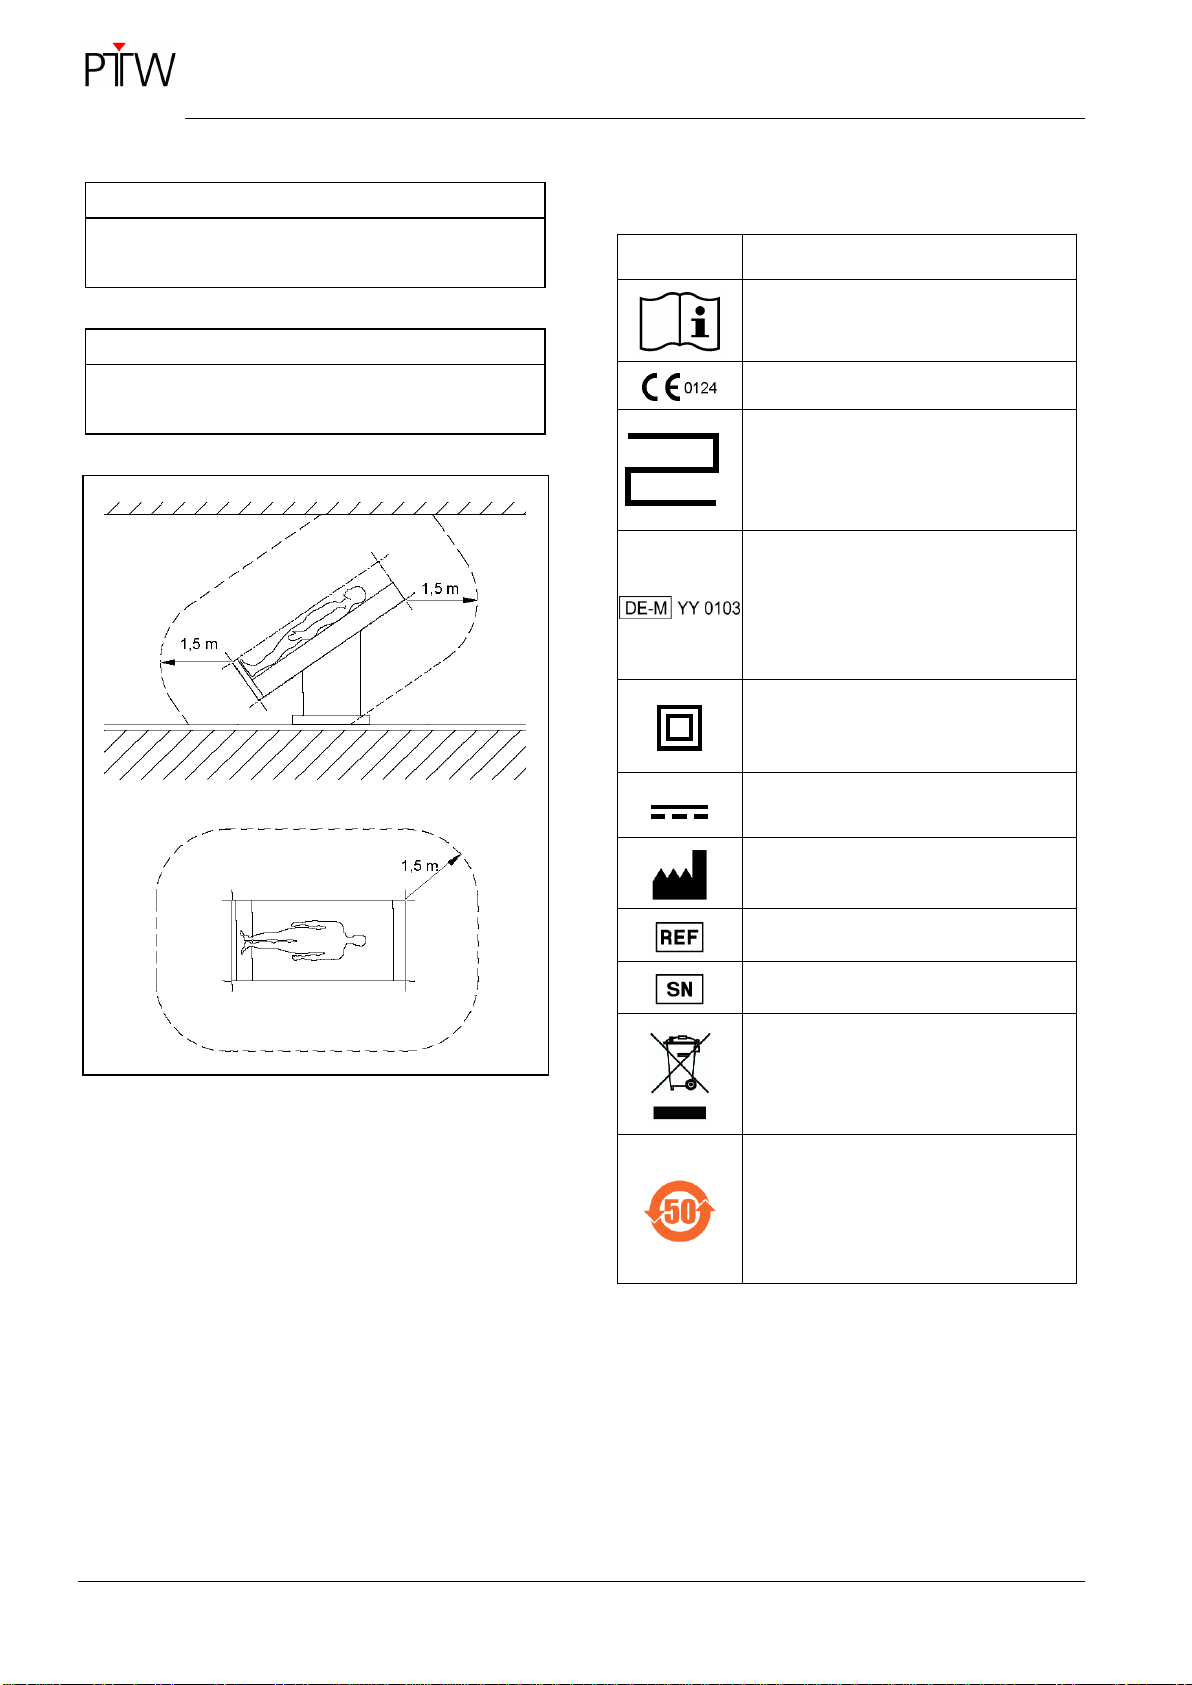
Exclusion of operation in the patient envi-
ronment: Neither the product nor any peripheral
devices may be operated in the patient environ-
ment (see Figure 1).
Exclusion of operation as device with patient
contact: The device is not intended for use in
direct contact with the patient. Neither the device
nor any peripheral device may have contact to
the patient.
Never touch the patient and open connectors of
the device at the same time.
Exclusion of operation as controlling instru-
ment: The device is only designed for use as a
measuring device. The device must not be used
to control radiodiagnostic equipment or radio-
therapy units.

DIADOS E
T11035
Safety Information
8
D616.131.00/10 en
WARNING
Use of peripheral devices: Peripheral devices
(PC, printer) may only be connected if they meet
the requirements of UL 60950-1/IEC 60950-1 or
of standard IEC 61010-1.
Devices may be connected to other devices or to
parts of systems only if it has been ascertained
that this connection does not impair the safety of
the patient, the operator or the environment.
If the device specifications do not contain infor-
mation as to connecting the device to other
equipment, you must consult the manufacturer of
the other equipment or an expert about the ef-
fects of the connection on the patient, the opera-
tor or the environment. Always observe standard
IEC 61010-1.
WARNING
Improper handling.
Patient Hazard!
The product is a medical electrical device and
must only be handled by persons who are trained
in the use of such equipment and are capable of
applying it properly. The operator must be trained
in the use of the device.
WARNING
Magnetic and electrical fields are capable of in-
terfering with the proper performance of the de-
vice.
Equipment Failure!
For this reason make sure that all external
devices operated in the vicinity of the device
comply with the relevant EMC requirements.
X-ray equipment, MRI devices and radio sys-
tems are possible sources of interference as
they may emit higher levels of electromagnet-
ic radiation. Keep the device away from these
devices and verify its performance before use.
The use of cables longer than specified may
impair the electromagnetic compatibility char-
acteristics of the device.
The device should not be used in the immedi-
ate vicinity of or placed on top of or below
other equipment. However, if the application
requires an arrangement of devices as de-
scribed above, the device should be watched
to ensure its proper functioning in the specific
arrangement.
The customer or user of the device should as-
sure that it is used in an electromagnetic envi-
ronment as described in IEC 61326-1.

DIADOS E
T11035
Safety Information
D616.131.00/10 en
9
CAUTION
Use of the product without observing the user
manual.
Bodily Injury! Equipment Damage!
Always use the product in compliance with the
user manual. Otherwise the intended protection
can be reduced.
Use the product only in conjunction with the de-
vices approved for this purpose by PTW and/or
the devices listed in the section "Intended Use".
Handle the product with care to avoid equipment
damage.
CAUTION
Operation under inadequate ambient conditions.
Equipment Damage!
Before connecting the device to the power line,
make sure that line voltage and frequency are
equivalent to the ratings indicated on the name-
plate of the device.
Set up the device in a location which affords
sufficient ventilation.
Always observe the ambient conditions as indi-
cated in the `Technical Specifications`.
CAUTION
Improper handling of cables and connectors.
Equipment Damage!
To avoid damage to the cables and connectors,
observe the following points.
Do not kink the cables. Observe the minimum
bend radius of the cables. Never exert pres-
sure on the cables. Do not step on the cables.
Do not roll trolleys over the cables. Do not pull
or twist the cables.
Disconnect the cables from the devices during
transport and when the devices are not in
use. Do not let the cables hang down unre-
strained.
The connectors must always be clean. Do not
allow the connectors to lie on the floor. Al-
ways protect connectors when pulling them
through cable conduits.
DIADOS E
T11035
Safety Information
10
D616.131.00/10 en
NOTE
Please observe the user manuals of all connect-
ed devices!
NOTE
Set up the device so that the operator has a
clear, unobstructed view of the control panel.
Figure 1: Definition of patient environment
Symbols on Product and Nameplate
Symbol
Description
Please refer to the user manual!
The product bears the CE-mark.
23.04
03.01
The product (T11035) was granted
the type-approval under German
law (refer also to the section
"Technical Specifications").
Identification mark of an officially
calibrated device according to the
German Metrology and Verification
Act (Mess- und Eichverordnung,
MessEV)
The device is provided with a pro-
tective insulation according to pro-
tection class II.
The device is only suitable for use
with direct current.
Manufacturer and date of manufac-
ture
Reference number
Serial number
Separate collection of electrical
and electronic equipment!
(refer also to the section “Disposal
of the Product”)
Labeling according to „Administra-
tion on the Control of the Pollution
caused by Electronic Information
Products (ACPEIP)“ (China RoHS)
(refer also to the Appendix)
DIADOS E
T11035
Operating Manual –Description of the Device
D616.131.00/10 en
11
Operating Manual
1 Description of the Device
1.1 General Features
DIADOS E measures the dose, the dose rate, dose
per pulse, time and pulse.
The Autostart function allows multiple consecutive
measurements to be performed without any user
intervention.
Selection of the measuring range is either automat-
ic or manual.
The device is equipped with an RS232 interface.
DIADOS E is powered via a multi-range power sup-
ply or from rechargeable batteries.
For officially calibrated dosemeters:
On the side there is an official seal. If the official
seal is damaged or removed, the official calibration
will expire.
CAUTION
Direct or scattered radiation
Equipment Damage!
Do not expose the DIADOS E to direct or
scattered radiation.
Do not store the DIADOS E in the treatment
room.
CAUTION
Improper handling.
Equipment Damage!
The DIADOS E is a sensitive measurement de-
vice, which needs regular checks and calibra-
tions.
Make sure that the DIADOS E is checked
regularly according to section 8.
Have the DIADOS E calibrated by a qualified
laboratory at intervals of at most 2 years.

DIADOS E
T11035
Operating Manual –Description of the Device
12
D616.131.00/10 en
1.2 Connection Panel
DIADOS E has connectors for the power supply
(9 VDC) and for the detector (DETECTOR) and an
RS232 interface (SERIAL) (see Figure 2).
As a general rule, the connector for the detector
should be sealed with the enclosed cap when not in
use.
Figure 2: DIADOS E connection Panel
1.3 Display
While a measurement is in progress, the current
dose/dose rate is indicated in intervals of 0.5 s.
The ALT key can be pressed to toggle between the
different readouts during a measurement.
Figure 3: DIADOS E display
1 Resolution:
" " greater than 0.5 %,
"*" greater than 1 %,
"**" less than 1 %
2 Unit C, Gy or R; displayed in reverse video in
pulsed mode
3 Application:
RAD –convential radiology,
DENT –dental application,
CT –CT application or
MamX/X –mammography
(MamM/M, MamM/R, MamW/A,
MamW/R, MamR/R, MamWAg)
4 Measuring range: Low, Med, High or Auto
5 Measuring value
6 Measurement status:
RDY –ready to take a measurement,
RUN –measurement in progress,
STA –measurement started with START/STOP,
STP –measurement stopped with
START/STOP,
TST –measurement stopped by timer
7 Filter:
"Unatt." (without additional filtration) or
"Att. " (with additional filtration)
8 Battery status: full/depleted
DETECTOR
SERIAL
1 2 3 4
5 6 7 8
DIADOS E
T11035
Operating Manual –Description of the Device
D616.131.00/10 en
13
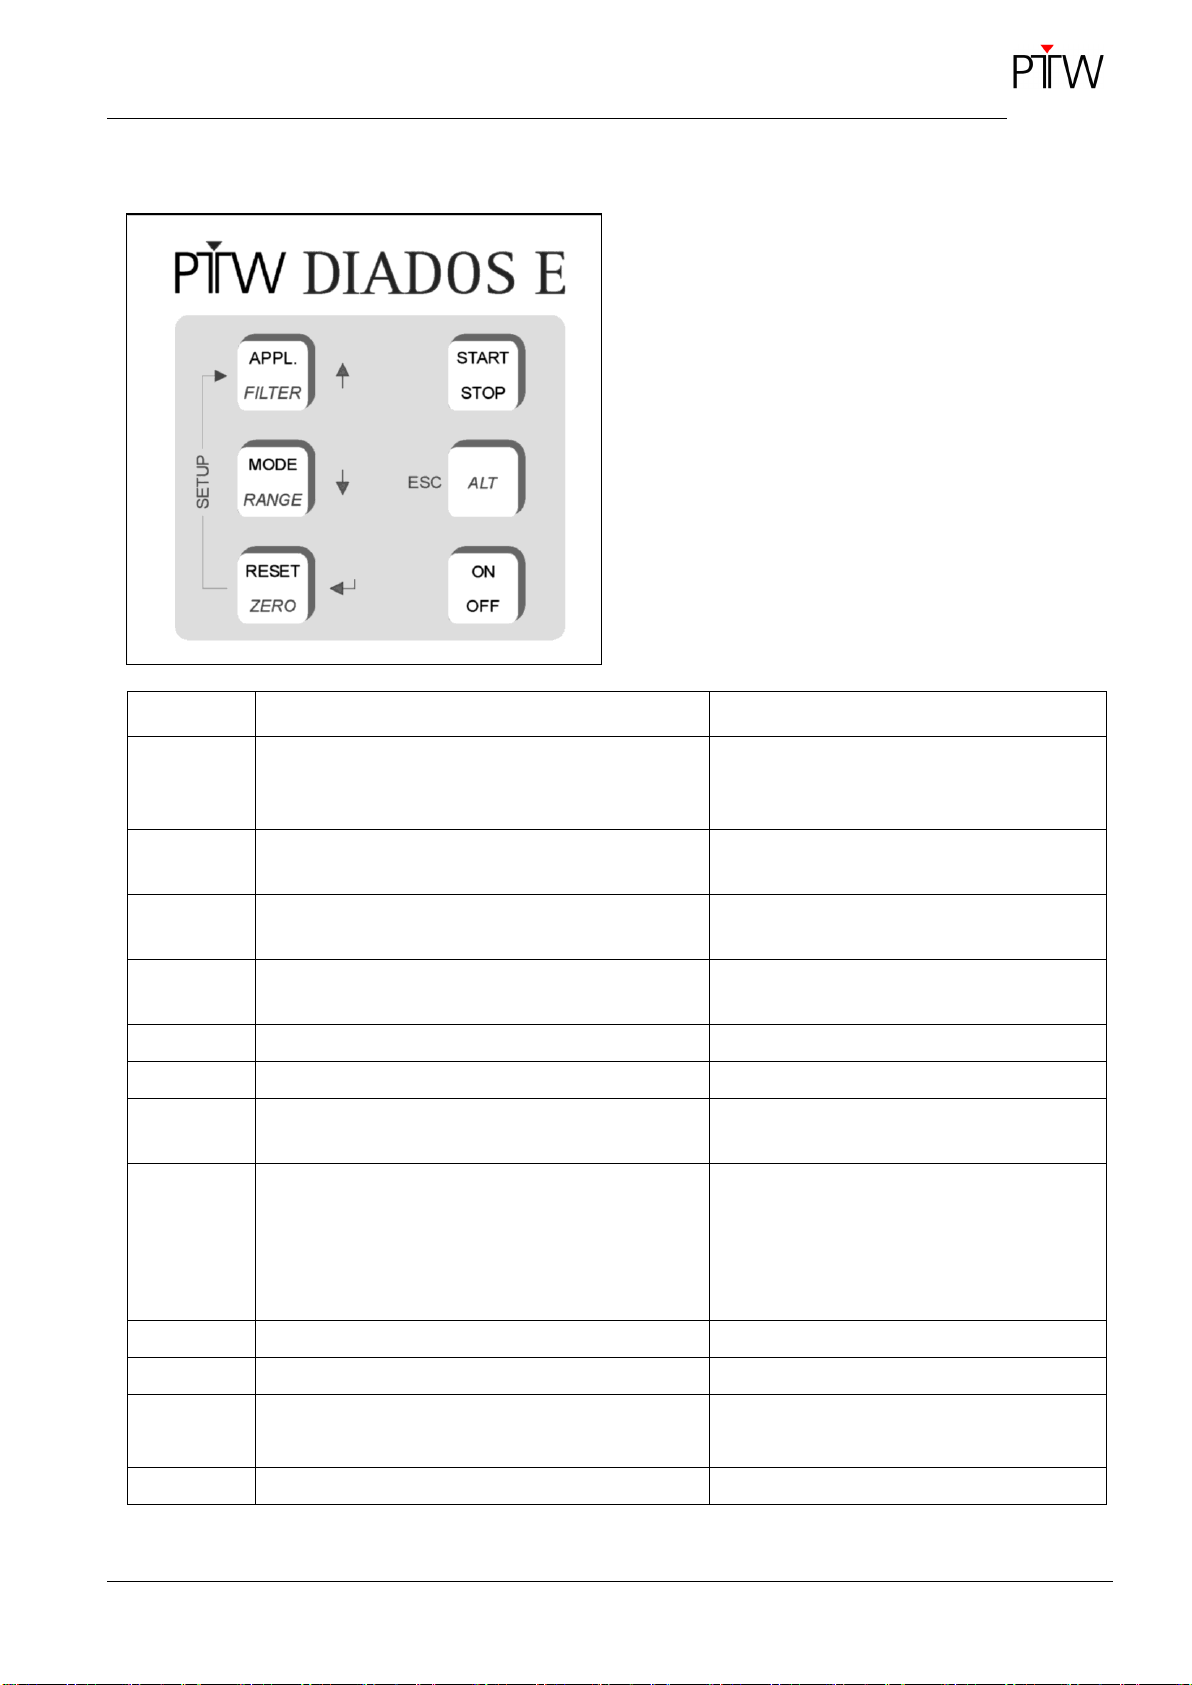
1.4 Keypad
Figure 4: DIADOS E keypad
The second function of a key (indicated in italics) is
activated with the combination of ALT key + the re-
spective key.
Function
Effect
Comment
APPL.
selects the application
RAD, DENT, CT, MamM/M, MamM/R, MamW/A,
MamW/R, MamR/R, MamWAg
Only calibrated applications can be select-
ed.
FILTER
toggles between the calibration factors
in front of ↔ behind the phantom
combination of keys ALT + APPL.
MODE
toggles between pulsed mode ↔ normal mode
in the pulsed mode, the unit is displayed in
reverse video
RANGE
toggles between the measuring ranges
Auto Range, Low, Medium and High
combination of keys ALT + MODE
RESET
resets the display to zero
STARDY, TSTRDY
ZERO
zero adjustment
combination of keys ALT + RESET
START/
STOP
manually starts/stops a dose measurement
ALT
activates the second function of a key
toggles between dose, dose rate and time in
normal mode and
between dose, dose/pulse and pulse in pulsed
mode
You can toggle during and after the meas-
urement.
ON/OFF
turns the device ON and OFF
push for 2 s
SETUP
brings up the Setup menu
combination of keys RESET + APPL.
,
used to navigate in the Setup menu
selects the sub-menu
ESC
used to exit the sub-menu/Setup menu

DIADOS E
T11035
Operating Manual –Description of the Device
14
D616.131.00/10 en
1.5 Control Keys/Functions
1.5.1 Turning the Device ON/OFF
ON/OFF key: push for 2 s to activate.
1.5.2 Starting and Stopping a Measurement
(START/STOP)
The START/STOP key initiates and stops a meas-
urement, even if no radiation is present.
The device has an Autostart feature. With Autostart,
a measurement begins as soon as radiation is de-
tected.
The timer measurement is disabled.
1.5.3 RESET Key
RESET sets all parameter readings back to zero.
RESET can also be used to clear an overload mes-
sage “OL”. After activation of the RESET key,
DIADOS E is in the Autostart mode.
An automatic zero adjustment process can be
aborted with the RESET key.
A measurement initiated with Autostart can also be
aborted with RESET. All parameter readings will be
reset to zero.
1.5.4 Zero Adjustment (ZERO)
The keys ALT + RESET will cause DIADOS E to
perform a zero adjustment. For the zero adjust-
ment, the detector and the extension cable used for
the measurement must be connected. During this
process, avoid moving or irradiating the detector
and the cable. Perform the zero adjustment after
setup and immediately before performing a meas-
urement. During zero adjustment the message “Ze-
roing” appears on the display, and the remaining
time in seconds is displayed.
The zero adjustment process can be aborted with
the RESET key. In this case the previous device
settings will be retained.
The zero adjustment should be repeated for follow-
ing cases:
after changing the detector or
after performing a reset the displayed value for
dose rate climbs up without radiation.

DIADOS E
T11035
Operating Manual –Description of the Device
D616.131.00/10 en
15
1.5.5 Selecting the Application (APPL.)
The APPL. key is used to select the application
range.
RAD: conventional diagnostics
DENT: dental application
CT: CT application
MamX/X: mammography (MamM/M, MamM/R,
MamW/A, MamW/R, MamR/R, MamWAg)
The application can only be selected if a radiologi-
cal unit is active (Setup menu).
Only these applications are selectable which were
calibrated radiologically. The registered calibration
factor is unequal 0,000.
If not all qualities (maximum 12) are required, the
user can deactivate a quality by entering the cali-
bration factor 0 (refer to user manual “RS232 Inter-
face for PTW-DIADOS E“ D616.131.01). The reac-
tivation is possible anytime, for it the calibration
factor has to be taken from the calibration certifi-
cate.
1.5.6 Selecting the Filter/Calibration Factors
(FILTER)
The function FILTER (keys ALT+APPL.) is used to
select the filter/calibration factors necessary for the
application. This function is active only when a radi-
ological unit is selected (Setup menu). Two calibra-
tion factors can be entered for each application, one
for application with additional filtration (Att.) and one
for application without additional filtration (Unatt.).
The filtration value for application without additional
filtration results from the inherent filtration of the
system.
The choices depend on the selected application:
RAD: • 2.5 mm Al → Unatt.
• 23.5 mm Al → Att.
DENT: • 8.5 mm Al → Unatt.
• 8.5 mm Al + 0.5 mm Cu → Att.
CT: • RQT9 0.25 mm Cu → Unatt.
• RQT9 0.25 mm Cu → Att.
When used with mammography units, the use of
the second calibration factor for measurements
behind the phantom is optional. For this reason
DIADOS E contains the same calibration factor
for measurements with additional filtration (Att.)
and without additional filtration (Unatt.).
NOTE
The recent draft of standard IEC 61674 does not
provide different calibration factors for measure-
ments with additional filtration and without addi-
tional filtration in CT application.
For this reason DIADOS E contains the same
calibration factor for measurements with addi-
tional filtration (Att.) and without additional filtra-
tion (Unatt.).
Thus pressing the ALT + APPL. keys has no
effect in CT application.

DIADOS E
T11035
Operating Manual –Description of the Device
16
D616.131.00/10 en
MamM/M: • Mo/30 µm Mo → Unatt.
• Mo/30 µm Mo + 2 mm Al → Att.
MamM/R: • Mo/25 µm Rh → Unatt.
• Mo/25 µm Rh + 2 mm Al → Att.
MamW/R: • W/50 µm Rh → Unatt.
• W/50 µm Rh + 2 mm Al → Att.
MamR/R
1
: • Rh/25 µm Rh → Unatt.
• Rh/25 µm Rh + 2 mm Al → Att.
MamWAg: • W/50 µm Ag → Unatt.
• W/50 µm Ag + 2 mm Al → Att.
MamW/A: • W/0,7 mm Al → Unatt.
• W/0,7 mm Al + 2 mm Al → Att.
For mammography applications: The calibration
with 2 mm Al is only optionally available.
1.5.7 Changing the Operating Mode (MODE)
With MODE you toggle between normal and pulsed
operation.
Normal mode
Measured parameters are dose, dose rate and
time. The timer function can also be used in this
mode.
Pulsed mode
In pulsed operation, the unit is displayed in reverse
video (uppermost line on the display). Measured
parameters are dose, dose per pulse and number
of pulses.
The displayed value is the measuring value select-
ed with the ALT key (see section 1.5.9).
1
Official calibration is not possible.
1.5.8 Selecting the Measuring Range (RANGE)
The measuring range is selected with the keys
ALT + MODE.
a) Low
Low measuring range, suitable for fluoroscopy
and measurements behind the phantom.
b) Medium
Medium measuring range, suitable for fluoros-
copy and measurements in front of the phantom
as well as for radiography and measurements
behind the phantom.
c) High
High measuring range, suitable for radiography
and measurements in front of the phantom.
d) Auto Range
Automatic adjustment of the measuring range;
depending on the selected mode of operation,
you will observe the following differences in the
measurement and on the display:
In pulsed operation:
The device defaults to the LOW range (display:
AUTO L). When this range is exceeded, the
message REPEAT appears on the display. At
the end of this signal (at least the measuring de-
lay time), the device selects the next higher level
AUTO M.
If the device overranges again due to an exces-
sive signal, the message REPEAT appears
again and the device selects the next higher
level HIGH (display: Auto H). Dose and dose per
pulse will not be indicated after overranging. On-
ly the number of pulses is displayed.

DIADOS E
T11035
Operating Manual –Description of the Device
D616.131.00/10 en
17
In normal operation:
Depending on the currently selected display
(ALT key), the Auto Range function decides in
an overrange condition whether to switch to the
next higher range with REPEAT or whether to
track the signal continuously. As in pulsed oper-
ation, the initial, most sensitive range is AUTO L.
If DIADOS E is in the dose rate mode at the time
the overrange condition occurs, it will immedi-
ately start switching ranges until the suitable
range is found.
If the range changes in the dose rate mode (e.g.
from LOW to MED), the displayed dose value
will read “OL” because it could not be correctly
determined. After the end of the measurement,
the dose rate readout will again begin with
AUTO L.
If DIADOS E is displaying the dose or time when
the overrange occurs, it will behave as in the
pulsed operating mode: the message REPEAT
appears after identification of the condition and
the next higher range is selected after the
measurement. After the end of the measurement
and when the dose is displayed, the measuring
range remains set until RESET is activated.
1.5.9 ALT Key
In combination with the keys APPL, MODE and
RESET, ALT activates the second function as-
signed to each key.
ALT + APPL. FILTER
ALT + MODE RANGE
ALT + RESET ZERO
During and after a measurement, you can use the
ALT key to toggle between display of
dose, dose rate and time in normal operation
or of
dose, dose per pulse and number of pulses in
pulsed operation.
ALT can also be used to exit the Setup menu and
the sub-menus. If you exit sub-menus with ALT, all
changes in that sub-menu will be lost.
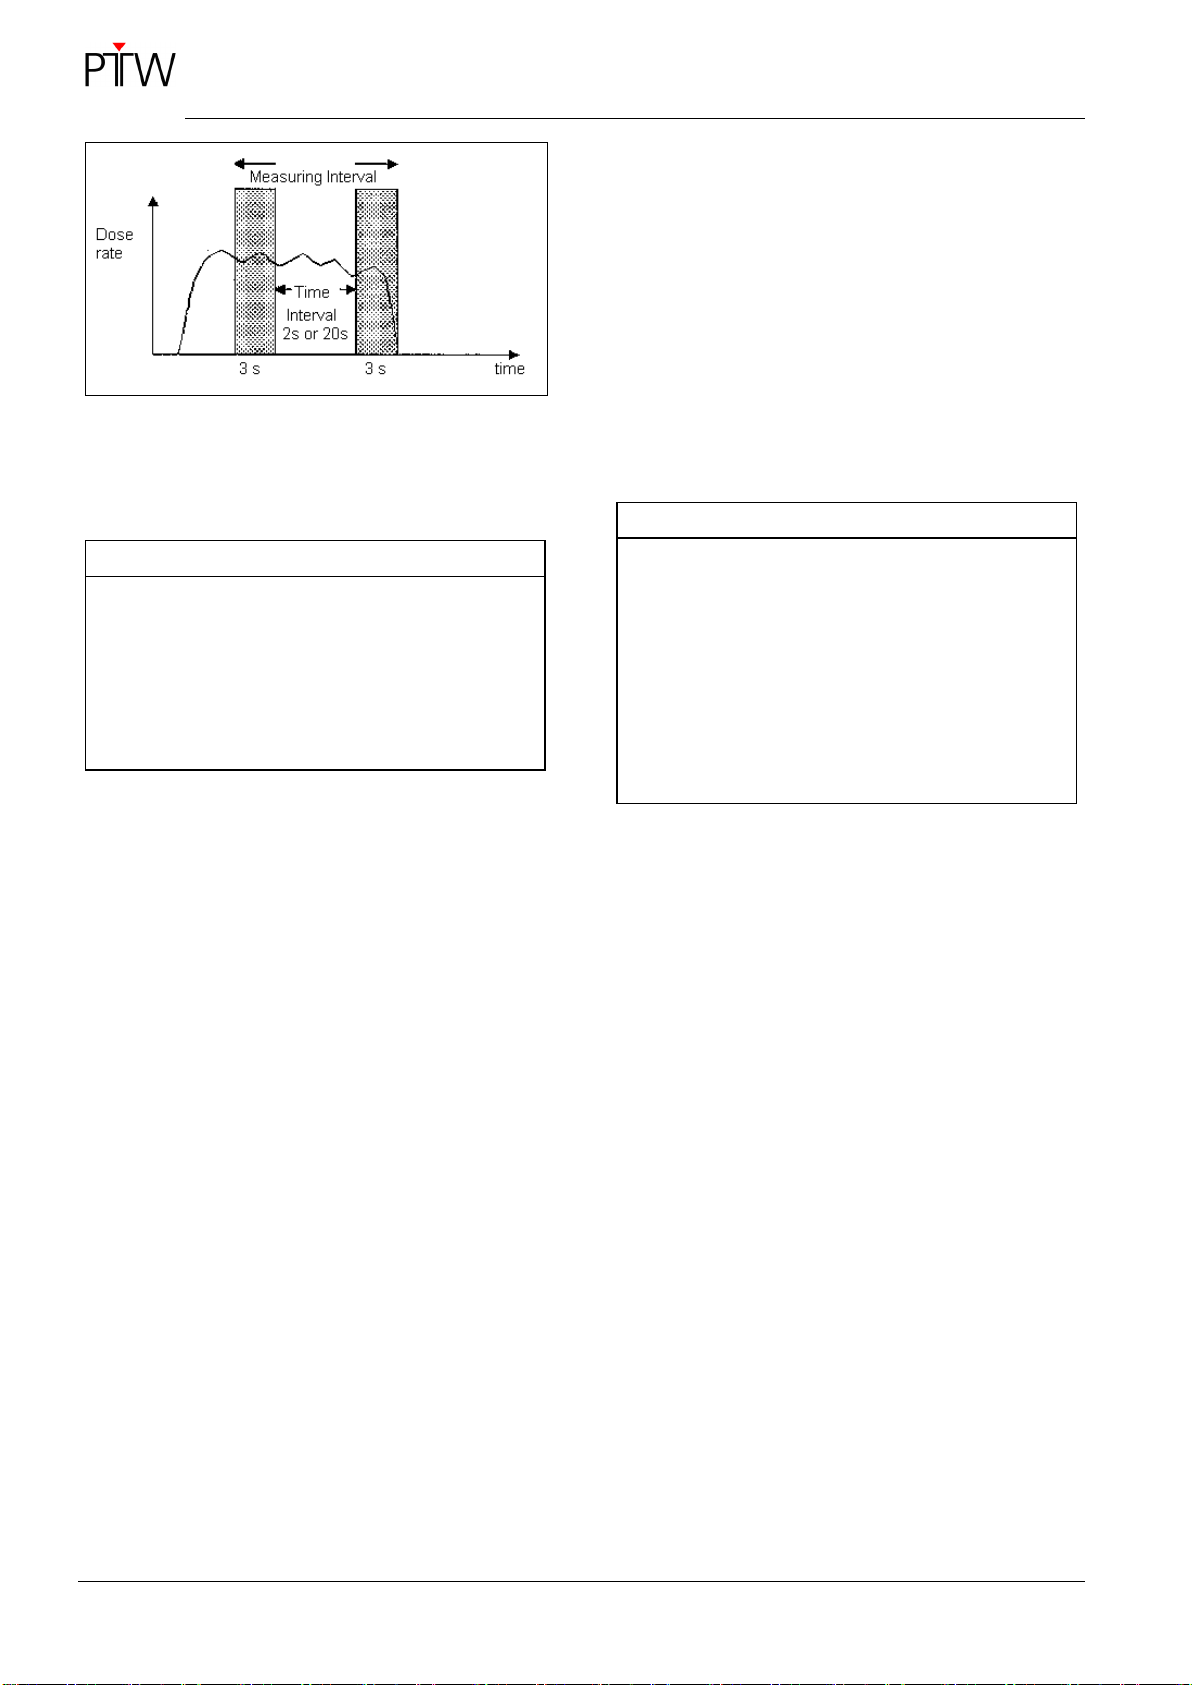
1.5.10 TIMER Function
Measurements with the timer are only possible in
normal mode. Pressing the START/STOP key
disables the timer function.
Functional description:
The timer function can be used to determine the
average dose rate over an interval of 2 s or 20 s.
To exclude the effects of switching on/off, the first
3 s and the last 3 s of the measuring interval will be
ignored.
The measuring interval is determined by the end of
the measurement (the measurement ends as soon
as the measuring signal is removed).
DIADOS E
T11035
Operating Manual –Description of the Device
18
D616.131.00/10 en
Figure 5: Timer function
At the end of the measurement, the dose rate aver-
aged over the timer interval will be indicated.
NOTE
Purpose of the timer interval “2 s”:
You will select the 2 s timer interval if DIADOS E
is to continue indicating the dose rate after radia-
tion has been removed (when the timer is off, the
dose rate displayed after removal of radiation is
0.0).
Measuring tasks:
a) Display of the dose rate value after removal
of radiation:
Recommended timer interval: 2 s (selection in
the Setup menu). DIADOS E starts averaging
3 s after a dose rate signal has been detected,
the displayed time blinks. The dose rate signal is
required for another 5 s at minimum. The dis-
played time stops blinking and DIADOS E stores
the measured dose rate values which are aver-
aged over 2 s in each case. When radiation is
removed, DIADOS E will display the dose rate
value measured 3 s before removal of radiation.
b) Determining the Average Dose Rate Over a
Period of 20 s:
The timer interval shall be set to 20 s (selection
in the Setup menu). DIADOS E starts averaging
3 s after a dose rate signal has been detected,
the displayed time blinks. The dose rate shall
now be maintained constant until the time dis-
played on DIADOS E stops blinking (this is the
case after another 23 s). Radiation can now be
removed. DIADOS E will display the dose rate
averaged over the last 20 s of fluoroscopy, while
ignoring the last 3 s.
NOTE
If the dose rate signal ends while the displayed
time still blinks, the average is calculated on the
basis of the existing values (with the exception of
the first and last 3 s) and the corresponding
measuring time is displayed. If the irradiation
time is less than 6 s, DIADOS E will indicate a
measured value of zero for dose rate, dose and
time. The dose is calculated on the basis of the
average dose rate and the irradiation interval.

DIADOS E
T11035
Operating Manual –Putting the System into Operation
D616.131.00/10 en
19
2 Putting the System into Operation
2.1 Inserting the Rechargeable
Batteries
On delivery, brand-new rechargeable NiMH batter-
ies are enclosed to the DIADOS E. Before setup
these new rechargeable batteries have to be insert-
ed into the device and have to be charged. Due to
their technology rechargeable batteries show a
limited durability.
DANGER
Improper handling of batteries.
Explosion Hazard!
Do not throw the rechargeable batteries into a
fire.
WARNING
Improper handling of batteries.
Bodily injury!
If electrolyte leaks from the battery, avoid contact
with skin or clothes. Immediately clean skin or
clothes that have come in contact with electrolyte
with water. In case of eye contact, immediately
rinse eyes with water and consult doctor.
Do not open rechargeable batteries.
WARNING
Improper handling of batteries.
Risk of Fire or Skin Burns!
Never short the rechargeable batteries together.
CAUTION
Improper handling of batteries.
Equipment damage!
Do not open rechargeable batteries. Never ex-
pose rechargeable batteries to water. Store and
use the rechargeable batteries at the ambient
conditions (temperature, relative humidity) speci-
fied for the device.
CAUTION
Improper handling.
Equipment damage!
Do not operate the DIADOS E with disposable
batteries. Use only the special rechargeable bat-
teries.
Therefore remove the lid from the battery com-
partment on the back of the device.
Insert the rechargeable batteries. For the num-
ber of batteries and the battery polarity refer to
Figure 6.
Figure 6: Mounting the rechargeable batteries

DIADOS E
T11035
Operating Manual –Putting the System into Operation
20
D616.131.00/10 en
Close the battery compartment.
Perform an initial charging of the rechargeable
batteries of 23 hours. An overcharging of the re-
chargeable batteries is not possible.
Then the DIADOS E will be ready for operation.
NOTE
New rechargeable batteries will reach their full
capacity only after several charging and dis-
charging cycles.
Please refer to section 8.7 for information about the
safe handling of rechargeable batteries.
2.2 Putting DIADOS E into
Operation
DIADOS E is either powered via a multi-range pow-
er supply or from rechargeable batteries. The power
supply automatically adapts to AC voltages be-
tween 115 V and 230 V. If the voltage of your local
power line is within this range, you can put
DIADOS E into operation after connecting the pow-
er supply. If the power supply is not connected at
the time the device is turned on, DIADOS E will
automatically be powered from the batteries. The
batteries charge automatically whenever DIADOS E
is connected to the power line.
NOTE
The wall outlet for connection of the power sup-
ply (power connector) should be within easy
reach to allow the device to be easily discon-
nected from mains.
NOTE
In CT applications (CT chamber and CT junc-
tion box) operate DIADOS E only on battery
power, refer to section 2.3.2.
Press the ON/OFF key to turn DIADOS E on.
The ON/OFF key must be pressed for 2 s to turn
the device off.
2.3 Connecting the Detector
2.3.1 Use with X-ray units
Two types of semiconductor detectors can be con-
nected to DIADOS E: DIADOS diagnostic detector
T60004 and DIADOS MAM detector T60005. Al-
ways use the detector suitable for the radiation to
measure.
The semiconductor detector is connected to the
DETECTOR connector at the top of DIADOS E.
DIADOS E can be on or off when the detector is
connected. The detectors can be connected to the
display unit via the 2 m detector cable directly and
via a 6 m extension cable.
NOTE
Detector T60004:
The detector is suitable for use with and without
brass absorber T20002.1.004.
Measurements of the surface dose (entrance
dose with backscatter) are performed without the
brass absorber.
Measurements of the entrance dose are per-
formed with the brass absorber attached to the
back of the detector.
Detector T60005:
This detector design only measures the entrance
dose. Therefore, it is not necessary to attach a
brass absorber to the back of the detector.
When used with X-ray units:
The overall length of the detector cable with ex-
tension cable shall not exceed 10 meters.
NOTE
Also refer to the user manual of the DIADOS
detectors.
Table of contents
Other PTW Measuring Instrument manuals


