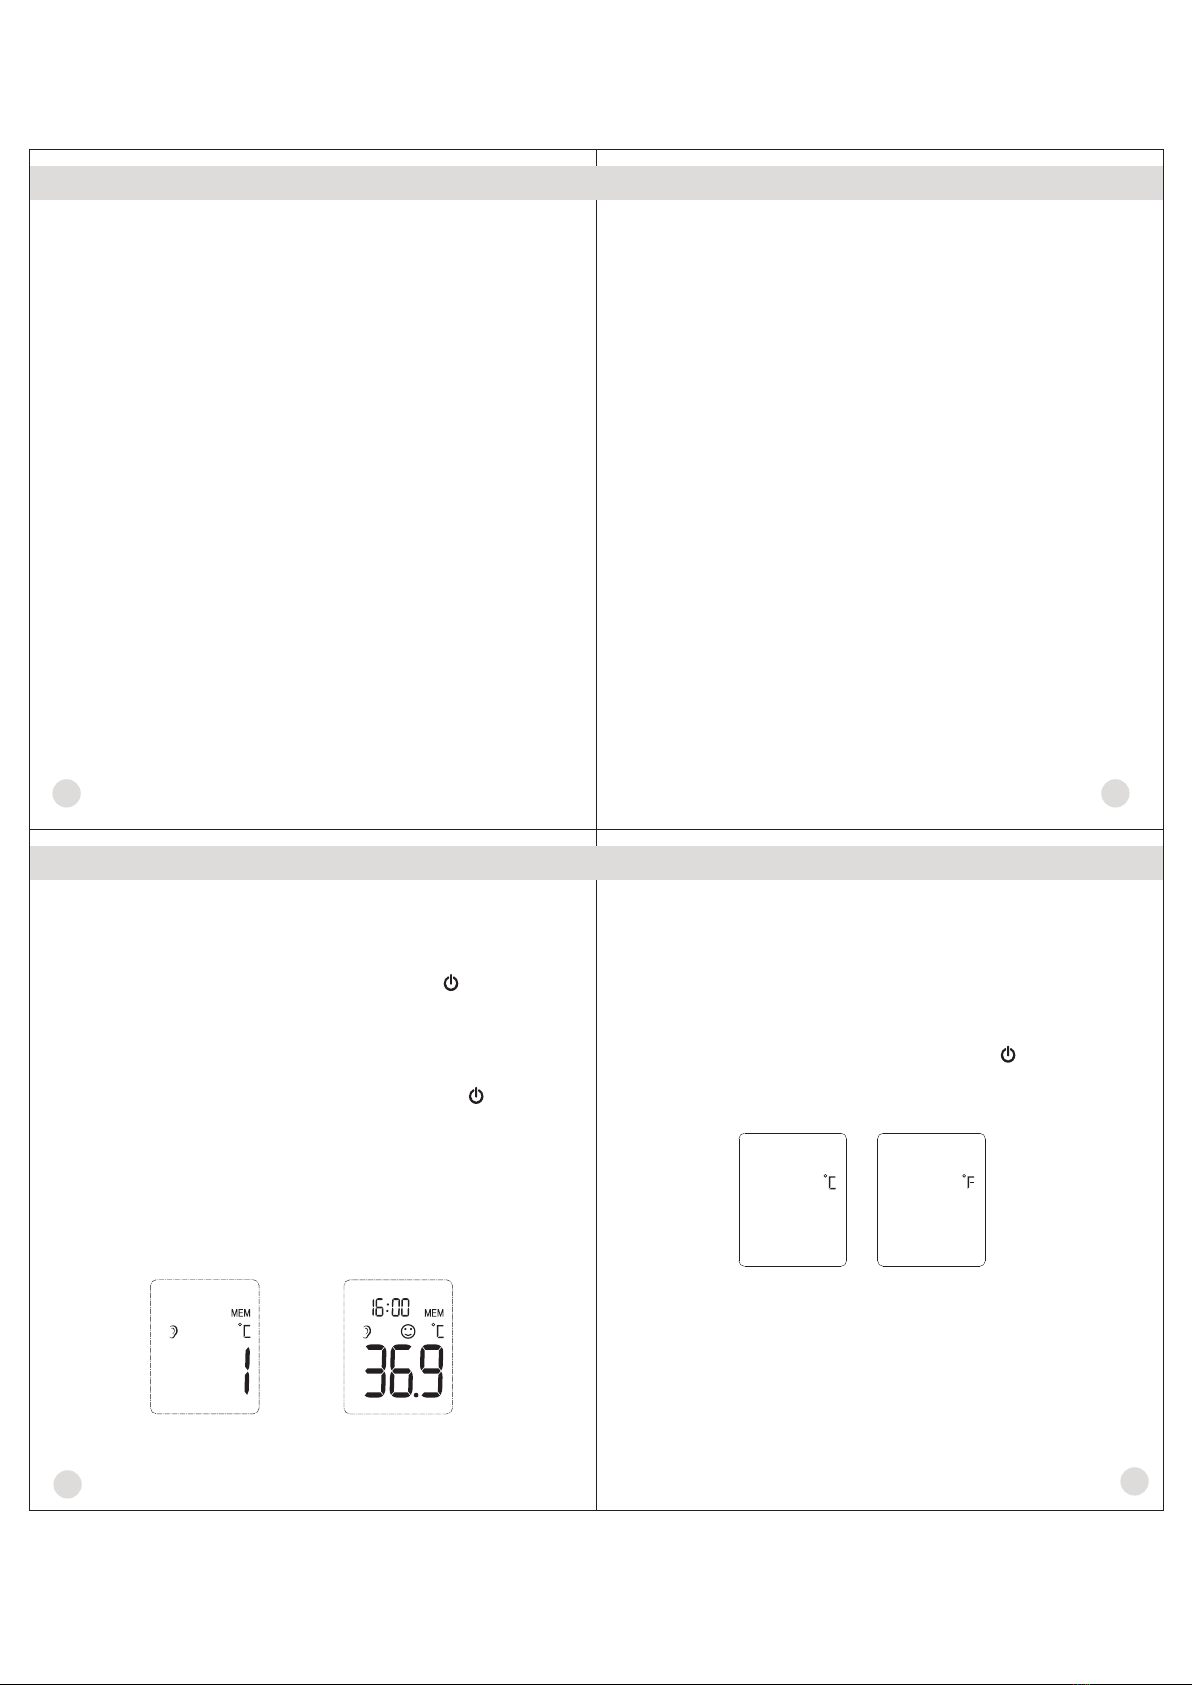
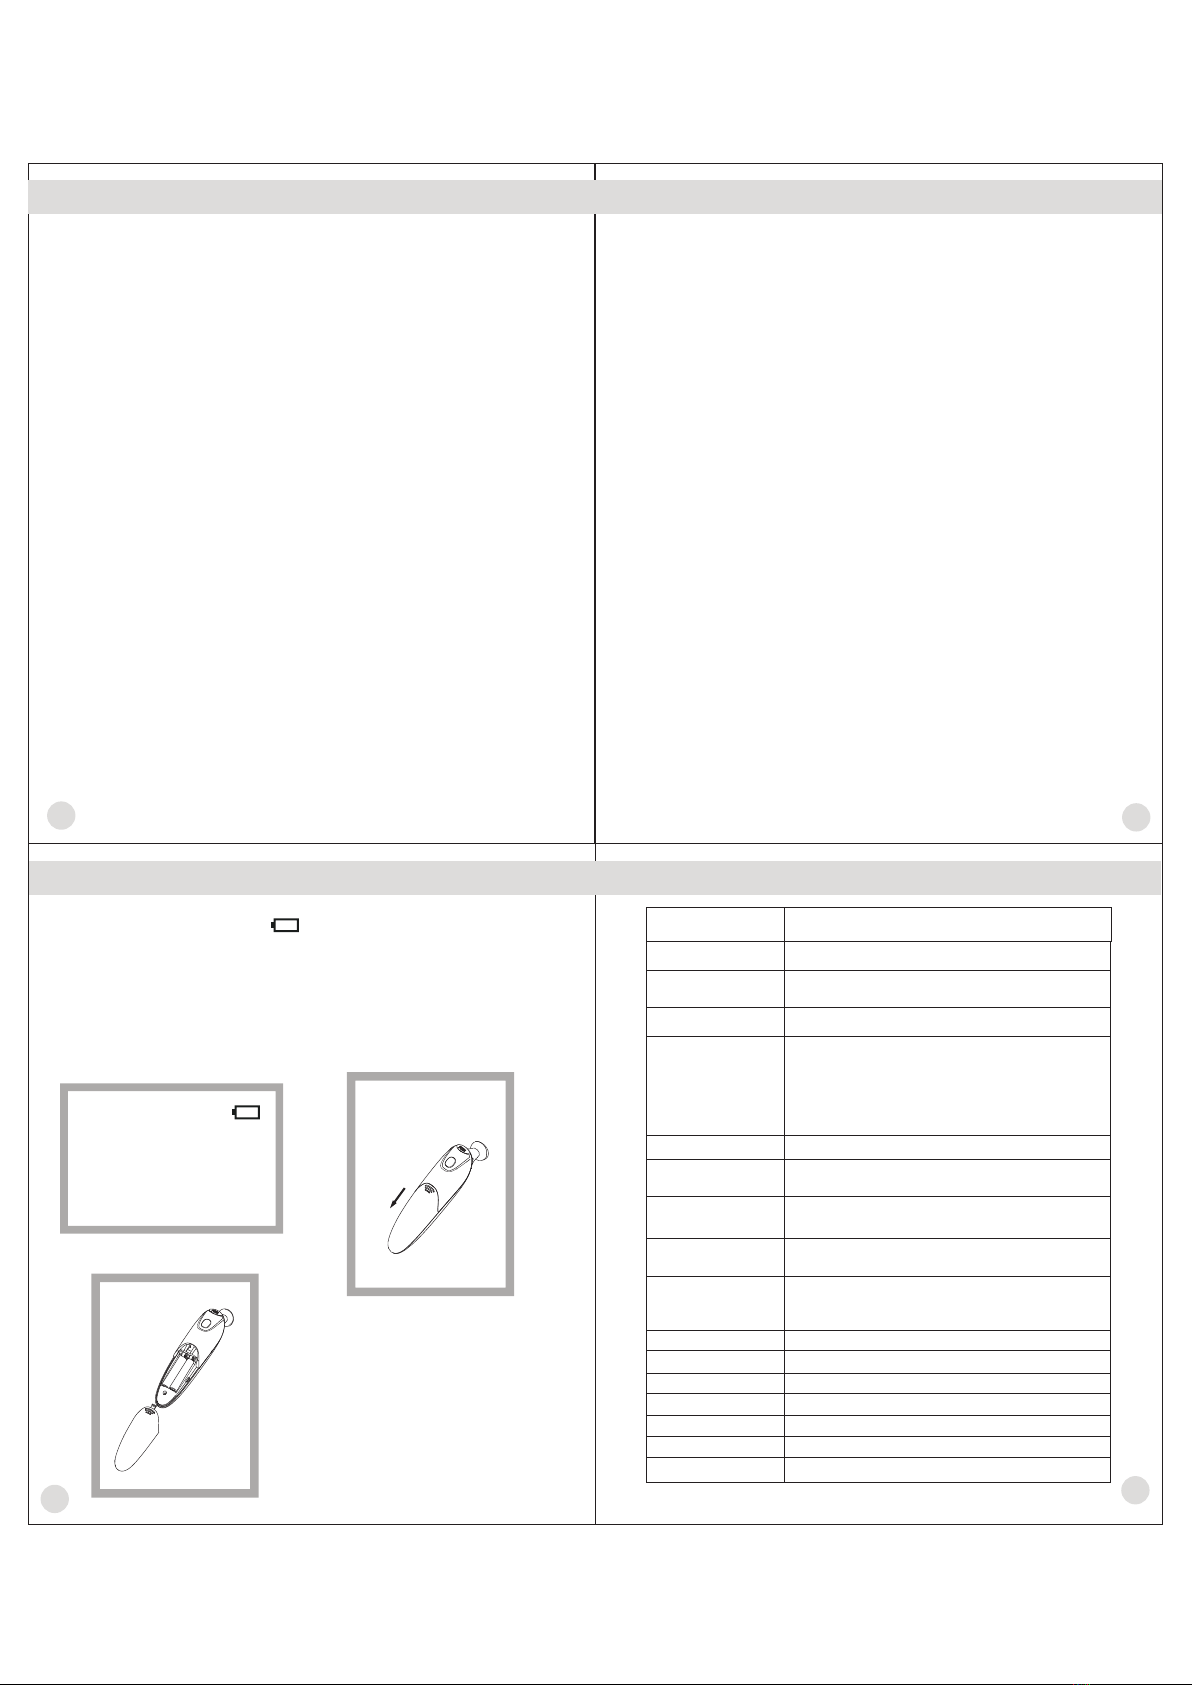
Pure Comfort DET-215 User manual

Owner's Manual
Model DET-215
Contents Introduction
1 2
Please read all instructions carefully and thoroughly
before using this product.
The multi functional thermometer is intended solely for measuring
forehead temperature, ear temperature and object temperature. It
allows you to quickly and easily measure body temperature and
object temperature. It converts the measured heat into a temperature
reading displayed on the LCD. Infrared Thermometer is intended
for the intermittent measurement of human body temperature by
people of all ages.
1.
It's not meant to replace a visit to the doctor. Please
consult with doctor if you have health concerns.
2. There is no gender or age limitation for using multi
functional thermometer. This thermometer can be reused by
many people.
3. Do not allow children to take their temperatures unsupervised,
some parts are small enough to be swallowed.
4. Never immerse this device in water or other liquids(not
waterproof).
5.Do not modify this equipment without authorization of
manufacturer.
6. Do not expose the thermometer to temperature extremes
(below -25℃/-13℉ or over 55℃/131℉) nor excessive
humidity (>95%RH).
7. Keep the battery away from children.
8
The devices are reusable for home use only.
. Remove battery from the device when not in operation for
a long time.
Warning:
Document No.: JDET-0504-002
Article No.: 002
Version: F
Date of Issue: 2020-01
Introduction ......................................................02
Product Description ........................................... 03
Lcd Display ...................................... 04
Basic Functions ............................................... 05
Real Time Clock Setting ............................ 06
Body Temperature ..............................................08
Illustration For Use ..........................................09
Temperature Taking Hints .................................15
Memory Mode ....................................................17
Selecting A Temperature Scale ............................18
Care And Cleaning .............................................19
Battery Replacement ..........................................21
Specifications .....................................................22
Troubleshooting .................................................23
Calibration .............................................................25
Service .............................................................26
Warranty .............................................................27
FCC Information ..................................................28
Electromagnetic Compatibility Information ...............29
Introduction ..
TEMPA CHECK INFRARED THERMOMETER

3
6
Basic Functions
LCD Display Introduction
4
5
Real Time Clock Setting
Set the time format
①
Set the hour
②
Set the minute
③
When using thermometer for the first time, please set the parameters
of the thermometer. With the thermometer off, press and hold
S BUTTON to enter into setting mode for 3 seconds.
The device can display the time
in either an AM/PM (12-hour) or
a 24:00(24-hour) format. Press
and release S BUTTON to select
the format. With the preferred
time format on the display, press
BUTTON, the Hour figure is
flashing automatically.
Press and release the S BUTTON to advance
one hour until the correct hour appears.
After the hour is set, press BUTTON, the Minute
figure is flashing automatically.
Press and release the S BUTTON to advance
one minute until the correct minute appears.
After the minute is set, press BUTTON, the Year
figure is flashing automatically.
Product Description
1. Forehead Cover
2. Probe
3. START Button
4. Button
5. S Button
6. Battery Cover
3
6
STAR T
1
2
45
Real Time Clock
Ear/Forehead
Temperature Mode
Object Temperature
Mode
The object mode shows the actual, unadjusted surface
temperatures, which is different from the body temperature. It can
help you to monitor if the object temperature is suitable for the baby
or patient, for example the baby's milk.
→ Please see the section to learn how to
measure the object temperature.
Illustration For Use
The real time clock will be recorded with the memor y function and
help you to recognize each measurement result.
→ Please see the Real time clock setting section to learn how to
setup the time in the first use.
The thermometer has been designed for practical use. It's not
meant to replace a visit to the doctor. Please also remember to
compare the measurement result to your regular body temperature.
→ Please see the section to learn how to
measure the body temperature.
Illustration For Use
Beep Alarm
Memory Mode
There are each 10 sets memories for ear, forehead and object
measurements. Each memory also records the measurement
date/time/mode icon.
/ Switch℃ ℉ Please see the Selecting A Temperature Scale section to learn
how to change between Celsius and Fahrenheit.
If thermometer detects a body temperature ≥ 37.8℃ 100.0)
under ear mode, there will be a long beep sound followed by three
short beep sound to warn the user.
( ℉
Low voltage sign
Ear temperature mode
Forehead temperature mode Temperature indicator
Unit sign: ℃ or ℉
Temperature result
Time and date
Memory mode
Object temperature mode
AM and PM
sign in Time mode

Real Time Clock Setting
78
Set the year
④
Set the month
.
⑤
Set the date
⑥
910
Press and release the S BUTTON to advance
one year until the correct year appears.
After the year is set, press BUTTON, the Month
figure will appear.
Press and release the S BUTTON to advance
one month until the correct month appears.
After the month is set, press BUTTON, the Date
figure is flashing automatically.
Press and release the S BUTTON to advance
one day until the correct month appears.
After the day is set, press BUTTON to exit the
setting mode.
Body Temperature
Illustration For Use Illustration For Use
Note:
Oils or cosmetics on the forehead may give a lower temperature
reading than the actual one.
●
Remove dirt from the forehead before
taking a measurement. Wait at least 10 minutes after washing the
forehead area before taking a reading.
Check before each use that the lens is intact. If it is damaged,
contact your retailer or the service address.
Bear in mind that the thermometer needs to have been in the room
in which the measurement is taken for at least 30 minutes before
use.
U
Before each measurement, make sure that the device is in the
appropriate mode for the measurement that you wish to take.
●
●
● sers and the thermometer should be in the same ambient
temperature.
●
Before measurement:
To measure forehead temperature:
Figure 1
1. Install the forehead cap.
2. Press the BUTTON to switch on the thermometer and the
display is activated to show all segments.
3.
4. Place the probe with the forehead cap fitted on the temple.
5. Press the START BUTTON to start measurement.
6. Move the thermometer smoothly over the forehead to the other
temple and back.
7. The measured value appears on the display and the end of the
measuring is signalled by a short beep.
8. The thermometer will shut off automatically after 60 seconds
of inactivity. To prolong battery life, press the BUTTON to
turn the unit off.
After self-checking, Figure 1 appears on the display screen with
beeps, so you can start a new measurement.
How to switch between ear and forehead mode:
● When the device is on, Press and hold the S BUTTON to switch
between ear mode and forehead mode.
●
● Remove hat and hair and wait 10 minutes before taking a reading.
Do not use the thermometer on a perspiring or sweating forehead,
as this may affect the reading.
The temperature of a healthy person is affected by various factors:
the person’s individual metabolism, their age(body temperature is
higher in babies and toddlers and decreases with age. Greater
temperature fluctuations occur faster and more often in children,
e.g. due to growth spurts), their clothing, the ambient temperature,
the time of day(body temperature is lower in the morning and
increases throughout the day towards evening), the preceding
physical and, to a lesser extent, mental activity.
It is suggested that users develop the habit of daily measurement,
and use this product to establish a private normal temperature
range for themselves and their families as a reference for
measurement.

714
Illustration For Use Illustration For Use
13
12
11
Some people produce different readings in their left and right ear.
In order to record temperature changes, always measure a person’s
temperature in the same ear.
As ear wax can affect the measurement, you should clean the ear
before measuring if necessary.
1. Remove the forehead cap.
2. Press the BUTTON to switch on the thermometer and the
display is activated to show all segments.
3.
4. Make sure that the sensor tip and the ear canal are clean. As
the ear canal is slightly curved, you have to pull the ear slightly
up and backwards before inserting the sensor tip.(See Figure 3)
When using the thermometer on infants under age 1, pull the
ear up making sure the sensor faces the eardrum.(See Figure 4)
When using the thermometer on individuals over the age of 1,
pull the ear back making sure the sensor faces the eardrum.
(See Figure 5).
5. Press the START BUTTON to start the measurement.
●
●
●
●
After self-checking Figure 2 appears on the display screen with
beeps, so you can start a new measurement.
To measure ear temperature:
Figure 3
6
measuring is signalled by a short beep.
Note: A waiting period of 20 seconds between testing is
recommended to avoid excessive cooling of the skin.
7. The thermometer will shut off automatically after 60 seconds
of inactivity. To prolong battery life, press the BUTTON to
turn the unit off.
. The measured value appears on the display and the end of the
1. Press the button to switch on the thermometer.
2. Hold down the BUTTON and the S simultaneously
for 2 seconds to switch to object temperature mode( appears on
the LCD display.
3. Aim the thermometer at the center of the object you want to
measure with a distance of 1 to 2 cm.
4. Press the START BUTTON to start measurement.
5. The measured value appears on the display and the end of the
measuring is signalled by a short beep.
6. To exit object temperature mode, hold down the BUTTON and
the S BUTTON simultaneously again for 3 seconds.
7. The thermometer will shut off automatically after 60 seconds
of inactivity. To prolong battery life, press the BUTTON to
turn the unit off.
Remarks:
This mode shows the actual, unadjusted surface temperatures,
which is different from the body temperature.
BUTTON
Illustration For Use Illustration For Use
After measurement:
1. Power off: Device will automatically shut off if left idle for
more than 1 minute to extend battery life.
2. Clean the probe after each use to ensure an accurate reading and
avoid cross contamination.
(See the section of Care and Cleaning for details.)
BackLight:
unit is ready for measurement and a measurement is completed.
The backlight design is to the benefit of reading in the night .
The display will only be lighted GREEN for 3 seconds when the
Temperature indicator:
In Ear/Forehead mode:
1. If the temperature reading is below 37.8 100.0 , a happy face
will be displayed next to the reading.
2. If the temperature reading is 37.8 100.0 or above, a bad face
will be displayed next to the reading.
℃( ℉)
℃( ℉)
Figure 4 Figure 5
To measure object temperature:
X
√
Figure 2

17
15 16
Temperature Taking Hints
18
Memory Mode
3.
press the START BUTTON to take new measurements.
In the memory mode, the mode icon always exist.
The user can
1. The Memory Mode can be accessed ether in ear mode, forehead
mode or object mode:
When the thermometer has been turned on and followed by
Figure 2 or finished testing, press and hold the BUTTON for
three seconds. The letter MEM will appear in the center right
corner of the display. (See Figure 6)
2. The thermometer will automatically memorize the last 10
temperature readings. Each memory also records the
measurement date/time/mode icon. Each time the BUTTON
is pressed, the screen displays past readings that correspond
with a number 1-10. The number 1 reflects the most recent
reading, while the number 10 reveals the oldest reading stored
in memory.(See Figure 7)
Temperature Taking Hints
Selecting A Temperature Scale
1. Temperature readings are available in the Celsius (℃) or
Fahrenheit (℉) scale.
2. With the unit off, press and hold the START BUTTON for
3 seconds to enter into unit changing mode.
3. Press and release S BUTTON to select the unit.
4. When the preferred unit on the display, press BUTTON to
exit the unit changing mode.
Figure 8
To ensure that the reading always reflects the body temperature
accurately, you need to take account of the following factors which
may affect an accurate reading.
1. It is important to know each individual's normal temperature
when they are well. This is the only way to accurately diagnose
a fever. To determine normal temperature, take multiple readings
when healthy. Re-measure with a standard digital thermometer
for confirmation.
2. The probe window of the thermometer is the most delicate part
of the device. Do not touch the probe window. The accuracy of
the reading may be affected if the probe window is damaged or
dirty.
.
Holding a hand on the forehead for any length of time will affect
the temperature reading.
3
bathing, showering, shampooing and hair drying before/while
taking the measurement. In these cases, wait 20 minutes prior to
taking a temperature.
4.
Users should not drink, eat, or be physically active such as
5. Do not take temperature over scar tissue, open sores or abrasions.
6. Don't take a measurement while or immediately after nursing a
baby.
7. Do not use this thermometer outdoors.
8. Do not take temperatures with this thermometer near places that
are very hot, such as fireplaces and stoves.
9. If the thermometer is stored in a significantly different
environment than testing location, place it in the testing
location for approximately 30 minutes prior to use.
Figure 7
Figure 6

19
22
Battery Replacement
1. Replace battery when " appears in the upper right corner "
of LCD display. (See Figure 9)
2. Slide battery cover down as shown in Figure 10.
3. Remove battery and install 2 new AAA alkaline batteries
as shown . in Figure 11
4. Slide battery cover back on.
Figure 9
Figure 10
Figure 11
20
Care And Cleaning
1. The probe window must be kept clean, dry, and undamaged at all
times to ensure accurate readings. The accuracy of temperature
readings can be affected by damage to the probe window, or the
presence of dirt and ear wax on the probe window.
2. Fingerprints, earwax, dust and other soiling compounds reduce
transparency of the window and result in lower temperature
readings.
3. The probe window is the most delicate part of the thermometer.
To safely clean the window, gently wipe its surface with a cotton
swab slightly moistened with isopropyl alcohol and immediately
wipe dry with a clean cotton swab. After cleaning, allow at least
5 minutes drying time before taking temperatures.
Note: Do not use any chemical other than isopropyl alcohol to
clean the probe window.
4. Use a soft, dry cloth to clean the thermometer display and
exterior.
5. The thermometer is not waterproof. Do not submerge the unit in
water when cleaning.
6. Store the thermometer in a dry location, free from dust and
contamination and away from direct sunlight.
7. Periodic cleaning and disinfection of the device following in
order to prevent patient cross infection. Please clean and
disinfect the thermometer immediately after each use.
21
Care And Cleaning
8. Ensure that children do not use the instrument unsupervised;
some parts are small enough to be swallowed.
9. Do not remove or modify the equipment without permission.
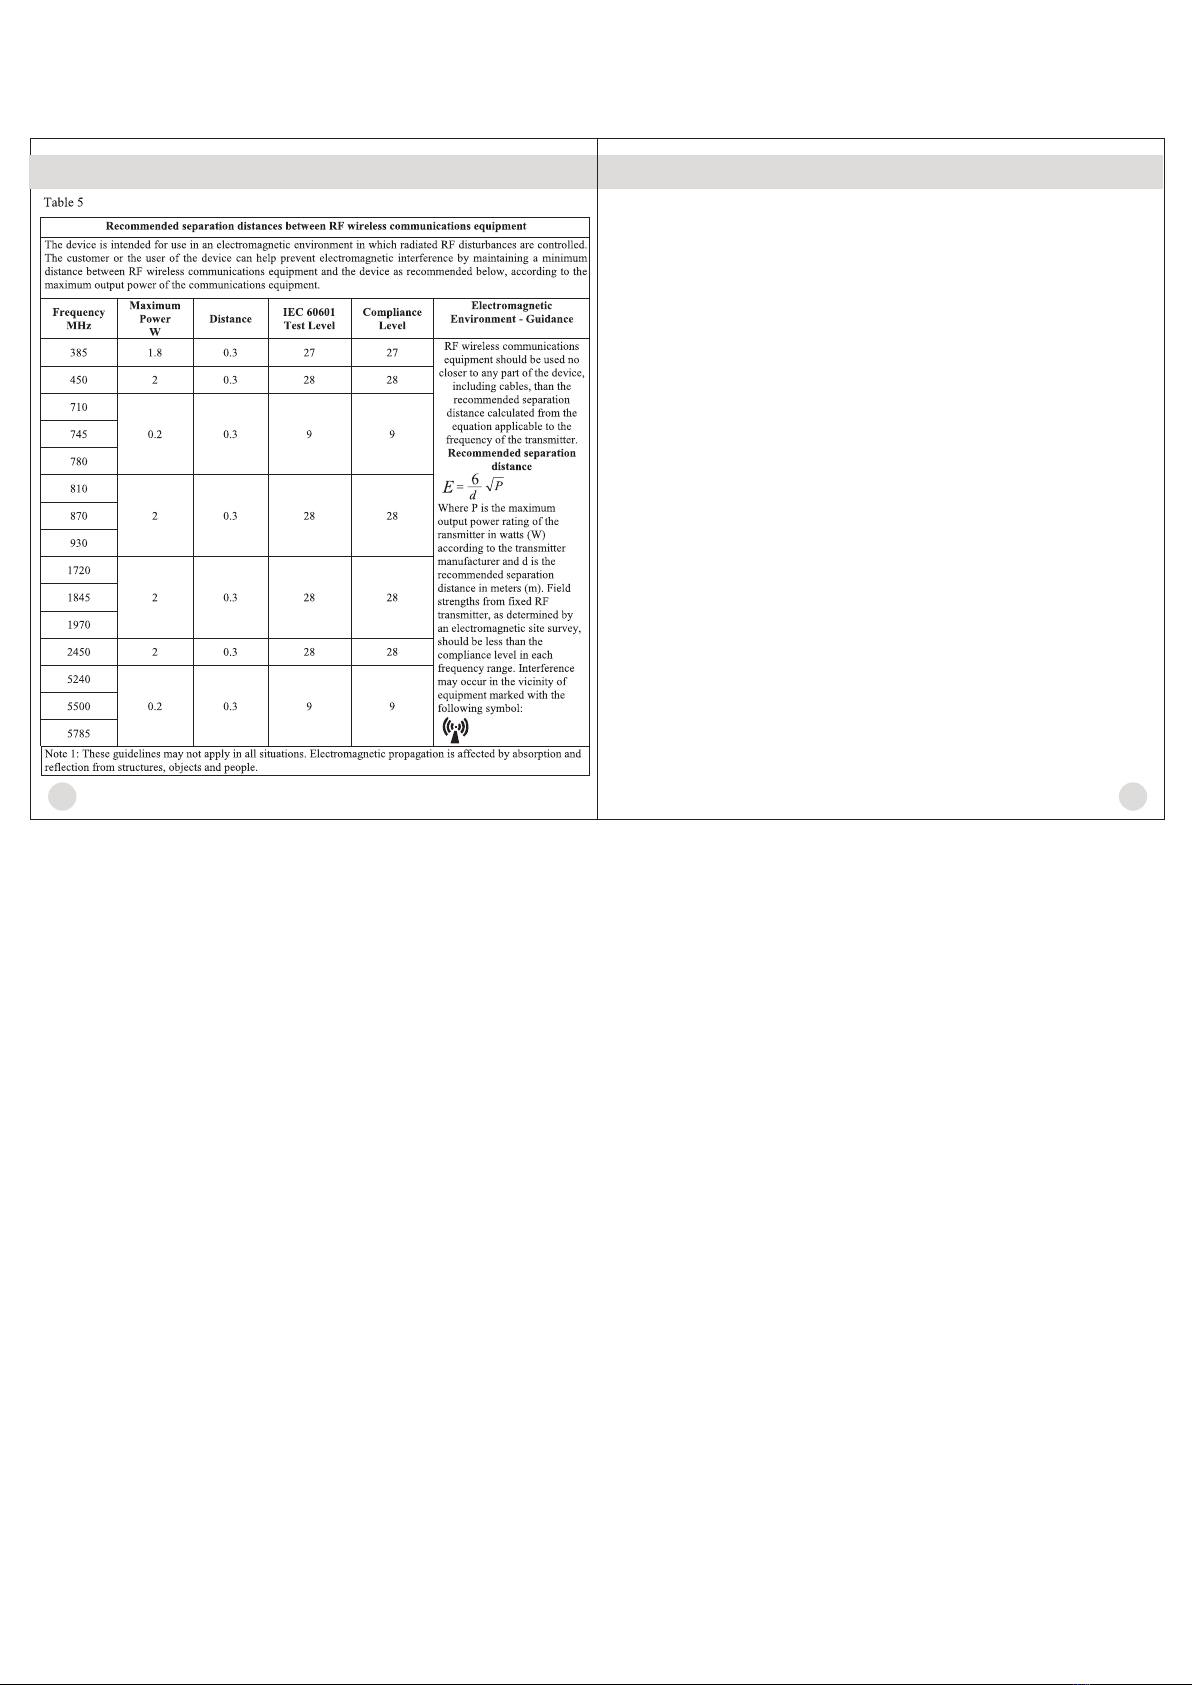
10. Strong electromagnetic fields may interfere with the proper
operation of the thermometer. The device needs special
pre-cautions regarding EMC according to the EMC information.
11
12. Put the thermometer back to the original packaging after using.
For cleaning:
1)Soak a clean soft cloth in drinking water, wring it out and then
wipe the thermometer(including probe) no less than 3 times;
2)Then use another clean soft cloth to wipe the residue water
on thermometer;
3)Put the thermometer in the original packaging.
For disinfection:
1)Soak a clean soft cloth in drinking water, wring it out and then
wipe the thermometer(including probe) no less than 3 times;
2)Then use another clean soft cloth to wipe the residue water
on thermometer;
3)Using a clean soft cloth dipped in 70% medical alcohol,
wipe the probe 3 times, at least one minute for each time.
4)Using a clean cotton swab dipped in 70% medical alcohol,
wipe the sensor window 3 times;
5)Wait at least 10 minutes to let the alcohol volatilization and
then put the thermometer in the original packaging.
. It is not intended for use in the oxygen rich environment and
presence of flammable anesthetic mixture with air, oxygen or
nitrous oxide.
Specifications
Ear/Forehead mode: 34.0℃~43.0℃(93.2℉~109.4℉)
Object mode: 0℃~100℃(32℉~212℉)
Ear/Forehead mode:
±0.2℃ (0.4℉) during 35.5℃~42.0℃ (95.9℉~107.6℉)
at 15℃~35℃ (59.0℉~95.0℉) operating temperature range
±0.3℃ (0.5℉) for other measuring and operating
temperature range
Object mode: ±4% or ±2℃(4℉) whichever is greater
Measuring range
Laboratory accuracy
Display resolution 0.1℃ or 0.1℉
Measure time
Ear mode :
Forehead: Approx. three seconds
/Object mode Approx. one second
Measuring site Ear canal(Ear Mode)、Forehead(Forehead Mode)
Oral (This thermometer converts the ear temperature to
display its “oral equivalent.”)
Reference body site
Operation mode Ear/Forehead mode(Adjust mode)
10℃~40℃(50℉~104℉), 15%~85%RH, non-condensing
00hPa ~ 1060hPaAtmospheric Pressure : 7
Approx.85grams(with batteries)
DC3V(2×AAA battery)
Operating temperature
range:
Storage and transport
temperature range
-25℃~ 55℃ (-13℉~131℉), 15%~95%RH, non-condensing
700hPa ~ 1060hPaAtmospheric Pressure :
Clinical accuracy
Dimension
Weight
Battery
Battery life Approx. 1 year/6000 readings
Ingress protecting rating
IP22
Clinical bias:0.05℃(0.09℉)
Clinical repeatability:0.11℃(0.20℉)
Limits of agreement:1.04℃( 1.88℉)
Shock withstands drop of 3 feet
Expected service life Three years
155 * 39* 50mm

26
Calibration
Troubleshooting Troubleshooting
In Ear/Forehead mode:
Temperature taken is
higher than 43.0 ℃
(109.4℉).
In Object mode:
Temperature taken is
higher than 100 ℃
(212℉).
Problem Problem
Solution Solution
The ambient temperature
is not within the range
between 10℃ and 40℃
(50℉~104℉).
Place the
in a room for at least 30
minutes at room
temperature between
10℃ and 40℃
(50℉~104℉)
thermometer
The thermometer is
placed incorrectly
or unsteady.
The thermometer could
not work due to low
battery.
The thermometer
showing a rapid ambient
temperature change.
The thermometer is not
functioning properly.
Read Illustration For
Use thoroughly and
take a new temperature
measurement.
Replace two new
alkaline batteries
size AAA.
Allow the thermometer
to rest in a room for at
least 30 minutes at
room temperature:
between 10℃ and 40℃
(50℉~104℉)
Unload the battery,
wait for 1 minute and
repower it. If the
message reappears,
contact the retailer
for service.
Error message Error message
Read Temperature Taking
Hints Thoroughly, then
take a new temperature
measurement.
24
Measurement before
thermometer is ready
25
In Ear/Forehead mode:
Temperature taken is
lower than 34.0 ℃
(93.2℉).
In Object mode:
Temperature taken is
lower than 0℃(32℉).
23
The thermometer is initially calibrated at the time of manufacture.
If the thermometer is used according to the use instruction, periodic
readjustment is not required. However, We recommends checking
calibration every two years or whenever clinical accuracy of the
thermometer is in question. Please send the complete device to the
dealers or manufacturer.
The above recommendations do not supersede the legal requirements.
The user must always comply with legal requirements for the control
of the measurement, functionality, and accuracy of the device which
are required by the scope of relevant laws, directives or ordinances
where the device is used.
A clinical summary and procedures for checking calibration are
available upon request.(Turn on the thermometer and press the power
button long time until entering into calibrate mode, software version
will be displayed.)
ASTM laboratory accuracy requirements in the display range of 36.0 to 39.0 °C (96.8 to 102.2 °F)
for IR thermometers is ±0.2°C(±0.4 °F), whereas formercury-in-glass and electronic thermometers,
the requirement per ASTM Standards E 667-86 and E 1112-86 is ±0.1°C(±0.2°F).”
Direct Current
Disposal of this product and used batteries should be carried out in accordance
with the national regulations for the disposal of electronic products
Type B F applied part
Consult Accompanying Documents
LOT Batch Code
Storage and Transportation Temperature Limit:
-13℉ ~131℉(-25℃~55℃)
-2 5℃
55℃
Service
The thermometer has a limited one year warranty. Do not attempt
to disassemble or repair the thermometer by yourself. Should
service be required during or after the warranty period you must
contact the manufacturer. Repackage the thermometer carefully in
its original packaging or securely pack to avoid damage during
shipping. Include the original sales slip indicating the date of
purchase, a note describing the problem, and your return address.
Send the thermometer prepaid and insured.
The lay operator or lay responsible organization should contact the
manufacturer or the manufacturer's representative:
– for assistance, if needed, in setting up, using or maintaining the
thermometer; or
– to report unexpected operation or events.
Manufactured for:
HOME AIDE DIAGNOSTICS, INC.
1072 S. Powerline Rd.
Deerfield Beach, FL 33442
Telephone: 1-800-915-0116
www.homeaide.us
Read Temperature
Taking Hints thoroughly ,
then make sure the lens
filter are clean, then take
a new temperature
measurement.
Take a measurement
until thermometer is
ready(with 2 beeps).

Warranty
This appliance conforms to the following standards:
ASTM E1965-98 Standard Specification for Infrared Thermometers
for Intermittent Determination of Patient Temperature,
ISO 80601-2-56 Medical electrical equipment —Part 2-56:
Particular requirements for basic safety and essential performance
of clinical thermometers for body temperature measurement,
IEC 60601-1-11 Medical electrical equipment —Part 1-11: General
requirements for basic safety and essential performance –Collateral
Standard: Requirements for medical electrical equipment and
medical electrical systems used in the home healthcare environment
and complies with the requirements of IEC 60601-1-2(EMC) ,
AAMI/ANSI ES60601-1(Safety) standards. And the manufacturer
is ISO 13485 certified.
Thermometer is warranted by manufacture to be free from defects in
material and workmanship under normal use and service for a period
of one year from the date of delivery to the first user who purchases
the instrument. This warranty does not cover batteries, damage to the
probe window, or damage to the instrument caused by misuse,
negligence or accident, and extends to only to the first purchaser of
the product.
28
27
Caution: Changes or modifications to this unit not expressly
approved by the party responsible for compliance could void the
user authority to operate the equipment.
*Note:
This equipment has been tested and found to comply with the limits
for a Class B digital device, pursuant to Part 15 of the FCC Rules.
These limits are designed to provide reasonable protection against
harmful interference in a residential installation. This equipment
generates, uses, and can radiate radio frequency energy. If this
equipment does cause harmful interference to radio or television
reception, which can be determined by turning the equipment off
and on, the user is encouraged to try and correct the interference by
one or more of the following measures:
- Reorient or relocate the receiving antenna.
- Increase the distance between the equipment and the receiver.
- Connect the equipment to an outlet on a circuit different from that
to which the receiver is connected.
- Consult the dealer or an experienced radio/TV technician for help.
FCC Information
Electromagnetic Compatibility Information Electromagnetic Compatibility Information
The device satisfies the EMC requirements of the international
standard IEC 60601-1-2.The requirements are satisfied under the
conditions described in the table below.The device is an electrical
medical product and is subject to special precautionary measures
with regard to EMC which must be published in the instructions
for use.Portable and mobile HF communications equipment can
affect the device.Use of the unit in conjunction with non-approved
accessories can affect the device negatively and alter the
electromagnetic compatibility.The device should not be used
directly adjacent to or between other electrical equipment.
29 30

Electromagnetic Compatibility Information
Electromagnetic Compatibility InformationElectromagnetic Compatibility Information
Electromagnetic Compatibility Information
NOTE 1At 80 MHz and 800 MHz, the higher frequency range applies.NOTE 2
These guidelines may not apply in all situations. Electromagnetic propagation is
affected by absorption and reflection from structures, objects and people.
a The ISM(industrial, scientific and medical) bands between 0,15 MHz and 80 MHz
are 6,765 MHzto6,795 MHz;13,553 MHz to 13,567 MHZ;26,957 MHz to 27,283
MHz; and 40,66 MHz to 40,70 MHz. The amateur radio bands between 0,15 MHz
and 80 MHz are 1,8 MHz to 2,0 MHz,3,5 MHz to 4,0 MHz,5,3 MHz to 5,4 MHz,7
MHz to 7,3 MHz,10,1 MHz to 10,15 MHz,14 MHz to 14,2 MHz,18,07 MHz to 18,17
MHz,21,0MHz to 21,4MHz,24,89 MHz to 24,99 MHz,28,0 MHz to 29,7 MHz and
50,0 MHz to 54,0 MHZ.
b The compliance levels in the ISM frequency bands between 150 kHz and 80 MHz
and in the frequency range 80 MHz to 2,7 GHz are intended to decrease the
likelihood that mobile/portable communications equipment could cause
interference if it is inadvertently brought into patient areas. For this reason, an
additional factor of 10/3 has been incorporated into the formulae used in
calculating the recommended separation distance for transmitters in these
frequency ranges.
c Field strengths from fixed transmitters, such as base stations for radio(cellular/
cordless) telephones and land mobile radios, amateur radio, AM and FM radio
broadcast and TV broadcast cannot be predicted theoretically with accuracy. To
assess the electromagnetic environment due to fixed RF transmitters, an
electromagnetic site survey should be considered. If the measured field strength in
the location in which the device is used exceeds the applicable RF compliance level
above, the device should be observed to verify normal operation. If abnormal
performance is observed, additional measures may be necessary, such as
re-orienting or relocating the device.
d Over the frequency range 150 kHz to 80 MHz, field strengths should be less than
3 V/m.
Table 3 continued
31
33
32
34

Electromagnetic Compatibility InformationElectromagnetic Compatibility Information
WARNINGS!
· This device should not be used in the vicinity or on the top of other
electronic equipment such as cell phone, transceiver or radio
control products. If you have to do so, the device should be
observed to verify normal operation.
· The use of accessories and power cord other than those specified,
with the exception of cables sold by the manufacturer of the
equipment or system as replacement parts for internal components,
may result in increased emissions or decreased immunity of the
equipment or system.
35 36
Table of contents