Pure Water 200 Series User manual

TM
Water Dispenser Owner’s
Manual – 200 Series
IMPORTANT: This manual includes important safety material; please read all
instructions before plugging power supply cord into receptacle.

2
SAFETY PRECAUTIONS
Basic safety precautions should be followed when using electrical appliances, including:
•Onlyplugindispenserinthesequencethemanualindicates(seeHOWTOINSTALLANDUSE).
•Inaccordancewiththeseinstructions,thedispensermustbeproperlylocatedandinstalledbeforeuse
(seeHOWTOINSTALLANDUSE).
•Useonlybottledwaterinthedispenser.
•Keepallgasolineorotherammablevaporsandliquidsawayfromthisandotherappliances.
•Dispensermustbeunpluggedbeforecleaning,sanitizingorrepairing(seeCLEANINGANDSANITIZING).
•Wipeupanywaterspillsimmediatelyafterloadingorunloadingwaterbottles.
•Donotusewithwaterthatismicrobiologicallyunsafeorofunknownquality.
•Thedispenserheatswatertoatemperatureabove190ºF(90ºC).Watertemperaturesabove125ºF(52ºC)cancausesevere
burnsordeathfromscalding.Mostatriskofbeingscaldedarechildren,thedisabledandtheelderly.
•Ensurethedispenserstandsuprightfor2hoursbeforeloadingwaterbottle,plugginginandturninguniton.
•Alwaysliftdispenserbyhandlelocatedonrearofunit.Liftingdispenserbyfaucetorfaucethandleswilldamagetheunit.
•Followpropergroundingsafetyprecautionsandinstructionspriortopluggingintheunit
(seeGROUNDINGSAFETYPRECAUTIONSANDINSTRUCTIONS).
•Supervisechildrenwhenusingthedispenser(seeCHILDSAFETY).
STOP & READ DIRECTIONS
before plugging in dispenser.
Read complete HOW TO INSTALL instruction sequence before
plugging in and turning on dispenser. Failure to follow proper
installation instructions may cause damage to water dispenser.
STOP
GROUNDING SAFETY PRECAUTIONS AND INSTRUCTIONS
WARNING: The dispenser must be grounded – if the appliance is improperly grounded, the result
could be electric shock.
Ensurethattheavailablepowersupplymatchesthedispenser’svoltagespecicationsindicatedonthenameplatelabel
(locatedattherear).Pleaseensurethatdispenserissetupsoaccesstothepoweroutletandplugisunobstructed.
IMPORTANT: To provide additional protection from the risk of shock, the dispenser MUST be
connected to a ground fault circuit interrupter (GFCI) outlet at all times. Use of an extension
cord will void any warranties. See warranty document for complete terms and conditions.
1
2
Load water
bottle FIRST.
THEN plug
in dispenser.

3
CHILD SAFETY
CAUTION: Supervise children when using the dispenser.
Thehotdispenserfaucetisequippedwithachild
safeguardthatreducestheriskofhotwaterbeing
dispensedaccidentallyorbysmallchildren.To
dispensehotwater,simultaneouslydepressthe
childsafetylock(locatedabovethelefthotfaucet
handle)andthelefthotfaucethandle.Donot
allowchildrentohang,climborstandonthe
dispenser;thedispensercouldfalloverandthe
childcouldbeinjured.
RECEIVING
Inspectthedispenserboxcarefullyforanyevidenceofshippingorhandlingdamagebeforesigningtoreceivegoods.Incaseof
shippingdamage,claimsshouldbeledimmediatelywiththecarrier.
HOW TO INSTALL AND USE
WARNING: Read through every step in HOW TO INSTALL AND USE before plugging in or turning unit on.
1. Installdispenseronaleveloorstrongenoughtosupportitwhenfullyloaded.
2. Ensuredispenserstandsuprightforaminimumof2hoursbeforeloadingwaterbottle,plugginginandturningondispenser.
3. Keepdispenserunpluggedandintheopositionuntilthewaterbottlehasbeenloadedandwaterowsthroughthefaucets.
4. Placedispenseraminimumof2inchesawayfromthewalltoensureventilation.
5. Donotinstalldispenserwhereitwillbesubjecttodirectsunlight,heatormoisture.
6. Donotinstalldispenserwherethetemperaturewillgobelow50ºF(10ºC)orabove100ºF(38ºC).
7. Wipedownthewaterbottlecapandnecktoensurethereisnodebris.
8. Removetamper-evidentsealfromplastic
bottlecap.DoNOTremoveplasticcapif
usingtheNO-SPILLWaterBottleSystem.
9. Loadwaterbottlebyliftingandinsertingit
ontotheprobe,ensuringbottleisfullyaligned
withthedispenserandcenteredovertheprobe.
Becertainngersandotherbodypartsare
clearofundersideofbottle.Applyslight
pressureuntilthepluginsidethecappushes
inandthebottleisseated.Waterwillbegin
toowintothetankcausingairbubbles
inthebottle.

4
CLEANING AND SANITIZING
WARNING: Always unplug dispenser before cleaning.
IMPORTANT: It is recommended that the dispenser be cleaned two times a year.
CLEANING OUTSIDE OF DISPENSER
Wipedispenserbody,bottlereceptacle,tankandfaucetswithaclothandwarm,soapywater.Thenrinsebywipingdownwith
cleanwaterbeforedrying.
CLEANING DRIP TRAY AND GRILL
Thedispenserdriptrayisnotself-drainingandshouldbecleanedregularly.Toreducewaterspotting,thetrayshouldbeemptied,
cleanedwithmildsoaporontoprackofdishwasher,andwipeddry.
Toreducemineraldeposits,seeREMOVINGMINERALDEPOSITS.
CLEANING AND SANITIZING RESERVOIR
1. Beforecleaning,placeswitchlocatedonrearofdispensertotheopositionandunplugunit.
2. Letdispenserstandforone hourbeforecleaningtoallowhottanktocool.
3. Removedriptrayassemblyandsetasideforcleaning.
4. Emptywaterbottle(ifapplicable)andthenremoveitfromthedispenser.
5. Draincoldwaterreservoirbydispensingwaterthroughthecoldwaterfaucet.
6. Drainhottankbyunscrewingdraincapand
removingredsiliconeplugatrearofthe
dispenser.Drainwaterintoabucketor
container(approx.0.5gallon).
Reinstallredsiliconepluganddraincap.
7. Presscoverlockandopentopcover.Remove
separatorbyliftingfromonlyoneedgewith
slow,steadypressure.Setasideforcleaning.
NOTE: Separator is designed to t
tightly into reservoir and will require
force to remove.
10. Placeacupunderthedispenserfaucet.Todispensehotwater,depressthechildsafetylock(locatedabovethelefthotfaucet
handle)andthelefthotfaucethandlesimultaneouslyuntilwaterowscontinuously.Next,depresstherightcoldwaterfaucet
handletomakesurethereisacontinuousowofwater.
11. Now,plugdispenserintothepowersupplyusingaGFCIoutlet.Turnonthehottankheaterswitchlocatedattherearoftheunit.
12. Installdriptraygrill.
13. Dispensewater.
NOTE: It takes approximately 1 hour for water in the dispenser to become hot and approximately
4 hours for cold water to reach optimum temperature.

5
8. Drainexcesswaterthroughfaucets.Waterwill
remaininbottomhalfofreservoir;tolower
waterbelowthefaucetoutletheight,tilt
dispenserforwardslightlywhiledepressing
thecoldfaucethandle.
9. Removefaucethandles(usingthumb
andforenger).Reachinsidetopfrontof
dispenserandsqueezepivotclamptorelease
andremovefaucethandles.Setaside
forcleaning.
10.Removereservoir.Releaselockingclipsand
slowlyliftreservoirfromdispenser.
11. Removebaefromreservoir. Emptyremaining
waterfromreservoir.
12.Thoroughlycleanreservoirwithamildchlorinesanitizingsolution.Tomakethesanitizingsolution,simplyadd1/8teaspoon
ofordinary6.0%maximumunscentedhouseholdbleachtoa2-quartpitcherlledwithtaporbottledwater.Do notadd
concentratedbleachtothedispenserasthis
coulddamagetheunit.
13.Wipeupperreservoirsupportwitha
cleanrag.Usingabottlebrushandthe
sanitizingsolution,cleanhottankinlet
andoutletopenings.
Inlet
Outlet

6
14.Cleanhottankwithsanitizingsolution.Priorto
cleaninghottank,positionbucketorcontainer
underdrainassembly.Usingasanitizedfunnel,
carefullypoursolutionintotankthroughinlet
opening.Rinsewithcleanwater.Dryall
accessiblepartsthoroughly.
15.Cleandriptray,faucethandlesandseparator
withmildsoap.Rinseanddryallpartsthoroughly.
16.Reassemble.Ensureallseals/gasketsare
reinstalledproperlybeforeinstallingredsilicone
pluganddraincap.
17.Installafullwaterbottleondispenser(seeHOWTOINSTALLANDUSE).
18.PlugindispenserusingaGFCIoutletandturnonhottankswitchlocatedattherearofunit.
19.Dispensewater.
CLEANING CABINET
1. Unplugdispenserfrompoweroutletpriortocleaningcabinet.
2. Allplasticpartscanbecleanedusingaclothandwarm,soapywater.Rinsewithcleanwater.Neverusescouringpads,steel
woolorscouringpowder.
3. Condensertubeslocatedonbackofdispensershouldbevacuumed.
REMOVING MINERAL DEPOSITS
•Toremovemineraldeposits,mixacleaningsolutionof2quartsofwaterwith2quartsofvinegarormix1gallonofwaterwith
2cupsofcitricacidcrystals.DothisinplaceofthechlorinebleachsolutiondescribedunderCLEANINGANDSANITIZING
RESERVOIR.
NOTE:Bleach does not remove mineral deposits.

7©2012DSWatersofAmerica,Inc.
TROUBLESHOOTING
WARNING: Always turn off dispenser and unplug from power outlet before inspecting or starting
any maintenance.
WATER IS LEAKING
•Bottlemayhavealeak.Removeandinstallnewbottle.
WATER DOES NOT FLOW FROM DISPENSER
• Makesurebottleisnotempty;ifempty,replacebottle.
• Makesuretopushdownonfaucethandlesfully.
• Inspecttoseeifthereisapinholeinthebottle;ifso,replacebottle.
WATER TASTES BAD
• Dispensermayneedtobecleaned(seeCLEANINGANDSANITIZING).
WATER NOT HOT OR COLD ENOUGH
• Checktomakesuredispenserispluggedinandtheswitchisturnedon.
• Afusemaybeblownorthecircuitbreakermaybetripped;ifneeded,replacefuseorresetbreaker.
• Dispensermaybeplacedindirectsunlightormaybetooclosetoaheatsource;trymovingdispenserinto
acoolshadedarea.
DISPENSER IS NOISY
• Makesurethedispenserisonaleveloororcounterstrongenoughtosupportitwhenfullyloaded.
• Itisnormalforthebottletomakeagurglingnoiseaswaterllsthetank.
• Itisnormalforthedispenserorwaterbottletoshakewhenthecoolingsystemcycleso.
PARTICLES FLOATING IN WATER
• Dispensermayneedtobecleaned(seeCLEANINGANDSANITIZINGandREMOVINGMINERALDEPOSITS).
• Alwaysensurelabelisfullyremovedfrombottlecapbeforeplacingondispenser.
• Callyourwaterserviceproviderifproblempersists.
DISPENSER NEEDS TO BE STORED
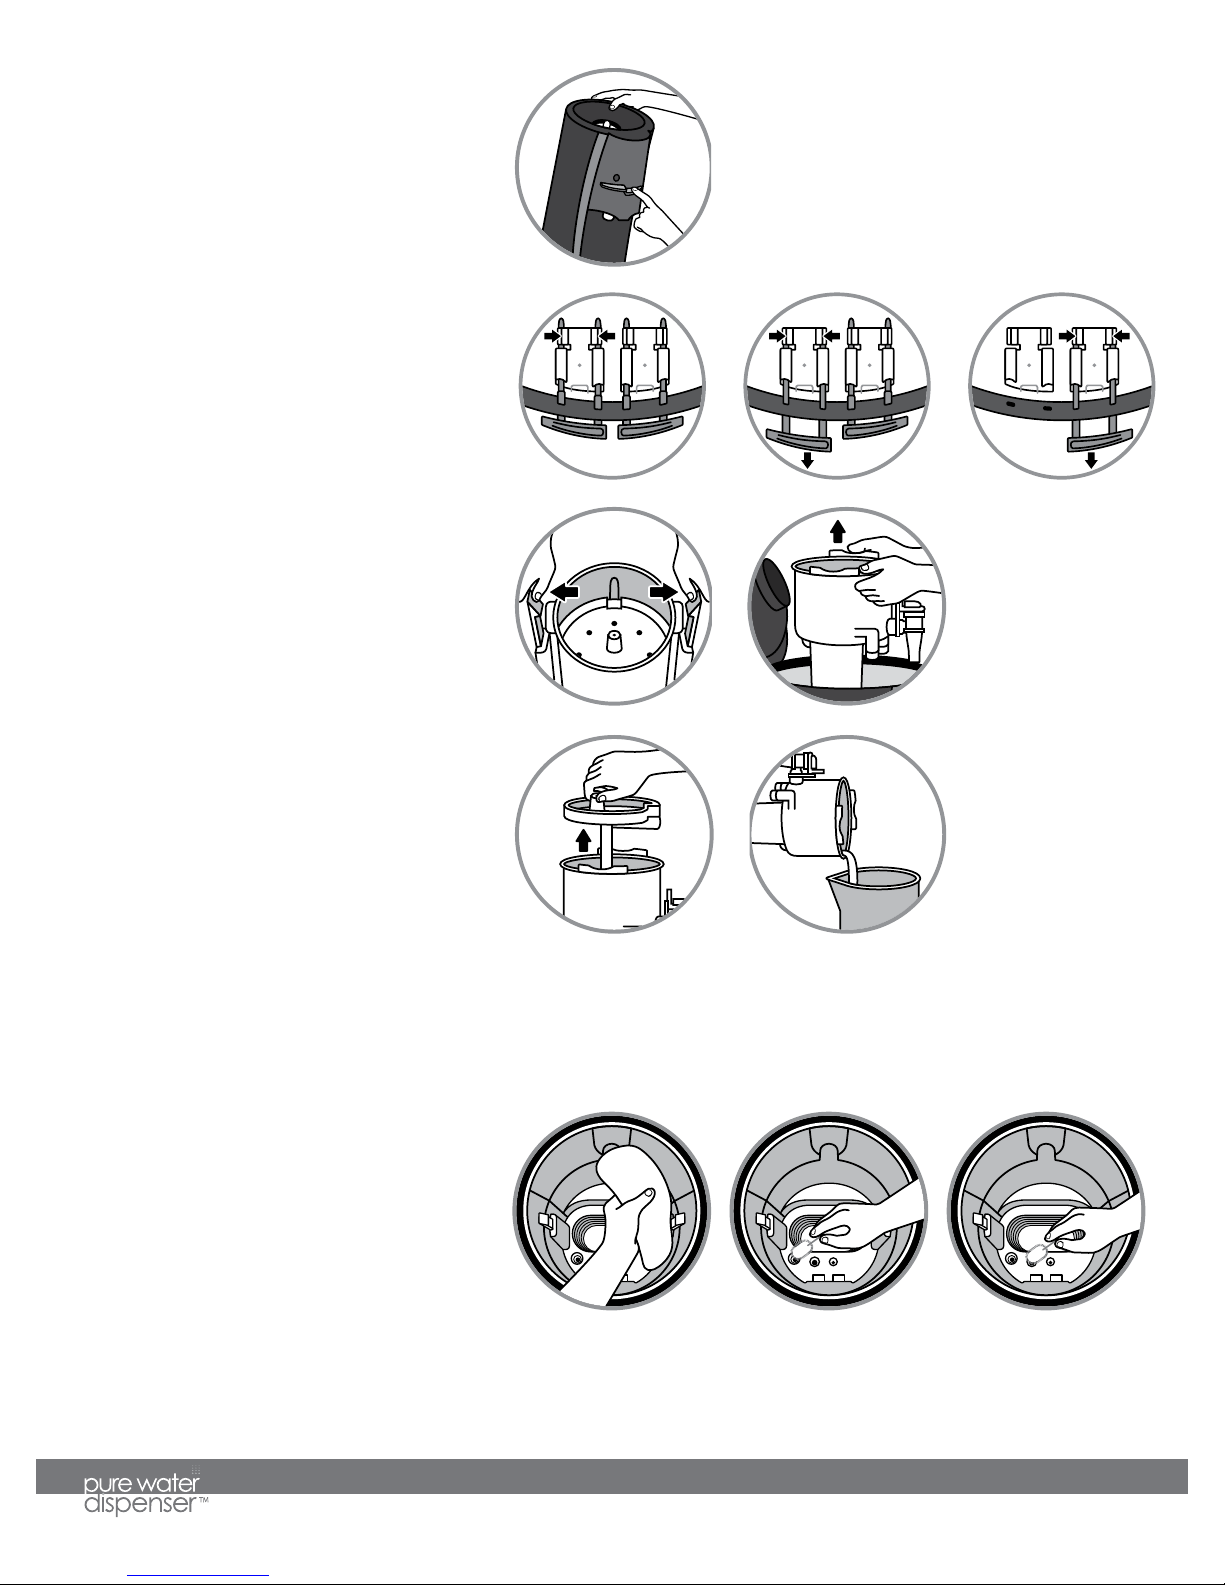
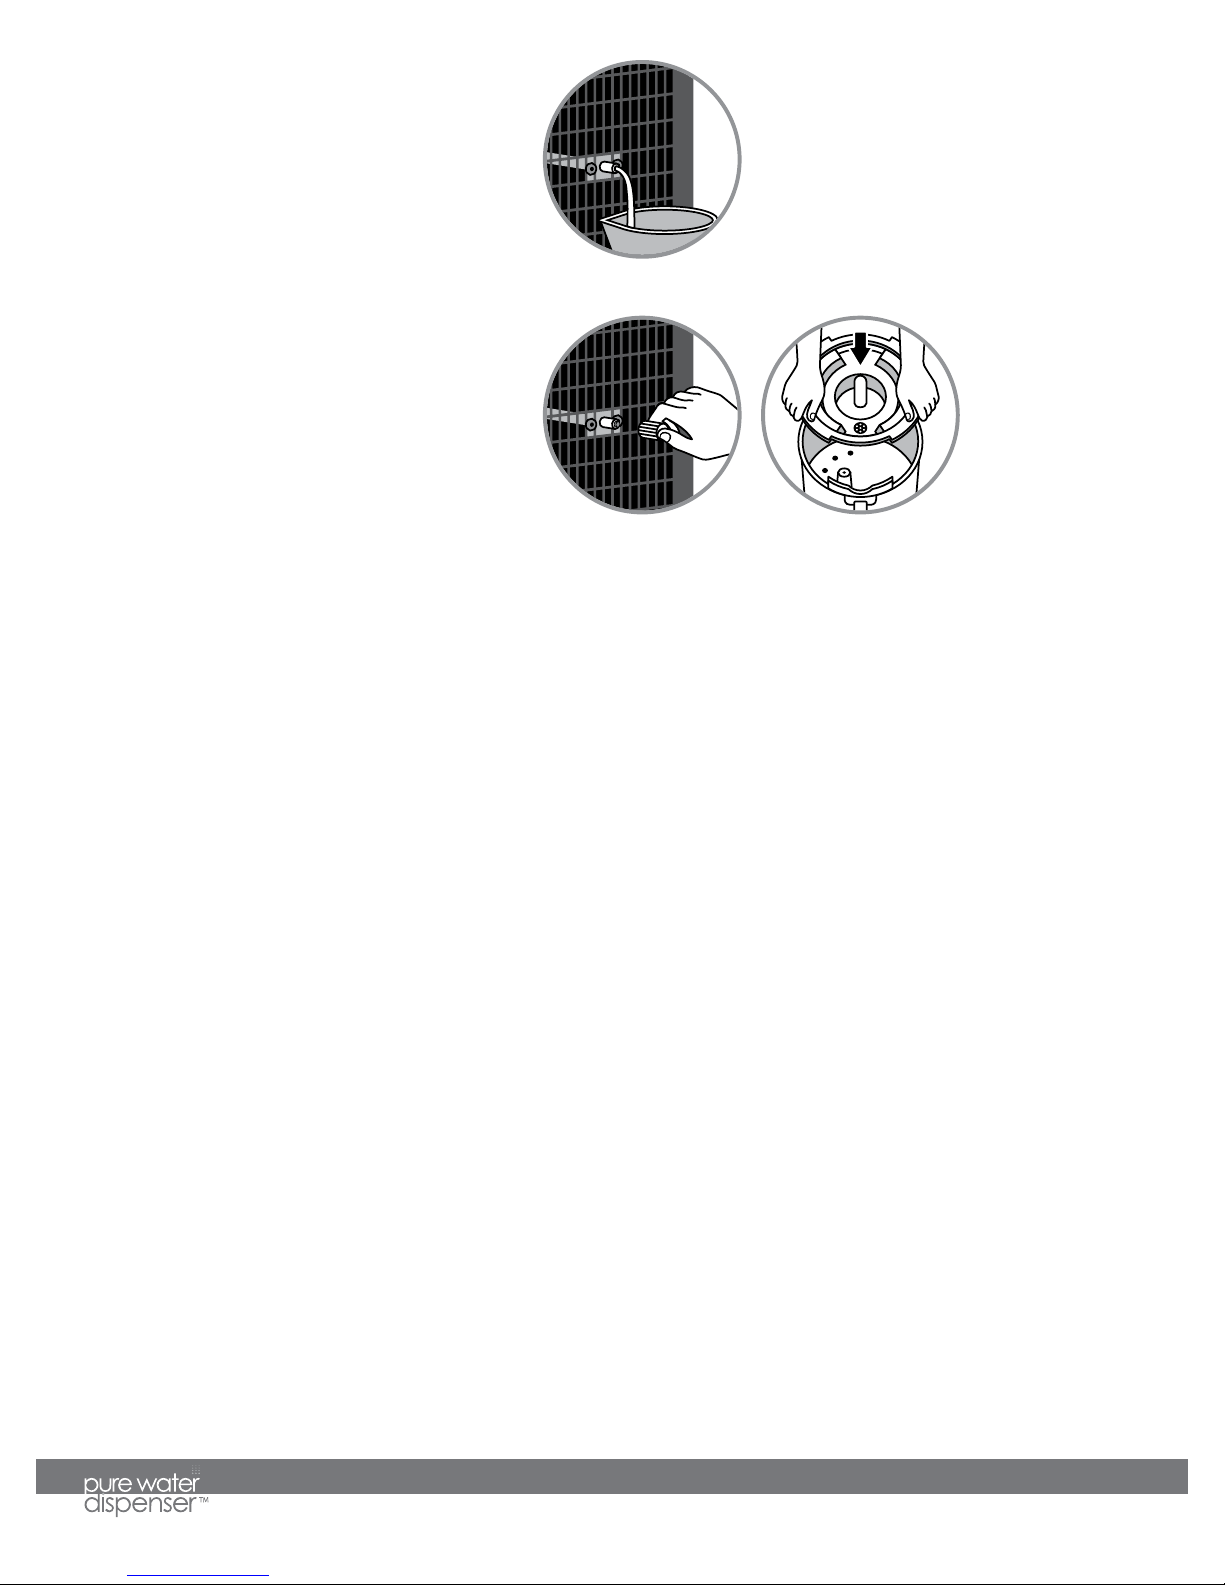
• Alwaysdrainwatercompletelyfromdispenserbeforeshippingorstoring.
TO PROPERLY DISPOSE OF YOUR DISPENSER
• Yourolddispensermayhaveusedaregulatedrefrigerantinitscoolingsystem.Theserefrigerantsarebelievedtoharm
stratosphericozone.Ifyouarethrowingawayyourolddispenser,makesuretherefrigerantisremovedandrecoveredforproper
disposalbyanEPA-certiedtechnician.Ifyouintentionallyreleasethisrefrigerant,youcanbesubjecttonesandimprisonment
underprovisionsofenvironmentallegislation.
WARNING: The Limited 1-Year Warranty and Underwriters’ Laboratory and CE listings for the dispensers are invalidated if
any alterations, modications, or use or misuse in combination with any other machines or devices is deemed to be the
source of any claim. See warranty document for complete terms and conditions. DS Waters of America, Inc. accepts no
liability (including for bodily injury) resulting from any alterations, misuse, neglect, accidents, improper installations or repairs.
The appliance is not intended for use by persons (including children) with reduced physical, sensory or mental capabilities,
or lack of experience and knowledge without supervision by a person responsible for their safety.
IMPORTANT: The customer acknowledges that water, like other liquids, can cause damage to surfaces. The
customer takes full responsibility for placing the dispenser within a residence or business and acknowledges that
failure to address drips, leaks or spillages is at the customer’s risk.
Table of contents
Other Pure Water Water Dispenser manuals

Pure Water
Pure Water 200k Series User manual

Pure Water
Pure Water 100 Series User manual

Pure Water
Pure Water NO FRILLS 500 GPD Manual

Pure Water
Pure Water Fountain Classic Installation instructions

Pure Water
Pure Water 200 Series User manual

Pure Water
Pure Water ULTIMA 888 User manual

Pure Water
Pure Water 300 Series User manual

Pure Water
Pure Water 100 Series User manual