PureEffect ULTRA-WH-PRO User manual

INSTALLATION CHECKLIST
We highly recommend: Scheduling the installation during the following hours:
(Mon-Fri, 11am-2pm Mountain Standard Time) to ensure we have time to assist.
REQUIRED TO ACTIVATE WARRANTY: Please have installer complete this
checklist, email it to: [email protected] and keep a copy for your records.
I, _____________________(Installers’ Full Name), of: ________________________
________(Company), confirm that I’ve completed the initialed steps below:
(Please initial next to each completed item)
____1. Ensured to remove shrink wrap from cartridges inside the system/housings.
____2. Measured the water Pressure (PSI) to ensure it is under 80PSI. If the
pressure is 80 PSI or greater and/or has a tendency to spike, a pressure-reducing valve
(set below 80PSI) was installed BEFORE the entire filter system.
____3. Ensured that the direction of the water flow matches the directional
indicators (e.g. In/Out Labels and/or Flow Direction Arrows) on the relevant
components.
____4. Created a Bypass around the entire filter system, so that in an event the filter
system is out of service the customer can still get water to their home.
____5. If there’s a fire suppression system, connected its water supply BEFORE the
leak-stopper device, to avoid water being shut off to it in case of fire.
____6. Installed the included automatic Leak-Controller / Shut-Off Valve at the
INPUT of the entire whole house filter system.
____7. Installed a garden hose faucet at the INPUT and OUTPUT lines connecting
to the filter system so that customer can flush cartridges/ bypass filter with garden hose.
____8. If Customer purchased our Descaler-MAXTM, ensure its installed as the Last
stage of filtration and that the Descaler cartridge was inserted only after flushing
preceding cartridges.
____9. Thoroughly verified the installation to ensure there are no leaks and that
the leak-stopper is functioning properly.
________________________ ____ __________________ _____/______/_________
Installers Signature Installers License # Installation Date

1

2
STEP 1- Assemble Main Tank Connections
Check plumbing pressure to ensure it’s under 80PSI and determine optimal location of the
Main Tank for connecting it to the main cold-water pipe; then assemble it as per 7-Steps
below: Remove cap from top of tank (pictures on p.5.), the parts box is inside.
Note: Ensure there is sufficient space for the Pre-Filter and the Descaler-MAXTM (optional)
housings to the left and right side of the Main Tank (see diagram on Page 4).
INSTALL SYSTEM OUT OF THE ELEMENTS, DIRECT SUNLIGHT OR FREEZING TEMPERATURES.

3
STEP 2 - Attach Brackets & Fittings. Align & Hang Housings
A). Screw the white metal brackets to the top of Black Caps of the CLEAR Pre-Filter and the
WHITE Descaler-MAXTM (if purchased) housings. (fully assembled system image on P4.)
Note: Use the included Phillips Head Screws for this. Notice the IN/OUT indicators on the caps
before attaching bracket so as to maintain proper flow direction.
B). Apply sufficient plumbers’ tape on the brass hex nipple threads and screw them into the
in/out ports of the Pre-Filter and Descaler-MAXTM housings.
C). Install the JG®SpeedfitTM/ProLockTM fittings (included) as per diagrams below:
D). After the fittings are installed, ensure the housings are properly positioned/aligned
against the wall in relation to the Main Tank connections so that the pipes will match up
properly with all fittings when connected, then hang the housings accordingly.
Note: The brackets must be screwed into sufficient wall support: e.g. into wood beam or onto
an additional wood support backboard (if you need to extend the housings beyond the wall).
IN
FITTINGS FOR 3/4” PIPE

4
STEP 3 - Install Leak-Stopper
Connect the Leak-Stopper (required to maintain warranty) BEFORE
the entire system as per its instructions.
Note: Insert the 9V backup battery into the leak-stopper control panel
(by unscrewing the 4 screws). Plug it into a GFI power outlet AFTER
installation is complete and everything is dry. Test to ensure proper operation. If there is a Fire
Suppression System: Ensure its water supply is connected BEFORE the leak-stopper.
STEP 4 - Install Bypass, Connect Pipes & Pressure Gauge
Create bypass around the entire system so you can re-direct water to the home in case
system ever needs to be turned off for service, etc. and connect the pipes (PEX
recommended. *Required if adding Descaler) to the system. Connect Pressure Gauge as
shown below. Install a drain faucet at the output of the system to bypass home plumbing when
flushing new cartridges via a hose.
Note: After the pipes are connected, twist the ProLockTM rings on the relevant fittings to lock
the pipes in place, you should hear/feel a click, ensuring maximum security.

5
STEP 5 – Install Cartridges
Install the Pre-Filter Sediment cartridge and the Main Tank Cartridge (leave the Descaler-
MAXTM cartridge out for now and close that housing empty).
Note: Remove the shrink wrap from the Pre-Filter and Descaler-MAXTM Cartridges that are
inside the housings.
TO INSTALL CARTRIDGE INTO MAIN TANK:
STEP 6 – Flush System & Check for Leaks
Flush the system (bypassing the home plumbing) for apx. 10 minutes and carefully check all
connection points for leaks (a flashlight can help you better target and detect leaking water).
Once the flush is complete, the system is ready for use.
Note: If you purchased the Descaler-MAXTM add-on, you may insert that cartridge into that
chamber after this flush. *If you have new copper plumbing, leave the Descaler-MAXTM
cartridge out for about 6 weeks to allow the new pipe copper leaching to clear out.
CONGRATULATIONS YOUR INSTALLATION IS COMPLETE!

6
MAINTENANCE
A). MAIN TANK CARTRIDGE: Replace when LED lights turn Red. When the LED lights turn
Yellow we recommend you order a new cartridge set as this means you have 10% capacity
remaining.
CAUTION!! BEFORE SERVICING THE UNIT: Turn off main water supply to the home first,
then open the drain valve on the bottom of the main tank and a faucet on the lowest floor of
your home to release water pressure. Press the Red Pressure Release buttons on top of
each housing until all air escapes & main tank’s fully drained before opening housing/s.

7
B). PRE-FILTER CARTRIDGE: Replace every 12 months or when LED on main tank turns Red
(whichever comes first). If you notice a significant reduction in water flow before the LEDs turn
RED, you’ll need to replace the Sediment Pre-Filter sooner.
C). DESCALER-MAXTM CARTRIDGE: Replace every 2 years (regardless of gallons used).
ONCE A MONTH: If you’re on CITY WATER, it is recommended to bypass the whole filter system
and run regular city water through your plumbing by opening all the faucets (hot & cold) in your
home for apx. 5 minutes. This will help periodically sanitize your pipes with chlorinated water.
Note: During cartridge changes, you may wipe the housings down inside with a paper towel to
remove any buildup.
KEEP SYSTEM OUT OF DIRECT SUNLIGHT OR FREEZING TEMPERATURES.

8
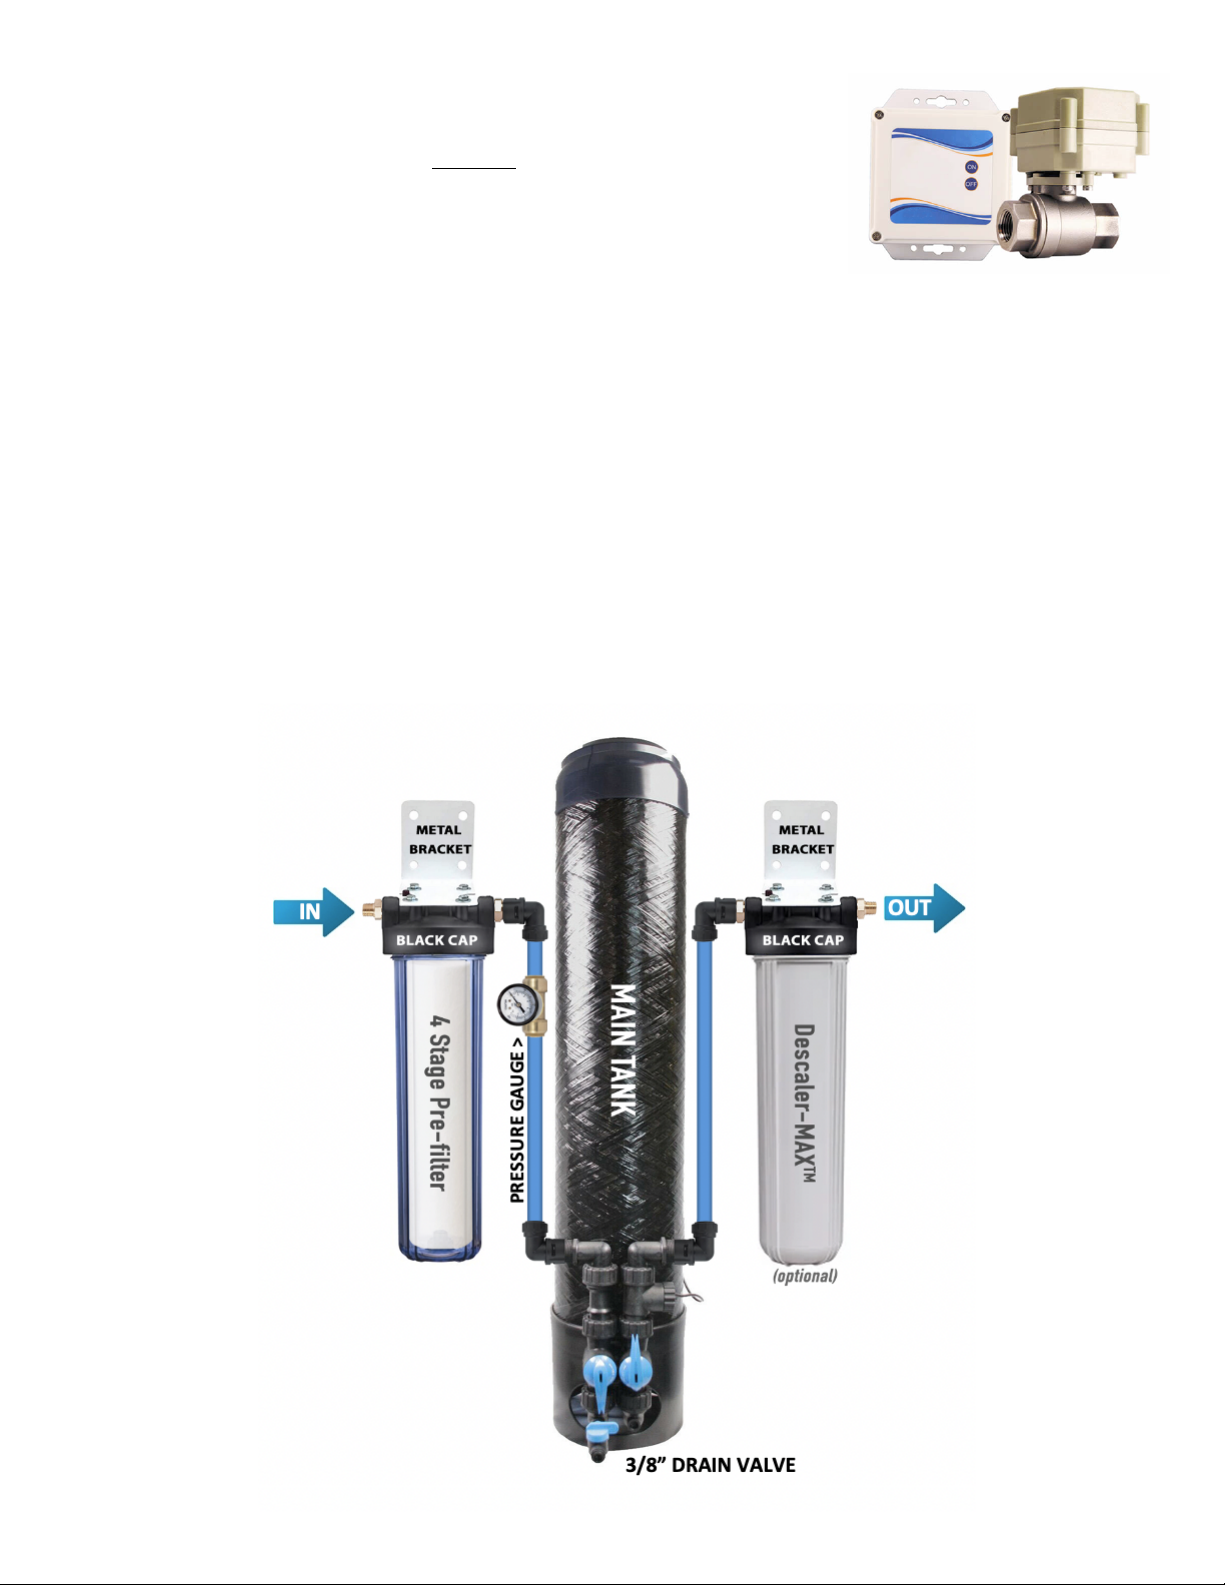
RETURN POLICY & WARRANTY
1. If the filter arrived damaged, please call us immediately to get an exchange: 1-347-492-4014
2. If you choose to return the filter for any reason other than damage upon arrival, we will be
happy to issue a full purchase price refund or exchange within: 14 days of delivery date, minus
shipping cost. The return policy applies to water filter systems and any unused (sealed)
filter media cartridges. If cartridges have been opened and used, we will deduct the price of
the cartridges from the refund, as they will no longer be re-sellable.
3. If you decide to return past the 14-day return period, we will still accept the item for up
to 30 days from delivery date, however, there will be a reasonable 10% restocking fee applied.
Please call us or send an email to initiate the return process or if you have any further questions.
Once you’ve experienced your new system, feel free to share your positive experience by going
to our website product page and writing a review. JThank You! - The PureEffect Team
NO-HASSLE 2-YEAR WARRANTY
PureEffectFilters LLC. dba PureEffectFilters.com, warrants its water filter systems to be free of
defects in parts and workmanship for a period of: two (2) years from the date of purchase.
All our systems are made of high-quality components (not made in china) and are designed to last
for many years beyond the warranty period, but if any manufacturing defect is present, it will make
itself know well within the warranty period.
In the rare case that it should become necessary to repair or replace the filtration system or one
of its components, please take a photo of the damaged part and email it along with your order #
and a detailed description of the defect to: info@PureEffectFilters.com or contact our Customer
Service Department at: 1-888-891-4821. We will handle your claim promptly, and as hassle-free
as possible.
This warranty does not apply to defects resulting from action/s of the user such as: misuse,
accidents, improper installation, operation outside of specification (e.g. over the indicated PSI
limit, exposure to direct sunlight, freezing temps, UV light), improper maintenance or repair and
unauthorized modification.
PureEffectFilters LLC total liability is limited solely to repair or replacement of the product. The
warranty set forth above is inclusive and no other warranty, whether written or oral, is
expressed or implied.
Table of contents
Other PureEffect Water Filtration System manuals

PureEffect
PureEffect ULTRA-UC-DISINFECT User manual

PureEffect
PureEffect ULTRA User manual

PureEffect
PureEffect Compact User manual

PureEffect
PureEffect ULTRA-UC-DISINFECT User manual

PureEffect
PureEffect ULTRA-UC User manual

PureEffect
PureEffect ULTRA-UC User manual

PureEffect
PureEffect ULTRA-WHW User manual