Pyle Sports PSWWM82 User manual

Front Cover
OUTSIDE
Back Cover

7KDQN\RXIRUSXUFKDVLQJWKLV:DWFK<RXU:DWFK
features electronic sensors, which measures and shows
the outdoor conditions: weather forecast, temperature,
pressure, altitude and compass directions.
<RXU:DWFKSURYLGHVWKHHVVHQWLDOLQIRUPDWLRQ\RXQHHG
when you go hiking, wild camping and other outdoor
activities especially for a prolonged period.
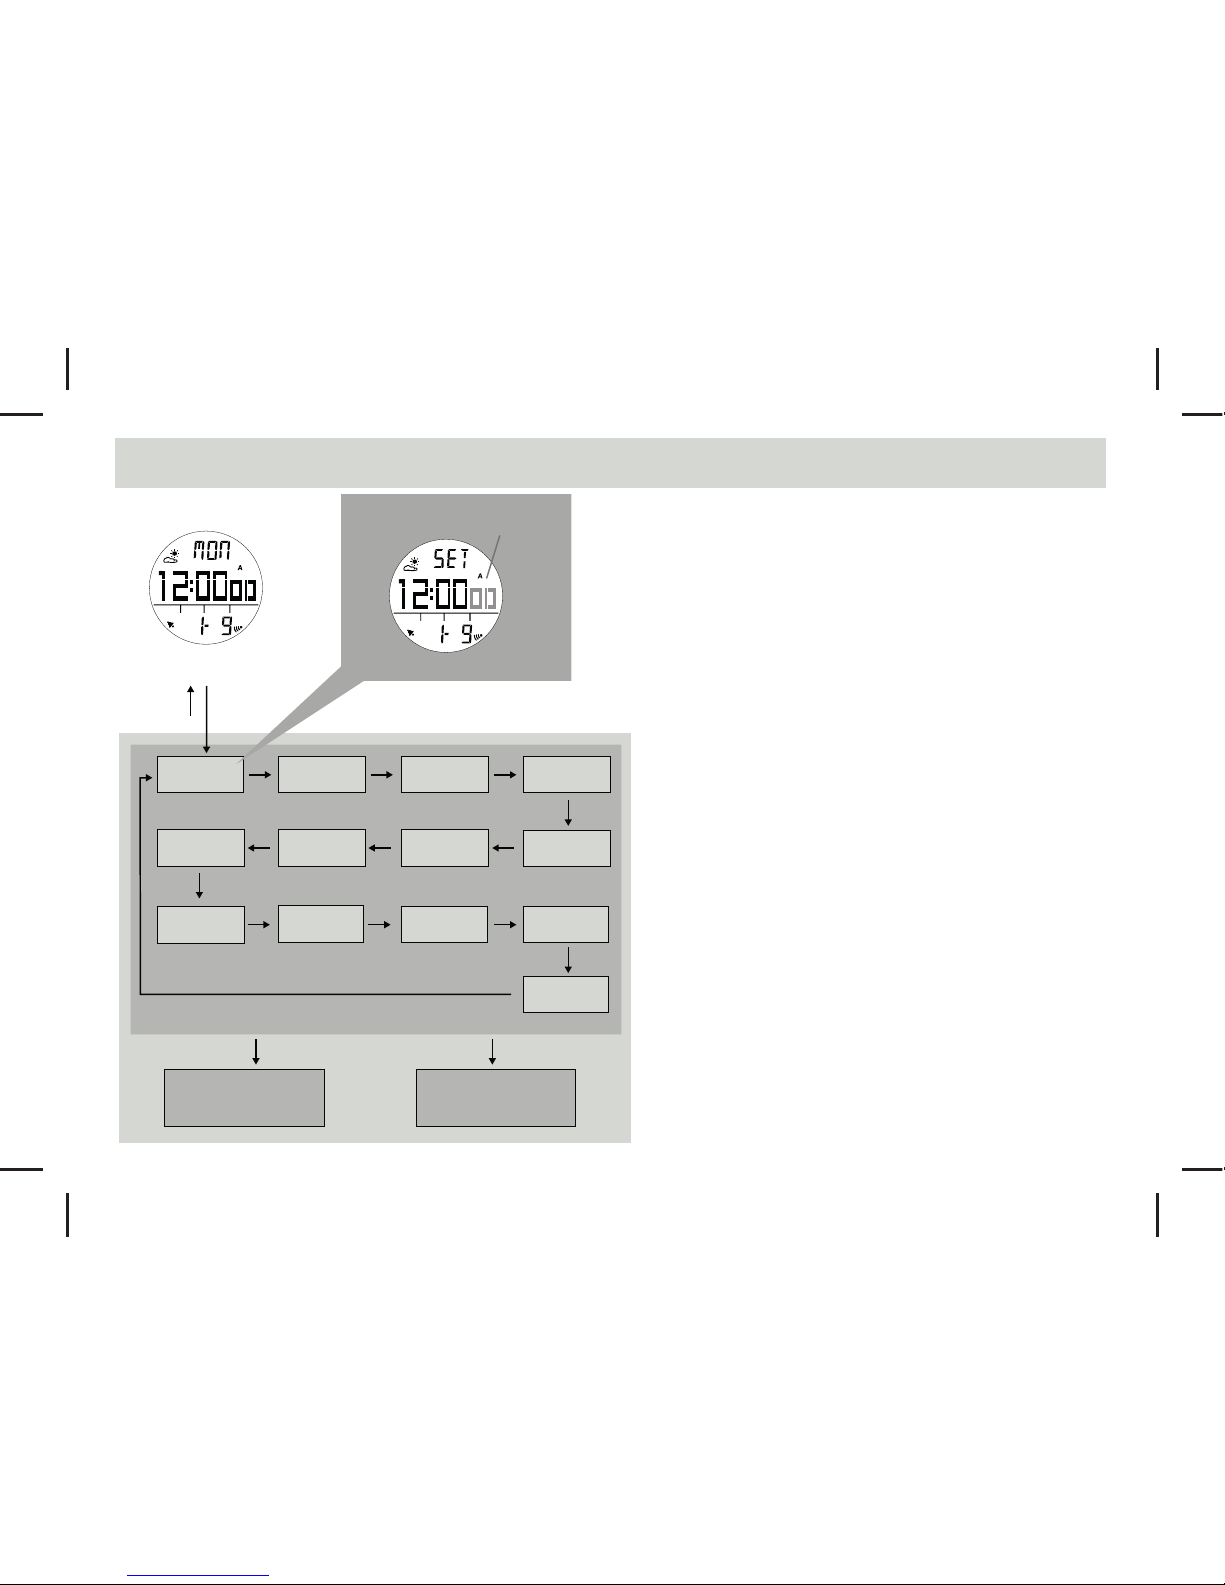
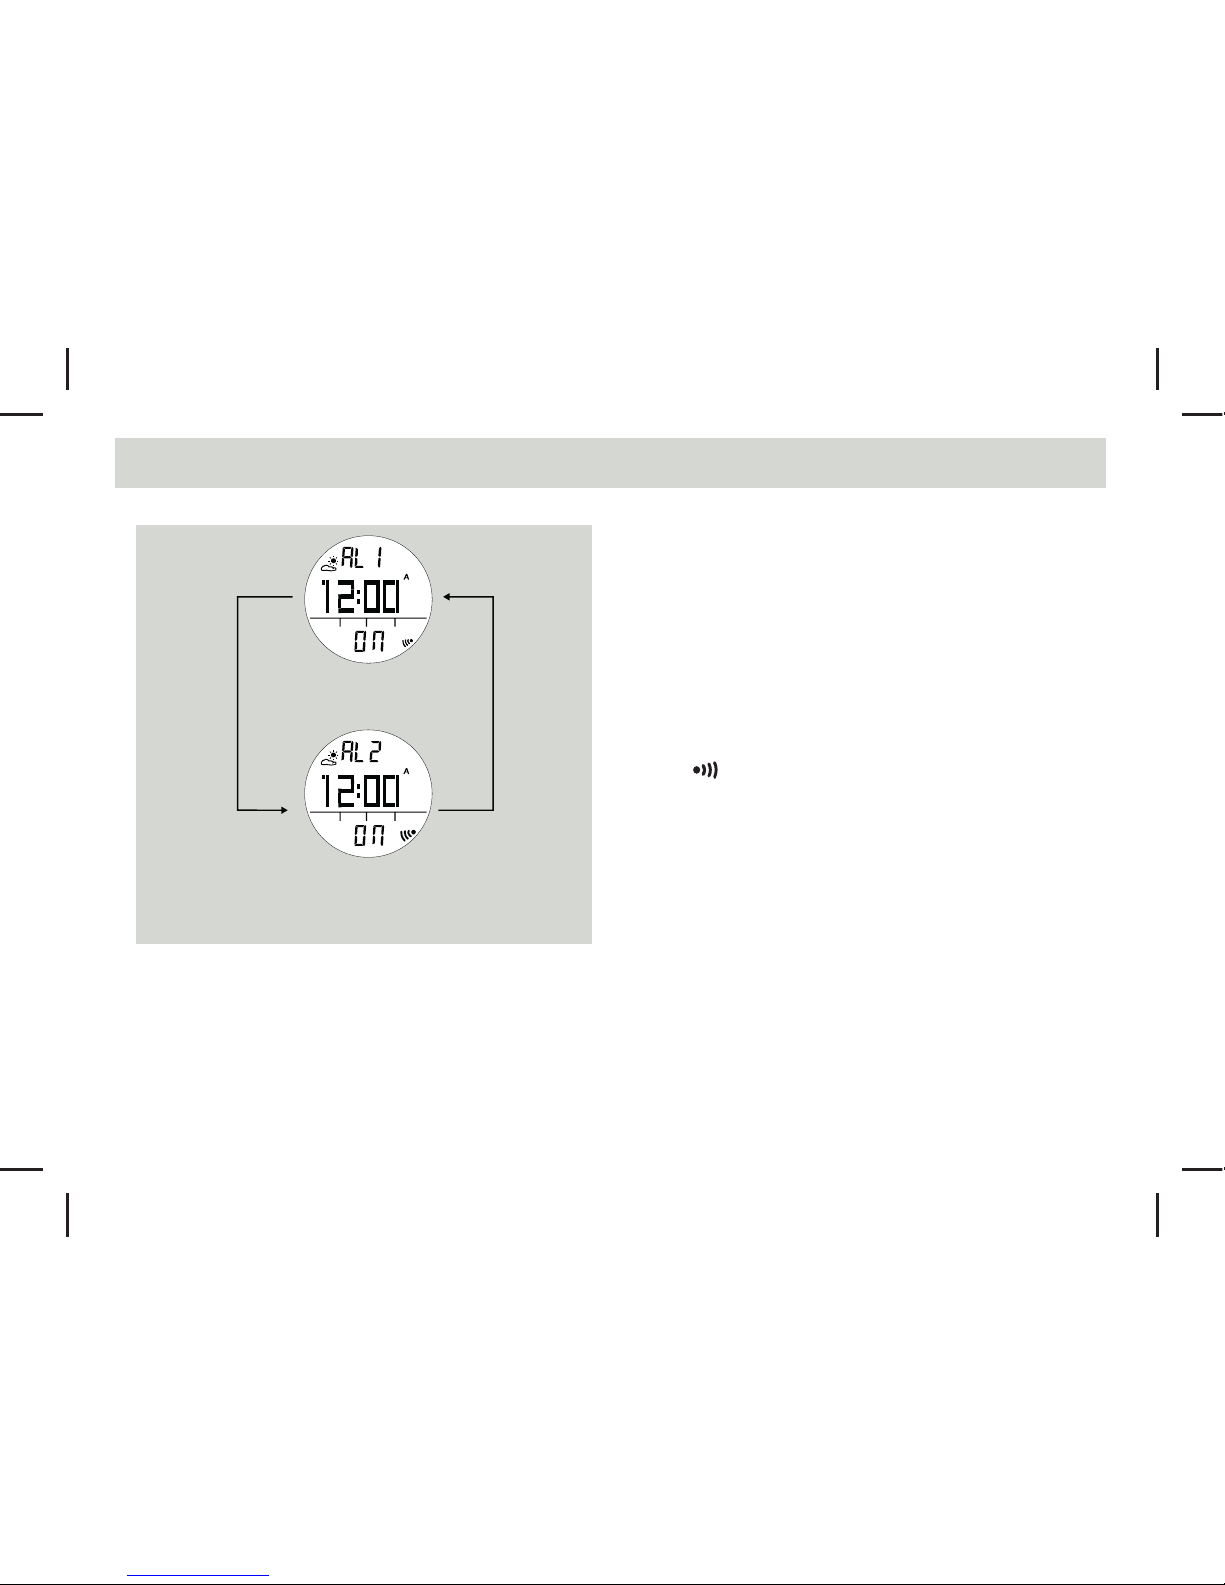
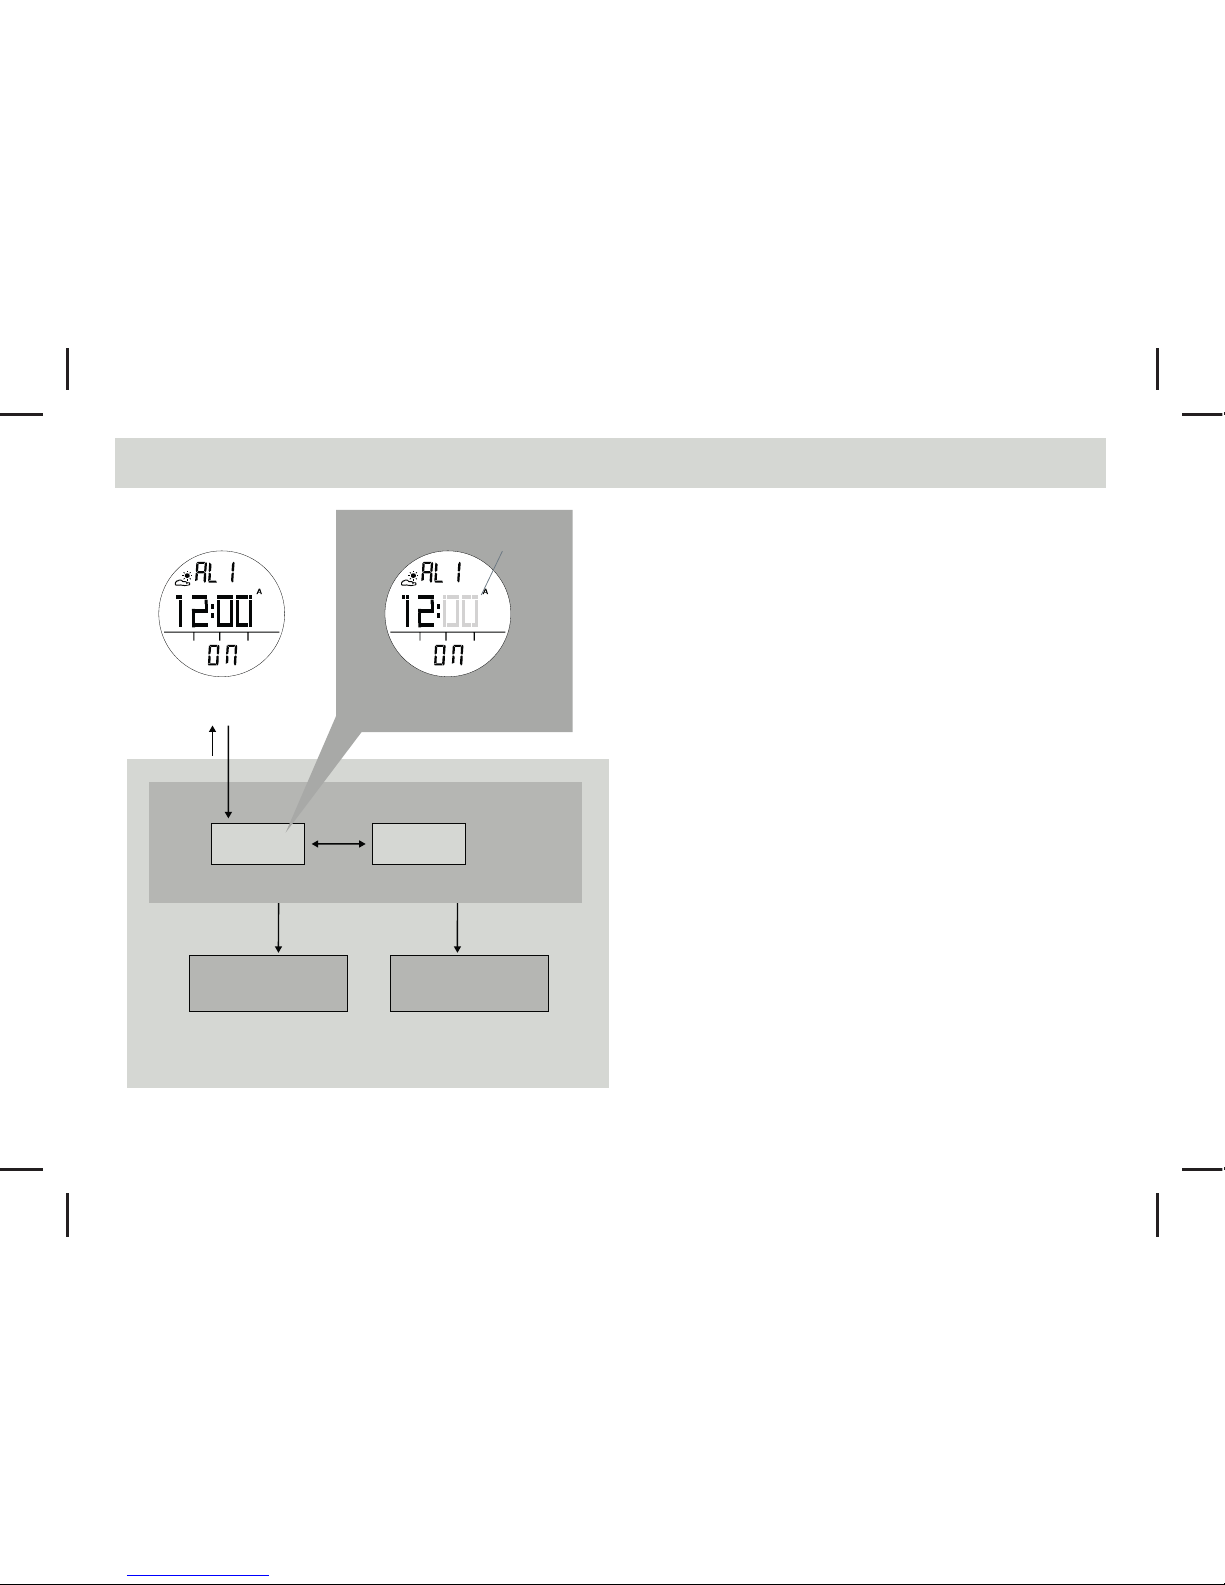
<RXU:DWFKDOVRLQFOXGHVFXUUHQWWLPHGDLO\DODUP
chronograph, timer and dual time functions.
$YRLGH[SRVLQJ\RXU:DWFKWRH[WUHPHFRQGLWLRQVIRU
an unreasonable time.
$YRLGURXJKXVDJHRUVHYHUHLPSDFWRQ\RXU:DWFK
'RQRWRSHQWKH:DWFKVFDVHXQOHVVE\DFHUWLILHG
service agency because your watch contains delicate
electronic sensors and components.
&OHDQ\RXU:DWFKZLWKDVRIWFORWKRFFDVLRQDOO\IRUD
longer useful life.
.HHS\RXU:DWFKDZD\IURPPDJQHWVRUDQ\
appliances which contain magnetic objects such as
mobile phones, speakers and motors.
6WRUH\RXU:DWFKLQDGU\SODFHZKHQLWLVQRWLQXVH
<RXU:DWFKLVFDUHIXOO\GHVLJQHGDQGSURGXFHGIRURXWGRRU
activities. In order to utilize the features, it is advisable to
read the following instructions before using the Watch.
1.0 Introduction

Model A Model B
Sensor
[SR]
Sensor
[SR]
Lap/Reset
[L/R]
Mode
[M]
Start/Stop
[S/S]
Light
[EL]
Lap/Reset
[L/R]
Mode
[M]
Start/Stop
[S/S]
Light
[EL]
2.0 Buttons and Its Functions - Model A and Model B

Mode Button [M]
7RVHOHFWDPRQJWKH&XUUHQW7LPH'DLO\$ODUP&KURQRJUDSK7LPHUDQG'XDO7LPHPRGHV
7RVHOHFWDPRQJWKHVHWWLQJLWHPVLQVHWWLQJGLVSOD\
Sensor Button [SR] (Model B ), Sensor Button [SR] / EL Button[EL] (Model A)
7RVHOHFWDPRQJWKH$OWLPHWHU%DURPHWHU7UDFNDQG&RPSDVVPRGHV
+ROGVHFRQGWRWXUQRQWKH(/%DFN/LJKWIRUDERXWVHFRQGV0RGHO$RQO\
Start/Stop Button [S/S]
7RVHOHFWEHWZHHQIXQFWLRQDOGLVSOD\VXQGHUWKHVDPHPRGH
7RDFWLYDWHWKHVWDUWRUVWRSFKURQRJUDSKIXQFWLRQLQWKHFKURQRJUDSKPRGH
7RWRJJOH<HV1R
7RLQFUHDVHWKHGLJLWVLQVHWWLQJGLVSOD\
Lap/Reset Button [L/R]
7RDFWLYDWHWKHODSRUUHVHWFKURQRJUDSKIXQFWLRQLQWKHFKURQRJUDSKPRGH
7RPRYHWKHFXUVRUWRWKHOHIWE\RQHLQWKH+LVWRU\UHFDOOLQJGLVSOD\
7RGHFUHDVHWKHGLJLWVLQVHWWLQJGLVSOD\
7RWRJJOH<HV1R
EL Button [EL] (Model B)
7RWXUQRQWKH(/EDFNOLJKWIRUDERXWVHFRQGV
Note
3UHVVDQ\EXWWRQWRDFWLYDWHWKHZDWFKXQGHU3RZHU6DYLQJ0RGH)RUPRUHLQIRUPDWLRQSOHDVHUHIHUWR&KDSWHU
2.0 Buttons and Its Functions - Model A and Model B

[SR]
[SR]
[SR]
[M]
[SR]
[SR]
[M] [M]
[M]
[M]
[M]
Current Time Mode
Sensor Mode Timekeeping Mode
Daily Alarm Mode Chronograph Mode
Timer Mode
Dual Time Mode
Compasee Mode
Track Mode Altimeter Mode
Barometer Mode
3.0 Major Function Modes -Timekeeping Mode and Sensor Mode

[S/S]
Current Time Mode
Day of Week Display
Temperature Display
day of week
temperature
current time
weather forcast
date
Functional Display
7KH&XUUHQW7LPH0RGHLQFOXGHVNLQGVRIIXQFWLRQDO
displays:
'D\RI:HHNGLVSOD\
&XUUHQW7LPHGLVSOD\
'DWH
:HDWKHU)RUFDVW
7RVHOHFWEHWZHHQGD\RIZHHNDQGWHPSHUDWXUH
displays by pressing [S/S].
4.0 Current Time Mode - Functional Display

Weather Forecast Symbols
Raining
Cloudy
Cloudy
with sun
Sunny
Weather Forecast Feature
$VSHFLDOIHDWXUHRIWKH:DWFKLVWKHFRPLQJZHDWKHU
predicting function. It works by analyzing the changes of
the past air pressure.
How to Indicate the Coming Weather
7KH:DWFKSURYLGHVGLIIHUHQWV\PEROVWRLQGLFDWHWKH
forecast weather, which are:
6XQQ\
&ORXG\ZLWK6XQ
&ORXG\
5DLQLQJ
IMPORTANT: Since the Watch predicts the coming
weather by using the data of the changes in the air
pressure, a higher accuracy may result when the user
stays at the same altitude for at least 24 hours.
IMPORTANT: The Watch predicts the weather by
adopting general weather prediction principles, it is NOT
capable to reflect the dramatic changes of weather
within a very short period of time.
4.1 Current Time Mode - Weather Forecast Feature

Current Time Setting Sequence
hold
[M]
digits have been
se l e cted flashing
[S/S] / [L/R]
hold
[M]
[M]
'DWH)RUPDW
Chime
212))
Unit
&HOVLXV)DKUHQKHLW
Key Tone
212))
Unit
Meter/feet
12/24
+RXU)RUPDW Day Month
<HDU
+RXUMinuteSecond
[M] [M]
[M] [M] [M]
[M] [M]
[M]
[M]
[M]
[M]
hold
[S/S] / [L/R]
Unit
PEKSDLQ+J
Current Time Setting Display
Current Time Display
[M]
Increase/Decrease
the number
Increase/Decrease
the number at a
higher speed
How to Set the Current Time
7RVHOHFWWKHVHWWLQJGLVSOD\SUHVVDQGKROGWKH>0@
button for about 2 seconds in the Current Time Mode.
In setting display, the word "SET" will appear.
,QWKHVHWWLQJGLVSOD\SUHVVWKH>0@EXWWRQWRFKDQJHWKH
selection following the adjacent Current Time Setting
Sequence.
:KHQWKHVHFRQGGLJLWVDUHIODVKLQJVHOHFWHGSUHVV
the [S/S] or [L/R] button to reset the digits to "00".
:KHQWKHGLJLWVDUHIODVKLQJVHOHFWHGSUHVVWKH>66@
RU>/5@EXWWRQWRLQFUHDVHGHFUHDVHWKHQXPEHU+ROG
down the button to change the number at a higher
VSHHG
:KHQPRQWKGD\RUGHUVHWWLQJLVVHOHFWHGSUHVVWKH
[S/S] or [L/R] button to select either month-day or
day-month format. When 12/24 hour format setting is
selected, press the [S/S] button to select either 12 or 24
hour format.
:KHQWKHVHWWLQJLVFRPSOHWHGSUHVVDQGKROGWKH>0@
EXWWRQWRH[LWWKHVHWWLQJGLVSOD\
4.2 Current Time Mode - Setting the Current Time

Daily Alarm 1 Display [S/S]
[S/S]
Daily Alarm Mode
Daily Alarm 2 Display
Daily Alarm 1 and Daily Alarm 2
7KH:DWFKLQFOXGHVWZRGDLO\DODUPV'DLO\$ODUPDQG
Daily Alarm 2. The Daily Alarm 1 and Daily Alarm 2 are
working independently.
3UHVVWKH>66@EXWWRQWRVZLWFKDPRQJWKH'DLO\
Alarm 1 and Daily Alarm 2 following the adjacent
diagram.
How to Turn ON/OFF the Daily Alarm
7RWXUQ212))WKH'DLO\$ODUPSUHVVWKH>/5@
EXWWRQLQ'DLO\$ODUP'LVSOD\
:KHQWKH'DLO\$ODUPLV21WKHDODUPLQGLFDWRU
ZLOODSSHDU
,IWKHDODUPLQGLFDWRUDSSHDUVWKH:DWFKZLOOVRXQGDW
the preset alarm time every day. When the alarm
sounds, press any button to stop the beep.
5.0 Daily Alarm Mode - Daily Alarm 1, Daily Alarm 2

Daily Alarm 1 Display
Daily Alarm Time Setting Sequence
hold
[M]
+RXU
Setting Display
Minute
[S/S] / [L/R]
hold
[M]
[M]
hold
[S/S] / [L/R]
digits have been
VHOHFWHGIODVKLQJ
Increase/Decrease
the number
Increase/Decrease
the number at a
higher speed
5.1 Daily Alarm Mode - Setting the Alarm
How to Set the Alarm 1 and Alarm 2
7RVHOHFWWKHVHWWLQJGLVSOD\KROGWKH>0@EXWWRQIRU
DERXWVHFRQGVLQWKH$ODUP'LVSOD\WKHQWKH
digitshave been selected will flashing.
,QWKHVHWWLQJGLVSOD\SUHVVWKH>0@EXWWRQWRFKDQJHWKH
selection between minute and hour.
:KHQWKHGLJLWVDUHIODVKLQJVHOHFWHGSUHVVWKH>66@
RU>/5@EXWWRQWRLQFUHDVHGHFUHDVHWKHQXPEHU+ROG
down the button to change the number at a higher
VSHHG
:KHQWKHVHWWLQJLVFRPSOHWHGSUHVVDQGKROGWKH>0@
EXWWRQWRH[LWWKHVHWWLQJGLVSOD\

Chronograph
Counting Display
Chronograph Stop Display
Chronograph
'All Zero' Display
hold
[L/R]
the digits
stop counting
Digits
running
1/100 sec
Total
Time
hours minutes
seconds
[S/S]
Elapsed
time
[S/S]
[S/S]
Chronograph Mode
7KH:DWFKLQFOXGHVDIXQFWLRQWRPHDVXUHHODSVHGWLPH
accumulative elapsed time and lap times - Chronograph
Mode.
7KHGLVSOD\VKRZVDQ$OO=HURVGLVSOD\ZKHQWKH
chronograph is selected the first time or it is reset.
How to Start/Stop the Chronograph
:KHQWKHFKURQRJUDSKLVVWRSSHGQRWFRXQWLQJSUHVV
the [S/S] button once to start the chronograph
FRXQWLQJSUHVVWKH>66@EXWWRQRQFHDJDLQWRVWRSWKH
FKURQRJUDSKQRWFRXQWLQJ5HSHDWLQJWKHVHVWHSVZLOO
get an accumulative elapsed time.
How to Reset the Chronograph
7RUHFRUGDQHZVHWRIHODSVHGWLPHKROGWKH>/5@
EXWWRQIRUVHFRQGVWRUHVHWWKHFKURQRJUDSKWRWKH$OO
=HURVGLVSOD\ZKHQWKHFKURQRJUDSKLVVWRSSHG
,QWKH$OO=HURVGLVSOD\WKHFKURQRJUDSKLVUHDG\IRUD
new counting.
6.0 Chronograph Mode - Start/Stop the Chronograph

Lap Times Recall Sequence
10 seconds
To Record Lap Time
[L/R]
[S/S]
[L/R]
[S/S]
[L/R]
the digits
is running
the lap
number
WKHQH[WODS
memories
the lap time will
freeze for 10
seconds
Chronograph
Lap Display
Total Time
Display
Lap 1 Time
Display
Chronograph
Running Display
How to Record Lap Time
7KHFKURQRJUDSKFDQPHDVXUHHODSVHGWLPHZLWKRXW
stopping the counting - lap time.
7KH&KURQRJUDSK0RGHDOORZVUHFRUGLQJODSWLPHXSWR
10 laps.
:KHQWKHFKURQRJUDSKLVFRXQWLQJSUHVVWKH>/5@
EXWWRQRQFHWRUHFRUGDODSWLPHWKLVNH\RSHUDWLRQZLOO
QRWDIIHFWWKHFRXQWLQJ
7KHODSQXPEHUDQGODSWLPHZLOODSSHDURQWKHGLVSOD\
for 10 seconds, and it returns to counting display
automatically.
5HSHDWWKHVWHSVPHQWLRQHGDERYHWRJHWDQRWKHUODS
time.
How to Recall Lap Times
7RUHFDOOODSWLPHKROGGRZQWKH>0@EXWWRQLQWKH
Chronograph Display.
:KHQWKH/DS7LPH'LVSOD\DSSHDUVSUHVVWKH>66@
RU>/5@EXWWRQWRFKHFNWKHQH[WRUSUHYLRXVODSWLPH
respectively.
+ROGGRZQWKH>0@EXWWRQWRJREDFNWRWKH&KURQRJUDSK
Display.
How to Reset Lap times
7RUHFRUGDQHZVHWRIODSWLPHKROGWKH>/5@EXWWRQIRU
2 seconds when it is stopped.
6.1 Chronograph Mode - Recording and Recalling Lap Time

Timer Display
Current Time
the time from which the timer
will countdown
KRXUPLQXWHDQGVHFRQG
Countdown Timer
7KH:DWFKLQFOXGHVDFRXQWGRZQWLPHUIHDWXUHWKH
Timer Mode.
7KH7LPHUVWDUWVFRXQWLQJIURPWKHSUHVHWYDOXHWR]HUR
and stops at zero.
7KHFRXQWGRZQWLPHLVDEOHWRVHWE\WKHXVHU
7KHVHWWLQJOLPLWLVXSWRKRXUVPLQXWHV
seconds.
2QFHWKHXVHUSUHVHWWLPHLVVHWOLNHPLQXWHVWKH
value is stored into the Watch for the user to recall it in
the future.
7RVHWWKHFRXQWGRZQWLPHFKHFNWKHFRPLQJVHFWLRQ
for more details.
7.0 Timer Mode - Countdown Timer and the Quick-Set-value

hold
[S/S] / [L/R]
[S/S] / [L/R]
User Preset Value Setting Sequence
Timer Display
hold
[M]
Setting Display
Minute Second
+RXU
hold
[M]
[M] [M]
[M]
digits have been
VHOHFWHGIODVKLQJ
Increase/Decrease
the number
Increase/Decrease
the number at a
higher speed
How to Set the Count Down Timer
7RVHOHFWWKHVHWWLQJGLVSOD\KROGWKH>0@EXWWRQIRU
seconds, and the digits have been selected will flashing.
,QWKHVHWWLQJGLVSOD\SUHVVWKH>0@EXWWRQWRFKDQJHWKH
selection among hour, minute and second.
:KHQWKHGLJLWVDUHIODVKLQJVHOHFWHGSUHVVWKH>66@
RU>/5@EXWWRQWRLQFUHDVHGHFUHDVHWKHQXPEHU+ROG
down the button to change the number at a higher
VSHHG
:KHQWKHVHWWLQJLVFRPSOHWHGKROGWKH>0@EXWWRQWR
H[LWWKHVHWWLQJGLVSOD\
7.1 Timer Mode - Setting the Count Down Timer

Counting Display
Timer Display
(Timer is set at 10 minutes)
Stop Counting Display
Counting Display
[S/S]
[L/R]
[S/S]
[S/S]
digits start
counting
digits start
counting
again
digits stop
counting
real Time
clock
Timer Mode
How to Use the Timer
:KHQWKH7LPHULVVHWSUHVVWKH>66@EXWWRQWRVWDUWWKH
timer. Press the [S/S] button once again to stop the
timer.
Timer Alarm Sound
,QWKHODVWPLQXWHVWKH:DWFKZLOOEHHSIRUHYHU\
minute.
,QWKHODVWPLQXWHWKH:DWFKZLOOEHHSIRUHYHU\
VHFRQGV,QWKHODVWVHFRQGVWKH:DWFKZLOOEHHSIRU
every second.
:KHQLWUHDFKHVDEHHSVRXQGZLOOODVWIRU
seconds. Pressing any button can stop the beep sound.
How to Reload the Timer
7KHODVWWDUJHWWLPHZLOOEHUHORDGHGDXWRPDWLFDOO\DWWKH
end of the 30-second beep sound.
3UHVVWKH>/5@EXWWRQZKHQWKHWLPHULVVWRSSHG
7.2 Timer Mode - Using the Timer

hold
[M]
Setting Display
Minute+RXU
hold
[M]
[M]
[M]
Dual Time Mode
digits have been
VHOHFWHGIODVKLQJ
hold
[S/S] / [L/R]
[S/S] / [L/R]
Increase/Decrease
the number
Increase/Decrease
the number at a
higher speed
Dual Time Setting Sequence
Dual Time Mode
7KH:DWFKLQFOXGHVDIXQFWLRQWRVKRZWKHWLPHRID
second time zone - Dual Time Mode.
7KHVHFRQGGLJLWRIWKHGXDOWLPHV\QFKURQL]HVZLWKWKH
Current Time.
To Set the Dual Time
7RVHOHFWWKHVHWWLQJGLVSOD\KROGWKH>0@EXWWRQIRU
seconds in the Dual Time Mode and the digits have
been selected will flashing.
,QWKHVHWWLQJGLVSOD\SUHVVWKH>0@EXWWRQWRFKDQJHWKH
selection between hour and minute.
:KHQWKHGLJLWVDUHIODVKLQJVHOHFWHGSUHVVWKH>66@
>/5@EXWWRQWRLQFUHDVHGHFUHDVHWKHQXPEHU+ROG
down the button to change the number at a higher
VSHHG
:KHQWKHVHWWLQJLVFRPSOHWHGSUHVVDQGKROGWKH>0@
EXWWRQWRH[LWWKHVHWWLQJGLVSOD\
8.0 Dual Time Mode - Dual Time and Setting the Dual Time

[S/S]
[S/S]
[L/R] hold [L/R]
[L/R]
[L/R]
time stamp
Altitude Value Altitude Tendency
Altimeter Mode
current
temperature
cursor moving
direction
flashing cursor
VWUHFRUGDW
WKHKRXU
current
attitude
current
time
current
time
-23 hour
History Display
History Display
History Display
(-2 to -34 hour )
Functional Display
$OWLPHWHUPRGHLQFOXGHVWZRIXQFWLRQDOGLVSOD\VDOWLWXGH
value or altitude tendency, which are shown in the
middle of display.
7KHWRSOLQHVKRZVWKHWHPSHUDWXUHDQGERWWRPOLQH
shows the time.
History Display
7KHZDWFKFDQVWRUHVXSWRSDVWKRXUO\GDWD
including altitude and temperature.
3UHVV>/5@WRUHFDOOWKHODWHVWKRXUO\GDWD
FRUUHVSRQGLQJKLVWRU\GDWDDOWLWXGHDQGWHPSHUDWXUH
with flashing time-stamp will be shown.
3UHVV>/5@WRUHFDOOQH[WKRXUO\GDWDDVDGMDFHQW
diagram.
+ROG>/5@IRUVHFRQGVFDQUHWXUQWRFXUUHQWWLPH
display instantly.
IMPORTANT: If you want to have an accurate reading of
air temperature, you must take off the watch from the wrist
that prevents body temperature effect on your watch.
IMPORTANT: Altimeter updated rate is 1 second for the
ILUVWPLQXWHVWKHQVHFRQGVIRUQH[WKRXUVDQG
minute afterward.
9.0 Altimeter Mode - Temperature and History Display

Altimeter Setting Sequence
hold [M] hold [M]
2 seconds
[M]
[M]
[M]
[M]
Altimeter Display
Sea level pressure display
Recall last setting
value display
“No” display
“YES” displayDone display
Done display
hold [S/S] / [L/R]
[S/S] /
[L/R]
[S/S] / [L/R]
Increase/Decrease
the number
Increase/Decrease
the number at a
higher speed
2 seconds
How to Set the Altitude and Sea level pressure
7RVHOHFWWKHVHWWLQJGLVSOD\KROGWKH>0@EXWWRQIRU
seconds, the word “SET” and the flashing value of
altitude will appear.
,QWKHVHWWLQJGLVSOD\SUHVVWKH>0@EXWWRQWRFKDQJHWKH
selection between altitude, sea level pressure and
default setting.
:KHQWKHGLJLWVDUHIODVKLQJVHOHFWHGSUHVVWKH>66@
RU>/5@EXWWRQWRLQFUHDVHGHFUHDVHWKHQXPEHU+ROG
down the button to change the number at a higher
VSHHG
Reset to Default
,QRUGHUWRDGMXVWWKHDOWLWXGHWRGHIDXOWYDOXHVHOHFW
³<(6´LQ6HW'HIDXOW'LVSOD\DVDGMDFHQWGLDJUDP
press [M] to confirm and “Done!” message will be
shown.
7RH[LWWKH$GMXVWPHQW'LVSOD\KROGWKH>0@EXWWRQIRU
seconds, and the Watch will go back to the Altimeter
Mode.
9.1 Altimeter Mode - Setting the Altimeter

current
temperature function is ON
PD[
track altitude
min
Track Altitude
Display
Max Altitude
Display
Reset Display
Min Altitude Display
Accumulated
Ascent Altitude Display
Accumulated
Descent Altitude Display
[L/R] [L/R]
[L/R]
[L/R]
[L/R]
hold [L/R]
Track Mode
How to Measure the Relative Altitude
7KH:DWFKFDQPHDVXUHUHODWLYHDOWLWXGH)RUH[DPSOH
it can measure the ascending or decending altitude
between the starting point and the finish point of a trail.
:KHQWKH7UDFNPRGHLVVHOHFWHGWKHLFRQ³75.´ZLOO
appear on the screen.
7RVWDUWPHDVXUHWKHDVFHQGLQJRUGHVFHQGLQJDOWLWXGH
of a trail, hold [L/R] to reset the reading to zero and
press [S/S] to start tracking at the starting point of a trail.
The flashing “ ” indicator will be shown on the display.
<RXFDQFKHFNWKHUHDGLQJDWDQ\SRLQW\RXOLNHDQGLW
shows the altitude relative to the starting point.
:KHQ\RXILQLVKWKH7UDFNLQJSUHVV>66@WRVWRSWKH
function.
Track Mode
3UHVV>/5@WRUHFDOOWKHPD[LPXPKHLJKWWHPSHUDWXUH
minimum height/temperature, accumulated ascent
altitude, accumulated descent altitude as adjacent
diagram.
Update Rate
7KHZDWFKZLOOXSGDWHGWKHUHDGLQJDXWRPDWLFDOO\
)RUWKHILUVWPLQXWHVZKHQWKH7UDFNPRGHLV
selected, it will updated every second.
:LOOXSGDWHHYHU\VHFRQGVLQWKHQH[WKRXUV
$IWHUZDUGVLWZLOOXSGDWHHYHU\PLQXWH
10.0 Track Mode

[S/S]
[S/S]
[L/R] hold [L/R]
[L/R]
[L/R]
Time Stamp
Sea Level Pressure Tendency
Barometer Mode
current
temperature
flashing cursor
VWUHFRUGDW
WKHKRXU
current
pressure
current
time
-23 hour
History Display
(-2 to -34 hour )
Pressure Value
cursor moving
direction
current
time
History Display
History Display
Functional Display
%DURPHWHUPRGHLQFOXGHVWZRIXQFWLRQDOGLVSOD\V
pressure value or sea level pressure tendency, which
are shown in the middle of display.
7KHWRSOLQHVKRZVWKHWHPSHUDWXUHDQGERWWRPOLQH
shows the time.
History Display
7KHZDWFKFDQVWRUHVXSWRSDVWKRXUO\GDWD
including sea level pressure and temperature.
3UHVV>/5@WRUHFDOOWKHODWHVWKRXUO\GDWD
FRUUHVSRQGLQJKLVWRU\GDWDVHDOHYHOSUHVVXUHDQG
WHPSHUDWXUHZLWKIODVKLQJWLPHVWDPSZLOOEHVKRZQ
3UHVV>/5@WRUHFDOOQH[WKRXUO\GDWDDVDGMDFHQW
diagram.
+ROG>/5@IRUVHFRQGVFDQUHWXUQWRFXUUHQWWLPH
display instantly.
IMPORTANT: If you want to have an accurate reading of
air temperature, you must take off the watch from the wrist
that prevents body temperature effect on your watch.
IMPORTANT: Barometer updated rate is 1 second for the
ILUVWPLQXWHVWKHQVHFRQGVIRUQH[WKRXUVDQG
minute afterward.
11.0 Barometer Mode - Temperature and Hisory Display
Table of contents
Other Pyle Sports Watch manuals

Pyle Sports
Pyle Sports PHRM22 User manual

Pyle Sports
Pyle Sports PSKIW25 User manual

Pyle Sports
Pyle Sports PSKIW25 User manual

Pyle Sports
Pyle Sports PSGP310 User manual

Pyle Sports
Pyle Sports PAW1 User manual

Pyle Sports
Pyle Sports PSGP410 User manual

Pyle Sports
Pyle Sports PPDM2 User manual

Pyle Sports
Pyle Sports Speed master User manual

Pyle Sports
Pyle Sports PSGP310PN User manual

Pyle Sports
Pyle Sports PSHTM24 User manual